Rob Roy

Home Model Engine Machinist Forum

Help Support Home Model Engine Machinist Forum:

This site may earn a commission from merchant affiliate links, including eBay, Amazon, and others.
Brilliant Pete ;)

Bet you're really chuffed, it sounds superb too.

I was reading a book with a section about steaming up the other day and it had some info in there which I guess applies to whether it's gas or coal fired. It will certainly help me in the future as I am guilty of it...

It said, one of the most common mistakes people make is to set off as soon as the boiler reaches pressure - I do it, whereas really you should spend a bit of time just doing a couple of short bursts back and forth with drain cocks open to let the rest of the engine warm up, and the boiler isn't really up to full temperature either yet, everything is relatively cold. Of course the effect with a coal fired one is worse as you end up needing to pump water back into the boiler and lose the fire, at least you don't lose the fire and have to start again. It said to spend another 10 or 15 minutes just building a better fire once it's blowing off and letting things heat up.

Nick
 
Congratulations Pete! Awesome. :bow:
Thanks for showing the video.
I am so jealous.
Thanks for the 'ride'.
 
Pete
Well done! A fine engine.
You will soon get used to steaming your small engine. They are a lot harder than 5” gauge and bigger.
A friend of mine fires both of his 2” scale Fowler ploughing engines on propane gas, when he is doing his ploughing demonstration at steam rallies.
What we have found is although gas is clean and easily managed, it dose not give out the same heat as coal and using gas on a road run you soon run out of steam.
Dave Bick
 
That was a real treat to see! Thanks, and great job.

Matt
 
Great stuff Peter,

:big: :big: :big: :big: :big: :big:


Congratulations

Stew

 
sbwhart said:
Great stuff Peter,

:big: :big: :big: :big: :big: :big:


Congratulations

Stew

Me too. :bow: :bow:

Best Regards
Bob
 
;D ;D Great stuff Pete ;D ;D Very well done - both yourself and your dad :bow:

I'm sitting here with one of the biggest smiles I've had on my dial for a long time - purely enjoying your fun Thm:

And as for the sound; I commented on it with wagons; didn't realize the wagon would be that heavy; Great stuff! Runs nice and sounds nice :bow: :bow:

Kind regards, Arnold
(I'm just as green as Carl right now :big:)

 
Don, Ron, Nick, Carl, Dave, Matt, Stew, Bob, Arnold

Thanks for your good wishes, it was certainly a great day.

Tonight I've been researching a new burner based on an article "Gas Firing for William" C H Hopkins (Oz) in Model Engineer 18 July 1986 and "Propane Burner" Lindsay McDonnell Modeltec Magazine June 1989. These articles were the basis of successful burners being used in NZ for some time.

The idea is to get more gas an air into the system and better combustion. I've just spent a number of hours trying to find out what drill sizes relate to gas jet sizes numbers so I can quantify the #15 jet in my ceramic burner. A bigger number is larger hole but a bigger drill number is a smaller hole, so its not that. I've found a web page that gives the BTU/hr for various hole sizes vs PSI.

I'll do a separate post

Pete
 
OK I didn't do a separate post so I'll do it here.

The problem I am having with running successfully is although I can get the engine up to pressure relatively easily maintaining it is a problem so I end up going round the track in short runs followed by a recovery of pressure then on again. On the assumption that the more heat you can get into the engine the more steam you make and keep up the pressure. I have been experimenting with burners and learned something from the exercise. Some of it is blindingly obvious but it has helped me understand what is going on, or not as the case may be.

The basics being.

  • To get more heat you need to burn more gas (I said it was blindingly obvious stuff)
  • The amount of gas you burn is a factor of jet size and jet inlet pressure.
  • You need the right balance of primary and secondary air to ensure complete combustion (its about a ratio 1:24 gas:air for propane (4%:96%)

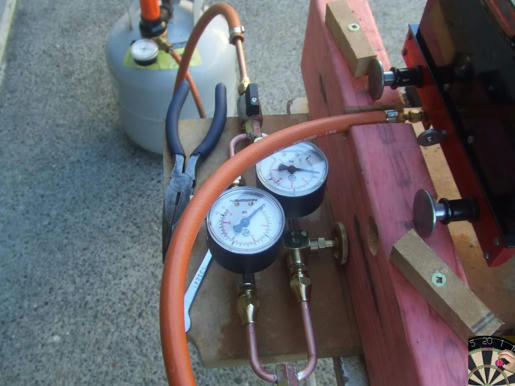
I made myself a test rig so I could see what was going on. Regulator on the gas bottle, Input pressure gauge and output pressure gauge after the gas tap

8t5o7y5ppvaxu3o4g.jpg


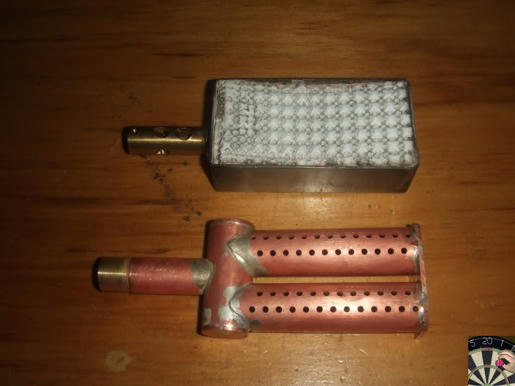
The assumed problem with the ceramic burner is it can't get enough secondary air. If it is running on the electric blower its fine, on the steam blower its fine. But the engine whistles like kettle as it tries to draw air through the holes on the firebox door. If the pressure is too high, and the blower is off, it flashes back with a huge pop or just goes out. If it goes out there's no idication as you can still hear the gas flowing. Not good

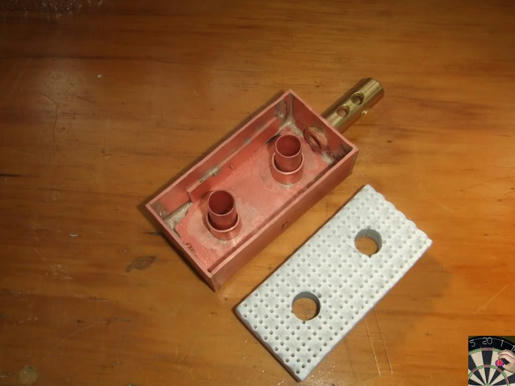
I started with making a new burner based on the articles in the previous post. The intention being that the gaps between the tubes would allow enough secondary air.

g193t8dt3gis9n84g.jpg


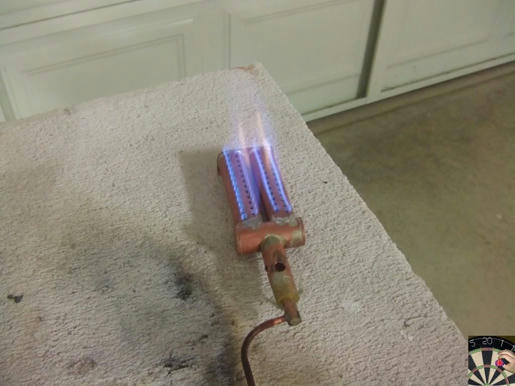
3p3s1nwik92dzdd4g.jpg


It worked, but it wasn't as successful as I had hoped lots smell of unburned gas and steaming took way longer than with the ceramic burner. The other big problem the burner head was at the level of the foundation ring on the firebox and any slight gust of wind would result in flames outside the the firebox.

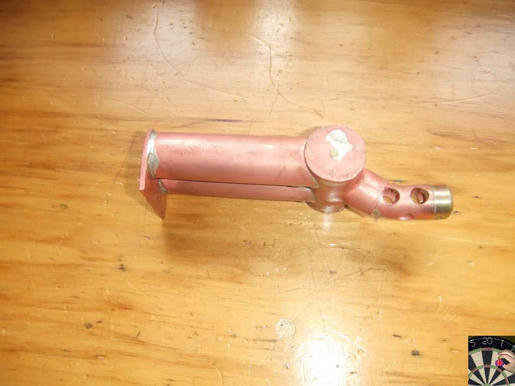
Second attempt was a version with a crank in the mixer tube.

2ip6ys6efas44w24g.jpg


That got over the external flames but other than that the results weren't much better than the previous version

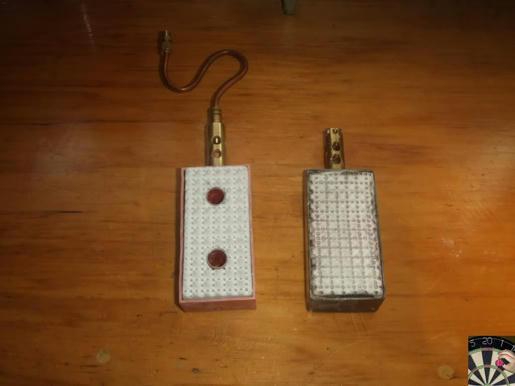
I then turned to resolving the secondary air issue with the ceramic burner I had seen a version of a burner with tubes running through it. I wasn't about to hack my burner about in case I was wrong so set about making a copy

zwxl101c4jxd8g84g.jpg


kury79arihr3qhc4g.jpg


This one works fine and even stays alight without any blowers going and the gas feed at 20psi. Its looking good but I still am loosing steam pressure when running. A glob of ptfe tape under one of the safety valve balls wasn't helping and I'm not happy with the valve timing so I have stripped down all the pistons and valves today.

More on that later.............

Pete
 
This may sound stupid and I may have missed it being sugested but how about a small air pump to supply air to the burner, I used at school (a long long time ago) a gas torch that had a small compresor the heat was far far grater with the extra air, could this be used as there are some very small compessors these days (a striped down tire unit and a set of nicads) Just a thought

Peter
 
Peter

An small air blower in the chimney is the way you get these started, then there is a steam bleed blower to draw air through the boiler to get it up to pressure. When its running the exhaust causes a good draft. Dare I say using an electric fan when you are running does seem to be cheating as its supposed to be a steam engine.

getting the burner air ratio right is the way to go

Pete
 
No the idea was to mix it with the gas in the burner itself to get more heat . I don't think sucking in that air has the same effect.

Peter
 
I just read this thread and I could not believe it when I saw you traveling down the track on the back it 8), I have no experience in reading looking or seeing anything to do with steam engines but well done looks like a serious machine.
Jamie
 
Peter

I think its much the same thing creating a pressure differential except that sucking the air through the flue means that the air flow, and heat goes where you want it to, through the boiler tubes.

Fingers

Thanks, I tell you there was nobody more amazed than me when it moved and kept moving.

John

Read you post, but its gone AWOL since so I'll not comment. But thanks for contributing your wisdom, I think I'm getting there but I'll do a separate post.

Pete
 
An update on the valve timing. Those of you who have been following this thread will have seen the video of the first time I ran it on air.

[ame=http://www.youtube.com/watch?v=cwH2MOvkbBM]http://www.youtube.com/watch?v=cwH2MOvkbBM[/ame]

As it turned out it was not very good so I stripped it down again and did the valve timing

[ame=http://www.youtube.com/watch?v=kBodAZdHhRc]http://www.youtube.com/watch?v=kBodAZdHhRc[/ame]

This is how it has been since then and that's how it was when I ran it on the track. It was becoming obvious it wasn't right and the guys in the club were giving me plenty of advice on how to get it sorted. Trouble was the write up in the Martin Evans book wasn't that clear to me and the advice I was getting was going over my head. However one bit of advice I did get was to get hold of the Dockstader valve gear simulation here

http://www.bittercreekwesternrr.org/Dockstader-Valve-Gear.html

With all the dimensions in the Martin Evans book I was able to model my engine and get some idea how the valve gear worked. After a bit of a play I re-read Martins instructions and it made sense. As did a lot of the stuff I was being told by the guys.

So I bit the bullet and did another strip down. No photos because it is much the same as before. This time I took the piston covers off to help see what was going on and noticed that one piston came further up the bore on the foreword stroke than the other. Investigation went on for an hour or so trying to figure out why. I traced it to the piston rod where it went into the crosshead. It hadn't gone fully home when it was originally crossed drilled for the taper pin. This made one piston rod 1mm longer than the other. I wasn't going to let it go after stripping it all down just in case it really mattered. I didn't want to go back and do it again. Trouble was 1mm meant that if I rotated the piston rod and re-drilled it would break through the original hole. If I made a new rod I couldn't ensure that the piston would go on squarely and I certainly couldn't re-skim the piston. Nothing for it but make a new piston and rod.

To cut a long story short the new piston was fitted, the valve timing set up and the whole lot put back together and run on air. You'll see it now runs smoothly on pretty much no pressure. Point to note I made an adapter that replaces the oiler clack, with the regulator shut the boiler doesn't pressurize and with a small air regulator its easy to control. You'll also see the new burner installed.

[ame=http://www.youtube.com/watch?v=-19uly6thq8]http://www.youtube.com/watch?v=-19uly6thq8[/ame]

I also steamed it up and with the new burner and timing and other things sorted it now maintains pressure way way better than it did. But I'll save that until I get it onto the track again.

Pete
 
Well done Pete :bow: :bow: :bow: :bow: getting the valve timing set is a real migraine job it took me weeks to get mine set up and then I cheated , machined up new slide valves with air running geometry, when I start up again thats going to be my first job, some correct slide valves, that valve simulator will be very useful thanks for the link.

I love the video runs real sweet very impressive on slow tick over.

All the best

Stew
 
Sounds like great progress Pete.
I'm looking forward to another video of you cruising around the track.
 
Stew/Carl

Thanks. The trouble with doing this the first time around is you have no idea what constitutes 'right'. A bit of observation of others helps. For example I was watching one of the guys training a driver on his loco. "leave the drain cocks open on starting"; each would emit a satisfying hiss as each port opened in turn on pulling away. Mine didn't do that but until I saw this doing it I had no idea something was wrong. It does it now and sounds great.

Another thing; with the gear lever in neutral and the regulator open it just vented steam through the stack. It doesn't do that now either. Put it in neutral with the regulator open and nothing but the roar of the burner.

So I'm feeling confident that it will run way better now. I did fire it up last night and it will now run and maintain around 60psi if I notch back the gear lever.

Pete
 
New Years Greetings

A bit more on running. I know Zee is waiting for the fully recorded documentary much like "Great Railway Journeys of the World", but not today.

This was the first track run since I had done the new burner, installed a gas jet pressure gauge, reset the timing, improved the method for initial water fill, improved the sight glass and more recently modified the mechanical lubricator which was going through oil like Deep Water Horizon (maybe not).

It ran well, only one flame-out but that was operator error when I stopped and didn't open the blower.

This is brief clip when all was going well and I was finally enjoying the ride and not functioning like one armed paper hanger and then realized I had a camera in my pocket.

[ame=http://www.youtube.com/watch?v=iugzOVs-73E]http://www.youtube.com/watch?v=iugzOVs-73E[/ame]

The sticky out bit on the left is the hand pump lever. I do still have water feed problems when running and the lad you'll hear running beside me had a jug of water in had ready for a top up!

You'll see it noticeably slow, labour and stop on the bend. That's a track problem and its a bit tight there, the good news is the elevated track is being ripped out in Feb and is being completely re-built.

Pete


Latest posts

Back
Top