Rob Roy

Home Model Engine Machinist Forum

Help Support Home Model Engine Machinist Forum:

This site may earn a commission from merchant affiliate links, including eBay, Amazon, and others.
Thanks Ron

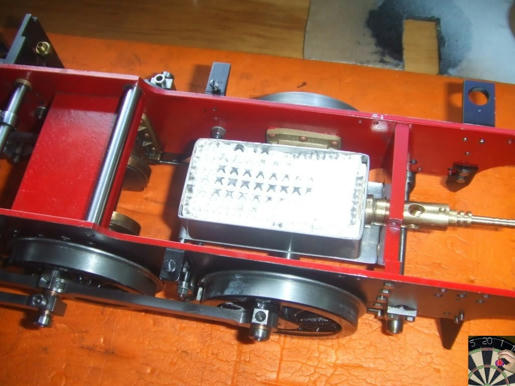
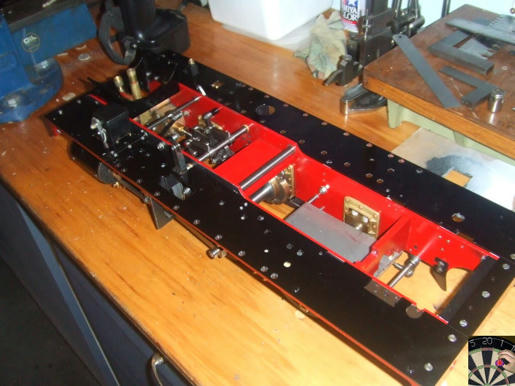
Getting the motion to run smoothly was the challenge I had deal with. There was no point in going any further until I go all that right. Putting it all together and having to strip it down again isn't something I want to consider. No doubt it will happen though.

John

Thanks for your support once again.

One of the reasons I tried it slow and at low pressure was last weeks conversation with dad, after he'd seen the first running video ".........that's great but I want to see it notched back and running slowly then I know you've got it right"

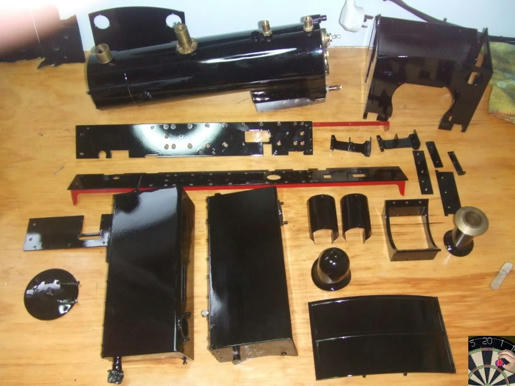
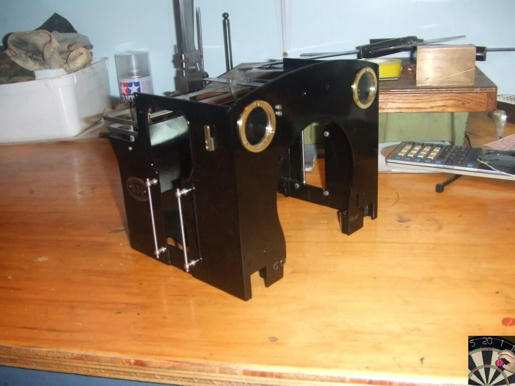
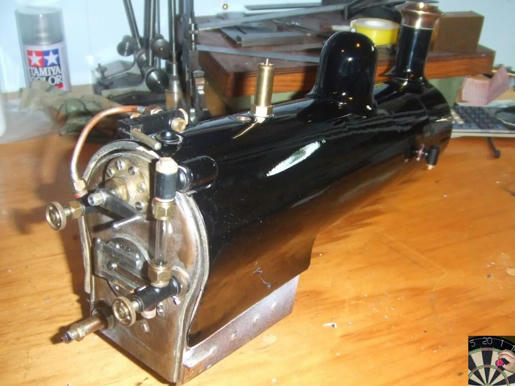
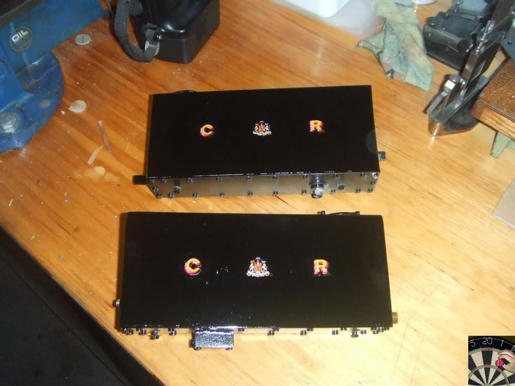
I'm quite pleased the way the plate work has come out. The sand blaster was worth the purchase and the 3M etch primer sticks like the proverbial s*1t to a blanket so very I'm happy with the results. I'm not sure if its as good as the airframe etch primer we both remember but it's good. A rub down with 1000 wet & dry and it's smooth as anything a baby may have.

Although I've got a compressor and spray guns any attempts I've made using them have been less than satisfactory. I've had better results with a spray can, and we know how unpredictable they can be, so rather than risk it I'm planning to get it professionally sprayed. That's the reason for getting all the parts to the same state so I can take them to spray shop and get the job costed.

Tomorrow will be filler and wet/dry day, maybe another look at resolving the broken tap.

regards

Pete
 
The pics are great and the video is awesome. That is really nice work.
Keep up with the tips/techniques on blasting and painting...I'm learning.

It was that kind of model that influenced me when I was younger and eventually landed me in this hobby.

........................

Wine you say? Do you drink that Nobilo? Wife loves it so there's always one at the ready in the fridge.

BTW...remember that point about 'going slow' ;D
 
Great stuff Pete - looks like it's got some poke!

Our club are hosting the Stephenson Memorial Miniature Locomotive Trials tomorrow which should be good! Competitors are given 20 minutes to do as far as they can with as much load on as little coal as possible.

Some of them are unbelievable, last time we did it a 3.5" Evening Star came 4th hauling 1307lbs 2839 yards on 15oz of coal!

Bet you can't wait to get it running on live steam!

Nick
 
Pete,

What a great build.

I'm looking forward to seeing your finished locomotive.

SAM
 
zeeprogrammer said:
It was that kind of model that influenced me when I was younger and eventually landed me in this hobby.

Wine you say? Do you drink that Nobilo? Wife loves it so there's always one at the ready in the fridge.

BTW...remember that point about 'going slow' ;D

Carl

Thanks; this has been a long time getting to this state and I was about half my current age when it was started and now I'm a few years off retirement. Plan is to get the skills up and when the big day comes get stuck into a serious project myself.

Sorry to say I was drinking Ozzie red. But good to hear you are helping the NZ economy and taking your bar management responsibilities seriously. Nothing worse than a warm Cab Sav or Chardy.

Steady and demonstrable progress is the way to go

NickG said:
Great stuff Pete - looks like it's got some poke!

Some of them are unbelievable, last time we did it a 3.5" Evening Star came 4th hauling 1307lbs 2839 yards on 15oz of coal!

Bet you can't wait to get it running on live steam!

Nick

My thoughts as well when I first ran it, it makes those 10mm bore engines I made look like toys. I understand that the problem with 3.5” gauge is traction and not power. They don’t have enough weight to get the load moving.

Heaven knows what a 7” would be like, frightening comes to mind.

SAM in LA said:
I'm looking forward to seeing your finished locomotive.

Sam

Thanks; and me to, hopefully I’ll get it done before the NZ summer. There’s is a bit of a deadline as the club are planning to replace the 3.5” track so the current one could be ripped up before I’m ready (thought; it may be an opportunity for a length of the old track for the garden!)

Pete
 
Pete,

You're right, a 3.5" A4 was there yesterday, it managed to pull 800lb 4800 yards in 20 minutes using 28oz coal. Struggled with a bit of slip to start with though.

There were 2 x 7 1/4" 0-6-0 tank locos - the one that won hauled 3300lbs 3690 yards in 20 minutes and used 46 oz of coal, hardly slipped setting off - quite a dead weight to get rolling and pull up the first gradient - incredible power. to get an idea of scale though, 2" bore 3" stroke! The incredible thing was he managed to steam up from cold in 15 minutes!

Anyway, sorry for a bit off topic there, it's things like this thread and seeing them in action that will spur me on to get mine done though!

Keep up the good work.

Nick
 
Nick

No; not off topic at all and interesting stuff. I'll be happy when I get mine to move under its own steam. And I'll be enough of a load for it.

Pete
 
I've been meaning to post links to these pics I've found of the real thing, or at last as close as Martin Evans design was to anything the Caledonian Railway used to operate

12.jpg


http://www.geoffspages.co.uk/monorail/kg/page07/index.htm

56169 was built as a dock shunter for the Caledonian Railway. St Rollox

23739.jpg


http://www.railbrit.co.uk/location.php?loc=Polloc%20and%20Govan%20Railway

Polmadie: Ex-Caledonian Beetle Crusher 56154, one of the sturdy McIntosh 2F 0-6-0T (original 498 Dock Class) locomotives, stands in the sidings at the Rutherglen end of Polmadie shed, probably in 1959. The locomotive was withdrawn from Polmadie in June of that year and cut up at Cowlairs Works 5 months later. [With thanks to John Robin]
Polloc and Govan Railway
K A Gray [//1959] Ref: 23739

Pete


Nice to see pics of the real thing. One like mine is in the railway museum at york - great to see the thing in the flesh!
 
Nick

I'd imagine your example in the York Railway museum looks in a far better state than these two sad examples waiting in the depature lounge. This was 1959 so this pair are no doubt now part of the Severn suspension bridge or somesuch structure.

Pete
 
Last weekend was a bit slow and all I managed to achieve was repainting the steam fittings from the original 80's red to the more contemporary black.

h6c6thbr2mgxzqg4g.jpg


And I fitted the gas burner differently as I didn't really like the way my dad had done it. The gas burner was a commercial item I had bought for my dad some years ago. I don't know the name of the suppliers but I do recall going to pick it up from some place in Surrey that was located in some sheds close to the river. Was this the original Bruce Engineering? This may not be for the purists but its going to be the clean way to run the engine without having to do a major clean up each time I do.

bbk9rq1f1xg96vk4g.jpg


So that was my weekend. However, the highlight of the week was finding somebody to professionally spray paint the plate work parts I'd sandblasted and etch primed. I had thought about using spray cans but the results have always been a bit hit and miss. I do have a compressor and spray guns but didn't want to learn how to use them on this job. It would have been too much work to start the whole prep again because I'd cocked it up.

hr89b6c8g0pbbn04g.jpg


I am really pleased with the finish, the spray shop used a two pack paint and baked all the parts to finish them. Now all I have to do is put it all back together. That shouldn't take too long but I'm in no rush. On the way I want to re-do pressure test on the boiler, check out the burner and raise some steam.

Pete
 

Wow! Awesome work on your loco. Your attention to detail is superb!
 
This engine will be stunning Pete,I thought of black for my engine,not sure yet,can't wait to see it all back together.
I am looking for a "next project" Rob Roy is high on the list after seeing your posts.
Don
 
Kevin/Don

Thanks for your support. I am so pleased I went for the professional paint job. I've been working with the parts today and I can tell they are going to last. The guys even used the spray can I had used for the buffer bars to paint the sides of the running boards. Their results are far superior to mine, maybe I should have go them to do the frames.

Despite saying I'd take it slowly, I've been getting on quite well today.

Put all the bits back on the cab;

lcvla5a42edlcuh4g.jpg


Installed the steam fittings on the boiler;

6rxa3amp5i196o74g.jpg


From the photo I can see the back head needs cleaning up a bit.

Put the "Caledonian Railway" transfers on the tanks and varnished them

pio6prk1tq7rq534g.jpg


Installed the cylinder lagging and running boards

7xf8k81aivir6bs4g.jpg


Tomorrow I'm going to pressure test the boiler to check for any leaks in the fittings. No point in putting it all together to have to take it apart for something silly.

I then may steam up the boiler to check the burner works. Again no point in finding out it doesn't do the job.

I'll let you know how I go

Pete
 
Pete, fantastic work there and it looks amazing. We all can't wait to see it in action!

Best mention that your dad did a fantastic job on making it in the first place.

:bow:
 
Nick

Thanks; you are right. This is about the work my dad did in making this in the first place. I'm just hoping I'll do it justice in getting it finished.

I know he's following this thread back in the UK so he'll appreciate your comments.

Pete


Looking great Pete. Have to agree, Dad did a good job on it.

Ron
 
Pete, this locomotive will be a beauty when finished :bow:

Kind regards, Arnold
(who is green with envy!)
 

Latest posts

Back
Top