Rob Roy

Home Model Engine Machinist Forum

Help Support Home Model Engine Machinist Forum:

This site may earn a commission from merchant affiliate links, including eBay, Amazon, and others.
Hi Pete
You are doing one amazing job there, Really looking forward to the rest
of the rebuild.
I noticed you said, you wanted to make an adaptor so you can run it on
air. Is that just a temporary measure to get it running and then change
over so it will run on steam, just interested :)

Ken
 
Thanks Ken

Yes I'm just going to get it running on air, its easier for setting it up, rather than build the whole thing and have to strip it down again for something silly.

Somehow I need to confirm the valve timing. I know it runs because I've remember seeing it years ago on a CO2 cylinder from the pub. However I do need to check it. The approach in the Martin Evans book doesn't suit as it requires that the valve chest covers come off and I don't want to do that.

As I said its a bit tight right now, a lot tighter thank it was before I stripped it down.

Pete
 

Yep Pete, that makes really good sense to me, and I'm sure that when you
do get everything running free, that engine is gonna run pretty sweet.

I will be watching your progress,and wish you every success with this build,
can't wait to see it running.

Think I'm gonna add this one to my favourites, Best of luck to you Pete.


Ken
 
Ken/Ron

Thanks for the good wishes. Not much will be happening with this during the week. I've got a lot on at work and I'm trying to fit in a conference with the socialising that goes with that.

Pete
 
Pete,

I've got a very similar project with a 3 1/2" gauge Mable 2-4-0 Tender loco - only my boiler is nowhere near as good as yours. So I should be able to learn a few tips from your posts.

I used to own a Rob -Roy at one point, didn't build it just bought it to run and it went quite well, would pull a couple of people ok.

Good work, thanks for sharing.

Nick
 
Thanks Nick, I have minimal claim no fame for any of this and I'll admit the boiler was done by a professional boiler maker.

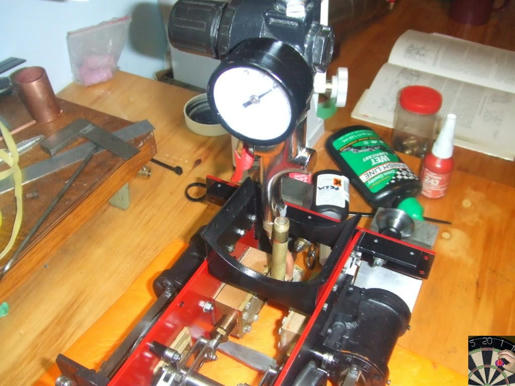
I couldn't wait until the weekend to make an air line adaptor. It occurred to me that I had a whole lot of different bits and bobs that came with my air tools and it wouldn't be the first time something fitted 'out of the box'..................

It did the thread on the air gun nozzle was 3/8" x26 so I was on my way

mpkhb3re1znaidm4g.jpg


The first attempt was hopeless air escaping somewhere. I'd left the oiler clack off so the air wasn't getting far. One of my boiler test blanking plugs soon fixed that.

Next attempt wasn't much better, air pouring out of the exhaust pipe and not a hint of movement on the pistons. Ho hum to stiff or something wrong with the timing. Then I remembered my dad saying "make sure you seat the valves first" with no hint of how to do that.

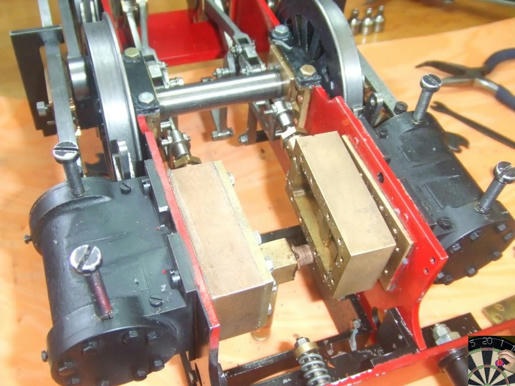
I sat down with the Martin Evans book and no clues in there either. From the drawings there seems to be a big gap between the valve chest cover and the valve slide so a good reason for it to leak.

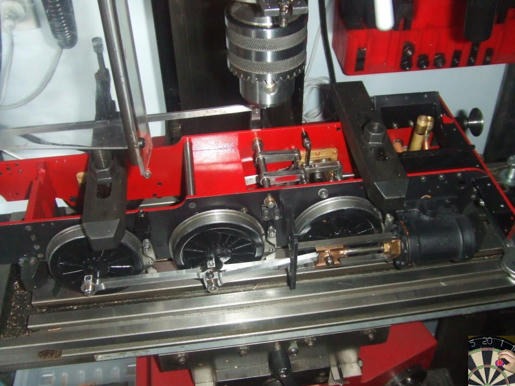
Not wanting to give up now I hand cranked the wheels and reversing arm to work out the relationship between the wheel position, valves and reversing lever. I figured that putting the reversing lever in the 'right' place would allow the valves to seat.

So third attempt and I just waggled the reversing lever about and bang it burst into life.

[ame]http://www.youtube.com/watch?v=cwH2MOvkbBM[/ame]

It's a bit noisy probably a timing issue but as there's no reversing quadrant fitted so the reversing gear is wobbling about a bit and that's probably not helping.

Happy person; and no doubt when he sees this, happy dad ;D

Pete
 
Very neat Pete. You have to be feeling pretty good.

What is it sitting on?
I just built a stand with rollers for my itty-bitty loco...now I'm wondering why. :big:
 
Pete, glad to hear you got it running.

There should be a gap between the cyl cover and valve. Not sure whether you know how a slide valve engine works but attached is a picture, not great but illustrates how the valve works.

You are right, you want the reverser to stay still, it will have a dramatic effect on how the engine runs if it's moving about. It limits how far the valves travel, so limiting the opening of the ports. Once the engine is up to speed it can be 'notched back' to use less steam.

Nick


View attachment Slide Valve Workings.bmp
 
Pete

Very nice, as you say looks like you have a timing issue, when I set the timing on mine I had great difficulty, getting my head around it, its all about the valves closing early to allow expansion of the steam, I ended up making a new slide valve that the engine runs nice and smooth on, but since found out that this new valve is optimal for air running, it will be next to useless for steam, so a new slide valve for steam is required, so what I'm saying is it may be rough on air but correct for steam, but never seen a correct steam valve running on air I can't say for definite.

Stew
 
It's really shaping up nice with the cleaning and new paint, Pete.
I can see why you didn't really want take off the valve covers with them both facing to the inside
like they are. Kind of tight quarters.
Nice video. It will be a beauty when you get it done!

Dean
 
I'd venture a guess that the "jiggling" of the reverse gear "Johnson bar on this side of the pond anyway" seated the slide valve on its seat and way she went....

I would venture an opinion of "thats normal"...especially on and engine that has been "operated on" recently....everything has to line up again.

Good to see!

Dave
 

Zee

Its just up on blocks under the buffers. I've got the air line valve in one hand and the camera in the other. No way could I adjust the reversing lever, but no real risk of disaster as long as I let go of the air valve in time. Saying that it was way more powerful than I had expected.

Nick

Thanks for the diagram. The problem is was reconciling was the gap between the slide and cover on the "how does that work?" and then sort of realizing that the valve chest pressure must keep it in place. Which resulted in the waggle approach to make it comply with theory.

I'll put in the quadrant or clamp the lever and see what happens.

Stew

I've learnt from my small engines there is a difference between air and steam. I'm going to do some experiments to see if I can get it going better under air. I assume if its balanced under air its part way there and then its anybody's guess how it will then go under steam.

Dean

I think I am getting there thanks.

The real problem with taking the covers off is how the inlet/exhaust ports are fitted and I couldn't work it out so left it alone. OK maybe I was a wuss and should have tried as it would have helped with the painting.

Dave

I think I've been to Johnsons Bar and there was a lot of jiggling going on but I can't remember which State it was (or I was).

Seriously; this is early days yet and it was nice to see it run again. I remember it being as smooth as a sewing machine so I have an idea of what to expect.

More to come.........................

Pete


Been a long slow weekend but progress is being made. I spent most of my time peering into the sand blaster cleaning the brass bodywork. Also sprayed some of the parts with etch primer.

h8icc9b4fvb4zt54g.jpg


bcv9snyh779zopp4g.jpg


ld3jchc62i309934g.jpg


The primer seems to work well. I'd done the steam dome previously and had sprayed it with black gloss. However, I wasn't happy with the results so decided to blast it off and start again. The primer certainly was stuck on well.

I ran out of the 3M etch primer and so had the local Super Cheap Auto store

Pete
 
Looking great Pete, looks like a really professional job :bow:, I wish I could get that finish on mine when I do it. Will try and learn some tips from your posts when I do, that's for sure.

Nick
 
I second that Nick,I shall soon be thinking about painting my Traction engine so looking for all the tips I can get.
Don
 
Many thanks

Nick

I wouldn't say professional but I hope I'm doing it right. I've never been much of a painter and must admit I'm getting withdrawal symptoms not having used the lathe or mill for a while. I did get some machine time over the weekend when I made a blanking cap for the tank filler.

Don

As I say I'm no expert but I do believe the sand blasting, with a fine glass grit, is the way to go. I'm following the advice of the guys at the club. It's clear that emery paper would never have provided the surface the blaster gives for the paint to key to.

Pete
 
I didn’t do an update last week but I did make progress. I spent most of last weekend with my hands encased in the rubber gloves of the sand blaster finishing off the last parts and getting a coat of etch primer on them. I’ve been told the brass parts re-oxidizes very quickly so I get them blasted , wash off the grit residue and get it well dried and primed with 3M etch primer.

ld3jchc62i309934g.jpg


The other good news; on Sunday I took the boiler to the club for the inspector to do the pressure test. That went well and I’m on the first step of approval for running on the club track

This week I decided that the only way I was going to get the timing sorted was to strip down the valve chests reset the slides and re assemble. Three attempts later I got it right. First too much RTV gasket which encroached on the valve chest so the valves wouldn’t seat, second I got the left/right covers switched over and the steam inlet was in the wrong place. Third was successful so I can now move on. Each of the strip, setup, re-builds took three hours or so, making it a long week. At least now the packing nuts now have viton O rings in them and are well sealed.

Valve chest rebuild #3

i2j42kek6bovz9w4g.jpg


The 4BA screws in the cylinders only serve to plug the drain cock holes for testing

Next was pin the lifting arms for the valve gear. These had never been drilled or pinned but the whole chassis fits on the mill table so I was able to set it up, lock the arms, drill the holes and taper ream for the lock pins.

dd3auz3bb3zz4944g.jpg


mg51ahtg8rjtd504g.jpg


This allowed another test run on air.

[ame]http://www.youtube.com/watch?v=kBodAZdHhRc[/ame]

Much better now smoother, less vibration and running on only 25psi.

Another good day until I broke the tap making the fixing bracket for the gas burner. More about that in a later post; it’s Saturday and now time for a glass of wine.

Pete


I just love all that motion working. Looks real good.

Ron
 

Latest posts

Back
Top