Marble lifting automation

Home Model Engine Machinist Forum

Help Support Home Model Engine Machinist Forum:

This site may earn a commission from merchant affiliate links, including eBay, Amazon, and others.
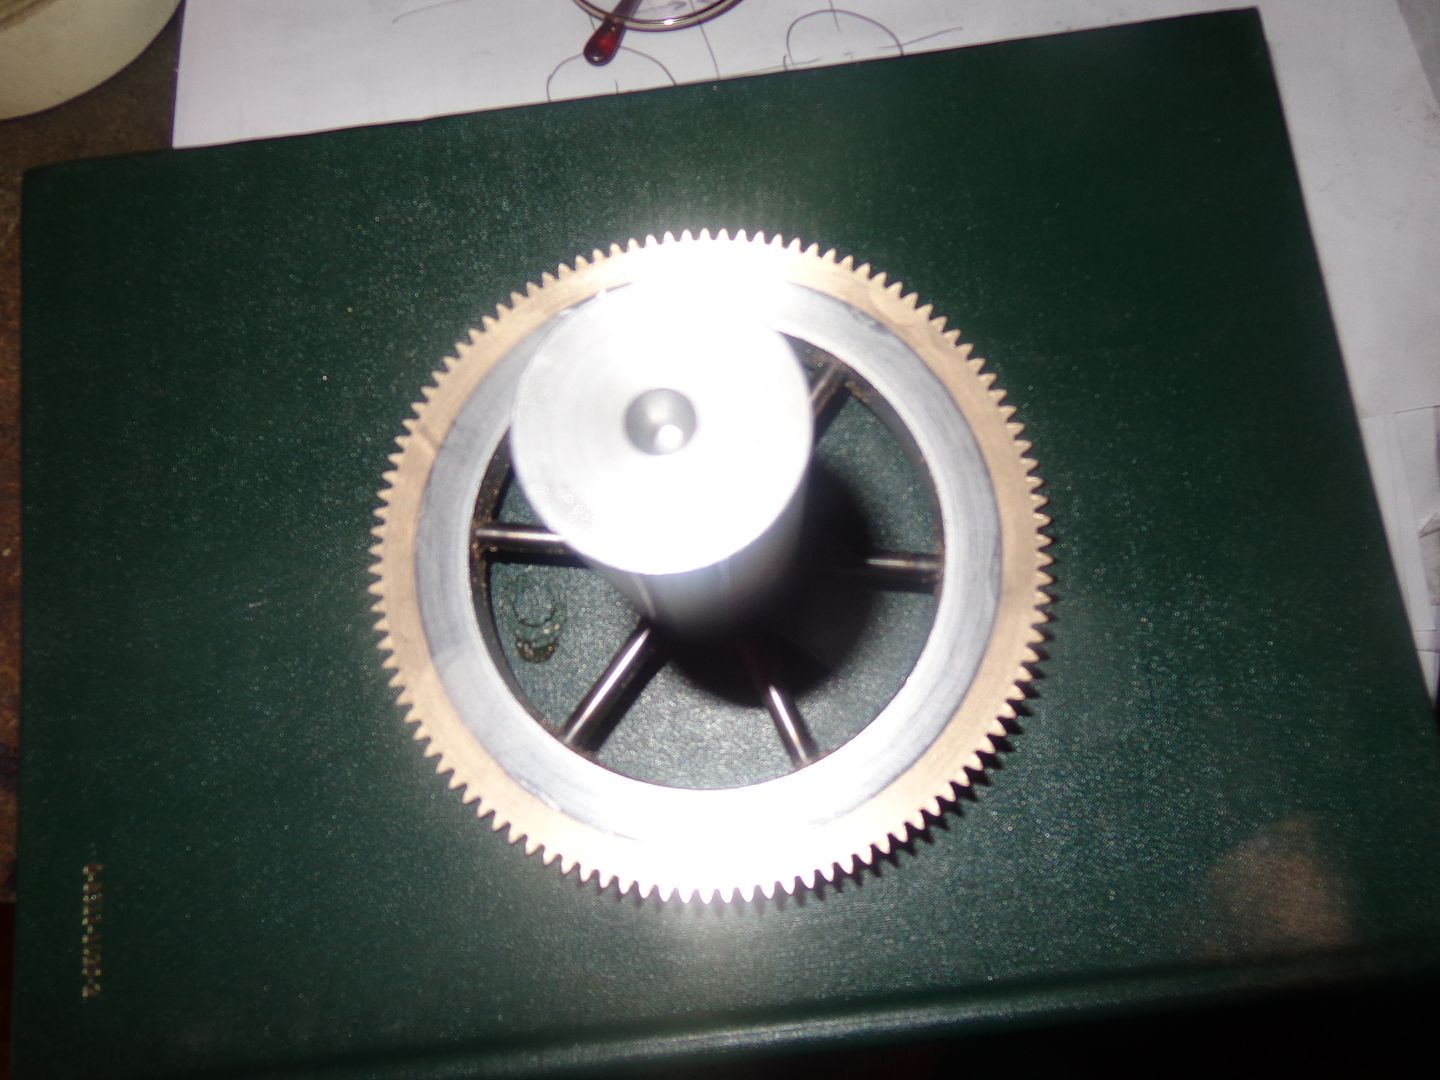
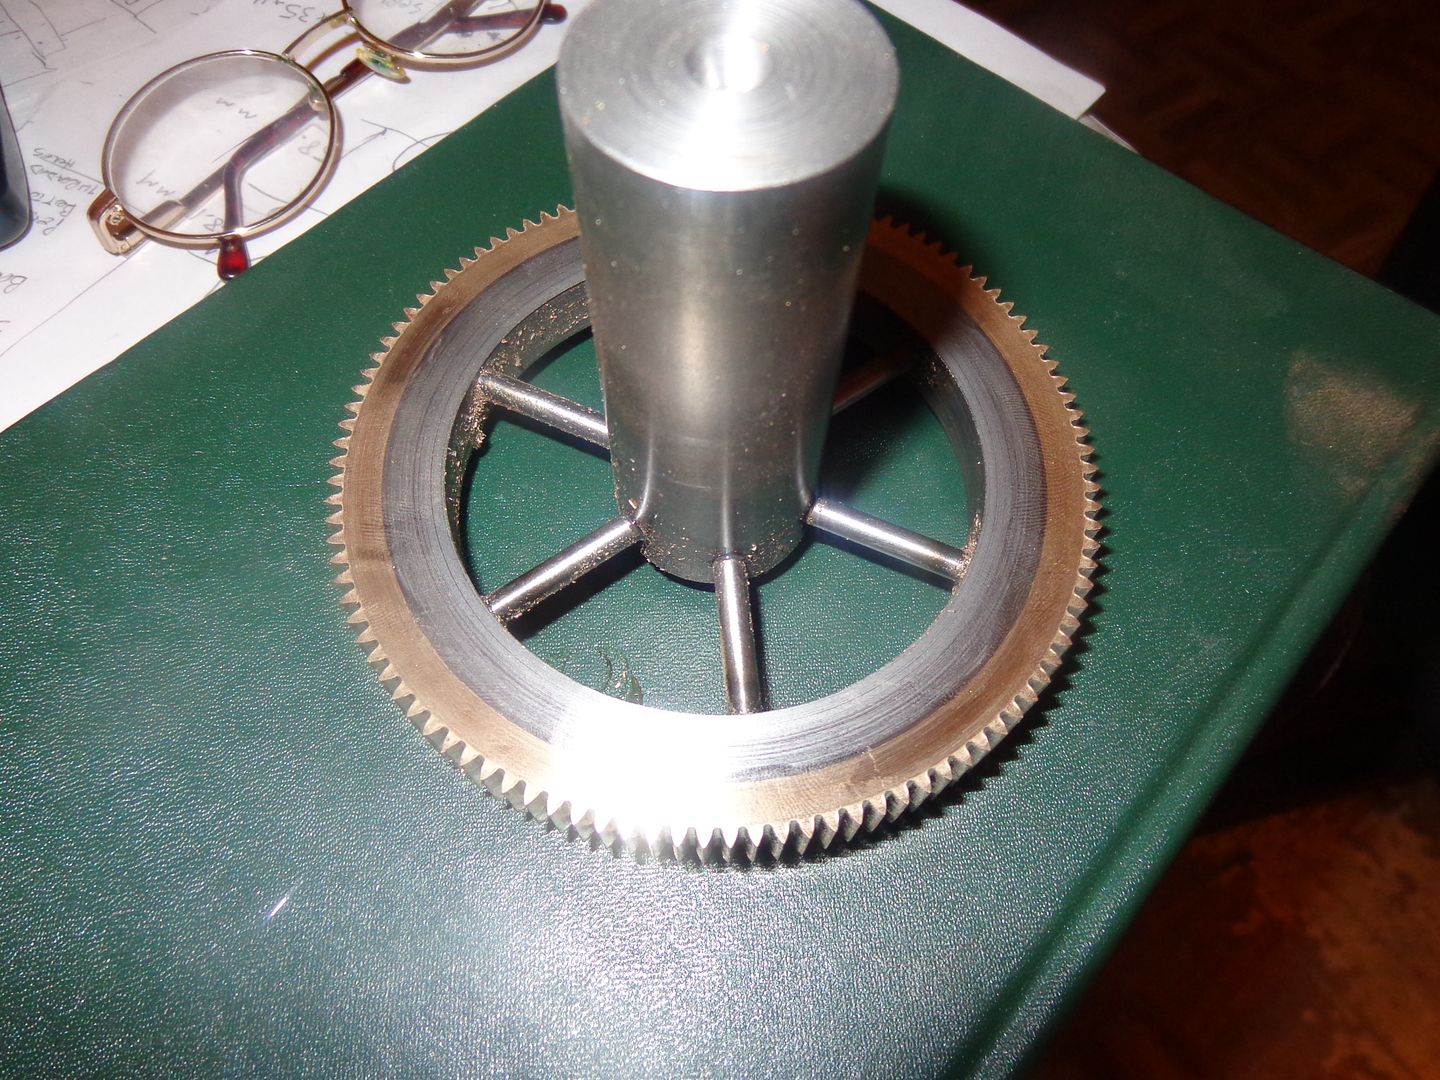
Now that, my friends, is one HUGE gear. Huge by model makers standards at any rate. The outer diameter is 4.583", and its the biggest blank that will fit into my milling machine. 108 teeth, 4.5" pitch diameter. It didn't really take as long to cut as I thought it would---maybe about 1 hour total. When I got to the point where I fed it through the cutter and didn't hear anything actually cutting, I breathed a huge sigh of relief. I have this deep seated horror of getting all the way around on a gear and then starting to cut away the teeth that are already cut.--It happens!!!

 
Brian
Aren't worried about the same "springiness" from the spokes causing a problem here ?
Is the gear tooth minor diameter bigger than that 3 jaw ? Can you move directly to the chuck ?

Scott
Scott--It was springy. I could feel it during the cut. In fact, I held the outer side of the gear with my fingers while cutting to dampen some of the harmonic vibrations. It doesn't seem to have affected the quality of the teeth though.---Brian
 
I have been lurking in the background, now you got me wanting to make one of these. I have never cut a gear I know one way they spec gear drawings is with diameter over pins, how did you set the depth you cut on your gear ? Nice work by the way. Mike
 
I have been lurking in the background, now you got me wanting to make one of these. I have never cut a gear I know one way they spec gear drawings is with diameter over pins, how did you set the depth you cut on your gear ? Nice work by the way. Mike
There are gear cutting charts available on the internet that give all the information you need. You have to know what diametral pitch your cutters are and what angle, either 14.5 degrees or 20 degrees.
 
So what do you do for an encore, once you have made the largest gear you can make on your mill??---Well of course---Then you turn around and you make the smallest. Okay--Its not quite the smallest. The small one shown here is a 15 tooth. I can actually make one smaller, a 14 tooth. This one wasn't quite so heart stopping as the big one. None of that so many turns and so many holes stuff. It was just 6 full turns of the handle between each cut. I still use the divider plates though. I do want these gears to mesh when I get finished here!!! That small gear is integral with the shaft. The o.d. of the gear is 0.708", so I turned both ends of a 3/4" shaft down to .437 and turned the center to 0.708 and then cut the teeth right on the shaft. Strangely enough, the cold rolled steel cut easier than the bronze, but I didn't have any vibration to contend with like I did when I cut the big gear. The spokes made the cutting of the big gear very "springy" while I was cutting.
 
  • Like
Reactions: gus
bb218--Maybe I didn't answer that very clearly. Once I get the cutter set at exactly the center height of the gear to be cut, I advance the table towards the cutter (not running) until I can just feel it pinch a piece of paper held between a cutter tooth and the side of the gear blank. Then I wind the table to the left until the blank is clear of the cutter and advance my mill table towards the cutter .089". That tooth depth is a constant for 24 diametral pitch gears with a 14.5 degree pressure angle. Once that .089" is set, I just wind the table back and forth, cutting full depth each time and advancing the rotary table by a predetermined angle each time I do it to cut the next tooth on the blank.
 
I got this far and gave it up for the night. Bandsaw blade is dull as a hoe!!! I try to get a year out of the bi-metallic blades, but invariably I end up trying to cut something that's hard as the devils horn, and I don't know about it until I've knocked all the "sharp" off the teeth. ----And it generally happens about 2 weeks after I've bought the new blade. Blades aren't cheap!! I pay about $50 each at BusyBee, and that's imported stuff. Maybe this weekend I'll buy a blade.
 
--Maybe I didn't answer that very clearly. Once I get the cutter set at exactly the center height of the gear to be cut, I advance the table towards the cutter (not running) until I can just feel it pinch a piece of paper held between a cutter tooth and the side of the gear blank. Then I wind the table to the left until the blank is clear of the cutter and advance my mill table towards the cutter .089". That tooth depth is a constant for 24 diametral pitch gears with a 14.5 degree pressure angle. Once that .089" is set, I just wind the table back and forth, cutting full depth each time and advancing the rotary table by a predetermined angle each time I do it to cut the next tooth on the blank.
__________________

Thanks that is how I assumed you would do it, Mike
 
There isn't too much I can say about this shot. The gears mesh the way I had hoped they would, and My Goodness --There's a lot of work in that new piece which supports the shaft with the small gear on it!!!
 
I found out today that there is a place in Brampton, Ontario that will make up a bimetal blade to order, and they are actually cheaper than BusyBee. They explained to me that their bimetal blades are a 14-10 tooth combination, with one inch of blade cut with 10 teeth per inch and 1" of blade cut with 14 teeth per inch, alternating over the full length of the blade. They claim longer blade life and easier cutting. The 93" blade in bimetal at BusyBee is $55.00 plus 13% tax. The blade from Tuff-tooth costs $50.06 including tax and shipping. I'll give a report on whether or not the blade works well.
 
My new blade came in today and I installed it on my bandsaw this evening. It is the same thickness (.036") as the blades from BusyBee and the same width, at 3/4". I cut a piece of 1" aluminum with it, and although its hard to be totally subjective about it, it seems to cut much faster than the old blade did.---of course like I said in my earlier post, the old blade was painfully dull. The price came in at a total of $51.65, which is $10.50 cheaper than BusyBee, delivered right to my mailbox. The name of the company in Brampton is R &D Bandsaws. The "Tufftooth" must be the name for their bimetal blades.
 
Now that my gear cutting is out of the way, it's time to put a pulley on that shaft that has the small gear carved on it. I am not sure of the torque requirements on this machine, so I have decided to use a flat belt drive on it, similar to the one on my sawmill. That way I don't have to be concerned with slippage like you get with an o-ring drive. Flat belts are a bear to wander off the pulley, so I will put a couple of 1/8" high flanges on the edges to keep the belt on. I went down to my metal supplier this morning and paid $10 for a 6" length of 5" x 1" aluminum, which will become the pulley over the next couple of weeks.
 
Well, I made a start on the pulley today. Short form goes like this.--Buy flatbar--Lay out circle with old drafting compass--Cut off everything that isn't part of the circle with bandsaw--Clamp plate between live tailstock center and chuck jaws and knock off most of the remaining corners--clamp in 3 jaw chuck, and away we go!!! Every time I hollow out the face on a pulley like this I seem to do it a different way. Most reliable way it seems is to make a series of plunge cuts at 90 degrees to the face with an old cut-off tool that I have ground to a long tapering point, close to the center hub. After enough plunge cuts side by side, I take it to the finished depth and wide enough to get a boring tool into what has now become a circular slot, and then use the boring tool to make successive passes towards the outer rim. Probably there are better ways to do this, but it works for me. Tomorrow if I have any ambition I'll flip it around in the chuck and do the other side.
 
As my friend Mr. Dundee once said--"Now this is a pulley!!! I still have to put the six holes in it. They don't actually do anything, other than make it more visible that the pulley is really turning. These are not critical holes in any way, so I may just lay them out, pop an indent with the center punch, and take them out to my big old drill press in the garage to drill.--Still, rather a pig of a thing to hold onto while drilling 1" diameter holes thru the 1/4" web.

 
Last edited:
My holes are in, but Jeez, what a dance!! I ended up using toe clamps to clamp the pulley to the mill table, then for each hole it was--put the chuck in, with a homemade "pointer" and run the table around until the pointer was on center of my "punch" marks. Take the "pointer" out of the chuck and put a 3/8" drill in. Drill thru, remove the 3/8" drill and put in a half inch drill and drill thru. Remove chuck, put in 3/4" endmill and mill thru the web. Remove the 3/4" endmill and put a 7/8" endmill and mill thru the hub. Remove the 7/8" endmill and put a 1" endmill in and finally mill thru to end up with a 1" hole. Then repeat 5 times. My mill is not a tower of power!!! Anything much over 1/2" diameter and it blows the glass fuse. The glass fuses are $3 each and you can't buy them anywhere on Sunday. I do keep spares around, but try not to blow them if I can help it. Oh well, job is done, and the holes look good. Now I can move on to one of the more interesting parts.
 
Amazing work Brian. What tool did you use too turn that pulley out?? If I try that I have a lot of shatter....
 
Lawjit--I use this rather evil looking modified cut off tool.--The right hand end. I plunge straight into the face at 90 degrees as close to the hub as possible---that's where the surface speed of the rotating part is lowest. You can't plunge too deep, probably a maximum of .020". then back out and shift over the width of the blade and plunge again. Keep doing that until you have a groove .020" deep x about 3/8" wide. Then go back and repeat. Keep doing this until you have reached the full depth you want, or very close to it. Then use a conventional boring tool that will fit into this trench and taking .015 depth of cut, cut from the center "circular trench" you have created towards the outer diameter of what the counterbore will be. Once you have the counterbore fully formed, put a conventional tool into the tool holder and do a very light clean up pass to get rid of any ridges or chatter marks.

 
My new blade came in today and I installed it on my bandsaw this evening. It is the same thickness (.036") as the blades from BusyBee and the same width, at 3/4". I cut a piece of 1" aluminum with it, and although its hard to be totally subjective about it, it seems to cut much faster than the old blade did.---of course like I said in my earlier post, the old blade was painfully dull. The price came in at a total of $51.65, which is $10.50 cheaper than BusyBee, delivered right to my mailbox. The name of the company in Brampton is R &D Bandsaws. The "Tufftooth" must be the name for their bimetal blades.

Hi Brian,
Makita sells two version for cutting steel. The non-bimetal blades have very short steel cutting life. Cut a Grade 5 fastener and the bandsaw will never cut straight again. This blades come in a box of three pcs. Paid the same price as yours for the bimetal.Still cutting on the scribed lines with easy hand guiding.
Will cut Gov Body for your H&M tomorrow. As for mitre gear cutting. My Impatience killed three gears, :hDe:
 
I've been terribly busy with real work, so this machine has taken a back seat lately. The next thing I do is going to be interesting though. I have to have a "chute" filled with "marbles" so that when the pitching arm lowers to horizontal, a marble will load into it, under the influence of gravity. However, since there will be more than one "marble" in the chute, I have to have a spring operated "stop-gate" which prevents the other marbles from running out onto the floor when the pitching arm is up away from horizontal. I have some ideas how I will do this--the stop gate will be opened by the downward movement of the pitching arm, which is powered down as well as up.
 

Latest posts

Back
Top