Marble lifting automation

Home Model Engine Machinist Forum

Help Support Home Model Engine Machinist Forum:

This site may earn a commission from merchant affiliate links, including eBay, Amazon, and others.

Brian Rupnow

Design Engineer
Project of the Month Winner
Joined
May 23, 2008
Messages
14,993
Reaction score
8,287
Location
Barrie, Ontario, Canada
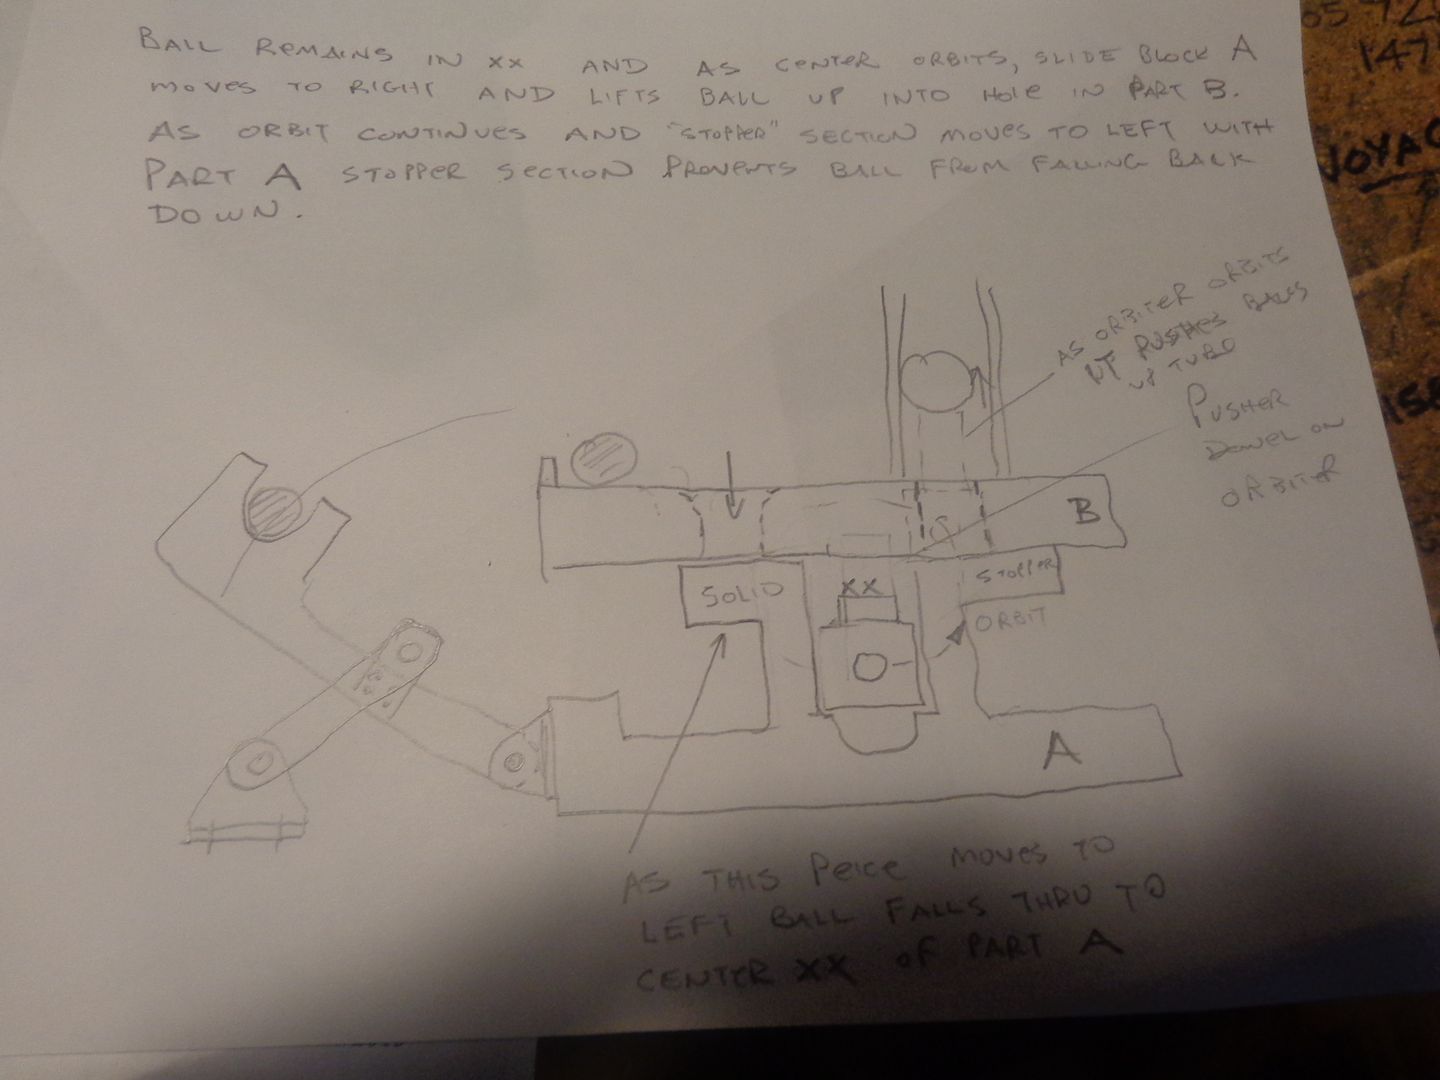
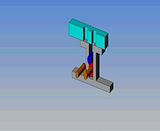
I have finally decided what I will build next. I want something new and different to run with one on my many model engines. I haven't been able to find any full sized machinery to replicate, but I have become fascinated by "marble machines" on Youtube. There are some fascinating marble lifting devices shown there. Of course they are mostly made of wood, and perhaps just a little crude by machinists standards, but have some brilliant thought put into the mechanisms themselves. So---Since imitation is the greatest form of flattery, I have decided to try my hand at building a marble lifting automation machine in metal. Of course, one of the first things I have to do is to figure out just HOW some of these things actually work.--So--It begins with some "Crap-o-cad" sketches to first get a handle on the idea---
 
Having roughed out an idea, after watching a Youtube video twenty times to see what is actually happening, and making a preliminary sketch, I then move to Solidworks, where I can create it in 3D to some kind of "scale", and see how the parts would go together, and what sizes of material I would use to make the components.
 
Of course it helps a great deal to then be able to animate things and see if they are going to behave in the way that I anticipated. The dark blue "marble" is shown in all of the different motions---In reality it would enter from the top left hole, be transported down and around the sliding red block cavity, ad then be shoved up through a second hole in the overhead blue part and into a clear glass vertical tube and be accumulated there, prevented from falling back down the tube by the grey sliding component. At this stage of the game, I don't have to make the animation any clearer than it is.--This is not nearly so much about a flawless animation as it is about getting all of the motions clear in my head.
 
There!! I think I got it.--My goodness, there is an amazing amount of inter-related geometry to get everything doing what it's supposed to!!!
 
The next step is to convert everything into plate and angle sizes that are readily available and add appropriate threaded holes and counterbores. There is still a bit more work before I am ready to pull detail drawings from it. That crank with the green handle, is going to become a 1/2" shaft supported in some form of bearing with a 5" diameter pulley on it, that can be driven by an o-ring drive belt from one of my engines.
 
These devices are very interesting, as they harken to the mechanical automation of the first half of the twentieth century, prior to PLC's and electronic controls. I have worked on hundreds of automated machines as part of what I do professionally, but I've had very little to do with this type of automation. I would like to build this machine in "modules" that are essentially a stand alone piece of machinery that can operate totally on its own (driven by some form of engine of course), but can also be expanded into part of a greater complex of machines. The problem seems to be that you mustn't "paint yourself into a corner" drive-wise. Whatever type of motive force operates the first machine must be of some type that can be "extended" to drive the other machines in the complex. Although it would be possible to use a "line shaft" to operate individual machines, this type of machinery generally didn't. Machine A fed power on to machine B which in turn fed power on to machine C and so on--. The other plus is that instead of having to build a very complex 500 hour machine, it can be built in much smaller segments as in blocks of "50 hour" machines that still can be operated on their own.
 
I have an absolutely amazing collection of ,umm, errr, well I guess you'd call it junk!!! I always buy a bit more material than I need whenever I get involved in a project. After five years, and countless projects, its time to start cleaning out my stockpile. Its all short ends, offcuts, bits and pieces, but I just hate to throw any of it away. Perhaps this project will let me get rid of some stuff instead of adding to it.
 
Sometimes you eat the bear--Sometimes the bear eats you!!! I was feeling very proud of myself for just finishing the first two pieces of the marble machine. Then I noticed that the drawing called for 3/16" reamed holes and I had put in 1/4" reamed holes.:eek::eek: Well POOP!! Nah, its okay--I'm the designer. I can get away with that. I'll just make the mating part 1/4" diameter.:D:D
 
I think I'll go here next. I'm not sure about the snap ring groove size. I'll have to buy some snap rings and check it.
 
You can google charts that will give you all the required sizes for snap rings to fit on the shaft.

Paul.
 
Swifty--I've got burned on that before. The snap rings they stock at my local "nuts and bolts" store don't always match whats in the charts. I find it much safer to have the snap rings in my hands before I cut the grooves for them.
 
Very cool Brian...I eat this Kinematic stuff right up.

Looking forward to seeing this through.
 
I will be watching this as well. I feel another Rupnow Wonder in the air. Methinks I need to work faster on my projects!

Cheers,

Tom
 
I will be watching this as well. I feel another Rupnow Wonder in the air. Methinks I need to work faster on my projects!

Cheers,

Tom
Are you home from your holiday already? Hope you had a good time. I need someone else to start posting a "Rupnow Engine" build.---Many of the people who first stepped up to build one have kind of faded away!!!
 
Hi Brian,

Yup, time goes by way too fast when one is having fun! I got home last night.

I am going this week I hope to get some of the material I need. I want to do the air cooled version, but so far I can't find a supplier for cast iron for the head.

I need to tweak my machinery a tad and hopefully I will be at it next week. It will be a slow build though as I have no idea what I am doing.

Cheers,

Tom
 
Every day--a little bit. Not too much tonight. After 9 hours on the computer designing a new machine for a customer I don't have much energy left. I whittled out 2 links and found some 1/4" cold rolled. I'm too tired to start grinding a cutting tool for e-clip grooves, so I'll leave that for tomorrow night.
 

Latest posts

Back
Top