Ignore this topic

Home Model Engine Machinist Forum

Help Support Home Model Engine Machinist Forum:

This site may earn a commission from merchant affiliate links, including eBay, Amazon, and others.
Status
Not open for further replies.
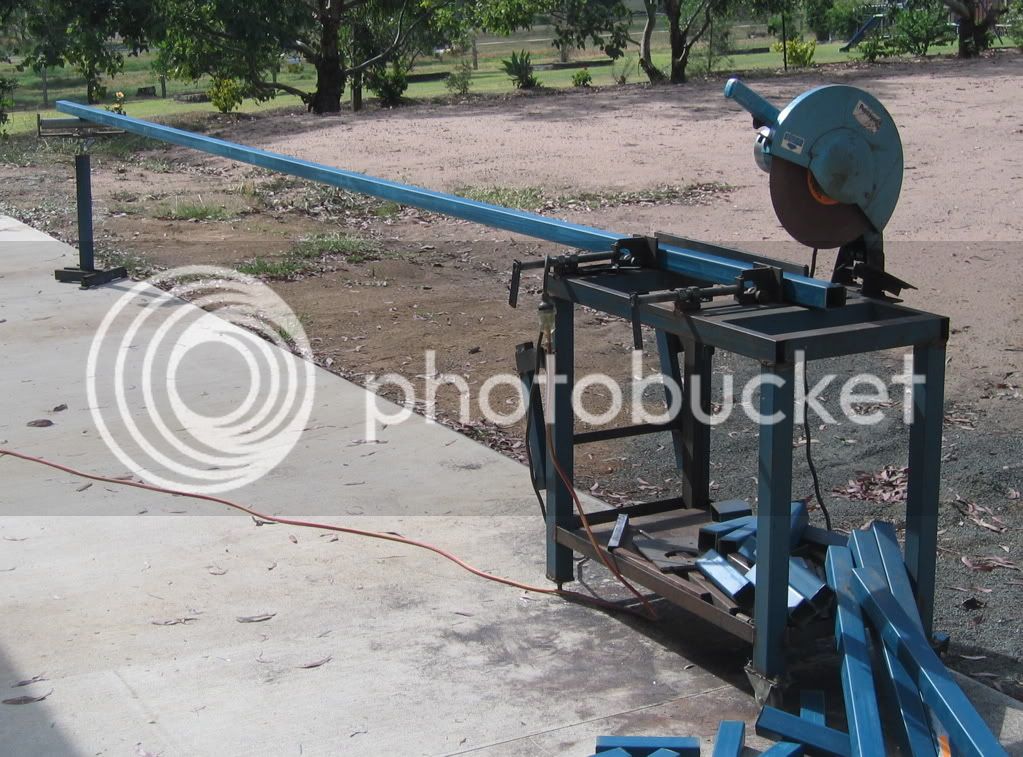
This was a standard 14" abrasive cut off saw, originally mounted on a small pressed metal base. A few years ago I got tired of kneeling on the floor to cut up RHS, so I dispensed with the pressed metal base and made up this trolley for the saw.

There is a drop down handle at the left hand end so I can wheel the trolley around wheelbarrow fashion.

While I was at it I made the back guide about 2' long and fitted 2 screw clamps, this helps keep long lengths of material square to the saw. Plus a tray underneath to hold small offcuts

Dropsawphoto.jpg
 
Guys I pruned this off the challenge thread. I think this is a great discussion but it was not part of the challenge thread.
1)I think this is a great Idea but i do see some things to overcome.
2)Someone would need to coordinate and work out the logistics.
3)Work would have to be decided as fairly as possible so one person is not contributing a huge amount of time or material.
4)In the spirit of the board it should be an engine NOT a tool.
5) Built should be from bar stock.
6)Size should be such that the guys with small machines such as the 7x10 lathe and the companion mini mill are included.
7) a time frame deadline to finish parts must be included.
8) The complexity of the engine may be determined by the size of the team.
Tin

So as to not let this idea die on the vine

a) do we have a volunteer or nomination for Team Captain/ coordinator
b) Do we have a volunteer/nomination as a second backup or assistant Coordinator
c) Who whants to be included in the team
d) lets see some suggestions for published/available blueprints of an engine to build.
Once a team and list of possibilities for the project are collected the team members can vote on the project and the team leader if needed. Also a reasonable deadline for completion can be set.
Once a team, leaders and project is selected then part /work assignments can be made.
 
Waiting in anticipation.

Another string to our bow.

John
 
What speed do you run that blade in the Taig? I've got one in the parts box all waiting for me to make an arbor.
 
Shred

I've been running at 880 rpm, it probably would do OK one range higher, I just haven't had the nerve to try yet! In both ali and brass, I've found that it runs a little quieter and leaves a smoother finish if I squirt on a bit of WD 40, the downside to this is that I have a couple of shirts with nice horizontal oil level indicators ;D

Joe
 
hi Bernd

It's 85mm / 24 tooth (just a bit over 3.25"). Picked it up at the local Canadian Tire for somewhere around $10 (don't recall exactly). Turned a boss on a blank arbour to a tight fit in the hole in the blade and that was that. Someday I might do the math to figure out the speed of a tooth at that dia at rpm "X" = what cutting speed, at the moment just going by what seems comfortable.

Joe
 
Powder keg said:
Here I'll Document the pillars that I'm building for the team build.

Tomorrow I'll heat treat the end and grind the relief n the top of it.Wes

How will you grind relief in the top without destroying the beautiful form shape ?
 
Go Wes!

Best,

BW

PS I'm a bit slow, just noticed the little saying in your signature. Almost sprayed my big monitor with Starbucks! LOL
 
Joe, that's a wicked looking saw blade in that mill!

I love the idea of being able to cut so close and save on the milling time. I may have to be on the lookout for one. I like the diameter too. I have a bunch of slitting/slotting blades I got off eBay that I use, but they're small diameter. Maybe 3" diameter on the biggest. The hub hangs down so that if you're cutting very far the hub hits too soon. This blade would cure that problem.

Thanks for sharing it!

Best,

BW
 
Hey Gang, I managed to get a little more done today. I heated the end of the tool steel blank up red hot and held it for a min or so. Then I quenched it in oil. This made a black finish on the tool. I took some emery paper and shined the end up a bit and very slowly warmed the end up till it started to turn straw color. Then I quenched it again. After that I set it at about 4 degrees in a vice on a surface grinder and just cleaned up the top. I only went back about 3/16 of an inch because that is all that was needed. Here is a picture of the result. You can still see the straw color on the top.
CIMG0217.jpg


If any need further description please ask:eek:)

Have a great day, Wes
 
Your off to a great start Joe. Keep up the great work! I like the saw idea. I might have to try that someday.

Wes
 
One thing I've learned with this: it lets you know RIGHT AWAY if you're out of tram ;D

Joe
 
Started on the second tool. I have it turned down. My tool was a bit dull, but a quick hit with a file and some emery polished right up. Here is a picture of it before I cut it off with my band saw.

CIMG0213.jpg


I'll bore it tomorrow. Can you guess what It is going to be?

Wes
 
That is one hungry looking cutter Joe.

Be SAFE!

Rick


wonderful job there wes.

suspect the new tool will be a plunge cut ball form tool

john
 
Status
Not open for further replies.

Latest posts

Back
Top