How to get a high finish

Home Model Engine Machinist Forum

Help Support Home Model Engine Machinist Forum:

This site may earn a commission from merchant affiliate links, including eBay, Amazon, and others.

eskimobob

Well-Known Member
Joined
Aug 12, 2009
Messages
100
Reaction score
0
I've been reading through a thread by Cedge on the building of his Philp Duclos "Victorian" IC engine Project. It is beautifully finished and has left me stunned :eek:

How do you go about getting a finish like this:
contour-rear.jpg


Hats off to Cedge :bow: :bow: :bow:
 
Looks like lots of WORK. I'm pretty sure I'm correct on this. Every pretty thing I've ever made was made beautiful by tons and tons of extra work.

Of course if I'm wrong I do hope somebody will let me in on the secret ;D The price of elbow grease is getting prohibitive for me. 8)


Secretly hoping it is all done with mirrors,
Kermit
 
I saw a topic on this on another forum and it confirmed what Kermit has just said. A great deal of elbow grease, several different grades of emery cloth / wet and dry then steel wool or whatever to remove all machining marks, using sticks and rubbing against flat surfaces etc. then polishing. Sounds a nightmare to me, I'm just not patient enough! Of course if you can get a good surface finish from your machine it will save on some elbow grease but I know people work hard getting rid of all machining marks before polish goes anywhere near it.

Nick

ps might try it on my next engine project!
 
Not unlike a custom hot rod. 3 grits of wet/dry to make it smooth (400, 800 and 1500) and then 3 polishing compounds on a buffer, each with their own wheel to make it shine. I use a small flat piece of wood with the wet/dry wrapped around it and work it alternately at right angles to prevent grooves and valleys. I prefer to do that under running water to keep the paper clean and avoid a build up that might cause a gouge. Curves require a lot of hand work.

Mostly just lots and lots of time and effort.
 
I agree 85vette, start with a grit that will knock down the high spots, then start progressing to finer grit.
I use 3M, they make a polish and a compound for anything.
I bought a 76 L48 vette when I was 20, I had to restore a lot of it, I did a lot of polishing, wet sanding and clearcoat polishing.
I found out after getting married you can only have one love in your life (I'm still married)
sorry that's a bit off subject, aluminum polishes great everything that is stubborn I powder coat, or paint.
 
Almost forgot. On something like the item shown in the first post I use my Dremel with small cylindrical and cone shaped buffers with the same compounds I use on my bigger wheels on the bench grinder. Works great in the curvy areas that are too small for fingers.
 
I don't have a buffer but I did try a dremmel on one of my engines. However, I don't think I worked hard enough getting the machining marks out first.

Is it possible to fit a buffing wheel to bench grinder? I never really used the coarse wheel on the grinder so could fit buffer wheel to that end if it's possible. Where would I get the right buffer wheels?

Nick
 
Harbor Fright sells the wheels, an arbor/adapter and the polishing compounds.

You need a separate wheel for each type of metal (i.e. 1 for steel, one for brass, etc.). Also, use a spiral sewn wheel for coarser polishing, and a loose wheel for final buff.
 
I know I am going to get beat up over this. :hDe: But, I have been known to mount a buffing wheel on my lathe and buff out a part there when I was in a hurry. Yes you can mount them on some bench grinders but usually not the ones with the built in guards all the way around them. Mine is totally open and the buffing wheel hangs over the side of the stand so I can manipulate the part all around it. Real buffing grinders have extra long shafts for this purpose.

You can't just start with a buffing wheel. First the work needs to be as flat and mark free as possible. Then start the buffing process.
 
Much of getting a good finish / polish is about progressing through ever finer grades of abrasive.

Start coarse even with a file to remove cutting marks, then cet finer keep working until the previous marks have dissapeared the go finer again. Ending up with some form of metal polish.

The reason behind this escapes some people and so they try to cut corners and go direct to a fine grade.

When your aiming to polish you have to remove the coarser marks, if you skip to too finer grade then all you do is polish the bottoms of the existing scratches because the grit is small enough to fit into the scratches and this makes the scratches shiny but not smooth and mirror like.

Where ever possible I prefer to rotate the work rather than hold the work against a buffing wheel as I find this keeps the shape (assuming round) better.

Although buffing wheels, as said are a great asset, they are perhaps one of the most dangerous things in a workshop - fast - unguarded - fingers and clothing and hair close to a moving wheel - and when it grabs your work it all happens too fast to do anything but close you eyes so always hold work below the centre line of the wheel so if it grabs your lump of metal gets thrown onto the floor and not at you.


Thanks guys, you're right it sounds hard work...

When using the file and then wet/dry, would you have the piece turning on the lathe to begin with and then on the bench for the finer grit or does it all have to be on the bench?

Similar sort of question with regards the buffing wheel - could you have the work turning in the latch and apply a buffing cloth instead of holding the metal against a rotating buffing wheel?
 
eskimobob said:
Similar sort of question with regards the buffing wheel - could you have the work turning in the latch and apply a buffing cloth instead of holding the metal against a rotating buffing wheel?

Never get any cloth material near a running lathe. You can rotate a work piece at low speed and use a Dremel on it. But it is hard to beat a good buffing wheel mounted on a bench or stand.

I usually use a file and emery paper on round pieces while in the lathe.
 
When I need a high polish finish on mould or form faces I tend to use Kemet type KD diamond compound/diamond paste, Its available in various grades the finest being 1micron. Its not cheap but a small amount can go a long way, as long as you take the time to get the heavy machine marks out with a fine emery and a scotch-brite pad. As for polishing in a lathe with it, my preference is to use a piece of soft wood dowel with a small piece of cotton rag looped over the end, but its down to how you feel comfortable doing it.
 
It is dead easy to get a shine on almost any material.

But unless you get the material to be polished as smooth as the finish you require, then it is waste of time doing it.

There is no easy method. EVERY tiny blemish has to be removed, flats have to be totally flat, and corners have to be sharp, just finger aching hard work that does it.

The final finish before the buffing should be smooth as silk.

The buffing should only take a couple of seconds if you have got the surface to the correct level of finish. Any longer than that, and you will be knocking off the sharp corners and buffing undulations into the surface.
In fact, a sheet of plate glass, with a sheet of newspaper on top, a spot of superfine polishing liquid, and a quickie rub over with the flat face of your part should bring up a mirror shine that you can see your face in.

Oily old rags are no use, as soon as they touch the polished part, it will be scratched, even your fingers can ruin the surface. You must use the softest material you can get hold of. I am lucky and found a paper towel range that is perfect for the job. Old, well washed soft cotton t-shirts work rather well.

Even a minute machine mark, if buffed, will produce an undulation on the surface.

For a lot of my brass flat faced work, I machine it off with a round nosed flycutter, and it comes off with a mirror like surface. But that surface, if polished directly, looks absolutely awful to the trained eye. It can take a couple of minutes to make a flat face, and maybe half an hour to prepare it for final polishing.

And I think Cedge will tell you exactly the same thing when he explains about how he gets good surface finishes.

There are no easy ways.

Blogs
 
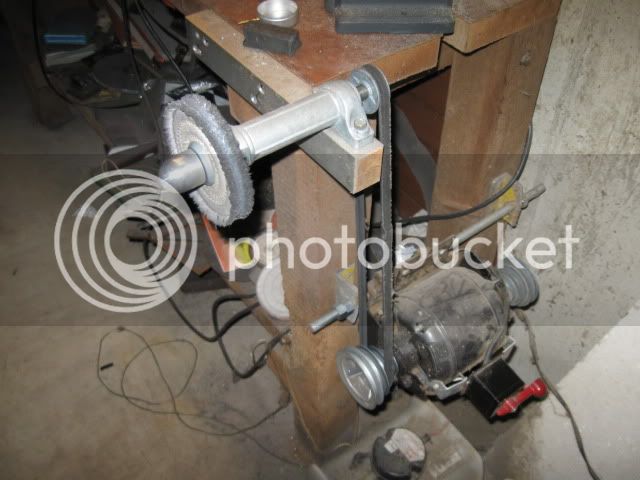
For an accessible buffing wheel I made this out of a hardware store arbor:

IMG_0593.jpg


I cut off two of the mounting ears and also made an aluminum cover like an airplane spinner to cover the nut. It's still dangerous around loose clothing, be careful.
Dave
 
Cheers for this insight guys. Think I'll still be going for the machined look then! Hardly have enough time to make the parts let alone spend twice as long blinging them! :(
 
Sorry if I state the obvious....

A lot depends on your machining finish - the smoother the finish you can accomplish while machining, the less time (and effort) it takes to bling. Finely honed cutting tools can give you a near-polished surface to start with (at least with lathe-turning).

Regards, Arnold
 

Latest posts

Back
Top