And oh yeah--I put a spacer between the outer edges of the throw sideplates opposite of the rod journal before I pressed the new crankshaft into place, so as not to collapse anything.

You are using an out of date browser. It may not display this or other websites correctly.
You should upgrade or use an alternative browser.
You should upgrade or use an alternative browser.
Heavier flywheels for the Kerzel hit and miss engine
- Thread starter Brian Rupnow
- Start date


Help Support Home Model Engine Machinist Forum:
This site may earn a commission from merchant affiliate
links, including eBay, Amazon, and others.
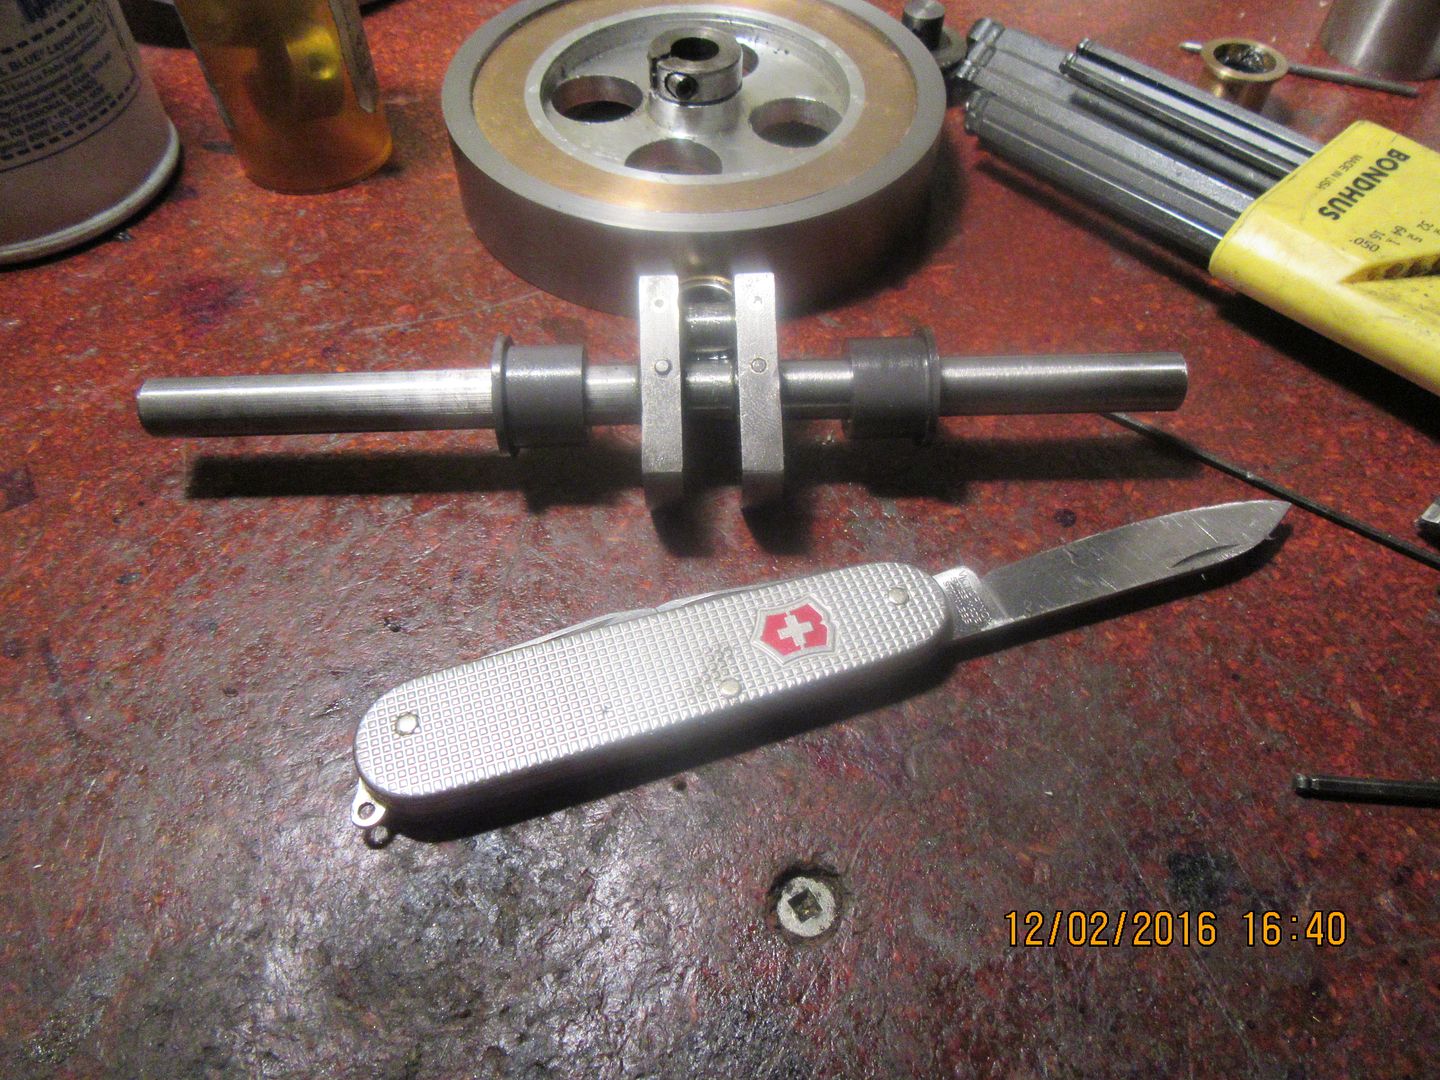
The crankshaft has been cross-drilled, reamed, and had 3/32" dowel pins Loctited into the reamed cross drilled holes. I ended up with a 1 3/4" diameter piece of super duper molybdenum nylon from my metal supplier. It was a short left over from a job they had done. I have never machined nylon before, but I had read that medium high speed and very sharp tooling was the trick. I ran it at 400 rpm and used a new hss lathe tool and it was beautiful to machine.

HELP!!!---I am getting ready to reassemble this engine, and I can not find anything in my notes, build thread, nor original David Kerzel drawings about the exhaust valve timing. I think it should begin to open at about 50 degrees before bottom dead center on the power stroke but I can't confirm that. Does anybody see or know where Kerzel gives that information.---Brian
Everything is back together again with new crankshaft and Nylatron bushings. Flywheels have gone from being rather "loosy-goosey" to "Oh my gosh, that feels snug"!--A word for any first time builders following this thread--If when you first assemble a crankshaft assembly it spins freely in the engine, odds are about 95% that after the engine has ran for half an hour, everything will be too loose. On the other hand, if everything is too stiff, then you won't be able to get the engine to run to free itself up. This is kind of a moving target, and although experience certainly is a big asset, even after 24 engines I still have to guess at it a bit.
As Robbie Burns once said "The best laid plans of mice and men, gang aft agley!!"---and mine seen to have went "agley" today. I hunted around until I confirmed that the exhaust valve on the kerzel should begin to open when the piston is 50 degrees before bottom dead center. I set the ignition timing---In fact I set it many times today. NO JOY---the engine fires like a devil, but I can't get it to keep running. I have tried all of my usual (and some rather unusual) tricks, and I do not have a runner. My wonderful new Nylatron bushings seem to have a great deal of "stiction"---resistance to free rolling of the crankshaft. I have one trick left in my arsenal of "things to try". I may just pull the sparkplug, coat everything that moves liberally with lubricating oil, mount a pulley on one end of the crankshaft and let my 1/2 horsepower electric motor drive things for a couple of hours. If that doesn't loosen up the "grabbiness" of the Nylatron bushings, then we will move on to plan "D". Plan "A" was 660 bronze bushings, which wore out very, very quickly when I first ran the engine 6 years ago. Plan "B" was to use the roller bearings, which worked, but was very noisy. Plan "C" was the Nylatron bushings which are currently installed. Plan "D" will be to pull out the Nylatron bushings and install a set of Oilite bronze bushings. I haven't changed anything on the piston nor the valves, so lack of compression is not a factor here.
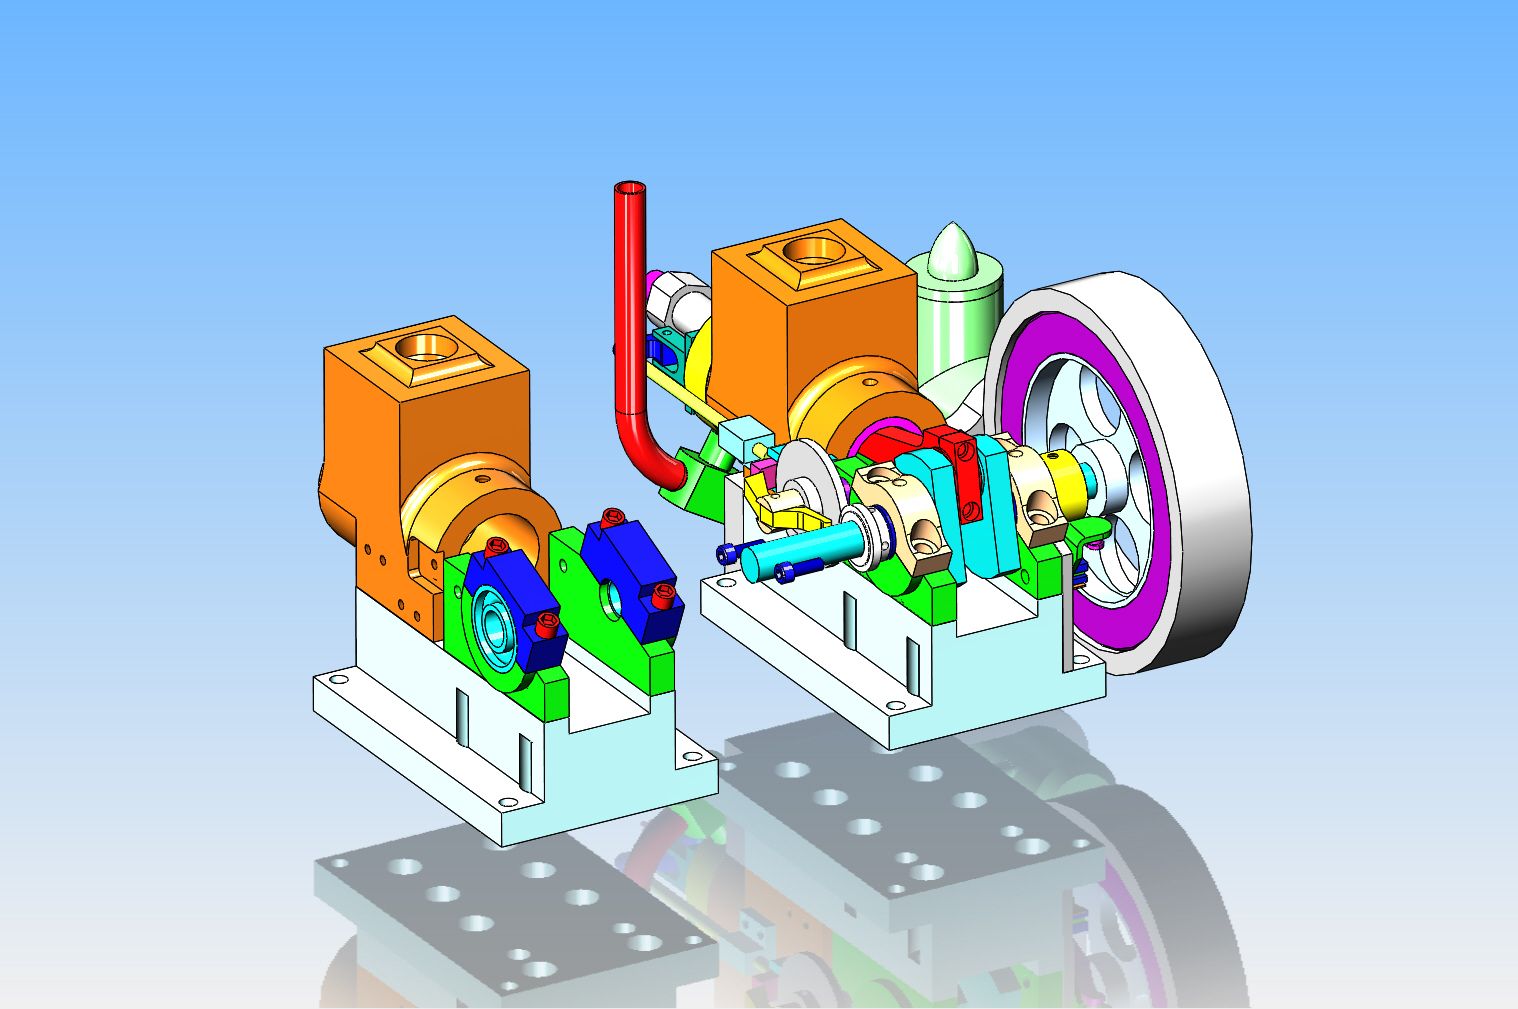
Lincoln, Lincoln, I been thinkin'-----If I take this thing apart again to change to yet another set of bushings, I think maybe I will completely forgo bushings and go straight to ball bearings. This involves making a few more parts which bolt directly to the existing base to capture the ball bearing. The ball bearing is the same one as was used in the Rupnow vertical engine, only this time I won't get sealed bearings. Sealed bearings are great if there is a lot of contamination around or if they are hard to access to lubricate. However, the seals do create a small amount of "drag" and in the case of this hit and miss engine they are quite accessible for a squirt of lubricating oil, and there is really no contamination around the bearing. I have about 500 little scraps of aluminum plate kicking around, certainly enough to make the new pieces without buying material. I'm a bit disappointed in the Nylatron bushings, but if you don't try something a bit different sometimes, then you never learn anything new. After playing with the engine for two hours to try and get it started, the Nylatron bushings had loosened up quite a bit. After setting overnight and cooling off, they are all "Grabby" once again this morning.

Oh, my poor old Kerzel. Heavier flywheels I said. Yeah----Which lead to different bushings. which lead to ball bearings instead of bushings---which lead to new bearing support side-plates and caps. And since we have everything apart, we might as well put a new Viton ring on the piston. And put the whole engine in the tank and get 6 years accumulated dirt and grease off it. The new side plates and caps are semi finished---I didn't want to put the mounting holes in the sideplates until I had taken the engine apart to confirm that I actually have the mounting holes in the base where the drawing says they are. I do!! As well as a plethora of other holes that were put in for various reasons back when I first built the engine. Fortunately, when the new ballbearing sideplates are mounted all of the "extra" holes will be covered up.----Sure am glad I enjoy this!!


jimsshop1
Steamman70
- Joined
- Nov 23, 2016
- Messages
- 117
- Reaction score
- 27
Oh, my poor old Kerzel. Heavier flywheels I said. Yeah----Which lead to different bushings. which lead to ball bearings instead of bushings---which lead to new bearing support side-plates and caps. And since we have everything apart, we might as well put a new Viton ring on the piston. And put the whole engine in the tank and get 6 years accumulated dirt and grease off it. The new side plates and caps are semi finished---I didn't want to put the mounting holes in the sideplates until I had taken the engine apart to confirm that I actually have the mounting holes in the base where the drawing says they are. I do!! As well as a plethora of other holes that were put in for various reasons back when I first built the engine. Fortunately, when the new ballbearing sideplates are mounted all of the "extra" holes will be covered up.----Sure am glad I enjoy this!!
I'm sorry Brian, I feel like I started all this
 :wall:
Jim---Never waste time being sorry for things you didn't do. If you're like most men, the time would be better spent feeling sorry for things that you DID do (Just ask Mrs. Rupnow.). I have never been totally happy with my Kerzel ever since I built it. Oh, it was a big thrill when it first ran. And an even bigger thrill when I got the hit and miss working. It's just that the hit and miss function has never worked as well as other home built hit and miss engines I have seen on the internet. This has been coming for a long time. I have known for a few years that I was going to do this when the time was right.---Brian
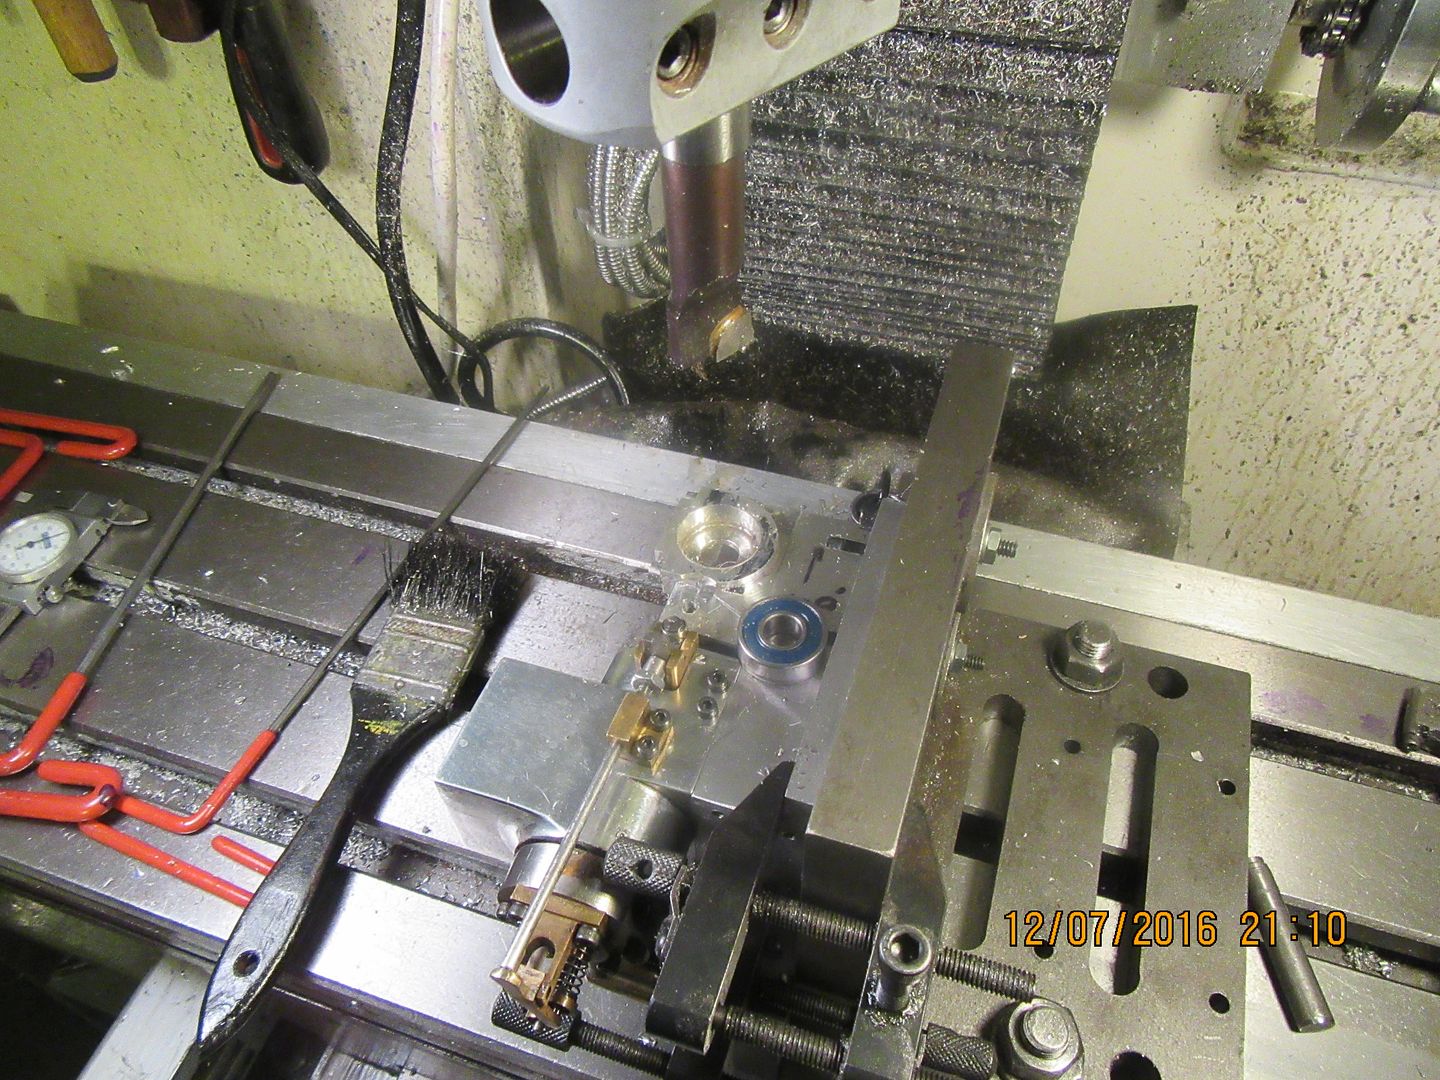
We are getting into the home stretch now. New sideplates and bearing caps have been made and installed, and in this picture I have just counterbored one sideplate for a #1606 ball bearing. The bore is finished, about .002" over so the bearing slips in easily. I now have to flip the engine over, center on the pilot hole that is reamed to 7/16" dia. and bore the other side. I made bolt on bearing caps so that I can take the caps off and lift out the entire crankshaft assembly, bearings and all without disturbing the sideplates. If the fit is good enough on the bored holes, I will lay a piece of 0.015" thick gasket material on top of the bearing and tighten down the caps to lock the outer race in place. I haven't decided yet whether to leave the seals in the bearings to retain grease, or pop the seals out, which gives a lot less friction but requires that the bearings be oiled from a squirt can.

jimsshop1
Steamman70
- Joined
- Nov 23, 2016
- Messages
- 117
- Reaction score
- 27
Nice job Brian. You will have it back together in no time! I think I may at sometime in the future replace the bronze bearings in mine with ball bearings as I have already replaced them once. Where do you get those ball bearings? BTW I finally got mine to hit- miss regularly but I'm still experimenting with spring tension on the governor weights to get the speed down.
Regards,
Jim
Regards,
Jim
I buy all of my bushings and bearings thru Canadian Bearings in Barrie. They have 1 to 2 day delivery of all the main brands. Congratulations on the hitting and missing. If you want I will post the drawings for the new sideplates and bearing caps that fit the holes in the existing base.
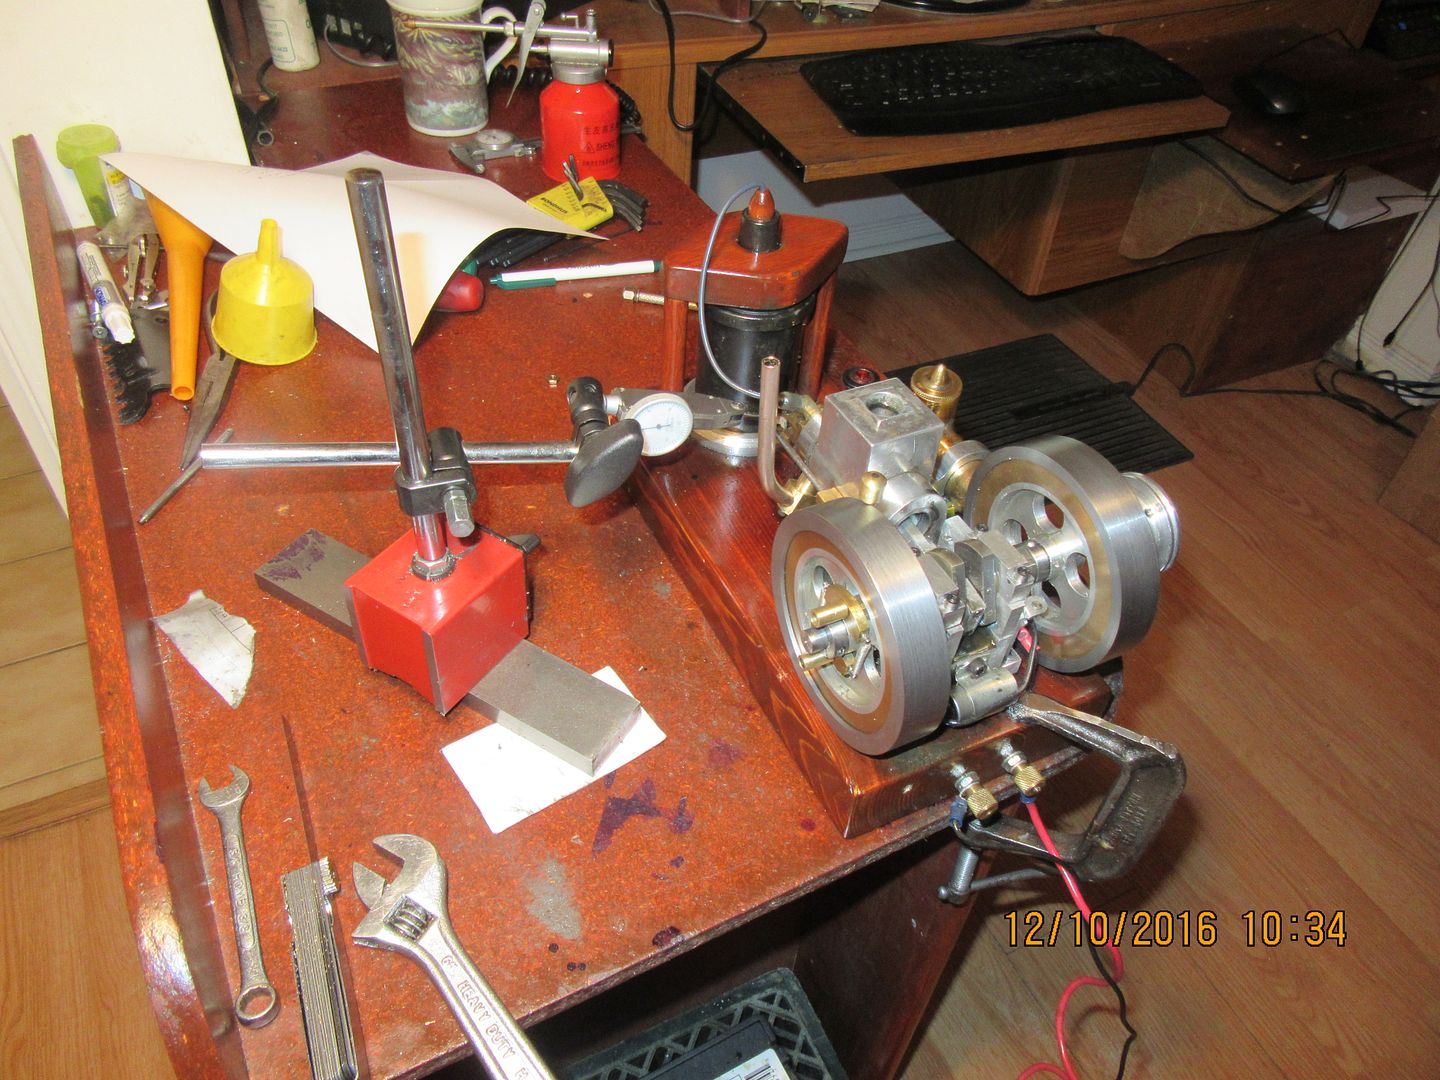
At the very last minute, I decided to pull the seals out of the bearings. There is no contamination around the engine to get into the bearings, and they are readily accessible for a few drops of oil from my squirt can. I went to Hercules O-ring this week and bought a lifetime supply of Viton O-rings for 3/4", 7/8" and 1" bore engines. I have been buying onesies and twosies for 5 years, but the last time I went over I got some flack about it. So--I bought a minimum size pack which contains 25 of each size. I put a new o-ring on the engine while I had everything apart. I have almost everything back together, and should finish re-assembly sometime this afternoon. It is hard right now to make a judgement call on how much the ball bearings have loosened things up, but I should know by the end of today.
Somehow, today I must be paying for past sins. I have everything back together, good spark, lots of gas , great compression, perfect valve timing---and I still can't get the engine to run. I haven't had to work this hard at getting an engine to run in years. We're having a blizzard outside today and it's been nice not to go out of the house. I worked all week at a factory on the other side of town designing new tooling for spin-forming lathes, so I was looking forward to getting the engine up and running today. I'm not exactly sure what I will try next, but I may put one of my other carburetors on it temporarily.
All I had to do was complain a bit on the internet--and tweak the valve timing a very little bit--and I have a runner!!! tomorrow I will see about hooking up the Kerzel lever to get some hitting and missing happening.
tomorrow I will see about hooking up the Kerzel lever to get some hitting and missing happening.Cogsy
Well-Known Member
I'm just thinking here Brian, but if the valve timing was stopping you from running, and you only tweaked it a little bit, then I'd guess there is potentially still some power to be had by fine tuning the valve timing further in the direction of your 'tweak'.
Also, I see you mentioned the exhaust valve opens 50 degrees before BDC, maybe this is a bit much for a slow running hit and miss engine? The idea is to give the cylinder pressure enough time to equalise with atmospheric pressure before the piston begins it's upstroke, so the slower the piston is moving the fewer degrees early the exhaust valve needs to be opened to get rid of the excess pressure. As long as the pressure is equalised by BDC, every extra degree you can keep the exhaust valve closed is extra power.
Also, I see you mentioned the exhaust valve opens 50 degrees before BDC, maybe this is a bit much for a slow running hit and miss engine? The idea is to give the cylinder pressure enough time to equalise with atmospheric pressure before the piston begins it's upstroke, so the slower the piston is moving the fewer degrees early the exhaust valve needs to be opened to get rid of the excess pressure. As long as the pressure is equalised by BDC, every extra degree you can keep the exhaust valve closed is extra power.
Cogsy--today I need to research this a bit more. I am having trouble finding good information on it. Last night I got out my "Shop Wisdom of Philip Duclos" and read up on his recommendation on valve timing on a hit and miss engine that he designed, and he too recommends that the valve just begins to feel the cam influence at about 1/8" before the piston reaches bottom dead center. if I can find better information somewhere, and it works for me, I will let you know. The engine is running now, but it seems rather "weak" is the best way I know how to describe it. I have a new piston ring on it, and the valves haven't been changed in any way from when I started this rodeo.
I am finding things out as I tune this hit and miss engine. I initially had the exhaust valve set to begin opening at about 50 degrees before the piston reached bottom dead center. This puts the bottom of the piston skirt about 0.145" away from the end of the cylinder. No joy----Much popping and firing along with the drill motor I use as a starter, but no way it was going to run without the drill motor. I tried various ignition timing, ranging from no advance to 15 degrees advance, and every possible needle valve setting but it wasn't going to run. I did a bunch of internet research on exhaust valve settings for hit and miss engines, but got a lot of conflicting information there, ranging from 50 degrees advance on the exhaust timing to no advance on the exhaust timing. I began to decrease the exhaust valve timing from my original 50 degrees in approximate 10 degree increments, and immediately began getting sustained runs with the engine. at 40 degrees advance, it would run, but had very little "power", just barely enough to keep it turning over. At 30 degrees advance, it ran better. I got my test indicator out and positioned it so I could tell exactly at what point the exhaust valve began to open, and decreased the valve timing advance even farther. Finally, I reached the point of no valve timing advance at all, and the engine runs quite happily there. I have found that the ignition timing seems to perform best of all when it is set to fire exactly at top dead center with no ignition timing advance at all. The engine turns very freely with the new ball bearings on the crankshaft. Somehow there has been enough changes in the dynamics of the engine that it is now running too slowly to make the governor engage the Kerzel lever and go into miss mode. I think I will have to add some more weight to the governor weights to increase the governor sensitivity and get it to hit and miss.

jimsshop1
Steamman70
- Joined
- Nov 23, 2016
- Messages
- 117
- Reaction score
- 27
Hi Brian,
I have my exhaust set to begin opening at exactly BDC and the points to open at exactly TDC and the engine runs very nice with just a couple flips of the fly wheel to get it started. I made new weaker springs out of .010 wire to get it to slow down as it was racing to fast for my liking, just the opposite of yours. I have to agree with you that the Kerzel is very cantankerous about it's settings but when you get them correct it runs like a top. Right now I am experimenting with the exhaust pipe to get a louder bark out of it and have so far been quite successful.
You will get it to run well Brian as I have seen that you never give up until something goes your way!
Have a good day,
Jim
Similar threads
- Replies
- 5
- Views
- 2K
- Replies
- 19
- Views
- 5K