Expanding Mandrel

Home Model Engine Machinist Forum

Help Support Home Model Engine Machinist Forum:

This site may earn a commission from merchant affiliate links, including eBay, Amazon, and others.

Lawijt

Well-Known Member
Joined
Dec 17, 2012
Messages
269
Reaction score
79
Hello,

Maybe it is very easy , but how do you make a " expanding mandrel".
It is maybe a good tool for working on the outside of a cilinder.

Somody can help me out please?

Barry
 
Barry--I have seen people take a piece of round stock slightly less in diameter than the diameter you want it to expand to, and drill and tap one end of it on center for a tapered thread pipe plug. Then use a very narrow slitting saw to cut thru the end of the shaft, about 2" deep on center at the same end as the tapped hole is, two places at 90 degrees. Then as the tapered pipe plug is screwed more deeply into the end of the shaft, the tapered body forces the shaft to expand. Of course you have to find a tapered pipe plug with a socket for a hex key to drive it.---Brian
 
i think the problem with the pipe tap method would be that only one side will expand, and it wont be a true cylindrical shape anymore. i think a good way could be to make a collet like thing with the slits going all the way around and alternating ends, just like a collet, so the whole thing could expand, and ream a tapered hole in it and make a tapered pin that goes in.
 
Instead of a tapered pipe plug, I just use a tapered tap on the hole then use a socket cap screw. As the cap screw hits the tapered part of the thread the mandrel will expand enough to hold the part.

We're only talking about making the mandrel just small enough to slip the part on that you want to turn concentric.

Paul.
 
you could also turn it between centers. if the hole is big enough it will usually have enough traction to not need a lathe dog.
 
Hi Lawijt,

This is the best way to make an accurate expanding mandrel.

Turn down a piece of bar with a shoulder that can sit against the front face of the chuck jaws.

Hold that piece in the chuck and then turn down the shape as shown in the picture.

Leave 0.5 mm on the front diameter and shoulder.

Drill and tap a deep hole right down into the main boss, then clean out the front end of the threads with a clearance drill.


You need a long series tap for this.

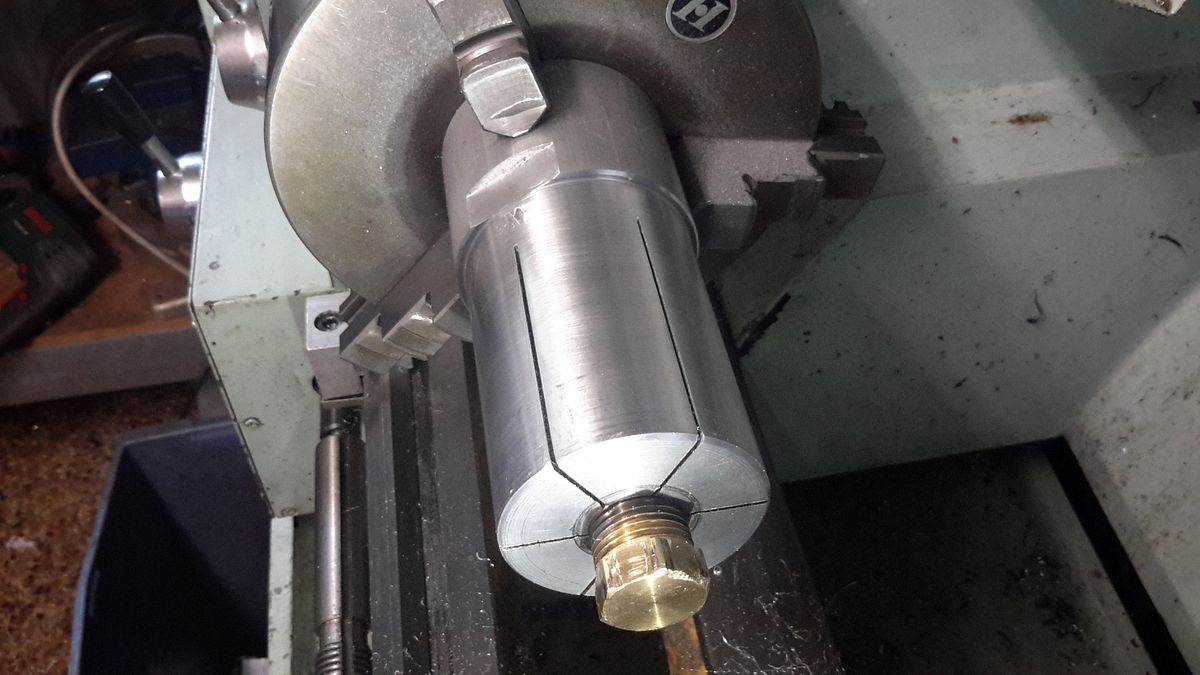
Use a large diameter slitting saw, or carefully use a hacksaw to make the six 1 mm wide slots right down to the main boss.

Turn a 15 degree taper in the front hole.

Turn a corresponding taper on the head of a standard hex bolt, M8 x 50 in this case.

Run the tap down the threads to clean out all the loose swarf.

Screw the bolt head down into the taper - light hand tight.

Finish cut the diameter you need on the front diameter and clean up the face of the shoulder.

Aluminium is good for one-offs, it grips well, steel is best for production runs.

This type of mandrel can be used over and over again.

Dave.

MANDREL 1.jpg


MANDREL 3.jpg


MANDREL 4.jpg
 
Thank you Dave. You text with the pictures are very helpfull. Also thanks to the other people.
If there are other people with idea's. Let those come. It is also very helpfull for others.

Barry
 
I have not done this but a friend made a whole set. He used BSPT tapered threads and a small brass bung (pipe fitting) for the bigger ones with 4 slots in the mandrel (I think he bought some tapered taps to cut the threads before slitting the mandrel). For the smaller ones, he turned a taper on the back surface of some hex head bolts which was a bit more acute than what you get if you just buy a countersunk screw. They worked well. For imperial ones, he cheated and bought a ready made set.

If you forget and need to cut a thread in the mandrel after you slit it, you need to install it in a tight fitting hole so it does not expand while cutting the thread. I seem to remember he learnt that the hard way...
 
Good timing, I'm in the same boat. Decided to order one of these for what I perceived was a bit of fiddly effort slitting & tapping a dedicated one-time tool. Anyone have direct experience?
http://www.kbctools.ca/products/WORK HOLDING/MACHINE ADAPTERS @@26 ARBORS/EXPANDING ARBORS/4735.aspx


Another option (more $ & specific size range). But Its expanding principle looks more like an ER collet principle, or the Backlund collet link posted = opposed slits on either side of the expanding ring portion. I would think that to be more uniform & maybe better gripping?

What I'm not sure about is how the sleeve expansion & removal occurs? Another website mentioned 'tapping' the expanding portion, like with a soft face hammer. Just by feel until its tight enough? Then what, same to remove? I would have envisioned some sort of threaded end-screw to tighten it up, but I don't really see that feature.
http://www.kbctools.ca/products/WORK HOLDING/LATHE TOOLING/LATHE MANDRELS/1046.aspx
 
I actually have several tapered arbors in my collection of old tools that vary in length, but are sized for standard imperial diameters. If you measure them the taper is roughly .004" from standard on the small end increasing towards the headstock end. You simply press the item onto the arbor and turn between centers with a lathe dog. It would be easy to make a one-off item from bar stock. The real beauty is that you can go back and forth between the lathe and milling machine without losing concentricity. I also have a small expanding arbor that spans 9/16" to 3/4" over a 6" length. It has centers drilled with a sliding collar with jaws that ride in tapered slots to hold the work (kind of like an expanding reamer). All good stuff, but you can make your own tapered shafts easily.

It's important to remember that all work force be directed towards the big end of the arbor. The taper friction drives/holds the work. Easy to forget, but the lathe dog is always on the big end for reference.

Rich
 
Thanks Blogwitch. I knew I saw a more complete (model engineering size) set somewhere & that was it. Anyone know if these same styles are available to N-Am based folks? I'm guessing they are of Asian origin just based on others I've see. Or maybe they are proprietry to ArcEuro?
 
For a once off use I just turn a piece of barstock to a tight fit and work lightly.

After machining, loosen the chuck and push the bar out with the tailstock.

If the part slips during turning add some koki marker and if that doesn't work, I locktite the part on and heat it off later.

I would only go to the trouble of an expanding mandrel for "production" work on several parts.

I'll put my hard hat on and wait for the Flak.

Regards,
Ken
 
No flak from here Ken, I had every set shown bought for me by a company that wanted me to do some rework for them, they went bump only a few months later.
The little wooden rack above the 5C collets (collets also supplied FOC).

http://i202.photobucket.com/albums/aa102/bogstandard_photos/Bogs%20pictures/Shop02.jpg

My workshop is full of stuff that they bought for me, they even gave me a donation towards a new lathe and mill, which allowed me to buy larger ones.
If the chance is there, grab it while you can.

John
 
Last edited:
Oh Man !
That's Aladin's cave - and well organised to boot - I'm green with envy.

Regards,
Ken
 
I often wonder why people don't spend a few coins more and buy old Sparey's Amateurs Lathe book as well as actually making up his many models. Again, I spent a few more coins of Tubal Cain's books( Tom Walshaw's) and George Thomas's stuff.

Some of the stuff is incredibly basic but works.
I mean what is simpler than a hacksaw, any taper tap and an allen bolt? If one follows a logical progression- that is what Sparey actually used. If it was good enough for him- unless you know better---blah, blah!

Regards

Norman
 
I mentioned the tapered pipe fitting before. Here is one I made.
20150112_065629_zpsczimub9i.jpg

I make a lot of parts that are simply a piece of thin walled 2.5 inch aluminium tube about 4 inches long. The problem has always been how to face them to make them look neat as the tube was too thin to hold in the chuck and the part was too long to hold it with the chuck outside jaws. Now its easy.

The first one of these I made out of plastic with an M10 socket head bolt tapered in the lathe but eventually the thread stripped but it proved the technique worked. We figured that the aluminium would need a lot more grunt to spread so am using a 1/2 inch BSPT bung (eg. 3/4" thread). You can see I have machined some flats so I could hold the part in the vice when tapping. Even cutting the hole oversize still required a long lever to tap the tapered thread.

If I did not have a rotary table, i would have turned a spiggot on the chuck end 1 1/8" so I could have held the part in a 5C collet in a collet block.

I am going to expand my collection of BSPT taps to a full set so I can grow my collection of expanding mandrels over time. This one is on the rather large size.
 

Latest posts

Back
Top