exp. design for a dbl. acting mini. hydraulic cylinder

Home Model Engine Machinist Forum

Help Support Home Model Engine Machinist Forum:

This site may earn a commission from merchant affiliate links, including eBay, Amazon, and others.
OK, the last part of this experimental project.

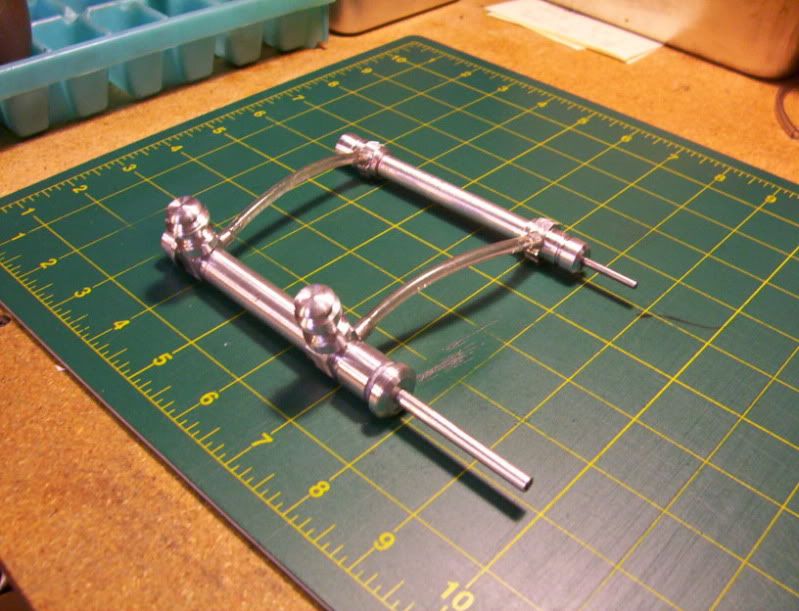
This is the oil fill reservoirs, for filling the master cylinder, on both sides of the piston.

192.jpg


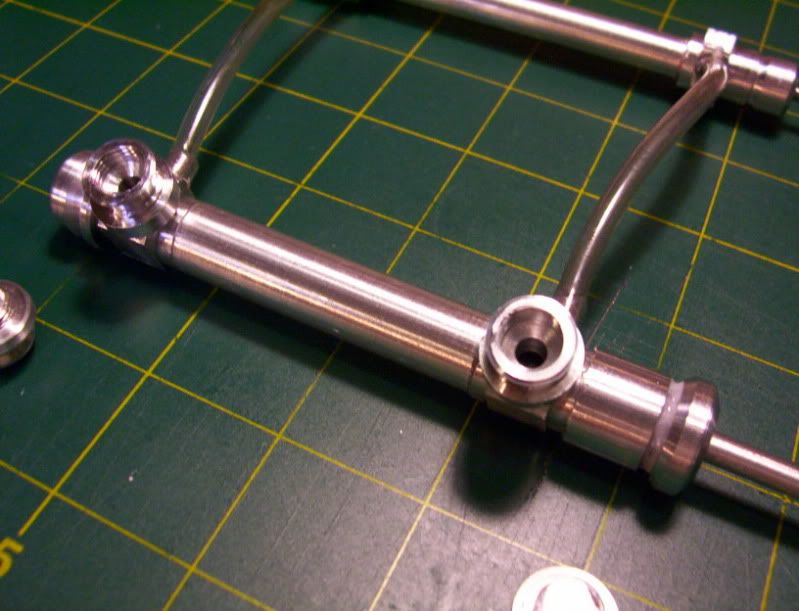
And the oil caps in place after filling.

193.jpg


Here is a quick working demonstration, using a master-slave system.

http://www.youtube.com/v/m0DMe5CLdwk?fs=1&hl=en_US

This is the last installment for this thread,
I set out to experiment in seeing if it is possible to design and build a double acting hydraulic cylinder, with minimal leaking exspecially where the piston rod exits out the cylinder.

What I've found is that a good seal can be made, making a rubber gasket, to fit tightly around the rod, and containing it using a 2 piece system consisting of a threaded gasket containing ring, and a gasket compression nut, that screws onto the ring with a thru hole to allow passage of the piston rod. Then this assembly screwed onto the top endcap.

Also I learned that making endcaps on both ends of a cylinder, is better, so as to get an accurate reamed thru hole through the cylinder, rather than a cylinder with a blind hole.
A blind hole makes it difficult to get an accurate reaming all the way to the bottom, due to chip build up during the reaming process.

Also making the hose connectors, on the endcaps seem to work real well for a good non leaking fit with the cylinder, as well as a good thread locker and some sort of sealant for all the permanently attached threaded fittings, such as endcaps, and such.

For long length piston rods, I found it's best to make the piston seperate and using drill rod for the piston rod.

As far as making the hose connector (spigot) as one piece with the cylinder or the endcap, is a sure way of keeping out all leaks, however I'm fully convinced with the proper surface area bearing points, that a seperate spigot, can be screwed into the cylinder or endcap, or any other workpiece, provided it is fastened in ,using a threadlocker, and a sealant of some sort.
Or even a gasket of some sort. But threadlocker seems to be the key ingrediant to this 2 piece spigot system.

Thankyou to everyone, who contributed ideas in making this a succesful experiment,
and thankyou to everyone who has been following this thread.

Thankyou, and God Bless...


Thanks for the journey. You have given me lots to digest and think about.
The cyls look great and work well.


Ron
 
Well Done Hobs, and a very fine thread. :bow:

SO........what are you going to do with them now?

Kel
 
kcmillin said:
Well Done Hobs, and a very fine thread. :bow:

SO........what are you going to do with them now?

Kel

Hi Kel,

Thanks, for the compliment.

My original idea was to try to model, one of those full size flight simulators, that pilots train in, I found some pictures on the innernet, that show the hydraulic cylinders, and I thought it would be a good machining challenge to make a miniature model of one, and see if I could get it to work mechanically.

I just did a google search on "toy hydraulics" and I wish I would have thought about this sooner, because there is a whole slew of you tube demonstrations that these kids use syringes, for the hydro. cylinders, and they use just the push and pull of the piston movement to carry loads, the piston of the syringes has a good seal due to the rubber piston, that the forward pressure and the backward suction is enough to draw the working pistons when loaded, so there is no need for a 2 tube system, if the piston is machined acurately.

So if I model this flight sim. hydro. system, I will use the one hose method, which will give me an oppurtunity to machine six pistons and cylinders and lap every one to a somewhat perfect seal, to achieve the ability to make my cylinders work under load, double action. That for me in itself will be a challenge.

The major challenge in this project will be to make a miniature joystick of some sort, that will work the manual pumps, in a controlled manner. If its possible,

Even though it wouldn't be much of a enthusiastical mechanical model to watch, it sure is going to be a lot of machining challenges to get it to work properly.

My enjoyment in this hobby is the designing and building process, more than the displaying of each model..... A simple looking model, but a challenge to build.

Thanks again...
 
ozzie46 said:
Thanks for the journey. You have given me lots to digest and think about.
The cyls look great and work well.


Ron

Thankyou Ron,

I appreciate the compliment.

 
love the videos, you made some very smooth cylinders :)
thank you for sharing, you have put out plenty of ideas and I think I would like to give it a try!
:)
 
Very cool. It does give one something to think about...miniature hydraulics.
I notice you have a mini-lathe like mine. Did you make any kind of adjustments to it?
 
Thanks Michael,

If you do give it a try, please keep ua up to date on your progress, it would be neat to see what kind of projects that can be done with this.

Even if hydraulics is not used, a very well fitted piston to cylinder, arrangement, would make real good projects in pneumatics as well. It wouldn't be as messy, (oil leaks).

Thanks for following aloing and posting.


Hi Carl,
I didn't need to make any adjustments to my lathe,
I got my lathe and micro mill, both around 2002, And this homeshop machining was all new to me,
And I thought it was already workable right out of the box, so I never knew anything about attempting to modify it or rebuild it, until I discovered the forums out there on the net, then I started to hear all kinds of things about these needing to be rebuilt to work accuratly.

I must have gotten one out of a good batch, or else I just adjusted to it's inherent inaccuracies without even knowing there were such a thing for this tool because I started using it literally right out of the box, I didn't know any better, at the time, I assumed these tools have to be in tip top shape for accuracies, because there machining tools. What was I to know about if a machine tool is working properly, I mean all this was totally new to me.

Even now with the knowledge of these things I still do not see any need for any major adjustments for my lathe.

Did you make a manual handle attachment for your lead screw?, I did, and it is a very convenient modification, especially when I'm setting up a distance for my cut, I lock the carriage to the lead screw, then I set up my dial indicator, and start turning the handle to advance the carriage in the thousands of an inch very precise movement rather than the abruptness of the handwheel on the carriage. and then set the carriage stop.

Do you do a lot of taper turnings? If you do , and find your having problems adjusting the compound slide to get the proper angle, or you need to use the tailstock center for longer pieces and the tailstock gets in the way, let me know and I'll post a picture of my taper attachment (homebrewed), (In the tool section of this forum.)
that could give you an idea of how to avoid these problems. This jig replaces the whole crosslide, and locks into one position on the bed, and all angle adjustments are easily done by just loosing a bolt and turning a turret to the angle needed then retightening the bolt, the tailstock can be used without it being in the way because the carriage remains in oneplace the turret moves on its own track down the length of the work.

However this is only if you do a lot of tapering, and you want a more accurate way of setting the angles.

Thanks for posting...


Nice job on your cylinders Hobby!

They work great. Lots of good ideas there.

A couple of those with your scissor lift might make a nice work stand for my bike ;D
 
Thanks KustomKB

Sort of like a team effort, you build the bikes and I'll build the scizzor jacks to display them on.... ;D

I started going over your thread AGAIN, and when I got to reply 36, you showed a video of you fabricating outer rims for the flywheel, and I seen how many parts you made thus far, and then as I watched that video, I realized I was doing it all wrong,
no wonder it took so long for me to do my projects, so I seen how you did the tailstock drilling, and I thought :noidea: ok, I'll run the drill in just as fast and see if that speeds things up for me, soooo I spun the handwheel as fast as I could, and the drill bit the work, and then bang...broken drill bit, I tried this several times, but ran out of drills. I think maybe I need stronger drill bits ;D

So then I tried to do a facing cut as fast as you did, would you know the lathe bogged down and then bang...I kept breaking my cutters. :wall:

I tried to measure as fast as you did, but I couldn't see the numbers they were like a blur going by,

I don't know, you really amazed me at the speed you work

As for me, I guess I'll go back to my old way and take hours to machine parts, yeh I know, it's a cop out,
but what da you do,,,I guess some people got it and some people don't , I guess I dont got it (the speed). :big:

Any way
thanks for the complement.
 
Thanks for the reply hobby.

I don't do very many tapers. Well none really...I think I've set the cross-slide to an angle twice...once for cutting the rims on my little loco...and one other time that I can't remember. ;D

A manual crank sounds more interesting to me than the motorized version. I know what you mean about the abruptness of turning the carriage wheel.
 

Thanks Hobby, but you know what your problem is, my alter ego is Flash Gordon. If I screw up I just spin around the world a few times really quickly and time travels backwards. Then I tell myself to watch out, say thanks, and proceed with caution.

flashmercurio.jpg


You guys mention the abruptness of turning tapers with the compound, I made a little handle, a stick with 2 holes and a handle, to extend the radius of the handwheel which I find helps give a little more control and smoothness when turning longer tapers. If you have the room to swing it. even a 1/2 inch will help.
 

Latest posts

Back
Top