Engraving without CNC

Home Model Engine Machinist Forum

Help Support Home Model Engine Machinist Forum:

This site may earn a commission from merchant affiliate links, including eBay, Amazon, and others.

kcmillin

Project of the Month Winner!!!
Project of the Month Winner
Joined
Jan 19, 2010
Messages
1,193
Reaction score
41
Recently I was approached with a request for a customized motorcycle part.

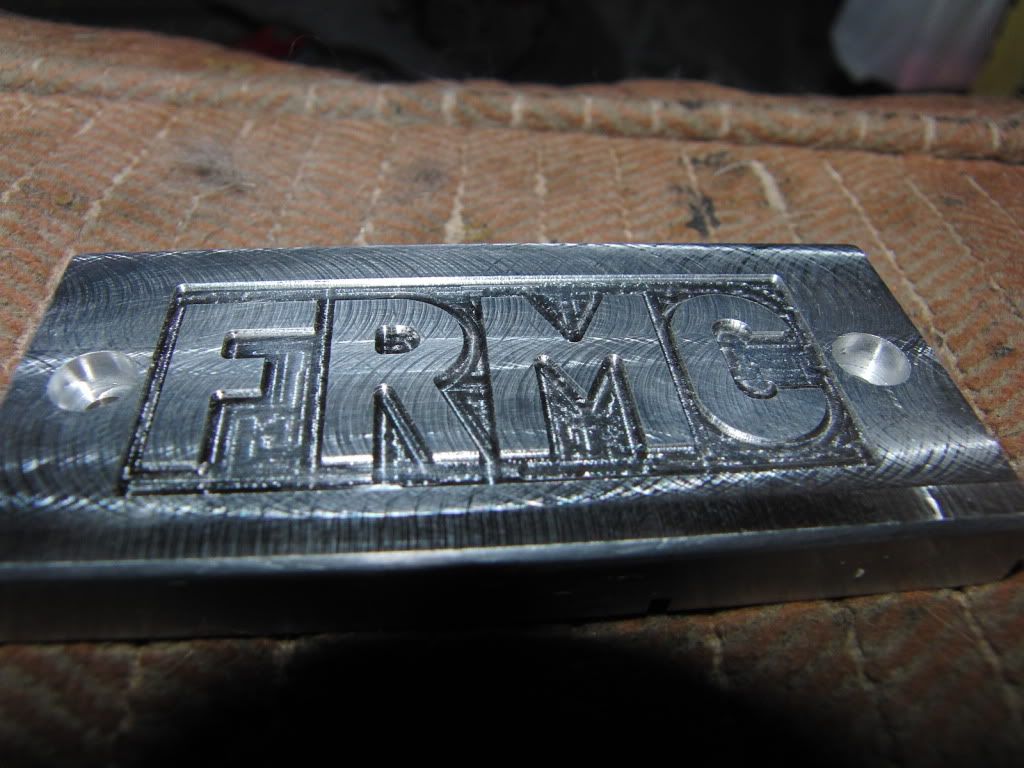
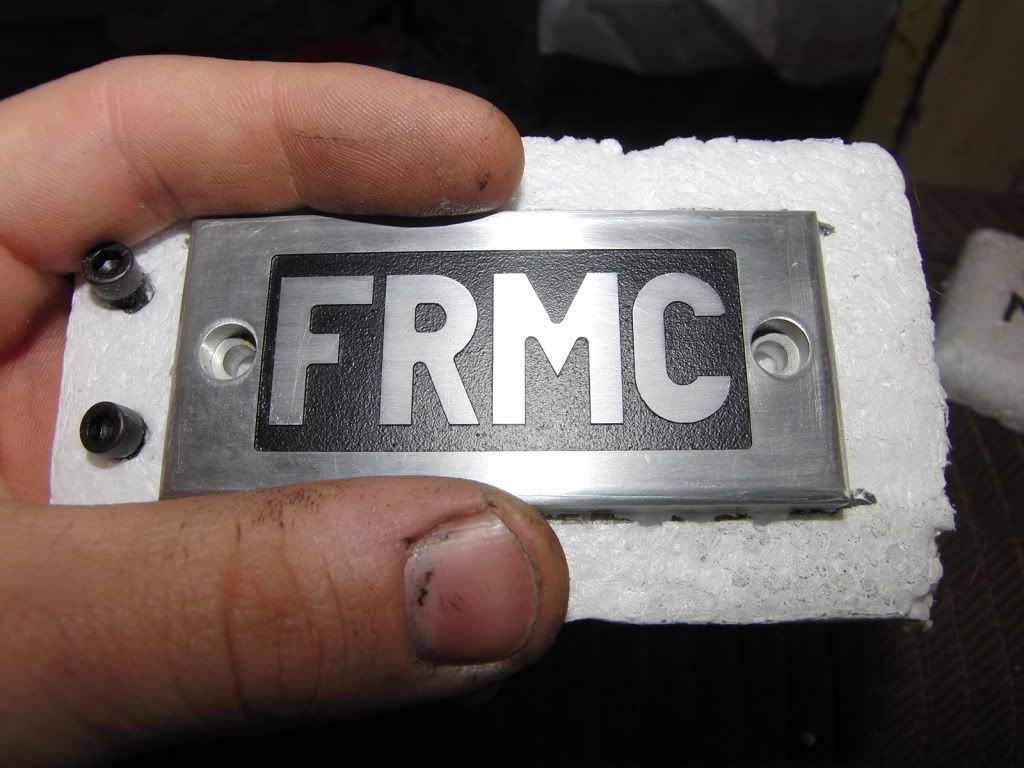
The request involve engraving letters into a brake master cylinder cover. I decided to re-make the entire part out of scrap aluminum.

Originally I told him that since I dont have CNC I would not be able to make nice letters, more like the greek alphabet. He was OK with this, but I was not.

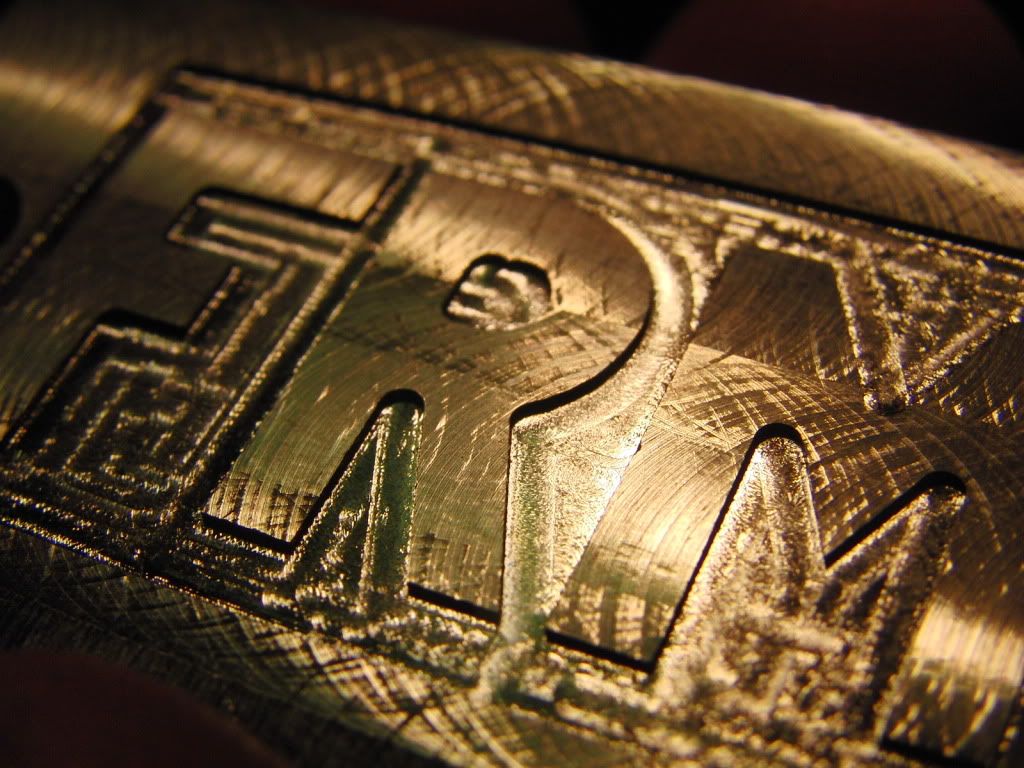
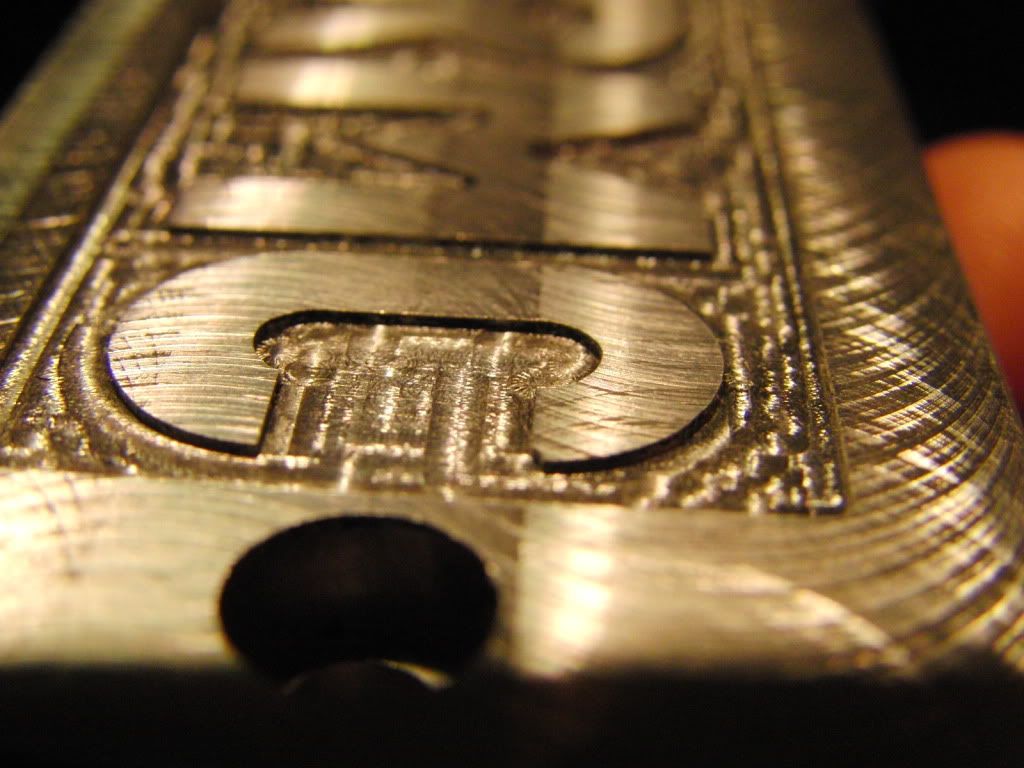
My original plan was to use the rotary table to get the rounded parts of the "R" and "C", and then angle the vice for the angles on the "R" and "M"

This would make a lengthly setup process, and the results might be less than great.

Since I had this first Idea I purchased a DRO, one that has the rounding and inclined milling features, and I used these features to get the "Angles" and "Rounds" of the letters.

Using some creativity, and drawing everything up in CAD to find tool position I came up with a decent result that I am sure he will be happy with.

I painted the milled out surface after sandblasting out the tool marks. I had tape on the raised parts. In the picture there is light scratches on the letters. This was from removing the paint, they will be sanded out once the paint cures fully.

CIMG1934.jpg


This goes to show that with some creativity and perhaps some mathematical formula, or a DRO with functions, that milling simple raised letters IS possible with manual machinery.

Kel
 
very nice!

A worthy addition to my McGyver moments collection!

tom in MA
 
Thanks for the comments guys!

I decided to Re-Do the lettering. The paint was worthless and the engraving was not very deep. After all, that is my first attempt at making letters, and It has to be good enough for me, because I am accepting money for it.

I am using a 1/16" end mill and first I went with a .005" DOC, but I decided to go deeper to make it more durable. .

I figured .015" should work better. My rule of thumb is 1/2 the diameter of the cutter is maximum DOC, however this small size I went with 1/4 the diameter, plus I am using a 4 flute. The End mill is very short and seemingly more rigid that the 2 flute I have.

Anyway, here are some pics of the "New" lettering.

CIMG1940.jpg


I have not yet finished the "Finish" I am going to powder coat it this time, then skim cut the tops of the letters to expose the aluminum and make the letters POP.

CIMG1941.jpg


CIMG1942.jpg


For those wondering the letters stand for....

"Freedom Riders Motorcycle Club"

I am hoping this will get me in the door so to speak, and perhaps lead to more sales of the "Hand Crafted" brake cylinder cover. If one person has one, then hopefully everyone els will too. (fingers crossed)

Thanks for lookin in.

Kel

 
that is gunna look great !!
Pete
 
Great work, really inspiring too.

So nice to see people doing something so complex with a DRO....and I assume a bucket load of patience.
 
Thanks Pete and Chris.

Chris, the first time I made the letters it took me 6 hours on the machine, that includes going back and forth from the computer, and writing down the current co-ordinances. The second time around I cut that time in half, about 2 and a half hours. I started to get a feel for the process, and was more confident that the result would be satisfactory.

Here is the finished part. I sandblasted the relieved area and powder coated it.

CIMG1962.jpg


I am thinking about doing a write up on this subject in the "Tips and Tricks" section. After some more practice I should be able to explain the process a little better. Right now it is even hard for me to describe it to myself, but it is in fact a real simple process, just a bit lengthly, and at times it gets a little nerve racking, like those brain fart moments when you forget which way to turn the handle and mess up the part in one foul swoop. Luckily I only had one tiny mishap, you might be able to "C" it in the pics.

Kel
 
Thanks Zee and Paul.

I am happy to announce that he was very happy with it, and has already started the "Marketing" process for me. (He sent a picture to other members of the club) So, hopefully there is some interest, I am not sure how competitive my price is with whatever other company that would make something like this (I can't think of any), but for the time involved, and the fact it is not made by a computerized machine might be worth something. This first one was sold for much less than I would do it for again, $30, and I have set a price at $80 for any more. This includes all the time measuring the original part, computer time to model it up, machine time, and of course all the time spent sanding, buffing and powder coating. I hope that number is not too high, or insulting. I would love some feedback on that.

This is a beginning of a dream for me. Since I was a kid I always enjoyed making things, doesn't matter what, anything from cookies to a homemade record recorder. (Thats right, in all of about fifteen minutes I turned a CD into a record by using a big paper cone and a needle) anyway, my point is I always enjoy making things, and not only working with my hands, but with my brain too. I am sure most of us in the model engineering world are much the same. That is what allures us to building engines, not because we want an engine, but because we want to make an engine. Most people would file what we do in the "Can't be done" category.


Kel
 
Quote the price per letter, e.g.,

First letter (and included surround) = $50
Each additional letter add $20

That will make your advertised prices sound less. (And it better reflects the cost reality.)

Since it's for motorcycle yahoos, be sure to mention that it's made from "billet" material. They eat that up.

I would charge at least $100 for the one you've shown in your pictures. Bling, especially motorcycle bling, shouldn't be inexpensive. Affordability dulls the blinginess of the object. :)
 
Thanks Marv, that is a good idea. I also like the "Billet" idea, just a fancy word for a chunk of aluminum, but some people cling to stuff like that. Thanks.

I have already set the price, but I am glad to know its not too high. I understand that my charge fee should reflect the quality, if I were to do it for cheaper, and still make it profitable, the quality would have to suffer, and then business would suffer as a result. So I am confident that most people know you get what you pay for, especially when it comes custom shops. I am just hoping to let my work speak for itself.

Kel

 
I'm with Marv looks like a $100 bucks to me. (at least)
And I have seen the billet work a lot for specialty items.
Nice job Kel!
 
Hey Kel,

It turned out pretty sweet! Like Marv said, a price per letter will make a good marketing approach. I keep a local Craigslist ad running, it looks like this;

Do you have a prototype that needs to be made a reality, need an obsolete part or a specialized tool? Do you want a one of a kind custom part for your motorcycle, hot rod or boat?

Skilled Machinist with own equipment is available to design, mill, turn, weld, fabricate just about anything.

I can also program your CNC or make a run of parts for you. Let me know what you have in mind.

$30.00/hr.

If you get the go ahead from the club. Use the machining co-ordinates that you have already worked out. Then add your bushing diameter offset and make a router template. Wood and aluminum have the same cutting speed when using carbide. so you could machine the components, drop on your template, then quickly rout in the logo. Just a thought.

All the best,
 
With a couple of steppers, you could rig up a quick small X,Y table to bolt on the mill. (semi-automatic) CNC. Even if the travel would be small, the rest could be done with the aid of the DRO and table ;)
 
Thanks Guys.

Kevin, I like your router Idea. I have done this with wood a long time ago, but those letters were recessed into the wood. How would I make a template for raised letters? Currently my brain is telling me that it would take multiple templates, and even then I am not sure. The space between the letters is the same size as the end mill, so a bushing would make it even bigger.

When I setup the DRO to mill the rounded parts of the R and C, I used a max cut parameter of .010. This made 42 way points for 1/4 of a circle with a .225" radius. Once I was done I checked the part with a 60X jewelers magnifying glass, I could barely make out the jaggedness. I was moving both handles at a time, as to create a more smooth surface. I am going to try to increase the max cut, this will decrease the amount time spent pushing buttons, I wish I had a foot switch option on my DRO. If I can get the time down to an hour and a half I would be happy.

I have been dreaming of owning a CNC machine for quite some time. I am hoping this adventure will create some investment capitol, in which I can put towards CNC. I like the idea of a dedicated x-y table for CNC, but I am really more interested in a turn key unit, like the ones on the LMS web site. I still find making a CNC machine to be a little intimidating, with all that is necessary to purchase, and then make all the bracketry, plus software license and machine, It is worth it for me to spend the extra money for a ready to use unit. I still want my manual machine to be manual. So converting it is out of the question.

Kel
 
CNC is clearly the way to make these kinds of letters. I suspect it would take me less than 10 minutes to generate the code and probably only 10-15 minutes to run one in aluminum.

I like the KX1 mill from LMS. After I made the agreement to run the seminar at Cabin Fever I got looking close at the machine and wound up buying one for myself, even though I have a bigger Jet knee mill that is CNC. It is a very well built machine and runs right out of the box.

I am now working on a plan to run a class at the CNC workshop in June that would involve a group purchase of mills and conversion kits and during the week we would build and test the machines. We are planning on just 10 slots in the class. Details are still open, but it might be a way to spend 4 day, get a CNC machine and attend many other seminars on CNC. I will post details here when they are developed.
 
Kel,

If you can't see the scallops under 60X magnification, I'd say you're using too fine a step size. 90/42 = 2.14 deg. Open it up to five deg and your step count will be reduced to 90/5 = 18.

BTW, good onya for demonstrating that one doesn't need a CNC setup to do a one/few-off job(s).
 

Latest posts

Back
Top