Elmer's Tiny in 1/4 scale.

Home Model Engine Machinist Forum

Help Support Home Model Engine Machinist Forum:

This site may earn a commission from merchant affiliate links, including eBay, Amazon, and others.
This is the schematic of the planned air supply... I have to change the CAD settings (re: number of points drawn) -- see that circles are rendered as polygons... But that's fine...

wiregraph.jpg


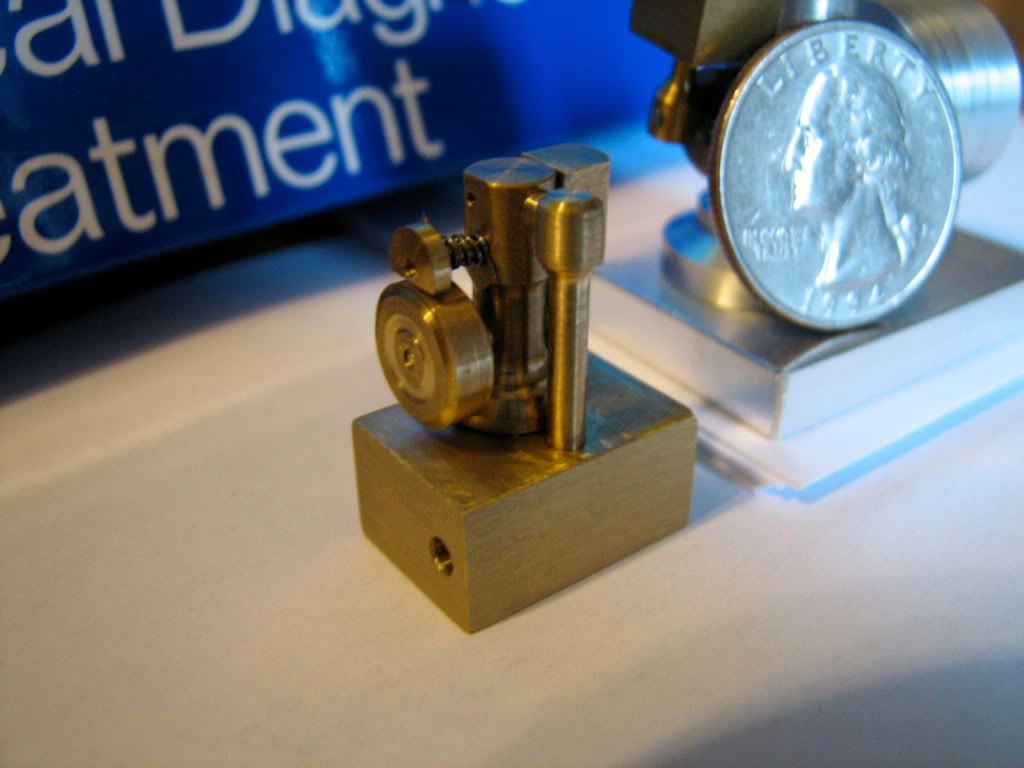
This is the 1/2 scale of the tiny where I came up with the idea... Air is pumped into the hole in the base, and then goes up in the vertical tube and then through a bridge to the inlet...

IMG_6417.jpg


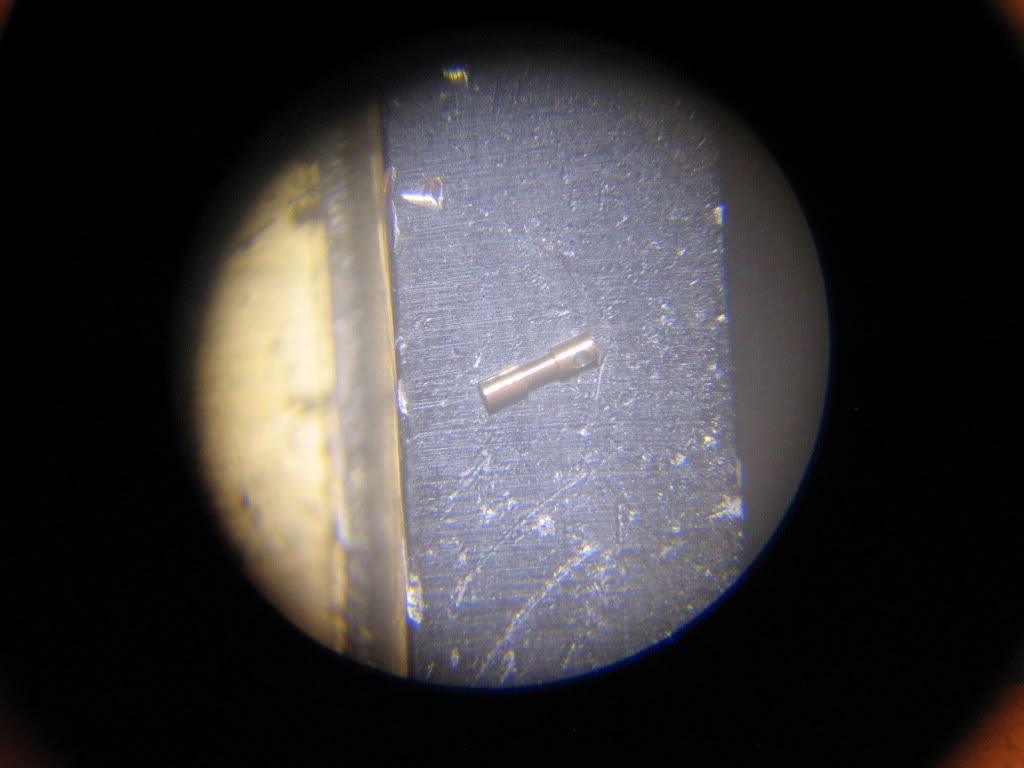
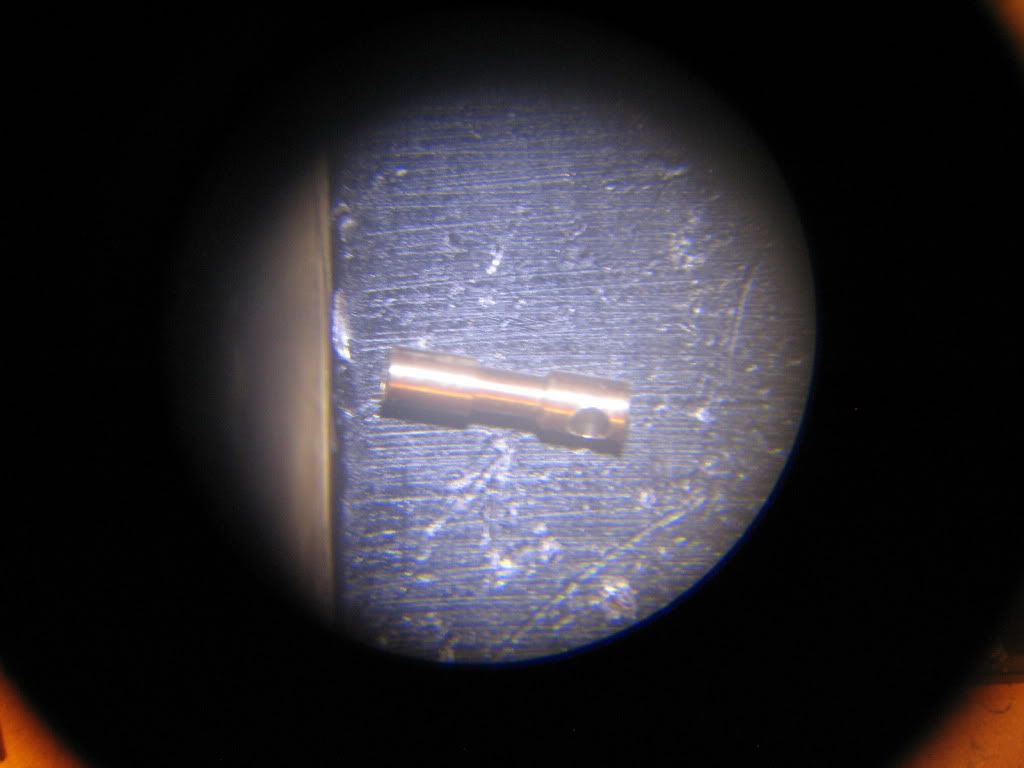
I'll try to turn the tiny metal tubes out of brass -- If I cannot I'll resort to syringes...

Now I'll admit that I did shy away from my original plan, which was to drill a hole from the base upwards, to meet the blind hole of the inlet port... In other words, 'replace' the vertical column with a hole that is in the column body a few thousands below the surface... It is theoretically possible, I can draw it, can't I? :Doh: The neat thing would be that that version would leave you scratching your head to see where the air comes from...
Oh well, we know what to do in version 2...

thanks for your pointers gents,

take care,

tom
 
Tom,

Not my own completely. I took the port and crank positions from Tubal Cain's 'Jenny Wren' and made mine around those.

This is the 'Jenny Wren', a combined boiler and engine (not mine, just one I found on Youtube). The engine part without the flywheel is about the same size as a filter tip on a cigarette.

[ame]http://www.youtube.com/watch?v=6wIpXQlH6Ek[/ame]

The whole lot was made in less than a day in the shop, winging it as I went along. The main column and engine backplate is all one piece and the circular base is in fact a 1 Euro coin, to give it a bit of value. A rather large bore of 0.125".
Apart from the air feed problem, getting a cylinder spring small enough was another. I think mine came from a stripped down disposable lighter. And yes, it runs like a Swiss watch on a couple of PSI, any more and the cylinder gets blown off the port face.

Your idea for air feeding externally is very feasible, unfortunately, it might just be me, it makes the engine look a lot larger, and really defeats the object of making it so small in the first place, other than for your satisfaction knowing you can do it.
It is an age old problem with tiny engines, getting the feed to them in some sort of scale as the engine itself.

Bogs
 
Bogs,

Thanks for the reply. I do have a question that I have not solved and your post reminded me of that.
I cannot see me making a spring this small. (We are talking about the spring that makes the cylinder stay in contact with the column... )

I saw somewhere (Dean's website? http://www.deansphotographica.com/machining/taig/soigotataig.html ) a tutorial for making springs on the lathe, but here we're talking quite small... Not sure I'm up to the task...

I managed one for the 1/2 scale, but for the 1/4 scale I was thinking of experimenting with small pieces of rubber band of various thicknesses...

Any pointers welcome...

take care

tom

ADDITION

PS. I cannot find the make-a-spring tutorial in Dean's website... So it may be somewhere else I saw it...
Your Graces will forgive me for the false pointer... but Dean's website is worth many visits... :)
 
As I said Tom, it might pay you to buy a couple of disposable lighters and strip them down. Get the ones with filler valves in the base, you should be able to get a couple for a buck. I always pick up discarded ones in the street, when the dog is taking me for a walk. There are usually a least a couple of tiny springs in them.
Springs are one of the things I do keep when stripping things down for recycling.

Or if you can find a small enough tension spring, just overstretching it will turn it into a very useable compression spring at these sorts of sizes.

You should get away with a small piece of wide elastic band with a hole thru it, then a small washer followed by two nuts. As you are only using air there are no problems with heat, but the nuts would have to be very finely tuned to ensure you don't have too much friction.


John
 
Yes Kevin this is what I had in mind.
John, I'll follow what you say.

t
 
Oh! I found the problem, Tom. You're using the link that originates from my camera repair home page,
or the one from Nick Carter's web page. That one is supposed to point to my main macining page, but for some reason it's going to a back-up page, which is slightly out of date.
Sorry!

This is the correct link to my main machining page, which contains the spring making page, too:
http://www.deansphotographica.com/machining/projects/projects.html
Glad you brought it up. I need to update the back-up page!

Dean
 
Yes you are right. I got there through the photogrphy site...

Awesome stuff I may say ... .
 
I ended up using a couple tiny o-rings as the spring on my Jenny Wren. They aren't the prettiest, but work ok. You're working another big step down the size range, so I'm not sure you can even get O-rings that tiny. Another option might be to take a slice of some springy plastic tubing and drill it cross-wise, making a double leaf-spring. Or maybe even rip apart an old relay and make a spring out of the bronze contact leaf-- that might look better on a metal model.
 
T'is the day for the piston... the diameter is 0.044". The length is 0.168". The hole for the crankpin is 0.031" and pretty well located I dare say. ::) Beefier than the exact 1/4 dimensions... But who cares... Low magnification...

IMG_7169.jpg


Higher magnification...

IMG_7171.jpg


It fits very well in the cylinder hole, with nice clearance...

take care,

tom in MA

 
Here's where we are at this point...
- one piece crankshaft out of steel (from a broken bit) is on the guy's chin
- brass piston on the back of the guy's head
- brass bearing on the neck
- assembly of steel column and brass cylinder/steel pivot pin just shy of the ponytail

IMG_7173.jpg


We still miss the flywheel and the spring-- or whatever contraption I'll use to keep the cylinder pressed on the column, as per advice received above...

take care,

tom in MA
 
Tom,

I have been thinking of your spring problem at this size, and have maybe come up with a simpler solution, requiring less parts.

If you look at the attached C-o-C, you will see you just have a stub into the pivot hole, and a tiny shim spring to hold the cylinder in place. The screw could be mounted on the back face if needed. You could fine tune by just bending the shim spring until the correct pressure is obtained.


Bogs

Alternative Spring.jpg
 
John
this is a very smart and elegant solution. Thank you, I shall definitely explore this.

tae care,

tom
 
Extraordinary Work Tom.

Them part are absolutely minuscule.

Well Done Thm:

Kel
 
Tom,

I am amazed with how you can make such tiny parts.

I would be interested in seeing the setup you use while machining.

Keep up the good work.

SAM
 
This is every bit as much a 'wow' thread as any of the larger builds here.
Excellent sub-miniature machine work, Tom!

Dean
 
Unbelievably small, nice work! :bow: Good idea with the spring Bogs.
 
thanks all for input, ideas and encouragement.
Last sunday I made a booboo while drilling the column... :wall:
I will have to repeat the part or repair... will post photos... and ask for advice...

take care,

tom
 

Latest posts

Back
Top