Cutting my first gear

Home Model Engine Machinist Forum

Help Support Home Model Engine Machinist Forum:

This site may earn a commission from merchant affiliate links, including eBay, Amazon, and others.
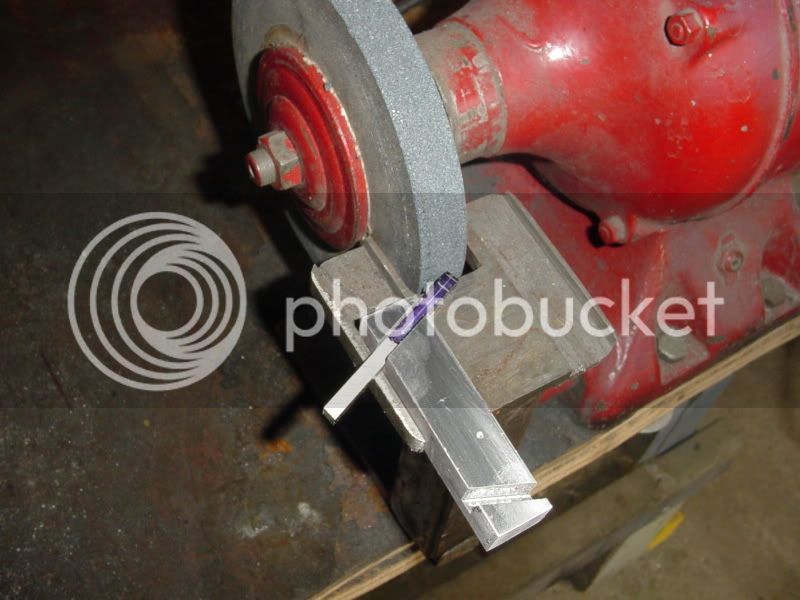
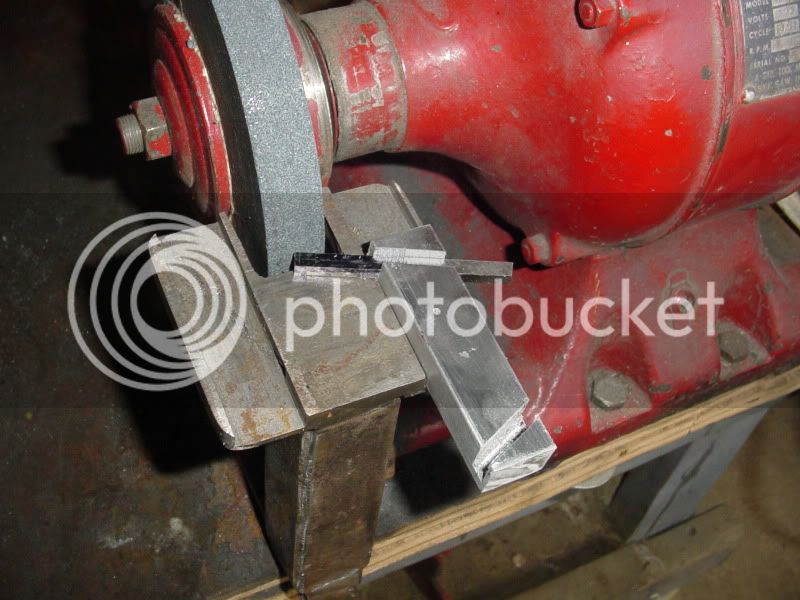
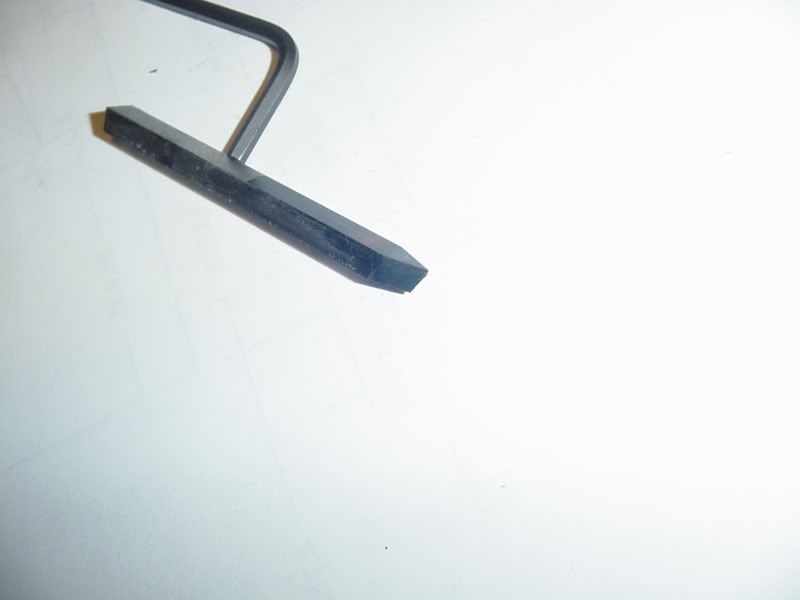
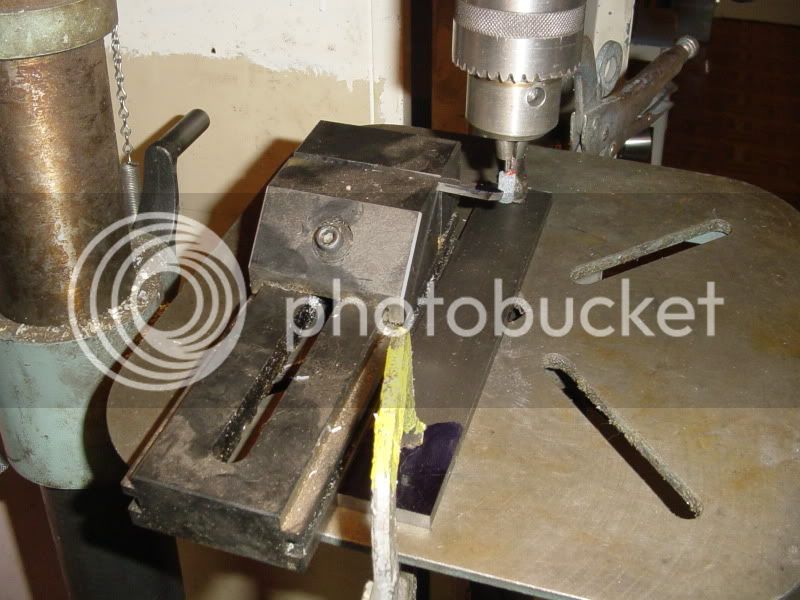
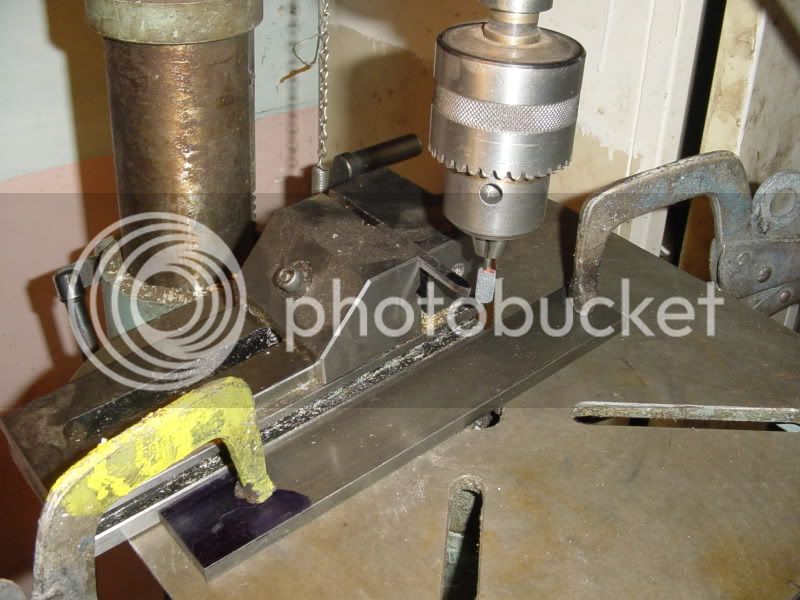
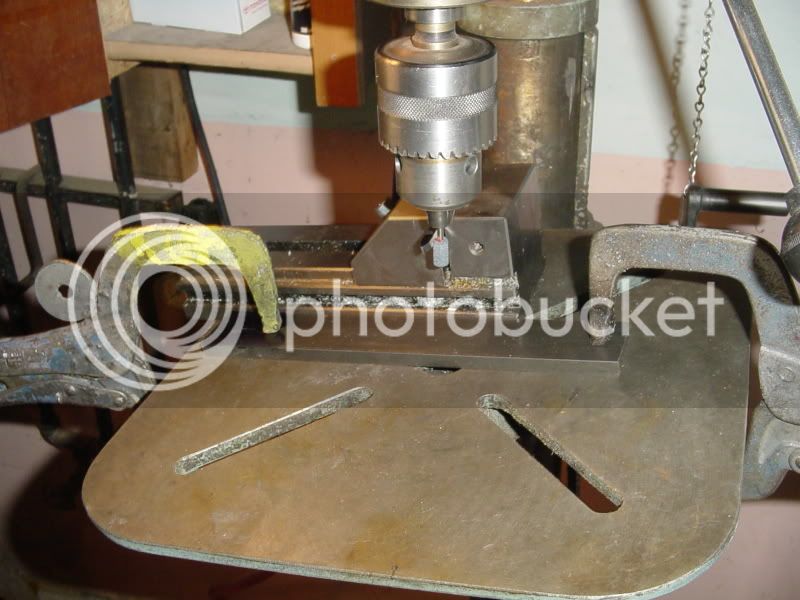
If you were wondering how I was going to cut that 22.5 degree angle, with a relief----Heck, even in case you weren't wondering--here's how I do it. The pedestal in front of my grinder is fixed at a permanent 7 degree angle. It has two 3/4" wide slots in it that are parallel to the sides of the grinding wheel. I take a piece of 3/4" square aluminum stock, set it up in my mill with my swivell based vice, and mill a slot (2 slots actually) through it 3/16" wide at 22.5 degrees. This lets me nest the HSS in the 3/16" slot in the 3/4" square bar, which in turn sets in the slots in the pedestal, and presents the HSS at a perfect angle to grind 22.5 degrees with a 7 degree relief angle. When one side is done, I flip the guide around, set it in the other slot, and grind the other side of the HSS.
grinding225degreeangle001.jpg

grinding225degreeangle002.jpg
 
Hey Brian,

From an existential point of view, what's the sound of one gear meshing?


Jerry
 
Here we are after the "first grind"---Jerry---Thats kinda like "If a gear meshes in the forest, and nobody hears it mesh"----
firstgrind001.jpg
 
Brian

That grind looks perfect.

What I was trying to say is that when you are turning up blanks for your gear, be sure you make more than one. That first gear is gonna want a mate real quick.

Jerry
 
So here we are, all set up to grind our radii. Same set-up as Captain Jerrys. only his machinery is cleaner. The drill press table is tilted 7 degrees, I was able to turn a 3/8" mounted point (grinding wheel on its own arbour) down to 0.300 using a carbide in my lathe. I have a guide bar mounted to the drill pres table with a couple of vice grip style clamps. and I will keep the cente of the grinding wheel in line with the tip of the tool . (I have ground a flat on the the tip (with 7 degree relief) as per the last drawing, but I didn't take a picture of that step.) The drawing calls for the center to be offset from the tip by 0.003", but for such a small amount of difference, I'm not going to worry.
grindingradius002.jpg

grindingradius001.jpg

grindingradius003.jpg
 
Brian,

The guide bar needs to be angled across the table and the point needs to point up the slope to get the compound relief/side clearance. If you grind the way you show it sitting, you will lose your relief angle.

Jerry
 
Jerry--I got relief the way I did it also, because the drill press table is angled at 7 degrees. When I moved the vice "up hill" the mounted point began cutting on the bottom side of the HSS first and had to cut a fairly good relief before it started to even cut the top of the HSS. as long as there is chip relief there, I don't think it matters too much if its angled back towards the rear of the cutter, or just in towards the center of the cutter. As far as the grinding itself, I think that everything was "fairly" scientific and repeatable, up untill the last stage of putting that radius in. that part is pretty Hokey---kind of a subjective thing. The blessing of course, is that even if the gear teeth I cut are a little "wonky" they should mesh well with any other gears as long as they are cut using this same cutter. And yes---I will cut a gear long enough that I can part it off into two gears to do a trial run and see if they actually mesh and run. Now I'm off to BusyBee to buy some more of that great Imported technology---I need a chuck to mount on my rotary table. Its a royal pain in the behind to have to steal the chuck off my lathe every time I want to do something on the rotary table!!!
finished001-5.jpg

finished002-3.jpg
 
Before I could go too much farther, I needed to go across town to BusyBee and buy a 3 jaw chuck to mount on my rotary table, bring it home, and make an adapter plate to mount it to my rotary table. Tomorrow I will continue the saga of cutting my first gear.---Brian
3jawchuck-2001.jpg
 
Brian, I have been following your thread on gear cutting and I can feel your excitement as you get closer to the actual cutting of the gear. I have cut many gears and believe me it is enjoyable and satisfying.

I hesitate to mention this as I do not want to get into a debate on it, but I feel you would have been better off to purchase a 4-jaw chuck instead of a 3-jaw. I feel that once you cut a successful gear, you may be making your own gears for all of your future projects. The 4-jaw chuck is less expensive than a 3-jaw and is more universal and accurate for some possible future projects.

Example: If you want to cut some more 18T 24P gears with a 1/2" bore for future engines, you can machine the blanks on the lathe and use the same old mandrel to mount the blanks on the RT. A 3-jaw chuck does not repeat close enough, (especially those Chinese chucks) Maybe I am not explaining this clear enough, but I do it quite often and it save a lot of time and material.
 
Putputman---Thanks for your input. Although I know everything you say is true, I am a total knob at setting up a 4 jaw. ;D ;D If I ever find in future that I really NEED a 4-jaw, I have a perfectly good one that came with my lathe which has never been used.---Except for one afternoon of complete frustration trying to center it----It was then returned to its box on the bottom shelf and will hopefully stay there untill I am old and dead!!!
 
Check this gear making video out.----Perfect---Have your sound on.
I just found this really neat video on "That other" website I hang out on. Its great---shows a man making a gear and using the dividing plates and sector plates. Make sure your sound is on when you watch it.
[ame]http://www.youtube.com/watch?v=VHTXaU7GZC0[/ame]
 
That cutter looks great.
Have you made the holder for the cutter?

Also, are you going to shorten the cutter? If so, how are you going to do it?

I have a pretty crude method of breaking mine, but it is very unpredictable. I put it in a vice, cover it with a cloth, and smack it with a BFH. If I dont loose it, I usually end up with something that is not very close to what I wanted. And tiny bits of HSS everywhere.

Kel
 
kcmillin said:
Also, are you going to shorten the cutter? If so, how are you going to do it?

I have a pretty crude method of breaking mine, but it is very unpredictable. I put it in a vice, cover it with a cloth, and smack it with a BFH. If I dont loose it, I usually end up with something that is not very close to what I wanted. And tiny bits of HSS everywhere.

Kel

Kel,

I cut my HSS with a 4" angle grinder and a 1 or 2mm metal cut off disk. I use the same method when making a solid boring bar from HSS, saves a hell of a lot of wear on your fingers and the bench grinder wheel.

All part of Bobs glossary of now why didn't I think of that before I'd buggered something up.

Best Regards
Bob
 
The angle grinder approach works well. If you don't have one you can do it with your bench grinder.

Using the corner of the wheel, score all four surfaces of the bit where you want the break to occur. Then mount in the vise with the score line about 1/16" above the top of the vise jaws. Cover with a disposable rag and whack with a hammer. The bit will break where it was weakened by the grinding.

Throw the rag away. It may contain minute shards of HSS that can play havoc with your hands if you inadvertently use it to wipe something.
 
I spent all morning fighting with my adapter plate which holds the new 3 jaw chuck to my rotary table. When I made that adapter plate a couple of years ago, it was to mount the chuck off my lathe to the rotary table. Of course the new chuck is smaller, had a different bolt circle and a different "register" diameter.---and I don't think things were all that concentric when I made it the first time. This afternoon, after driving all the way across town to buy a 5/8" bolt, I made a holder for my cutter. I was supposed to go to Kitchener tomorrow to measure up a machine for another design contract, but now they have called and said the machine won't be disassembled untill Monday, so I may actually get to making a gear tomorrow.---And---I cut my HSS tooling with a 3" diameter x 1/16" thick abrasive wheel in my pneumatic grinder. So anyways, here is todays progress---
cutter-holder001.jpg

cutter-holder002.jpg
 
For the benefit of future readers of this thread...

If you don't want to take the time to make a tool holder as Brian has shown, take a length of cylindrical stock of the size of the horizontal hole on your boring head and mill a groove the width of the tool bit down its length. Insert tool and use the boring head setscrews to secure the bit. As an advantage you gain the built-in ability of the boring head to make fine, precise adjustments of the bit extension.

I use this arrangement to do cut knurling on flat surfaces. Recommended.
 
Yesterday evening, I turned a blank on my lathe, with the required major diameter of the gear and two areas slightly smaller than the root diameter which would become hubs. While I had the material in the lathe, I also drilled and reamed it for a 5/16' shaft. This morning I got up early and scooted down to my little shop to set everything up.
finished003-1.jpg
 
Although Captain jerry cut his gear teeth in one pass, either he's a braver man than me, or has a sturdier machine than mine. The difference between the blank diameter and the root diameter is 3/16", meaning a full depth cut would be 0.094" in one pass. I figured my small mill would probably lay an egg if I tried to cut that all in one pass, so my first series of cuts were 0.043" deep. The machine didn't protest too much, and everything worked quite well.
finished004-1.jpg
 
After my first pass around the gear I dialed in for a full depth cut. My little machine really didn't like that--Thumpa-Thumpa-Thumpa. Damn, I hate those interupted cuts. I have no idea what kind of aluminum I made the gear blank out of, but I noticed that after going all around the gear at a full depth cut, some of the aluminum seemed to be "extruding" for lack of a better word around the crests of the teeth---you can see it in the picture. This was not a big issue, as I took it over to the lathe after it come off the mill and used high speed and a sharp HSS cutter to turn the diameter back to what it should be---and this step cleaned up the outer diameter of the gear very nicely---didn;t look so ragged then.
finished007-1.jpg
 

Latest posts

Back
Top