Cutting my first gear

Home Model Engine Machinist Forum

Help Support Home Model Engine Machinist Forum:

This site may earn a commission from merchant affiliate links, including eBay, Amazon, and others.

Brian Rupnow

Design Engineer
Project of the Month Winner
Joined
May 23, 2008
Messages
15,001
Reaction score
8,298
Location
Barrie, Ontario, Canada
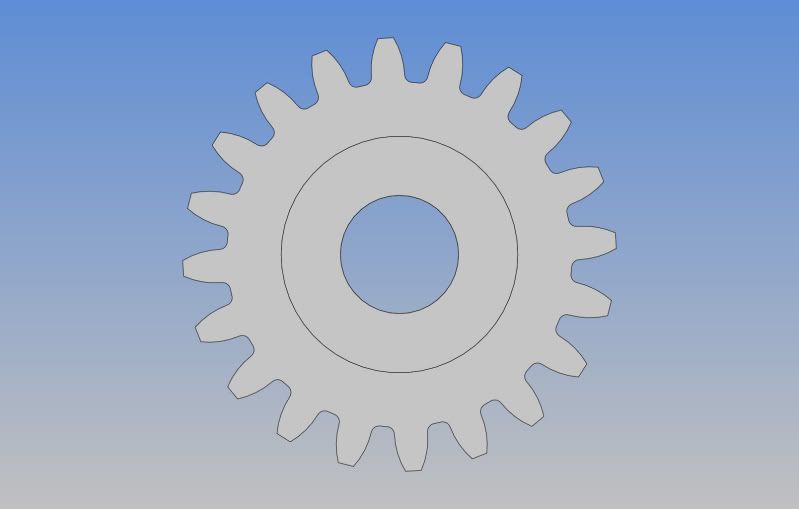
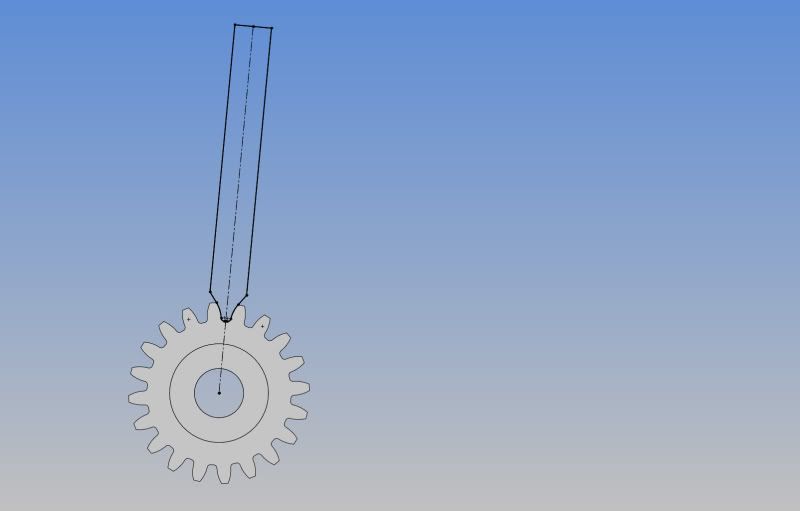
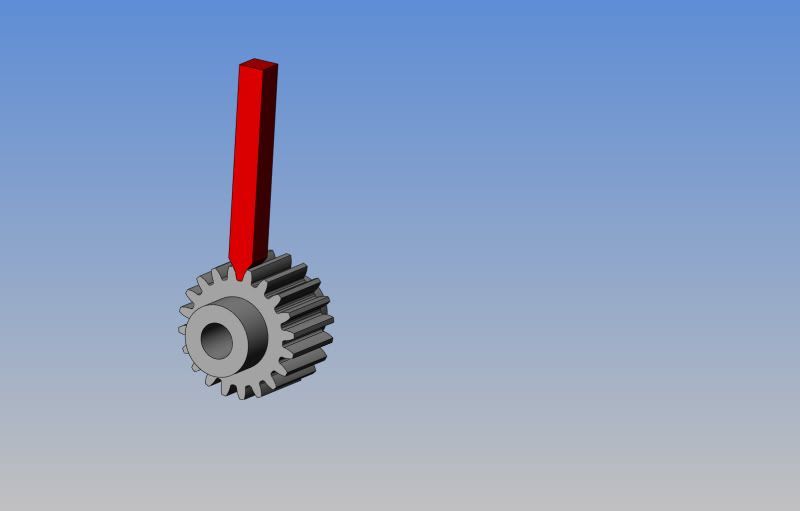
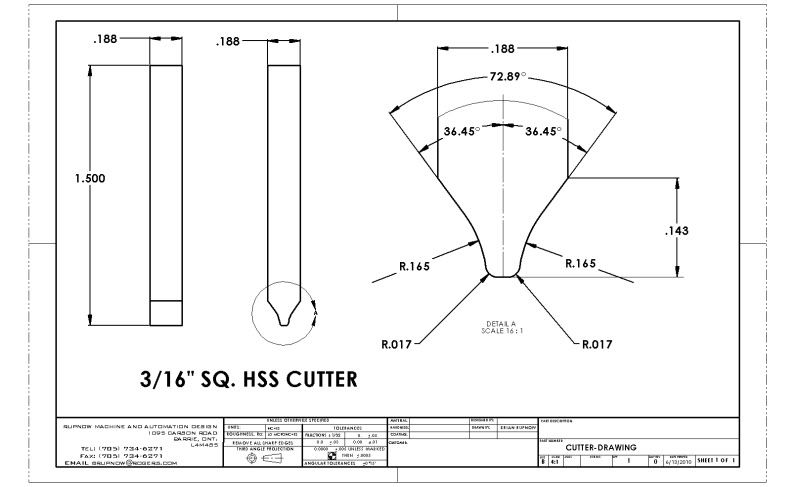
I was so inspired by Captain Jerrys post about gear cutting in his thread about the donkey engine, that I thought I might try it. I have never done this before, so it will be a total learning experience for me. Jerry refers to this excellent website in his post
http://www.rushgears.com/Tech_Tools/PartSearch5/partSearch.php?gearType=SPUR
which will let you configure the gear to what you want, and then let you download a 2D or 3D file of it to use on your computer.
 
You'll get it, no prob Brian.
Like Linda Ronstadt says;
It's so easy, so easy, so easy, so easy...
 
I went to their website, and chose a 24 pitch, 20 tooth, spur gear with a pitch diameter of 0.833 and an overall diameter of 0.917"---This was determined more from the fact that I have a scrap piece of 1" o.d. aluminum round stock than anything else. The gear downloads very nicely, and they even have an option for downloading it in solidworks
RushGears_2010_1013-2074.jpg
 
Once I had the solid model of the gear on my computer, I started a sketch on the face of the gear, and converted the lines adjacent to the gap between two teeth to "line entities" and decided that a piece of 3/16" square HSS would be large enough.
SKETCHTODEVELOPTOOTHCUTTER.jpg
 
I then extruded those line entities into the third dimension (thus 3D) and created my cutting tool 'In place".
ASSYOFGEARANDTOOTHCUTTER.jpg
 
Brian, in case you haven't come across it somewhere, there's a simple formula for finding
gear blank diameter. Take the number of teeth you need, add the number two, divide by the gear pitch. Try it with the one you just put up, and you'll see what I mean.

Dean
 
Then I pulled the newly created cutting tool onto a drawing sheet, and began to generate dimensions from the math data which is captured in the solid model when I create it.
CUTTER-DRAWING.jpg
 
At this point I have all the information I need to build a cutter which will exactly replicate the cut in a gear blank identical to the gap between the teeth in the "parent" gear. No provision made as yet for relief angles.
CUTTER-MODEL.jpg
 
Although what I just done was the "high Tech" version of it, I am sure that many gears have been built by tracing the profile from an existing gear, and then replicating it. I think it will be quite a challenge to grind this profile correctly without a "visual comparator" which will project the profile of what I attemp to grind onto a much larger screen where my results can be "compared" to the theoretically perfect profile. and I don't even know where to start in terms of relief angles.
 
Brian Rupnow said:
Although what I just done was the "high Tech" version of it, I am sure that many gears have been built by tracing the profile from an existing gear, and then replicating it. I think it will be quite a challenge to grind this profile correctly without a "visual comparator" which will project the profile of what I attemp to grind onto a much larger screen where my results can be "compared" to the theoretically perfect profile. and I don't even know where to start in tems of relief angles.

Get hold of a copy of Ivan Laws' book and your troubles will be over, or just beginning! ;)
 
Brian Rupnow said:
I think it will be quite a challenge to grind this profile correctly without a "visual comparator"

It can't be that hard. It's done all the time by people like Tel, me, Jerry, and so on. Properly ground
single point gear cutters have been done this way for generations.
 
Brian

I still have a lot to learn about gears so I want to follow this thread. For practice, I created and downloaded the same gear spec from the rush site and worked up the drawing as before. I was surprised to find a significant difference in a critical dimension. Your drawing shows the angle between the opposing gear faces of 72.89 degrees. On my workup I found the critical angle to be 44.59 degrees.

With a little effort, I found the reason for the discrepancy. The lines that you have constructed are tangent to the gear face at the TIP of the tooth, and the line that I have constructed is tangent to the face of the gear at the midpoint of the tooth face.

The reason that I chose the construct that I did is that it lets you grind a "V" point on the tool blank to this angle that you can very easily measure. From that point to get to the final profile, you only need to remove a VERY small amount of material from the flat face. That's the purpose of the small diameter stone that I used. The full face of the stone provides the correct radius. No fancy measuring equipment needed!

I hope this doesn't confuse the issue too much. I'm only trying to make it as easy as possible. My workup drawing is attached.

Jerry

EDIT. I also attached a PDF file that can be enlarged with better detail.

Brians gear.jpg


View attachment Alibre Design Drawing of brians gear.pdf
 
Brian,

That looks pretty good. Why do you think the tooth face radius has changed from .165 in the model view to .17. Is that from rounding to two places?

I think you will agree that it is no real problem to grind a flat sided shape that is pretty close to the finished shape. The difference between 44.59 deg and 43.51 deg is pretty slim and if you can get anywhere in between it ought to work just fine. I don't know what you call the area that is between the chord and the subtended arc of a circle but maybe Marv can tell us. That small area is not all that hard grind off. Wear your safety glasses and get in close and watch it come to shape. The small radius at the end is a non-contact surface and is for clearance only so its not all that critical. The only thing you need to worry about now is the relief angles. A few months ago, you showed a tool grinding fixture. You ought to be able to adapt something like that. If the straight sided cutter has a few degrees of relief it makes it easier to keep that angle as you grind away the little unnamed arc.

Top rake is important too but that is handled by the tool holder design. Brass and Aluminum don't need much top rake but a few degrees of top rake seems to reduce the pounding at the start of the cut. I have not tried to cut a steel gear yet but my guess is that top rake would more necessary.

I hope this is helpful. I'm a little uncomfortable sounding like an expert. On my donkey build thread, I was just showing the approach that I took. If you were influenced by that experience I just want to be more clear about what I was attempting to do.

Jerry
 
After thinking this through, I may have shot myself in the foot first thing!!! My rotary table rotates through 4 degrees with one complete turn of the handle. Although I did buy the divider plates along with a tailstock when I bought the rotary table, I don't (at this time) have the faintest idea as to how to use them. So---I would like to cut a gear that will require full complete turns of my rotary table handle between each tooth. This is where it gets a bit strange--A 20 tooth gear will have 18 degrees between each tooth. 18 is not evenly divisible by 4, so this means 4 1/2 turns of the handle between each tooth. What I want is for instance, four complete turns. This would mean 16 degrees between each gear tooth, resulting in a 22 1/2 tooth gear!!!--So thats out. If I work with 3 complete turns of the handle, that would mean 12 degrees between each tooth. 360 is divisible by 12 evenly, giving me a 30 tooth gear. so---perhaps I will start with a 30 tooth gear instead.
 
Limiting yourself to only divisions that are integer multiples of 4 deg will severely cramp your gearmaking possibilities.

The plates you bought allow you to use your RT as a dividing head. Download my DIVHEAD program and read the simplified description (about four paragraphs) of the computations involved, set up the data file for the hole plates you have, and the program will do all the math for you.
 
Marv--I'll save that for another day. With a little more cogitation, I realized that an 18 tooth gear will have a seperation of 20 degrees between each tooth (360 / 18=20). And that twenty degrees is evenly divisible by 4, so that calls for 5 full complete turns of the handle on my rotary table at 4 degrees per turn to give the even twenty degrees of indexing from tooth to tooth.
With that in mind I went back to the gear website and downloaded the profile of a 24 Pitch, 14.5 degree pressure angle,18 tooth gear, with a p.d. of 0.833" and an o.d. of 0.917"---------this means I can still cut it out of my 1" diameter piece of aluminum. So---here is the gear profile with the edges of the gear converted to "line elements" and used to establish a drawing of the appropriate cutter.
LAYOUTOFCUTTERFOR18TOOTHGEAR.jpg

 
And here we have the detail drawing of the cutter. This will get developed more before I decide how to machine/grind this exact profile, but this is my starting point. I now have to figure out how to add some draft to the sides and how to grind the radius with a relief included.
CUTTERFOR18TOOTH24PGEAR.jpg
 
Back
Top