Building a double acting wobbler

Home Model Engine Machinist Forum

Help Support Home Model Engine Machinist Forum:

This site may earn a commission from merchant affiliate links, including eBay, Amazon, and others.
Progress in a big way this weekend. New mill works great, everything goes together so far---

SEMI FINISHED001.JPG
 
Nice work Brian 8) ........... your learning curve seems almost vertical ::) ....... but it seems to be working well

;) CC
 
CrewCab ---I have been using tools and machinery all my life, to build drag racing cars, show cars, and hotrods. The only reason that I didn't have a mill and lathe was because I couldn't afford them. Professionally, I have been designing machinery for 43 years, so I know what a lathe and mill are capable of, from a theoretical/capability standpoint. I am plagued by fairly bad arthritis now, and just can't get up and down well enough to continue building hotrods, so I thought that in preperation for retirement in 3 years I would buy a lathe and mill and get into model machining as a hobby. So, in a way its new, but in another way its not something "brand new" to me. This is a picture of my current hotrod that I built 4 years ago. I do all my own chassis design and build, welding, bodywork, and paint. This car has taken many trophies, and what most people don't realize is that I started with a 2 door sedan, shortened it 5 foot, cut off the top, built the box from scratch, and designed and built the convertible top frame from scratch.--Working with tools is not something new to me. Thanks for your kind words.---Brian (and it wasn't me that hit the lamp post---it was my freakin snow plow guy)

side view of finished rpu.jpg
 
Brian, I'd picked up some of your background and experience through your posts and links ;) It's the mill (and lathe) that's new but you seem to be taking to it like a duck to water .............. engineering's clearly in your blood mate.

Sorry to hear about the arthritis, I have several friends and family members who suffer from it. A very close friend recently (well ..... in the last couple of years) had a change of medication to a fairly "new" treatment and it's worked wonders for him ..... I hope you find something similar; I know it's not a nice ailment, ........... best wishes.

I really do love the "Yellow Peril" 8) ............ and the paint job is to die for ........ once you start painting your models everybody's gonn'a have to step up a gear or two. ...... Personally I ain't worried, I can cope with most things but, spray painting with a finish any better than orange peel has always eluded me to date ....... then again the most expensive spray gun I've ever owned cost about $15 ???


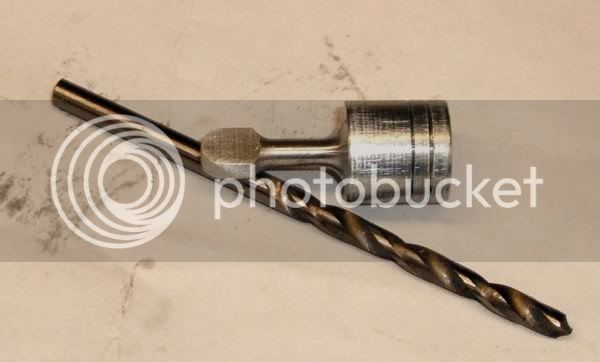
Anyway, it ain't just you who's been butchering aluminium all day :eek: ...... ;D .... although my offering is a bit of a tiddler by comparison ......... drill bit in the photo is 1/8" dia.

Piston_01600x362.jpg


CC (Dave) ;)
 
We have a base!!! I milled that pocket with a 4 flute end mill, 5/8" dia., and brothers, you were right--Four flute end mills don't plunge cut worth a darn. I was taking it pretty easy, plunging 1 millimeter at a time, then going around the profile. I found that when squaring the ends up on the outside of 1" thick aluminum, I can take a 0.010" thou deep side cut on the full 1" depth before the mill sounds like it might be straining. This is the first pocket I have milled, and it went very well. I used my carriage stops for the first time while machining the pocket---my mill only has stops on the side to side table movement, not the front to back axis, and I really wish it had them there as well. I find that everything gets so quickly covered with swarf that you can not see your scribed layout marks, and so I spend as much time brushing away chips to clear the field of vision as I do actually milling.

TRIAL ASSY WITH BASE001.JPG
 
Brian Rupnow said:
I spend as much time brushing away chips to clear the field of vision as I do actually milling.

I find an airline nearby is very useful ;) ................... doesn't make cleaning up later any easier though :(

CC
 
So---Today is Canada day, nothing big planned, so maybe I will make some good machining progress. Wouldn't you know it!!!! I drilled one hole on the mill and then the friggin 10 Amp fuse blew!!!--And no place is open where I can buy another. Oh well, the lathe still works, so I built my piston, con rod, and con rod end, and layed out all my hole positions in the main body that have to be drilled. The best laid plans of mice and men----
 
Brian Rupnow said:
The best laid plans of mice and men----

Oh well ........... Happy Canada Day anyway ;) .............. make sure you buy a few fuses, which reminds me though .......... I must buy some spare lathe belts ....... and fuses for the mill

CC
 
Brian Rupnow said:
I drilled one hole on the mill and then the friggin 10 Amp fuse blew!!!--And no place is open where I can buy another.

I've gotten around the blown fuse by using some very thin stranded wire. I unwind one strand and solder that across the fuse ends that is blown. If there is a dead short it will blow that wire also. Then you know it's time to look for the cause because it could be major.

Bernd
 
Well, its really starting to look like an engine!!! I still have to wait for the #5-40 unc tap and die that I ordered to come in so that I can put the cylinder 'wobble shaft" in place, and I had to order some 648 Loctite--(I realy hope the Loctite works as good as its supposed to.) I have to machine some brass plugs to cap of the ports in the side of the vertical aluminum frame, and have to drill and tap the crankshaft throw for a set screw to hold it in place on the crankshaft. That flywheel that I machined from steel is so awsomely heavy that I think I will cross dowel it to the shaft. That way if I have to make a lighter flywheel out of aluminum, it will be a lot easier to take it apart.---Brian

STARTING TO LOOK LIKE AN ENGINE004.JPG
 
looking real good brian.........can't wait to see a video of it running ;D

chuck
 
Brian , when I did mine I threaded the ports and some brazing rod. Screwed them in and filed flush. Worked pretty well for me.
regards,
Dick
 
Damn!!!--Talk about pickin' fly poop outa pepper---I made the port plugs tonight, and if they were much smaller these old eyes wouldn't have been able to see them. My #5-40 tap and die came in today and I was able to thread my wobbler shaft (I still think that sounds vaguely dirty) and tap my brass cylinder where the wobbler shaft fits. (Yeah, that too). All I'm waiting for now is my Loctite #648, and I have to make up an inlet port hose adapter and an exhaust header.

PORT PLUGS004.JPG
 
There's dirt on your calculator :eek:


Nice job on the parts:eek:)

Wes
 
Brian,

Nice work you are turning out there.

As you get further into this game, you will find the bits get smaller and smaller.

You will need to grow suction cups on your fingers and auto magnifiers on your eyes.

John
 
Today was the nicest day we've had so far this summer. And where did I spend it ???---Down in my shop---fittin and assemblin'. Should have been outside doing something, instead I was silver soldering, filing, threading, and getting everything to run freely with no bind. I silver soldered the brass end of the connecting rod to the steel shaft, and made a new aluminum piston, then tapped the piston and threaded the end of the con rod that attaches to it. The plans call for just loc-titeing it all together, but I never have trusted any kind of glue too much. Somehow I tapped the cylinder crooked where the wobbler shaft goes into it, and of course this didn't show up untill I assembled it to the main aluminum body and noticed that the cylinder was touching the aluminum body at one end and .045" away from it at the other end. I had too much work in the cylinder to scrap it, so I set it up in the mill, drilled the threaded hole out to 1/4" diameter, made up a brass plug that I tapped in the lathe, then press fitted it into the cylinder and brazed it. Second time around it fits properly, with full contact at both ends of the cylinder. I sacrificed another mechanical pencil today---the spring in them fits over a 1/8" wobbler shaft and has just the right amount of compression to hold the cylinder tightly against the aluminum body, but not so tight that it binds. Thats what I used on the first wobbler I built also. Trouble is, now I'm out of mechanical pencils.---Of course, where else am I going to find a spring on a Sunday?? If my 648 Loctite comes in this week, I may be just about ready to run this thing. I have to build an air inlet tube yet, and maybe a 90 degree bent exhaust pipe. Where can I get small (as in 3/16" O.D.) brass tubing in Canada?
 
Brian Rupnow said:
Where can I get small (as in 3/16" O.D.) brass tubing in Canada?

Brian ............ over here in the UK it's readily available as car "Brake pipe"

This stuff .......... surely you have some, I've got 3 coils somewhere in the garage, ..... not that that helps you much :(

Nice work though 8) and it sounds like your having fun, at the end of the day that's what it's all about imho :D

atb

Dave
 
Crewcab--We have that here also, but it is copper (same as the link you posted). I was thinking of brass, but that is not as easy to find. I just did a little calculation here, and with a 3/8" (10 MM) piston, and 20 PSI of air pressure, that is a force of 2.2 pounds (about 1 Kilogram) of force exerted on the piston.
 
Must be an age thing Brian .......... read "Brass" and reply "Copper" :wall:

Sorry :( ........... but then again .......... it could work if you have a problem sourcing brass. ;)

The "force" calculation, is that related to the head and the locktite joint ?? to be fair I spent many years doubting adhesives, but, in this present era their development has changed my views considerably; out there ......... there is something to stick anything to anything ........... even Delrin apparently ??? .......... unfortunately in some cases it comes at a cost.

I used a locktite oil tolerant adhesive to retain the pin in the crank of my little engine and I've got to be honest and say ............ It worked very well.

hth


CC
 

Latest posts

Back
Top