British 0-4-0 Toy Locomotive: he said

Home Model Engine Machinist Forum

Help Support Home Model Engine Machinist Forum:

This site may earn a commission from merchant affiliate links, including eBay, Amazon, and others.
Great looking parts Zee :)

Watching your build closely...

Jeff
 
Wowowowow!! Nice looking stuff so far zeeps....

You best git crackin or Dean will get the bug to build a loco and be running around the track before you get those bandaids off yer knee! ;)
 
Great looking work, Zee. I'll see everyone's "wow" and up 'em a "gosh!". These really do look that good, to me.

I am working on sumthin', bud, so "nyah" back at ya.
Glad you're mending!

Dean
 
Nice looking parts Zee, I cant tell that their on drugs! :)

Paul
 
Great job so far. This may be an upcoming project for myself as well. I plan it to be a gift, so will be watching how you tackle the build with interest. Thanks for the well documented journey.
 
Zee,
Very nice pieces. I particularly like the boiler mount stud. Going from thick to thin can be tricky.
Dennis
 
Great work, Zeep! That's a bunch of nice-looking parts.
 
Sean, Jeff, Mike, Dean, Paul, Ken, Dennis, Vernon...thank you very much.

Much appreciation to the forum for helping me get here. Confidence is rising and trepidation is decreasing. (But then, I haven't gotten to the parts that require skills I haven't used yet. ;D )


Looking good Zee.

About the Vicodin, Doc gave me some once,I took it one time and never again. I could have got to liking that stuff tooooo muuuch. Felt like I was floating for quite a while. No need for that. Besides the pain wasn't that bad as I remember.
Just a personal aside.


Ron
 
Zee, I'm inspired to go out to my shop and make some threaded things now. Too bad I'm at work presently. :( I'm really looking forward to the part where you make the boiler.

-Trout
 
Those are really great looking parts Zee :bow:

But then, I haven't gotten to the parts that require skills I haven't used yet.
So when did you do sheet metal work before this and did not share ? :big:

Looking forward to the boiler build !

Kind regards, Arnold
 
Zee

I'll join in on the "good looking parts". Have you considered weaning them off the pain killers and using steroids instead? Then you could build a BIGGER engine.....:hDe:

Joe
 
Thanks Ron. Not to worry. While there was no floating for me (maybe I'm too big - or the martinis masked the effect ;D)...I just didn't like using the knee and not knowing if it was hurting me. The pain was never so terrible to warrant too much of the stuff.

[EDIT: I don't mean to make too light of this. Pain killer and alcohol do not mix. And neither do they mix with running equipment.]

Trout...looking forward to me making the boiler eh? I'm not. I figure that's when everything goes awry. Oh I think I'll get it to together...and it'll probably work...but it won't look good. But that's okay...people say the same thing about me...or used to. They don't refer to me having it together or working anymore.

Thanks Arnold...remember...you're the one who called me out on filing. ;D I've got more sheet metal to do...I'm expecting a story with at least two of them.

Joe...not a bad idea...but steroids tend to make other things smaller...and I'm still hoping to make use of them...or the one...as I'm sometimes reminded. ;D

Thanks all. This is fun.
 
Re your question about running characteristics, it should be manageable on a loop of track, The Bowman company used to make a loco similar to this mechanically, and look at the old Birmingham Dribblers and how successful they were.
 
Thanks Kaleb.

This weekend was about the front wheels...meeting daughter #2's boyfriend...family...and dishes. The new boyfriend is okay...and he quickly coughed up his driver's license upon demand.

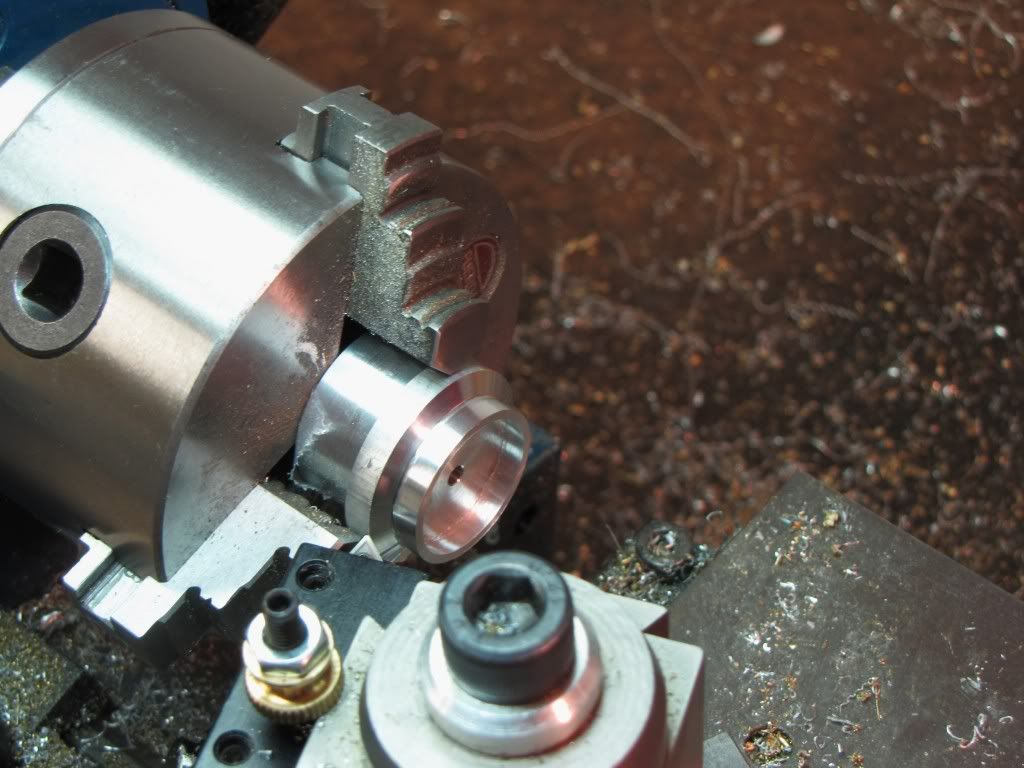
The tricky part for me was the trepanning. I'd tried it once before on a flywheel and...we'll just leave that lie there.

Anyway...went okay...a little trashy in the corner on my first wheel...second wheel went better. I used a boring bar. Having the center hole made that more possible. The instructions had you using an end-mill (progressively stepping up and then moving to a boring bar) but that resulted in a whole lot of chatter.

This shot shows the setup (well not much of it unfortunately) where I was turning the flange.

712f0c88.jpg


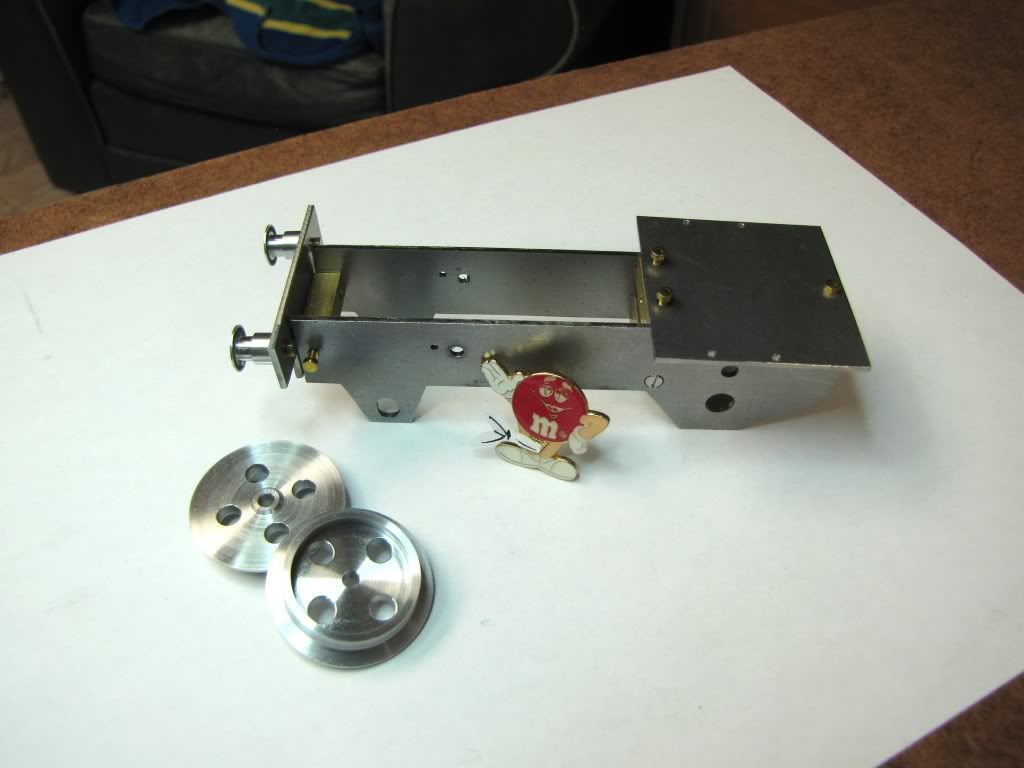
To do the 4 spoke holes, the instructions had you sit the thing on parallels in the mill. I saw that a 3/16 drill bit was called for and knowing I have tendency to crush things in the vise, I mounted my rotary table instead and used a 3/16 collet to hold the center drill and drill. That was a dream.

The wheels turned out pretty good for my first ones...although I seemed to have gotten a bit of swarf or two between the integral washer and something on the one wheel (you might be able to see it).

The other problem is that the 4 spoke holes are drilled from the back (even when you follow the instructions). This results in some crud around the rim on the front side. Because of the outer wheel rim, I couldn't get to it with the counter sink I have. I took a larger drill bit and twirled it by hand. Works...sortof...but you can see a slight amount of chatter.

Any suggestions for better methods?

Here's the wheels...

64b2f058.jpg


The little guy gets his stitches out tomorrow.
 
Deburring jobs like that can sometimes be done effectively with a ball endmill. In extremis, I've ground an Xacto blade to the needed shape and used that.
 
The wheels look good, Zee. I can't see the boogering you mentioned around the holes. It may just need a little sandpaper on a small dowel to clean it up. Go at it gently and take your time so as not to round over any edges.

meeting daughter #2's boyfriend

Naturally, when I read this, in my brain it came out "meeting daughter's #2 boyfriend". All I could think was, "Man... that boyfriend #1 must be a very understanding guy..."

No wonder I make so many mistakes.

Dean
 
zeeprogrammer said:
I took a larger drill bit and twirled it by hand. Works...sortof...but you can see a slight amount of chatter.

Any suggestions for better methods?

For small holes 3/16 or smaller I do what you did, use a larger drill bit. I also use razor blades for tough spots and 360 grit paper for square corners and places that are easily accessed.

Great build by the way. I have been following along from page one.
 
Thanks Marv. What did you use to hold the bit...be it ball end or X-acto?

Thanks Dean...I was thinking sandpaper on a dowel...but have to be careful not to mar up the side of the rim. And I'd like to make the mistakes you make. (See next post.)

Thanks Steve...and thanks very much for watching.

 
Rats.

At first I thought the wheels were a press fit but they're not. The axle is a simple turning job (he said) so I thought I'd try and get that in before calling it a night (or rather, be yanked out of my hole).

1018 3/16 rod...my favorite metal. ;D

Faced the one end, turned it down to diameter, and then got out the center drill.
Busted the center drill.
Luckily...the end piece flew off somewhere.
I was pretty sure I was going too slow so I got out another, increased the speed, and everything was fine. Drilled and tapped 2-56.

Now for the other end. Faced to diameter.
Center drill...same speed.
Busted.
I'm thinking it wasn't true (i.e. off center).

This time the end piece was stuck in the rod.

Sadness. :rant:
 

Latest posts

Back
Top