British 0-4-0 Toy Locomotive: he said

Home Model Engine Machinist Forum

Help Support Home Model Engine Machinist Forum:

This site may earn a commission from merchant affiliate links, including eBay, Amazon, and others.
Nice work, Zee. I just might have to put a loco on my to-do list.

zeeprogrammer said:
...as for the crisp lines...well...afterwards I took a file and went over everything. However, if that's what I was supposed to do...then ignore what I just said. ;D

OK, ignored ;D

Yes, you should break all edges after cutting. Any burrs will cause parts to not sit flat or to deflect in the vise. They cut fingers, get rid of 'em (the burrs, not the fingers!). Just confirming what you already knew to be correct. To my mind parts just aren't finished until the edges have been taken care of.
 
Deanofid said:
If you know the possibilities, you can do what is needed to prevent problems.

That's what I'm enjoying about this build. The experience is starting to catch up. (I like to think.)

Thanks hobby.

Thanks Kevin.
 
Great frames! Man, I'm having locomotive withdrawal symptoms. :bow: Go, Zeepster!


ksouers said:
To my mind parts just aren't finished until the edges have been taken care of.
Sooooooooooo true!
 
Zee,

Nice start, if I e..........v...........e...........r finish the hit and miss I have promised myself I will, ..........yes I will,........ no I really mean I will............... make a copper boiler....................................... :p :-\

Decisions, Decisions, Decisions. :'(

Best Regards
Bob

 
Thanks Vernon.
Thanks Bob...and yeah...I'd like to see that hit-n-miss...what's the hold up? ;D

Okay...I managed a part tonight. But first, please help me remember the following mantra by gathering together and singing with me...

'Do not rush', 'Do not rush'
'Double check', 'Double check'

Lest you end up posting your boo-boos like me...

A simple part...front of the frame...square it, trim off two corners, and drill 4 holes. It would help if you mill to the correct scribe lines. It also helps if you have sharp drills. It's even better if you know what you're doing.

A post or two ago I showed my frames. What I didn't mention was the amount of blue chips I created. So this time, I used a smaller mill (thanks Seanol), slower speed (thanks Vernon), and offset the cutter instead of going down the middle (thanks again Vernon). Much better. Until I tried going full depth. Ah... well...I can see some experience is sticking to me...played with speed control and feed...and it went better.

But...I went too far on one end, and cranked the wrong way on the other end...maybe you can't tell...but that's why the little guy is frowning...

3ce6d8bb.jpg


And a fun fit...

da528007.jpg


Zee,

No problems. I made 3 side rails all to .020 smaller that what the plans called for. All at once!

I found that when I used the smaller cutter I went faster, not slower. But that was for the size of my machine.

I only took big cuts in aluminum. In steel I chicken out. Even with a stout setup I will never take more than .050 and on the edges of the frame I was taking .020 a pass. I remove the majority of my stock with a 4x6 harbor freight band saw so I don't have to spend all night cranking back and forth (all right, watching the power feed go back and forth... :big:)

Keep up the good work,

Sean
 
Zee,
Using Bob Warfields GWizard program I get 1300 rpm with a 3/8ths 2 flute cutter (hss) cutting 3/16ths (half) width running at 1300 rpm with a feed rate of 4 inches per minute or .066 a second. (You were cutting mild steel right?)

How does that stack up to what you were running?

If you substitute a carbide 2 flute cutter you are at 2800 rpm with a feed rate of 11.4 inches per minute! :eek:

This assumes 80% of the recommended production SFM and a rigid set up. Even at 50% you are at 1800 rpm and 7 inches per minute.

Hope that helps a little,
Sean
 
Thanks for the new assembly shot, Zee. I'm gettin' all impressed an' stuff.
I mean, I like it!

Dean
 
Nice work Zeep,
Your moving along at a nice pace

Tony
 
Thanks Vernon.
Thanks Seanol...faster/slower is relative...I think I was so fast...I had to go slower which might have been your faster. ;D
Thanks Dean. Careful...you still ain't gettin' my M&Ms.
Thanks Tony.

Well..got an hour in the shop (I can say 'in the shop'! that is so cool!) and made a simple part...the floor for the frame. Nothing special....other than I made it and it's mine. ;D

5cd7a23d.jpg


Some of the screws that hold the stretchers need to be shortened yet.

You might notice the little dude has a bandage on his knee. He's scheduled for arthroscopic surgery on Friday and that may slow him down. On the other hand...we're supposed to get 10-14" inches of snow tomorrow. Which might mean postponement...but he's going to be really bummed out cause there won't be the usual Friday pizza.

The knee is no big deal...but it'll be difficult getting into (yay! I get to say it again) 'the shop' for a while cause it's in the basement. Tore the meniscus hauling my horizontal band saw into the basement.

Happily I'll still be able to dance.

Now...how many of you thought 'happy dance' and how many of you thought 'ballroom'? hehehehehe...I enjoy both, but to be honest...dancing with wife is pretty nice.
 
Nice Zeep,
I did the meniscus thing about 4 years ago. Ice on the knee and martinis in the face. :big:

Tony
 
When I hear "happy dance" I always think of Snoopy in the Charlie Brown cartoons. He looks very happy, indeed.

You're little chugger is looking better with every shop session, Zee. I really enjoyed Arnold's "Fred", and I'm liking your little tank, too. What is it about small locos? I've never built one, but I'm getting an itch!

I hope your appointment with the saw bones goes well. Pizza and M&Ms are both known to help men recuperate faster. Mass quantities are even better. The more of them you eat, the sooner you'll be able to get back into The Shop.
No, really!

Dean
 
Zee,
Tore mine last year and still waiting to have it fixed!

Go slow and heal up, we need our "As the Workshop turns" fix! :big:

Good luck,

Sean
 
Zee,

If you rig up a sled and come-a-long you can winch yourself up and down the stairs to the shop.

scratch.gif

SAM


Coming along nicely there Zee. Hope to get more done on mine soon.

Make sure the Nurses treat you well. ;D ;D

Ron
 
Getting along nicely Zee ;D - Aren't you cheating a bit with milling and not filing though ? :big: :big:

Nothing special....other than I made it and it's mine.
That's precisely what makes it special !

Best wishes with the medical stuff as well, keep a supply of M&Ms handy; I've heard the red ones are especially good pain killers...

Kind Regards, Arnold
 
Not expecting as much snow as they thought...so it may still be on.

First question to the doctor...."No. How are YOU today?"
Second question..."Did you have your Wheaties?"
Third question..."Why am I still awake?"
First beg to the nurse..."Please be nice to me."
Second beg to the nurse..."Please come home with me."
Third beg to the nurse..."Please...", well it pretty much just keeps going that way...

Tony...'martinis in the face'...yep...that's my usual remedy for all things unpleasant.
Dean...Build one! Build it! That would be great!
Sean..."As the shop turns"... Rof} That was great.
SAM...wife keeps threatening me with one of those stair elevators (like in "Up").
Ron...see above pleading. Never has worked but I'm an optimist when it comes to women. The alternative means to question life. ;D Wife don't mind...she's a realist...she knows I'll fail every time.
Arnold! Back from your trip. I hope it went well. What'd Grandpa Fred say? Ha...nice shot about filing. ;D [EDIT: I'm working from the past...just came across your post and Grandpa. That's great! Be sure to take photos of the 'veranda railway']

Thanks everyone. Very much appreciated. No worries here.
 
As part of my therapy from arthroscopic surgery...I did do some work in the shop.
However, no prescription pain killers were involved (during shop time).
But I did play some music...a little '3 Dog Night'... ;D

2bdbf85f.jpg


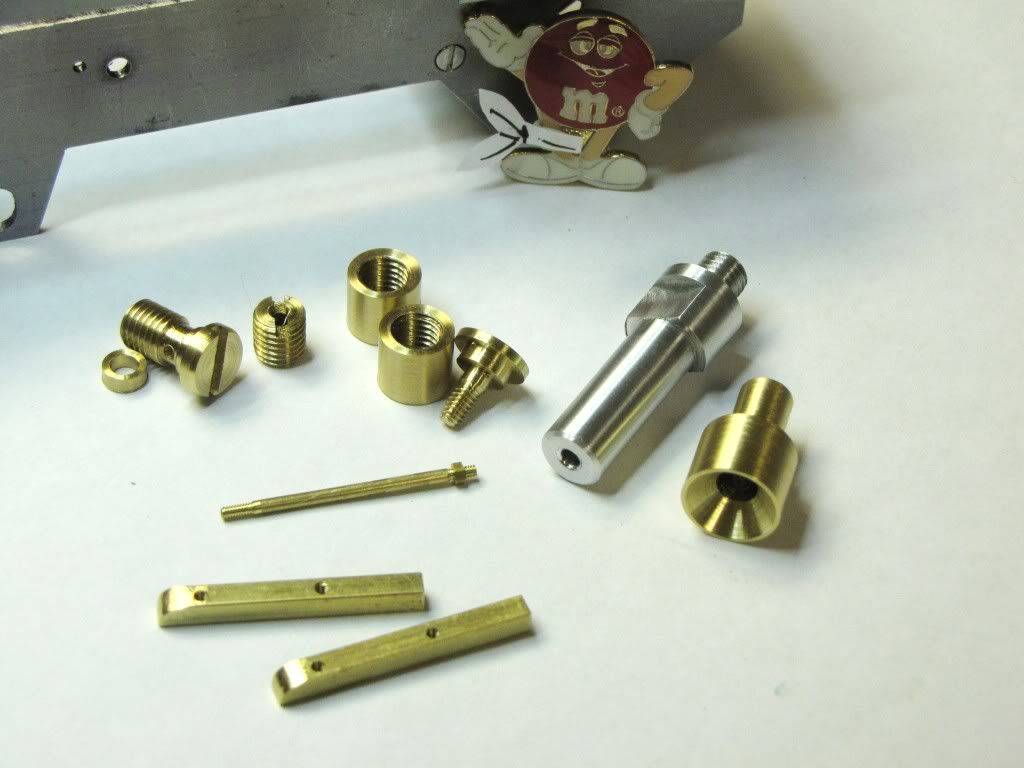
Upper left is a spacer. This is used to mount the boiler to the cabin. Sorry...I forgot to include a coin for scale. The spacer is .20 OD, .13 ID, and .08 thick. I dropped it once. It is now embedded in a hunk of blue tack.

Next to that is the steam dome cover. That was a fun piece. But I was just a little off with the slitting saw.

Next is the 'orifice' safety valve'. Also fun and a better job with the slitting saw.

For those two pieces I took a piece of aluminum, tapped it 1/4-28, slit it, and used it to hold the pieces during slitting.

Next are two bushings. they're identical...one is for the steam dome and the other for the chimney. I used a 1/4-28 tap from a kit that includes dies better suited for cleaning up threads rather than making new ones. I think I'm going to go look for better taps too.

Next is the boiler mount stud. I do so enjoy working with brass.

Now comes the connector for a bicycle hand pump. It's used when testing the boiler for pressure. For this I used a 5C collet in a collet block. Marv's and Tel's earlier advice about mounting and using a stop was very helpful. (By the way...I think it was you Trout that talked about the 5C collet block...the wrench that came with my mill worked fine for tightening the collars).

However, it's actually the 2nd try. On the first try I milled off part of the collar. That would have been okay...still useful since it's not part of the final engine. But then I milled the side too far. Again still useful but I was discouraged and decided a second go would be good practice.

The next part is the filler tube. I was pretty happy with this..but it went awry just as I was almost done (a familiar story I'm sure). It might be difficult to see but there's a bit of chatter on the inside. It didn't help that I used a counter-sink that was some 30 years old and had been used to...well... you don't want to know...you'd kick me out.

In the center is a handrail stud with a 0-80 pre-made nut on one end. I'd never made a thread that small before. I was feeling pretty good until I ripped off the end of the next stud. In trying to get the piece of brass out I ruined the die. One thing I noticed is that by having the part sticking out further, I could feel the twist in the metal and back up. The rod is only 1/16 diameter. On the next part though it was held closer to the chuck...I couldn't feel the twist...and simply twisted it off. Having said that, I don't think I had the rod end at the right diameter for threading with the die.

Lastly, the two handrails. Kind/sorta happy there. The holes are not exactly centered though. And the bigger issue is I used a v-block to hold the part for drilling the hole in the end of the piece. As I am too often wont to do...I tightened the vise too much and crushed the rails. You can't tell from the pic...the dents are underneath. The ends were hand-filed.

For the most part...fairly easy parts. I'm working on two more sheet metal parts for the cab.

The score so far is 25 good pieces and two for the 'wall of learning'. And if you're keeping score, I only mentioned the one 'wall of learning' piece. We won't speak about the other. Mainly cause I can't remember what I did...but it's sitting here staring at me.

And now a personal note...well...two personal notes...

Dean...."nyah"
Vernon...didn't you get a lathe recently?

Now...where I'd put that Vicodin?

 
Zee,

Wow.

That is all I can say.

What an improvement in your skills. Beautiful parts that I would be proud to display on my loco.

Nice job again,
Sean
 

Latest posts

Back
Top