British 0-4-0 Toy Locomotive: he said

Home Model Engine Machinist Forum

Help Support Home Model Engine Machinist Forum:

This site may earn a commission from merchant affiliate links, including eBay, Amazon, and others.
Hey Zee;
The (burner?) tubes look just fine, to me. I can barely see the bulge you mention. I thought about that a bit last night when I first read yesterdays' post about boring the tubes. Didn't really come up with anything solid about the bulge, except that sometimes if I'm boring a small tube and let the tool stop in one place for a sec or two, it will make a bright line at that point on the outside of the tube.
Also, that line will show up just before a tool comes through the wall of the tube.
Don't really know why you got them.

Anyway, they look nice.
I wonder if you have to hard solder these at all. Probably should do what the prints suggest, but these are not under pressure. They also should not get that hot if the wick is going to be sticking out of the top of them. They surely would not get to the 400-500° f that it takes to melt the solder. Probably wouldn't get over about 200°. I have a couple of alcohol burners, and the tubes that hold the wicks get hot enough to feel hot, but won't raise a blister.

You're right about your mistakes, and a few of us have been happy to tell you so. :)
The few shafts you have there are mistakes you probably won't make often in the future. The other
pieces look nice, even if they're goofs. You're even working to a good standard on your mistakes!

Thanks for the updates, mighty mulch man.

Dean

 
Thanks Dean. But don't be calling me 'mighty mulch man'...that kind of thing can stick...and if wifey sees that...how do I explain that 'mighty' can also mean 'wimpy'?

I think you're right about hard versus soft soldering for the fuel tank...but, other than the cost issue, does it really matter? It's basically the same process. So from that standpoint...I've got the newbie jeebies.

To be honest..I worry less about the soldering process as I do about the preparation and ending process...proper cleaning, flux, citric acid and so on. And even then...I'm probably more concerned about the citric acid part...I have no experience at all with that.

...here's the part where I talk to the kids or newbies at work...a year from now you're going to be saying to yourself (i.e them, me) .."I've forgotten what I didn't know."

I just have the initial heebies-jeebies. We've all had them. ;D Reminds me of my first date.

P.S. That boy is growing on me. Sort of like a wart that won't go away. You just get used to it. :big: :big: :big: I crack myself up.
 
Zee,
Good progress from my perspective. I have remade parts so many times I just accept that as the learning process. I'm coming from the same place that you are. Not so long ago I had never used a tap, or die, or lathe or milling machine. I have a four year degree's worth of education in my odds and ends scrap box...and hey no student loans :big:

Keep at it - you're doing some tricky stuff now.

Cheers,
Phil
 
Zee, when you said "this kind of soldering", I assumed you meant you intended to hard solder it. If you just meant that you hadn't soldered something like this in brass, it soft solders very similar to copper as used in plumbing.

The cost difference won't be much, either way. It's only going to take a few inches of hard or soft. Hard solder takes a lot more heat, and it's not quite as easy to see when it's going to flow as it is with soft solder. Otherwise, it's fairly similar. It's usually easier to put the hard solder on the joints in little pieces along with the flux, then heat it, as opposed to the way you would heat first then run soft solder on the joint.

The citric acid part is straight forward. I buy it powder in a half pound container and just dissolve it in water. I think that's how everyone does it. You can get it at a health food store, and sometimes the pharmacy. Probably many other places. Eight ounces makes about 3 quarts of pickle. It won't hurt your skin. I don't know how long you are supposed to use it. When mine quits working, I make a new batch.

What do you intend to use, hard or soft?
If hard, practice on scrap. You're going to want to know what to look for and how long to expect to heat it. You don't want to learn that on your nice fuel tank pieces.

Hope the boy is a good one. Does he like engines?

Dean
 
Your loco is looking great.
Silver soldering on small parts like this isn't too hard.
Actually the greatest danger is getting them too hot and melting them.

Get yourself some really fine silver solder for these little parts and cut them and put in place before you solder. Poking a stick of silver solder at the parts when its hot will just result in a lot of wasted expensive solder.

I just finished a burner last night that is for a toy steam engine I've just sold to partially cover a purchase of a Stuart 10V and 504 boiler.

If you interested how I soldered the small parts up look here.
http://modelsteam.myfreeforum.org/ftopic29519-0-asc-15.php

I do have an update for my clock too which I hope to post tonight.
 
Zee

Its sounds like you have a few failed parts lying around so practice stuffing up the soldering on them. You'll soon get better and find you are stuffing up less and less.

However, its not foolproof but the more wimpy you are at approaching it the more likely you are to stuff things up. You know I am well qualified to give you this advice as my boiler thread attests. Now I wonder why I ever had a problem to the point I am now happily using SS on 5/16" nipples.

Be a man and get stuck in. Practice makes perfect

Pete
 
Zee,

Great progress. Like you, my learning curve is fairly steep. The best looking parts I have made are usually my second or third attempt. I look at them as being the price of tuition. Someday I would like to try to build something as complex as a locomotive.

SAM
 
Some good progress Zee :)

The "wall" parts won't go away - it becomes part of the process :big:. They do get less if you treat every bit of material as though it's the last bit you have though (DAMHIKT ::) )

As to the solder - You know I aslo had problems with silver soldering, and now think nothing of it. Part was attitude; I dreaded it initially, and didn't get it right until I overcame that dread and just decided to really make a go for it. Like Dean and Pete suggested - practice on some scrap first to get a feel for the process.

And like Dean said, the citric acid is safe as houses - you can actually drink it if you want to taste something really sour ;) - maybe use some as a cocktail mixer for the lad that's courting your daughter :big:

Kind regards, Arnold
 
Thank you Phil, Dean, tmuir, Pete, Sam, and Arnold.

Phil...I know what you mean. No student loans for me either...but a huge debt anyway to my folks, wife, and friends. ;D

Dean...I intend to use hard solder. Even though soft solder may do the job...I want the practice. And yes...I'll practice on scrap first. Thanks for the info on the citric acid.

tmuir...thanks for the link. That was very helpful.

Pete...not to worry...I'll be a man...let's just not ask what kind of man. ;D

SAM...do it...build a loco. ;D Everyone knows you can.

Arnold...your progress has to be measured by leaps and bounds rather than my hops and skips. I remember your threads. As for the boy...neat idea...but I need to include daughter...she's to blame too.

And now...a word from the pit...

Drat.

But first...some pics...

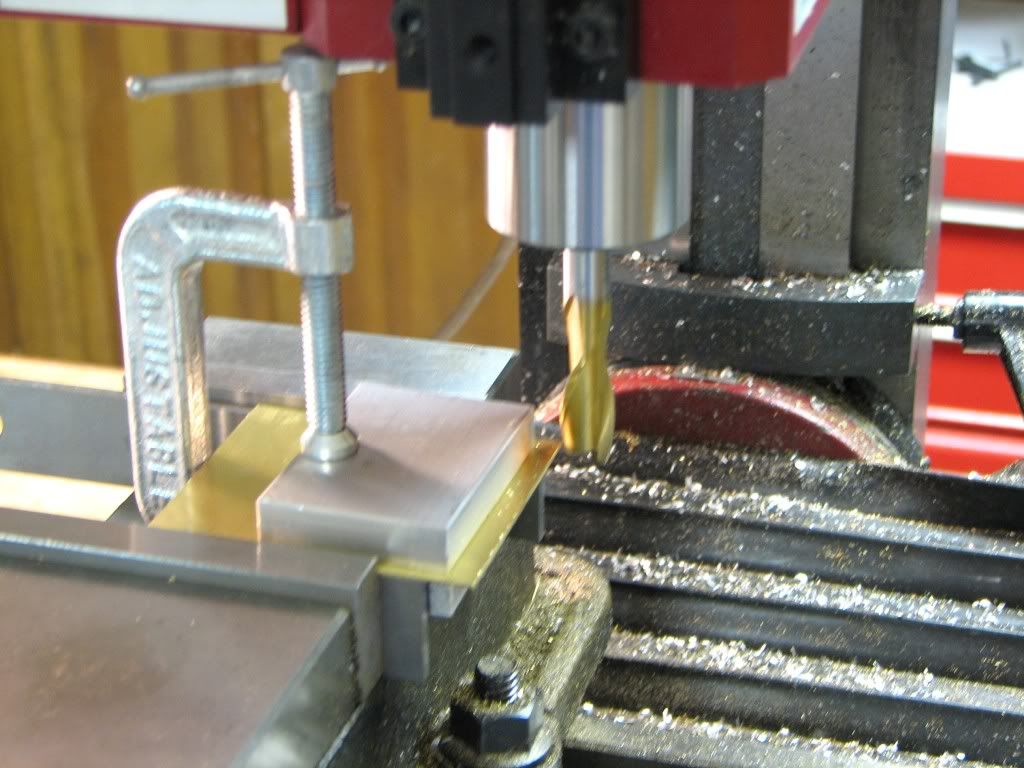
This is about fabricating the fuel tank. I need to square up a sheet of 2.31 x 2.5. Instructions use some blocks and a C-clamp to stiffen the sheet. I also used some parallels to raise the thing. It's sticking out a bit because the C-clamp isn't small enough.

e096b9a2.jpg


You can see the end mill isn't as deep into the spindle as one would like. But it was the only way to reach the sheet before the spindle head hits the top of the clamp. I'm cutting thin brass so I didn't worry too much about it.

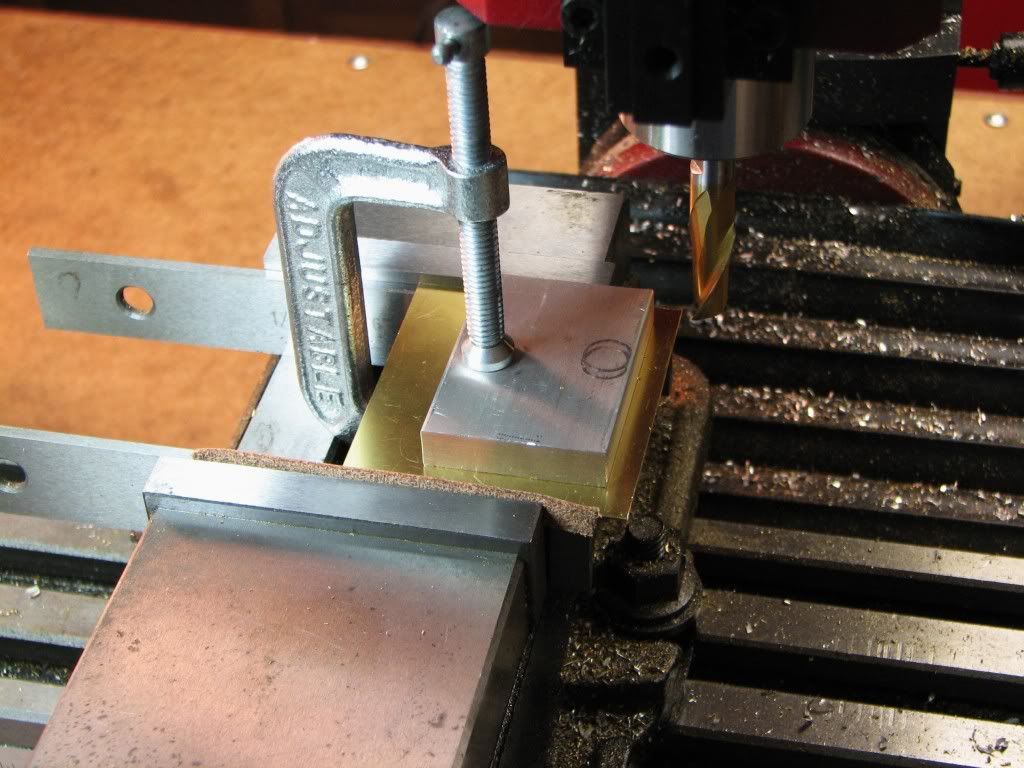
Here's an adjoining side being done. I put the cut edge against the vise and used a bit of leather on the other side.

7b9aba9b.jpg


Does any one else find it interesting that the clamp has the word 'ADJUSTABLE' molded in? Would anyone think it was 'NON_ADJUSTABLE'??

Then I blued the other two sides, scribed them, and trimmed them.

Now it was time to cut two slots. The slots are used to 'hang' the tank on the bearings of the drive wheels.

I know the difference between 9/32 and 3/8. I do. It's 3/32. Duh. But my eyes apparently did not believe what they saw and told me 3/8.

So now I need to order some brass sheet. Are small sheets available from a hobby shop?

Did I say 'drat'? I meant 'rats'. :big:
 
Zee, you can find brass sheet at the hardware store is small chunks. I have got some at Ace hardware. in the back with brass tubes and balsa wood and such. You should be able to get it at the hobby store as well.

And if all else fails, you can buy a brass kickplate at the hardware store, (This is what I have now, but I stole it off my backdoor) this will have a coating on it to prevent tarnishing, if you heat it up this will melt and create a smelly gas that you don't want to breath. So If you go this rout removing the coating is a must.

You are coming right along. I will be interested to see how your silver soldering comes out. I have never tried this either, and watching another "newb" can be very helpful. Judging by your perseverance in the past, I am confident you can do it.

Kel
 
Hobby / model stores and even places like Hobby Lobby (they're everywhere around here) carry small sections of brass sheet and tubing. IIRC it's something like 4"x10" at the largest sizes, and most don't have much thicker than 1/32". Brass kickplate is a pretty good source if you make sure to get real, 100% brass, not brass-finish or whatever... you also have to clean off the lacquer.


Hobby shop has .015 and .032. I was looking for .02x.
I think I'll try the .015. Fuel tank is boxy and light so the flex shouldn't be a problem.

But I am wondering about silver soldering. Any cautions? Thanks.
 
Zee, you might have to be careful not to keep too much heat on a specific point, or it will melt the plate. Just move the torch (I presume you are going to use a butane torch or similar) around on the work edges to try and distribute the heat with a smallish flame.
You do like challenges though :) - you might have been better off with the slightly thicker .032 for a start.

Give it a go though - there's nothing like trying !
 
I think Arnold has the right idea here, Zee. If you can, use the thicker material.
You will probably need about a medium sized flame if you're using a hardware store torch,
like a BernZomatic.
Don't know what size solder you have, or the silver content, either. If you have kind of fat diameter
wire, like 1/16", you can smash it flat with a hammer, if that will help you keep it in place while you
heat. What kind of flux did you get? White paste, I hope?

Dean
 
Is it really necessary to *silver* solder a fuel tank? Soft (e.g., 4% Ag) solder should be completely adequate and a lot easier to work with on such thin material.
 
Thanks Arnold. Thanks Dean.

That's exactly what I was worried about.
I think then I'll work with the .032.
The bill of material actually called that out but they sent .022.

I have SAFETY-SILV(r) 45 and 56 kits so the flux came with.
Unfortunately I got the 1/16" and I'm thinking I'd rather have gotten the 1/32.

Darn...I just opened one of the kits and I can feel it's very very different from soft solder. It's like coat hanger wire! Much much stiffer than I'd imagined. I'd thought I might be able to trim lengthwise. I don't think so. At least not with the equipment I was thinking of. Any ideas?

I saw one of your recent posts Dean about sources for silver solder. I think I'll look around for 45 in a 1/32.

I also have a BernzOmatic kit...Power Propylene and torch.
The torch is marked TS4000. I have no idea how well this will all work...
but it will work well enough to do the job or teach me how to do better. ;D

Oops...pizza's here. Bye.

Rats...just saw your post Marv...pizza has to wait. No...it's not necessary to silver solder the fuel tank. I didn't see the harm and was thinking it would be good practice. Perhaps I should rethink? I'll rethink once I do some practicing.

Thanks Marv.
 
We tried to talk him into soft solder already, Marv. He's intent on learning the hard stuff!
What a silly notion, that learning.

Zee, the 1/16" stuff is a little fat, but it will work okay. It won't hinder you much. The smaller diameter is just easier to position and keep from running. Runs won't hurt the piece, functionally.

You have the right stuff as far as solder and flux are concerned. Use the 56%. Melts at a lower temp.
Yes, it's hard wire. If you want to flatten it, you have to pound it pretty vigorously.
Just use small snips spaced apart along your joint. If you put a continuous piece of it along a joint, it will
end up all over the place.

Ask more questions. Enjoy pizza! What a happy thing.

Dean
 
I can't encourage you enough to practice soldering with a torch but there's no reason to make it unduly hard for yourself.

Practice on scrap. Practicing on something you hope to eventually be a part is bad psychology. Try as you might, you'll be worrying about the part and not concentrating on observing the soldering *process*.

It's highly unlikely that any model you build will *need* 0.015" material silver soldered. Most things that *need* silver soldering need it to withstand extreme heat or strong forces - neither an application where it's likely that such thin material will be used.

Get or make a small, smooth anvil and a small ball pein hammer. Clean both throughly so you don't embed dirt or foreign material into the SS. Pound the end of the SS flat until it's on the order of 1/32" thick. Then with dikes you can cut off small pieces (jewelers call them pillions) which are coated in flux and stuck into place at the joint - on the side opposite where the torch will be applied so they are not blown away by the torch.

Two joints you should practice...

Two plates flat against each other so you can watch the flow of the solder into the join when you reach the right temperature.

A butt joint between a large rod and a small rod so you can grok the need to heat the big piece and not the joint. Test the joint by trying to snap the small rod off. It should bend before the joint fails.

Dean types faster than I. :)
 
I second the hammer and anvil approach put forth by Marv.

I used a large hammer held in a vise as an anvil. Start with a piece of wire long enough to keep your finger'nails' out of the way. :big:

It(the coat hanger stuff) should spread out to almost 1/4 inch wide(6mm) and invariably will curve one way like a long flat banana. <--AFTER you beat on it and stuff, of course ::)

I'm loving the ride Zee, and the price of a ticket is right.

getting railroaded,
Kermit
 

Latest posts

Back
Top