Brian Builds the Kerzel Hit and Miss I.C.

Home Model Engine Machinist Forum

Help Support Home Model Engine Machinist Forum:

This site may earn a commission from merchant affiliate links, including eBay, Amazon, and others.
Brian,

Nice big end. :bow:

Happy your big end came through without permanent scaring. ;D

Best Regards
Bob
 
Okay---First side is done. Now I will flip it end for end and machine the other end. I don't machine at the chuck end, because the lathe dog is in the way.
machiningcrank-4001.jpg
 
Thats it!!! I'm done. A bit of deburring and polishing, and trim the ends to the correct length--(I started with stock 1" longer than I needed exactly for that reason---to trim off the countersunk holes in the ends.) Now if I've lived right, and the whole thing doesn't pretzel on me when I remove the clamp bolt, then I'm happy.
machinecrank-5001.jpg
 
Hi Brian. That's a mighty fine looking crank you got there! I don't enjoy turning them from solid. Maybe I'm machining at too high of a speed because the webs and rod journal becomes uncomfortably invisible to my eyes.

Good work! :bow:

-MB
 
Brian, what spindle speed were you running when you cut the C'rod journal? (more or less)

(becoming the pest from the West)
BC1
Jim
 
Highest speed I can run is 950 RPM with that offset load from the lathe dog. All cutting was done at 250, 550, or 950 RPM. I only used the 950 for light finish cuts with lots of coolant or cutting oil, to get a bit better finish.
 
Nice job on the crank. I always find it very satisfying to look at a finished crank. Just seems like the pinnacle of achievement in metal working.

Chuck
 
Before committing myself irevocably by cutting the ends off the crankshaft, I took 2 peices of scrap brass and drilled/reamed a 3/8" hole in one and a 7/16" hole in the other. This was to perform a final "check for fit" to make sure the crankshaft diameters were correct. Both of the 3/8" outer ends were still a bit large, so I set the crank back up "between centers" same as yesterday and VERY carefully dressed them both to a final 0.375" so they would both fit into the reamed peice of brass. The lathe dog fastens down on that last 1/2" at each end which will be cut off, so I'm not worried about marking the crank. When I got to the 7/16" inner ends, one needed about .002 more turned off it, the other end was about .005 undersize!!! :mad: :mad: thats not a huge problem---I will line bore the bushings instead of ream them. If one bushing is .005 smaller than the other, no-one will know but me. ;D ;D
checkingcrankshaft001.jpg
 
Getting a crank, or any OD to an exact finished diameter can be tricky, at least for me. I sometimes wind up polishing the last thou or so with wet or dry sandpaper while spinning the piece in the lathe. Makes for a nice finish, too. Unfortunately, I've also thrown away a lot of pieces because I went to far and cut them too small. :mad:

Also, being a cautious type, cutting the crankshaft ends off is usually the last thing I do after the engine is completely assembled. Sometimes, I never cut them off...

Chuck
 
Hi Brian, using a custom size bush is a good idea, I like the simple solution. :bow:

Quote ??? ; no-one will know but me. ;D ;D

You do realize that this is an open forum?, and on The World Wide Web!

Your too funny. I can't stop giggling! :big:
 
MetalButcher--Hey, we get to have a little fun here too------This is a hobby, its not life and death. I try to give good information, I can be corrected without taking deep offence, and I can be a little funny too. Some of the other forums are full of mean spirited people who frown on any levity at all.
 
Things have stumbled to a halt, for today, anyways. If I had machined both crank journals to the correct 0.4375" diameter, it would have been a simple "Ream in line" job. Now however, I have to bore the bushings, and my long, small diameter boring tool was bent last year by some fool running the end of it into a blind hole whilst reaming. I went across town to the toolshops I deal with, and nobody has one in house. I ordered one, and it will be in tomorrow morning. While I was out, I bought a pair of 2 1/2" machinist clamps for $5.99 each on sale at BusyBee tools, 3 new ends for my deburring tool which I broke 2 years ago, orderd a 6" x 3/4" grindstone (green) for sharpening my carbide lathe bits, and ordered the missing boring bar. Remember a few posts ago where I said my "line boring/drilling/reaming set-up" was too ugly to post a picture of?? Well, in the interest of science, I have decided to post it today, because I had got to the first step of boring my crankshaft bushings and was going to photo document the entire process, before I realized that I lacked the appropriate size boring tool. First I mount an angle plate on the bed of my lathe, making sure it is set up at an exact 90 degrees to the front edge of the table. Then I set the engine base against the angle plate, with one side in contact with the mill table. I then put my big old welding vice grip style clamp on it with a peice of brass under the jaw to keep from marking my engine, and tap the engine assembly down to make certain the bottom edge hasn't drawn away from the mill table when the clamp was tightened. I put a peice of 3/8" diameter stock in the chuck on my mill, and play with the Xand Y coordinate handles untill the 3/8" diameter peice in my chuck slips freely into the previously reamed bushings. Next step would have been to put a reamer or boring tool in place and cut both bushings in one set-up.
lineboringset-up001.jpg
 
Brian Rupnow said:
...tool was bent last year by some fool...

Hey! That same guy does things like that in my shop, too.


Looking good, you'll have a runner in no time.
 
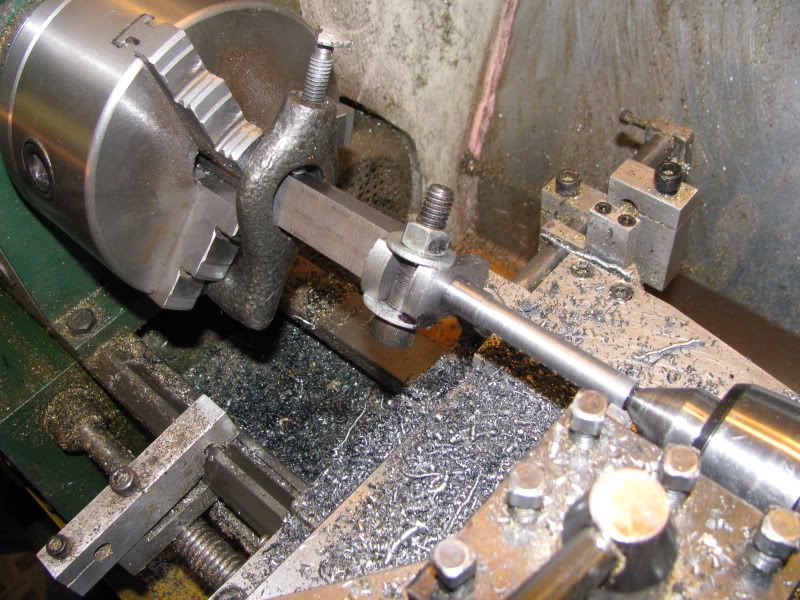
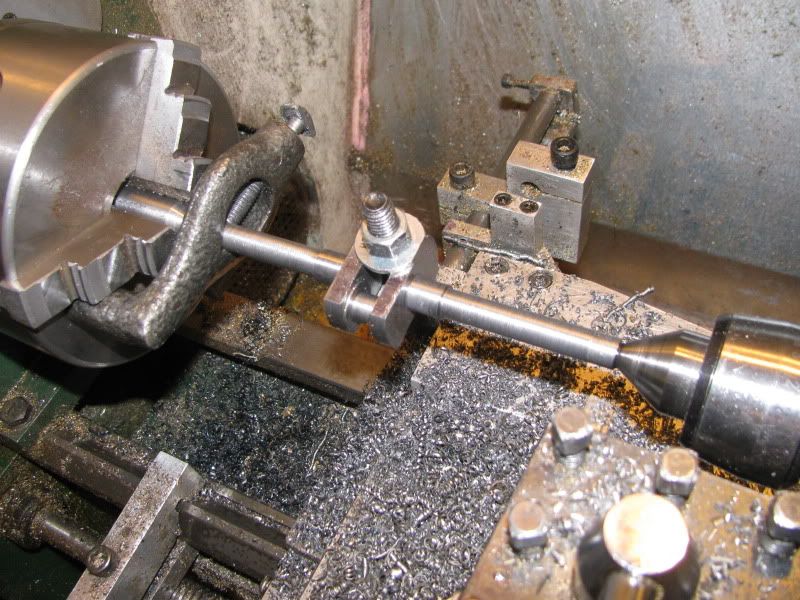
I may have discovered a major "GOTCHA" today with my lathe. I decided that since my mill was tied up with my bushing boring venture, I would throw a peice of aluminum up in the lathe and make a piston. Now I don't have a nice, adjustable height toolpost, so I have to use a variety of shims under my cutting tools to get the correct tool cutting height. My tool was a little low today (Jeez, that almost sounds like a medical condition.)--and when I faced off the end of the aluminum, it left a little tit about .030" diameter in the center. No problem, says I---I'm going to put a big counterbore in that end anyways. I put the chuck in the tailstock, and ran it up close ready to start drilling---and immediately noticed that there was about 0.040" misalignment between the tip of the counterbore and the aluminum "tit". Whoaaaa Nelly---Whats going on here????? I took a close look at the tailstock, and noticed that both adjusting screws in the two peice tailstock were loose, and the tailstock was "drifting" back and forth by about 1/16". Damn, Damn, Double Damn---Why couldn't I have noticed that before I machined the crankshaft yesterday???? Perhaps the vibration from the interupted cuts was what made things loosen up. I put a drop of thread locker on each screw, re-adjusted the tailstock on center, then walked over to the wall and banged my head against it 4 or 5 times!!! I'm not sure what the ultimate effect will be on the crankshaft. I won't know untill I get it in place in the engine and rotate it with a dial indicator on the shaft ends. I just HATE wobbling flywheels on an otherwise good looking engine. In the overall scheme of things its not a real big deal---$5 worth of material and a Sunday afternoon if I have to scrap it. Ah well,----I do this for fun.---just keep repeating---I do this for fun----fun----fun---(Betcha my 90 year old mother (Who seems to own shares in the United Church) would say---'Thats what you get for working on Sunday, son!"
 
No progress today. The tool supplier got my boring bar in this morning and the supplier sent him the wrong size. Thats okay though, because I have #1-Some "real" work to do. and #2-A terribly sore back. Leaning over the lathe most of sunday making my ill fated crankshaft has agravated a nerve in my lower back and I'm setting around with a heating pad taped to my computer chair and a gut full of Percosetts. I have to drive over to the far side of Lake Simcoe tomorrow to look at a potential automation job, an old customer from 2005 dropped in today to discuss redesign of a concrete curb laying machine I first designed 5 years ago, and a current customer wants to design a second hydraulic yaught lift. The way things have been the last two years, I don't turn down any paying customers. I will get back to the engine later this week (if my back sorts itself out). When I go over to the south end of town to pick up my new boring bar, Hercules O-Rings have a plant/distribution center over there, so I will stop in and buy a couple of Viton O-rings for the piston and the information on groove width and depth requirements.
 
Brian you have this best posts on the forum. Tell some one you have a bad back and they have a cure. Well for what it's worth I had one to. I went through the funny pills.exercise.walking and the heating pads. Nothing worked. However I got interested in working in my small machine shop building my first model a steam engine. About three months into the project and the aches and pains were gone. I am almost finished with my second model and I feel great. Try and pace your self and keep on machining and maybe the cure will work for you. Best of luck with your engine it looks great. Jack B
 
Thanks Jack, nice compliment. My sore back has more to do with being old and fat and not leading a very active lifestyle than anything else. ;D ;D
 
Finally, today my toolshop got in the correct boring bar for me. Tomorrow I will attemp to bore my crankshaft bushings, in situ on the engine. I'm really not very good with this boring head. It has a very small dial on it where you adjust the diameter, and its supposed to be set up so that one graduation on the dial equals .002" on the diameter of what you are boring. Perhaps its just me, but my results with it seem to be pretty "Hit and miss"---pun intended. My back it still badly messed up from last weekends machining marathon, so I won't be doing much. I would like to get the crankshaft mounted, and perhaps next week I can get the o-rings and groove information so I can finish the piston.
 
It's coming along nicely Brian - you are waaaay ahead of me. One thing tho', and you've probably picked it up already, Kerzel shows the bore on the small gear as 0.312" - I know you like tight fits ;) but you'll have a jolly old time trying to fit that on the 0.375" crankshaft.
 
This whole bushing boring issue has turned into a comedy of errors! Yesterday I reported that my tooling supplier had got in the correct boring bar on his third attempt.--WRONG!!!! He sent me one the correct length and shank size but too large a head diameter. On finding this out earlier today, I called a machining friend Colin, across town and asked if he had what I needed. He said yes, and I could borrow it. Drove all the way across town, and he had exactly what I needed---Except his boring bars had a 3/8" dia. shank, while mine are all 1/2" shanks. Borrowed it anyways, and built a 1/2" o.d. x 3/8" i.d. adaptor sleeve from a peice of brass and finally got the job done.
boringcrankbushings001.jpg
 

Latest posts

Back
Top