
You are using an out of date browser. It may not display this or other websites correctly.
You should upgrade or use an alternative browser.
You should upgrade or use an alternative browser.
Setting up Shop Questions - from an NZ learner
- Thread starter joco-nz
- Start date


Help Support Home Model Engine Machinist Forum:
This site may earn a commission from merchant affiliate
links, including eBay, Amazon, and others.
Don't get me wrong D, I have welded with it, I made up a tow bar for my mobility scooter, but not up to the quality I can obtain with gas or stick. I did 2 years of night classes at college to get those under my belt.
I think the main cause of the problem was the fact I was using the supplied gasless wire, and it spattered everywhere.
I do very little welding nowadays, so it would not be a viable proposition for me to get it fitted out with a large gas bottle when I can just get hold of a few rods and weld away with certainty.
Thanks anyway for the tips
John
Hi,
Ahh, I understand. Flux-core can be a pain in backside. It is completely possible that the supplied spool isn't much good. Pretty common with the smaller home machines.
Dale
goldstar31
Well-Known Member
Good Morning, James! Apologies for delays but I've been spending a few days with my daughter and her family. Incidentallly, she is like her late mother a top welder and wire bender and silver solderer! Me, I'm merely one of these guys who was a bean counter in the days of yore but acquired a City and Guilds Certificate in Motor Vehicle Restoration and added a Certified Welder ' thingy. I also counted beans until I tired of that nasty complaint called 'Work' some 31 years ago:hDe: As my son describes it, I've been retired longer than I have ever worked. So my comments must be taken as advice rather than criticism. He, incidentally, seems to have picked up a knowledge of engineering along with his Cambridge degree in French and Geography. He blames 'moi' as his first car at 17 years was rebuilt from scrap and a loan of half the cost of £75! Been there, burnt holes in my tee shirt and all that.
So your Mig efforts? I suspect- and it is difficult to assess from photographs, you are not getting 'Penetration' . I've got a little similar job with square wall tubing- once the streets get aired. I'm lifting my little lathe above its lathe tray so that what is left of my arthritic hands will not be 'barked' from the handles. For what it is worth, I'm setting up the joints with a gap of the same thickness of metal - to get the required penetration of the weld.
Apologies- but I hope that this is constructive criticism.
As an addendum, might I suggest two or three things to add to your increasing experience?
The first thing is to register with www.mig-welding.co.uk. It's quite informative and I was able to resurrect a scrap 105A Mig.
The cost of changing over from gas to gasless was quite prohibitive.
The second was to try to get the videos from the Welding Institute to cover all three ordinary welding techniques. The Mig one, covered the restoration of an ancient MGB-- rather than my VW Polo with moss growing in the windows.
The third is 'spot' or plug welding which requires nothing more than a different nozzle. Saves a lot of fiddling about with a mask.
Time for coffee- again. I hope this helps
Norman
- Joined
- Dec 12, 2012
- Messages
- 2,220
- Reaction score
- 1,285
If you are doing a fillet weld as your photos appears to show
then you do not need penetration as such.If you are doing a butt weld then Goldstars advice is sound,although I would suggest a gap of 2/3rd the matle thickness,and if possible a light backgrind and a fillet on the other side
I would class myself as a good welder,but would most likely fail a weld test etc
But for us home welders its not necessary,it wont be holding bridges up
Reminds me of a time listening in to an old welder puffing on his pipe and
watching his lad turn over a large pipe with a crane
Ay lad what are you doing
Turning this pipe over to weld the other side
Nay lad says he they don't turn ships over
joco-nz
Well-Known Member
- Joined
- Feb 21, 2016
- Messages
- 566
- Reaction score
- 209
Thanks gents. From what I can tell with the joints being made I am doing a number of fillet welds and flare/bevel welds. Where there is in theory a butt weld I have not bothered welding since I have 3 of 4 sides welded and this is only holding up a desk top. So I should have masses of strength in place with what I have.
From what I can tell by looking on the insides of the open end tubes it looks like there is reasonable penetration going on. Of course when I start getting into building a welding table, or for that matter the stands for lathe and mill I will need to pay closer attention to penetration due to the weight to be supported.
But at the moment I'm having a blast making sparks and using the nicely tuned bandsaw. Currently starting to/trying to come up with a welding cart design that makes the most efficient use of the steel I have left over from this build. 4m of 30x3mm SHS and 6m of 20x3mm angle with a few meters of 25x3mm flat. I'm trying to work out a design that will have (ideally) 3 shelves (planning a ahead for ~180AMP AC/DC TIG and possible ~40AMP Plasma Cutter) and will be able to hold a couple of D size (2 cubic meter) bottles. If anyone has some suggestions from their internet wanderings it would be useful.
I'm wondering if the general approach would be to have the SHS for the high weight parts (base frame holding wheels and bottles) and the supports for the shelves. Then use the angle for the mid and upper shelves with some aluminium tread plate screwed/bolted on.
Cheers,
James.
goldstar31
Well-Known Member
Laughingly, Barry! Nissan used to give us Nissan Primeras which had failed the inspection process. Then the instructors got into the panels with air saws and we had to stick the bits back on. The next bit was 'leading' and then painting.
Of course, the Primeras had to be handed back- for tax purposes.
Oh yes! Ships? My mill stand has quite a bit of metal out of Swan Hunters shipbuilding- courtesy of the late son of one the founders.
A reward for helping with his MGC cylinder head.
Of course, the Primeras had to be handed back- for tax purposes.
Oh yes! Ships? My mill stand has quite a bit of metal out of Swan Hunters shipbuilding- courtesy of the late son of one the founders.
A reward for helping with his MGC cylinder head.
goldstar31
Well-Known Member
If anyone has some suggestions from their internet wanderings it would be useful.
I'm wondering if the general approach would be to have the SHS for the high weight parts (base frame holding wheels and bottles) and the supports for the shelves. Then use the angle for the mid and upper shelves with some aluminium tread plate screwed/bolted on.
Cheers,
James.
Obviously, I have little time but I recall that the web site mentioned seemed to be littered with welding trolleys as 'party pieces'
Cheers
N
Using this one as inspiration from indicated site, which I seemed to have already ferreted away in my reading list. Thanks for reminding me of its existence:
A couple of suggestions that might be worth considering:
1. Welders require a few expendable so and frankly a couple of right Angie grinders. Ideally you want the parts for the welder collocated with the welder. Thus I highly recommend building drawers or using prebuilt toolbox mid sections in the design. Possibly consider a low profile roll around tool box. At least for me this prevents having to run around for tips, grinding wheels, spanner wrenches and the like.
2. If not drawers shelves to hold fishing tackle boxes or similar storage containers are a good idea. All the little bits need to be corralled and somethings (like feed wheels) you don't want to misplace. Shelves with tackle type boxes provide a way avoid loss of "stuff".
3. Add hangers for cables. Eventually you will find yourself wanting extension cords for the leads or supplies. Same thing for hoses. In fact for gas tanks it might pay to have a manifold mounted to support a number of hoses. A manifold becomes useful if you need to shield a back side or purge a pipe in prep for welding. Additional shielding gas can be important for things like stainless. You may not need it immediately but thinking about a manifold for your cart in the future can make an upgrade easier.
4. Space for one of those tiny bench grinders people use for TIG electrodes is nice to have too. If I understand this thread right you have a MIG / flux ore welder so this does apply right now but if you do plan on an additional welder it is well worth considering.
5. Speaking of grinders, they require AC power. As such it is worthwhile to add support for AC outlet power for hand tools, again a place to hang long cords upon. In the USA this would mean a 110VAC outlets, which can be done simply with a cord that has multiple outlets. Or you can get more complex with built in outlets if you are familiar with local codes. By the way this is great for lighting too. The minute you want to use the welder outside, say on a car or other big project the more desirable cord "management" becomes.
On another note you expressed a disinterest in penetration, I'd strongly suggest that this should be a primary skill to perfect. That is learning to set the welder up for the proper penetration for the material to be welded. Like many here I don't have a professional welding background so I can't just flick the knobs to the right settings due to muscle memory so I usually engage in a lot of tuning to get good results. Once you get beyond the initial fun of making sparks your primary goal with every welding project should be to get proper penetration. You really don't want your welds to fail for any reason. If you have the resources and time I'd spend the next few weeks practicing setting up the machine to weld a variety of materials. The goal being to get good solid welds with proper penetration. On the flip side you don't want to put too much heat into a weld as that just creates a huge heat affected zone.
The key to welding is practice!
Using this one as inspiration from indicated site, which I seemed to have already ferreted away in my reading list. Thanks for reminding me of its existence:
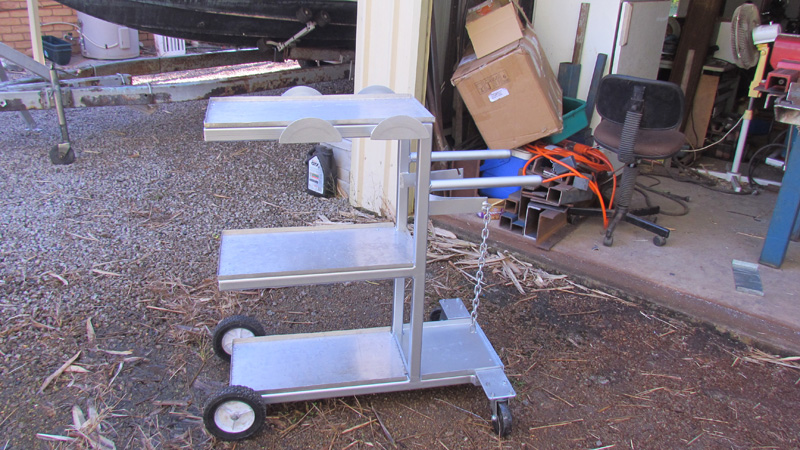
Oh I forgot one thing, those cantilevered shelves on those skinny uprights are a problem in my mind. I'd most certainly consider larger basic frame components just to prevent bending and twisting as the platform gets used. Something like 60mm X 30mm, 2 mm thick tubing, for the base and uprights, would produce a much stiffer frame. You could also use 2 inch square tubing. In either case use gussets in high stress areas. The idea here is to keep the frame light yet strong. However there are advantages to having lots of mass in the base of the frame, you don't want the cart tipping over at every crack in the floor.
goldstar31
Well-Known Member
Of course Wizard69 is absolutely correct. My top tutor( Alan Robinson), who wrote the 'standard' book 'Repair of Vehicle Bodies' for us, insisted that we must get at least 80% penetration before moving on. !
Digressing, there is a heap of 'cowboys' and worse with electrodes from coat hangers and other crap. Again, there were the suicide merchants who welded high strength low alloy steels with gas welding. A grave mistake:fan:
I repeat 'Practice, practice' until you can put the tail back on the donkey using the right flux.:hDe:
Another 2 cents....The cart needs to be strong enough and with big enough wheels so that it can be transported to another location. If you can roll it up a ramp onto a truck and safely tie it down you win. Any 14-50 (stove) circuit available will do for a remote welding job. I have even used both sides of a split 15 amp circuit to get 240 VAC and by keeping the current low and using thinner rods welding remotely can be done.
Sooner or later a buddy will ask for your help to weld something that can't be moved to your shop.
The top shelf in the sample picture can be angled back for easier setting of welder switches but for sure this will be a top heavy rig. For my big stick welder the case itself becomes part of the cart. It stays low with wheels and legs attached. A long handle with hooks for extension cable and welding cables plus a welding pouch for rods completes my set up. I can easily tip it back on the wheels to move it. Simple is good.
Whatever you build it will be the last one so plan it carefully. At least that has been my experience with setting up a shop. Once I build a cart or table it stays that way for decades. Function is better than form for me.
joco-nz
Well-Known Member
- Joined
- Feb 21, 2016
- Messages
- 566
- Reaction score
- 209
Cheers gents. Appreciate the feedback and ideas.
I was perhaps giving the incorrect impression re penetration. I believe I have good penetration on the work to date. However given its expected load I have not gone OTT re cutting up and etching a sample weld. However, there are projects I am about to get into that will hold significant weight and I will do sample welds on that material and cut/etch them to ensure what I believe is good penetration is in fact good penetration. With the settings and technique in use.
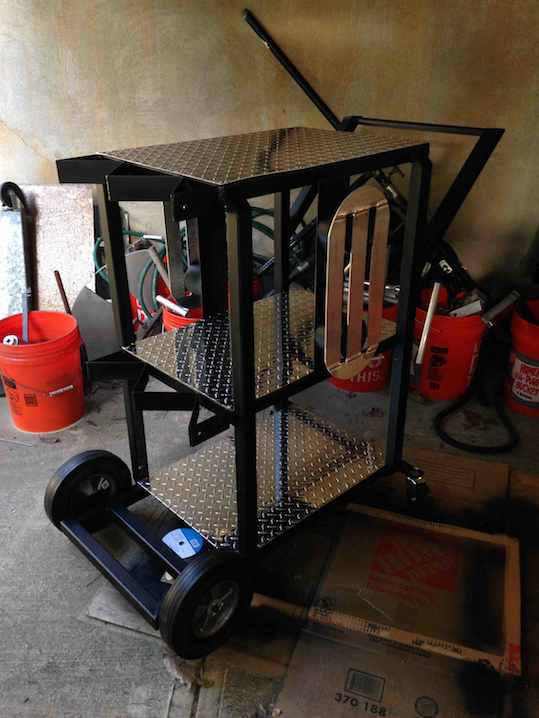
On the welding cart front, since I am going to need to get some metal to do the job I think I will end up following the build of Jody Collier from http://www.weldingtipsandtricks.com. His cart looks very solid and is big enough to hold a lot of stuff including some redesign for a draw or two (which I think is a really smart idea). I'll probably fabricate something unless I can find a metal draw system that will work.
I think I will continue to use 30x3mm SHS for this build. Its very solid and while the cart will get a little on the heavy side it will be built like a brick out house, stable and is not going to have any sag issues as it gets loaded up with gear (angle grinders, toolbox etc.).
Jody's design:
I was perhaps giving the incorrect impression re penetration. I believe I have good penetration on the work to date. However given its expected load I have not gone OTT re cutting up and etching a sample weld. However, there are projects I am about to get into that will hold significant weight and I will do sample welds on that material and cut/etch them to ensure what I believe is good penetration is in fact good penetration. With the settings and technique in use.
On the welding cart front, since I am going to need to get some metal to do the job I think I will end up following the build of Jody Collier from http://www.weldingtipsandtricks.com. His cart looks very solid and is big enough to hold a lot of stuff including some redesign for a draw or two (which I think is a really smart idea). I'll probably fabricate something unless I can find a metal draw system that will work.
I think I will continue to use 30x3mm SHS for this build. Its very solid and while the cart will get a little on the heavy side it will be built like a brick out house, stable and is not going to have any sag issues as it gets loaded up with gear (angle grinders, toolbox etc.).
Jody's design:
goldstar31
Well-Known Member
James
Apologies, but I had no intention of suggesting that you create a Quality Control lab and etch your embryo welds.
Suffice to have a test piece of a join in flat plates and nothing more than turning your work on its back - and seeing that your efforts have penetrated the thickness of the metal which in your case is as 3 milly or an eighth in my book.
Regards
Norman
joco-nz
Well-Known Member
- Joined
- Feb 21, 2016
- Messages
- 566
- Reaction score
- 209
Norman - All good mate. ")
I can be an anal whatsit and will do a weld etch thingy (already found out how to do it using easy to find products) at some point. Just so I "know" what the heck is going on. :thumbup:
And before I launch into building welding tables and lathe/mill stands I sure as heck will be checking that the output from my weld settings and technique are rock sold before letting thousands of $$ and hundreds of kg of weight be positioned on top of them.
Cheers,
James.
Last edited:
If inspecting welds is important to you as a hobby, go for it but in my experience we are not welding pipe lines or bridge work. As long as you do not have 'cold' welds that look like lumps of deposited metal the weld is strong enough. Check the strength of the rod material that you are using. Thousands of lb/sq inch is a comfort factor that a tool stand will not collapse due to a less than perfect weld.
Your welds look strong enough to me but to be sure find a university with an engineering lab and have your first stand crushed. That would be the best test.
I like your idea to continue using square tubing. It is very strong and the finished product when painted looks good too.
I see that you are having fun so carry on.
joco-nz
Well-Known Member
- Joined
- Feb 21, 2016
- Messages
- 566
- Reaction score
- 209
DJP - thanks for feedback on the welds. It's good to have someone who has the experience letting me know I'm heading on the right track.
The etching thing is probably just my focus on the doing things as well as I can. Cheers.
The etching thing is probably just my focus on the doing things as well as I can. Cheers.
- Joined
- Dec 12, 2012
- Messages
- 2,220
- Reaction score
- 1,285
I would class myself as a good home welder,and have never done an
etchy sketchy thing yet.Havent even cut thru a weld to check penetration
By the time you have done a few welds you tell e good un from a bad un
A good weld is far stronger than the base section and for what you will be doing
is more than adequate.As others have said if you want to weldtest for your
own amusement then go ahead,but chemicals for dyetesting are expensive and messy.From the photos you showed the fillet are good enough now and will
only get better.Hows it going with the lathe and the mill ?
joco-nz
Well-Known Member
- Joined
- Feb 21, 2016
- Messages
- 566
- Reaction score
- 209
On the weld etching front the game plan was to follow the ideas from here: http://www.weldingtipsandtricks.com/macro-etch.html
So while there are chemicals to use nothing like the nasty nitric acid solution that the "proper" way would have you do.
So while there are chemicals to use nothing like the nasty nitric acid solution that the "proper" way would have you do.
Similar threads
- Replies
- 44
- Views
- 8K