Vega 9cc v twin

Home Model Engine Machinist Forum

Help Support Home Model Engine Machinist Forum:

This site may earn a commission from merchant affiliate links, including eBay, Amazon, and others.
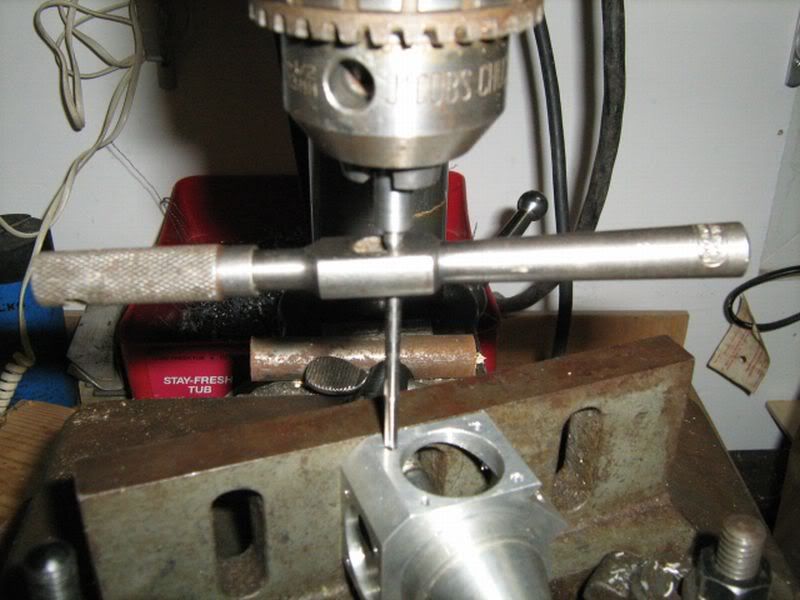
After much procrastination I have started making the cylinders. It was hard to find the courage to make the first cut. I spent about an hour going over the measurements and checking and re checking the positions on the leadscrew wheel.
Finally decided I had all the numbers written down correctly and got on with it.
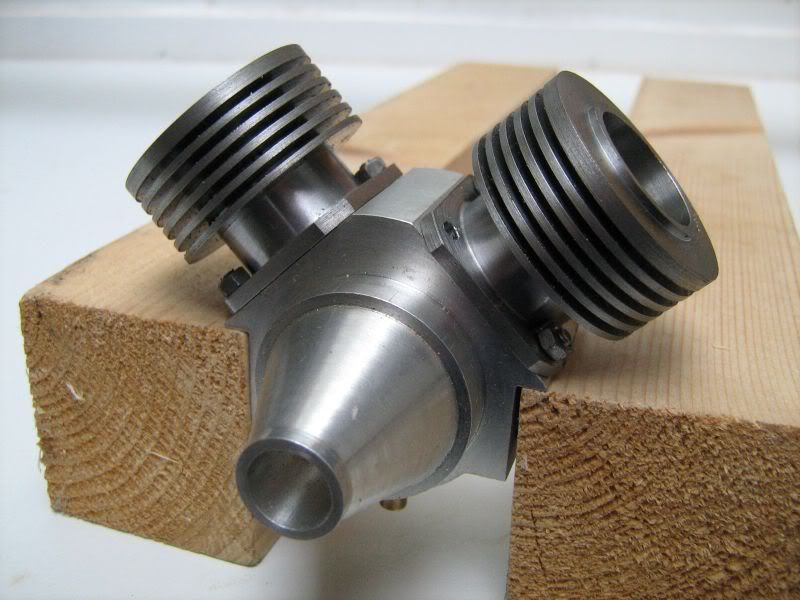
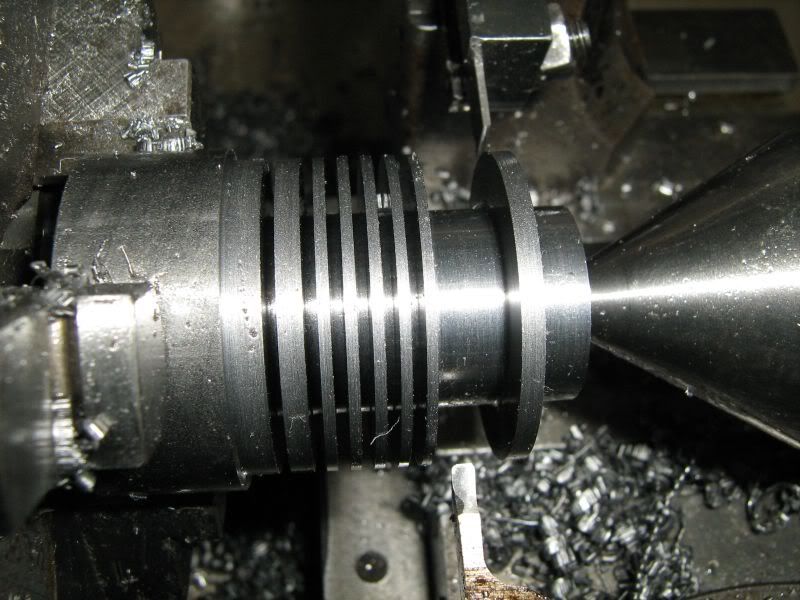
Had to be slow and steady using middle speed with the backgear on my Myford but all went well without mishap. The fins are 45 thou with 55 spaces.
Vegacylinder1_20091008_2.jpg


Vegacylinder3_20091009_4.jpg


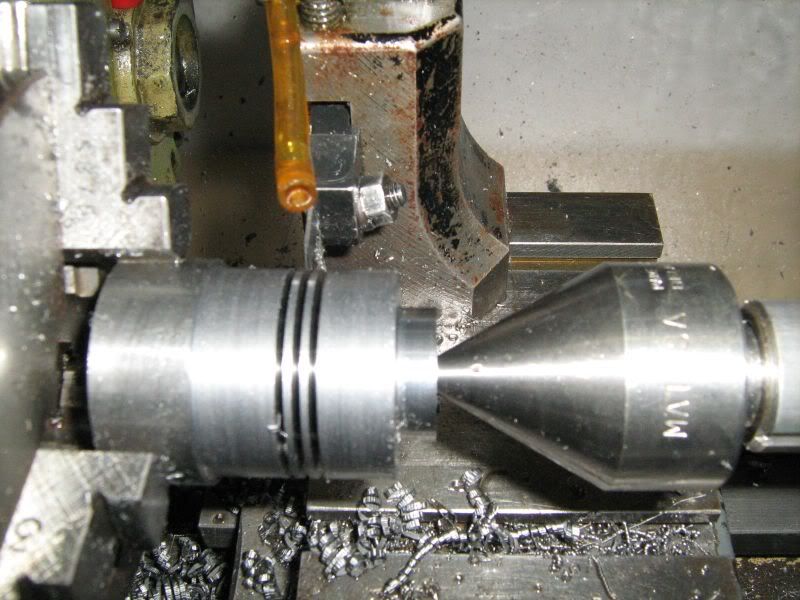
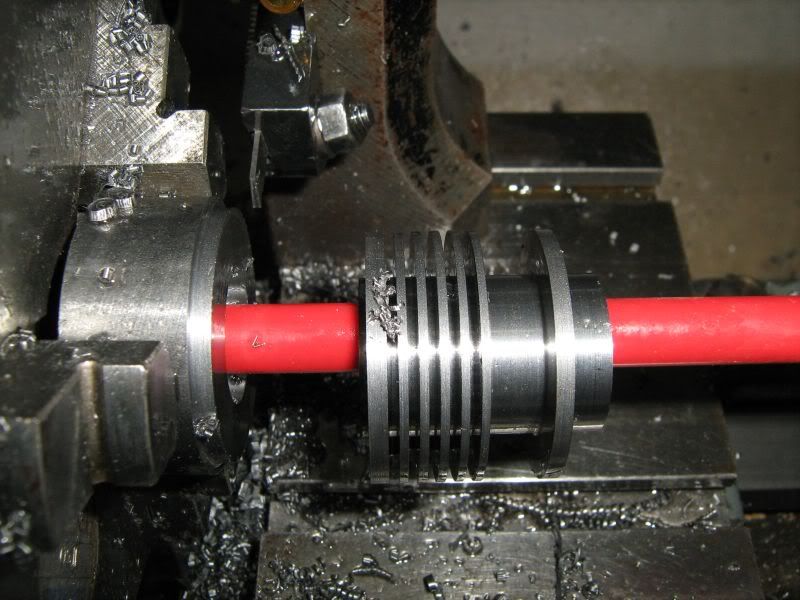
So with the outside finished I started drilling the bore. All going fine until the drill (11/64 I think) bit for some reason and snapped !!! And there was me fretting over the fin cutting. The broken piece came out easily and I started to breathe again. Ready to have another go with a smaller size to try and ease things through found the cylinder had shifted in the chuck. Out with the clock and set up true after almost giving up. Had to use a boring tool earlier than I planned but now have a cylinder bore 2 thou undersize ready to lap. I think I was a bit lucky.
Number two I have drilled through with ¼ before finishing the outside. No problem with that. Now ready to bore out to ¾ inch.
Vegacylinder4_20091009_5.jpg


When I bought the model engineer magazines with this article in them I was perhaps a little naïve in thinking all I had to do was follow the instructions. Not having built an engine before I realize now that it was not a good choice for a first project. I do however believe I can finish it and hopefully get it to run.
I am however suffering from a lack of confidence in posting this stuff. I am well aware that I cannot meet the high standards of some on here who can explain and photograph things very well indeed but I will do my best and hope someone finds it interesting.

ttfn Peter

 
Peter i fully understand your comments about confidence but you are too critical on yourself (not a bad thing sometimes...) but your photo's and posts are of real interest to me. Additionally by giving your experiences warts and all, only help others just starting. I always thought (before coming to this particular forum) that 'real' model engineers got it right every time. It was only me that got nervous about cutting or carrying out a new procedure to me, but the reality is that the fear is almost always worse than the experience itself

I shied away from the faceplate for a long time, now I use it quite a bit and enjoy using it. The same with using a rotary table, I could go on. So you are doing a great job for all those who have yet to tread your path. You also get the benefit of those with more experience giving their advice. Every one is a winner so keep going is my advice!

MM


Peter,


I agree with MM, you are doing great. I suffer the same confidence issues as you, but you seem to over come them better. Gives me something to shoot for. Keep at it.

Ron
 
Whew Peter. Very glad it ended well. Great post too. I almost felt I was there feeling the angst and the joy.
 
Thanks Peter for sharing with us your fears and reliefs. You just go right on posting pics (nice by the way) of whatever it is you are doing. I for one certainly do appreciate having a visual reference to help guide my rather 'slow' mind and it also helps to me get ideas from setups etc. that folks are and have been using to good and sometimes not so good results. Carry On!!

BC1
Jim
 
Looks the biz to me chief !!!!!!!!!! Every day is a school day .
I did my time in the weapons industry and have seen and made some huge mistakes big money and big stuff .And guess what ,still scrapping stuff now in my shop at home!!!!
Nobody is imune from the engineering gremlins !!!
Good work :)
 
+1 on MM's comments (and others). I'm new and need to see all the tribulations I'm likely to encounter - and have to correct/cure!! Great work Peter, forge on....

Cheers
Garry
 
Thanks for your candid comments mate, Im a relatively inexperienced machinist with big plans.... confidence is the main issue and Im damned surprised at how stressfull it can be until I take the part off the mill/lathe whatever with a successful finish (unfortunately its not always this way!). Cheers

Rob
 
Peter, the lads have said it all really, your doing bloomin well and everyone is enjoying and learning from your progress, me especially ;) .............. and your photos are pretty good too 8)

Posts including "warts and all" are what we all learn from the most so please carry on Thm: ........and don't have a lack of confidence, your fluted cylinder is a nice piece of work :bow:

CC
 
Artie said:
.... confidence is the main issue and Im damned surprised at how stressfull it can be until I take the part off the mill/lathe whatever with a successful finish (unfortunately its not always this way!). Cheers

Rob

Rob,

Why should we be the only ones who feel that way!
;D

Ya doin fine!, and WE are in good company.....soldier on!

Dave
 
Dont lack confidence, that parted cylinder looks great.
I have a few pics that I was unsure of, they dont look as good as your last pic.
-B-
 
Thanks for all the kind words. You have spurred me on.
The cylinders have had the flange milled and fixing holes drilled. Today I tapped the crankcase for 6BA studs and fitted the cylinders to see how it looked.
tappingcrankcase_20091016_9.jpg

fittingcylinders_20091016_9.jpg

For scale the timbers are about 45mm/1and1/2 inches square.

ttfn
Peter
 
Very Nice. Those cylinders are nice! Did you choose that metal specifically or just have it around the shop?
 
It really looks good when it starts coming together.
Keep up the good work!

Dean
 
Diy89 said:
Very Nice. Those cylinders are nice! Did you choose that metal specifically or just have it around the shop?

Thanks I am pleased with them too. They are EN8m as specified by the designer. I asked around my local engineering shops but nobody was using any so I had to send for some.

Peter
 
That's looking very good Peter Thm:

Regards, Arnold
 
Had a go at making a lapping tool this week. After reading all I could find and taking into consideration my skills (or lack of) and the materials I had, I decided to try the split method using copper given in LH Spareys book.
After turning the diameter and grooves I drilled halfway with 1/4 to take a piece of steel that is cut to a wedge.
Then cross drilled with 3/16 and joined the holes with a hacksaw cut. This is where things didn't go quite as planned as you can see from the photo the cut ran off centre at the back and wobbled a bit in the middle. After some adjustment to get the wedge to engage in the slot it seems to work ok and I can expand it to the 750 thou I need without much effort.
The photos should explain what's going on.
Here are the two parts with a cylinder for scale.
lappingtool2_20091128_9.jpg


This is the side that went off centre
lappingtool1_20091128_9.jpg


I could do with some help now please as I am unsure if the errors will make a difference to how it will work so any comments would be welcome.


Mo,

I don't think the run out of the slot will make any difference or problem with the lap. I had trouble getting the wedge to stay put at the setting I wanted, ( it kept coming loose). From memory I held it in and set it using the tailstock and allowing a drill chuck to rub on the end of the wedge. Have a look at "3cc diesel My First ICE," if you think it will help.

Best Regards
Bob
 
Thanks Bob,that didn't come up in my searches and you actually made the same design. Milling the slot though,that's cheating ;D he definitely said you must use a hacksaw. Seriously though that must have been a very small cutter. I did wonder briefly if I could machine the slot but it seemed too difficult for me to attempt.
I am feeling more confident about it now but I think I will bore out a piece of scrap to practice on. I'll also then see if this wedge comes loose. I had to grip it in the vice to get it out but I guess it is the action in it being used that works it free.

My other concern is bell mouthing. My feeling is that I should proceed with the bottom of the cylinder towards the chuck and not take the top past the cutting area of the lap but just up too it.
Or would that be opposite and actually cause more to be taken at the top? ???
Any thoughts?

Thanks,
Peter.
 
Hi Peter.
I had a quick look at my Sparey book - I was sure Mr Sparey mentioned somewhere that you could use slight bell-mouthing to your advantage for IC engines. I don't see it in the section on lapping though, but I _think_ it is referenced somewhere in the book (if you are referring to "The Amateur's Lathe") - but the top of the cylinder must be toward the chuck - in effect making for a slightly tighter dimension of your cylinder, and thus higher compression at TDC in the engine.

Not much, I know, but HTH.

Regards, Arnold
 

Latest posts

Back
Top