Transfer Punches

Home Model Engine Machinist Forum

Help Support Home Model Engine Machinist Forum:

This site may earn a commission from merchant affiliate links, including eBay, Amazon, and others.

BobWarfield

Well-Known Member
Joined
Dec 27, 2007
Messages
1,151
Reaction score
1
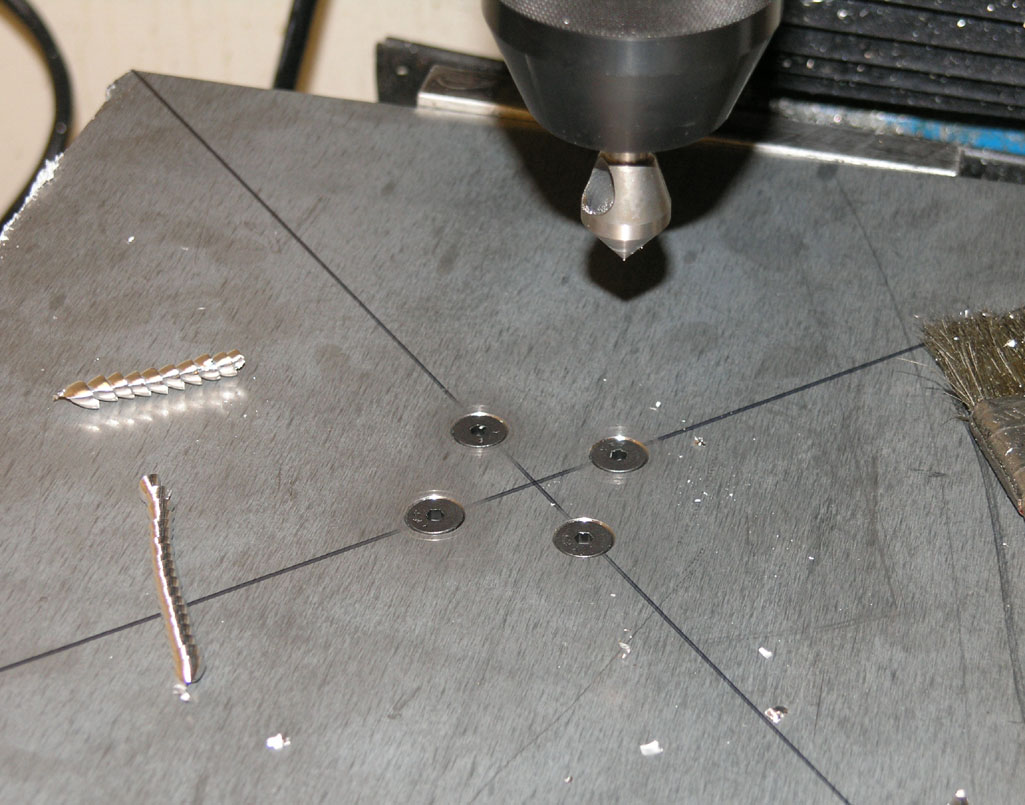
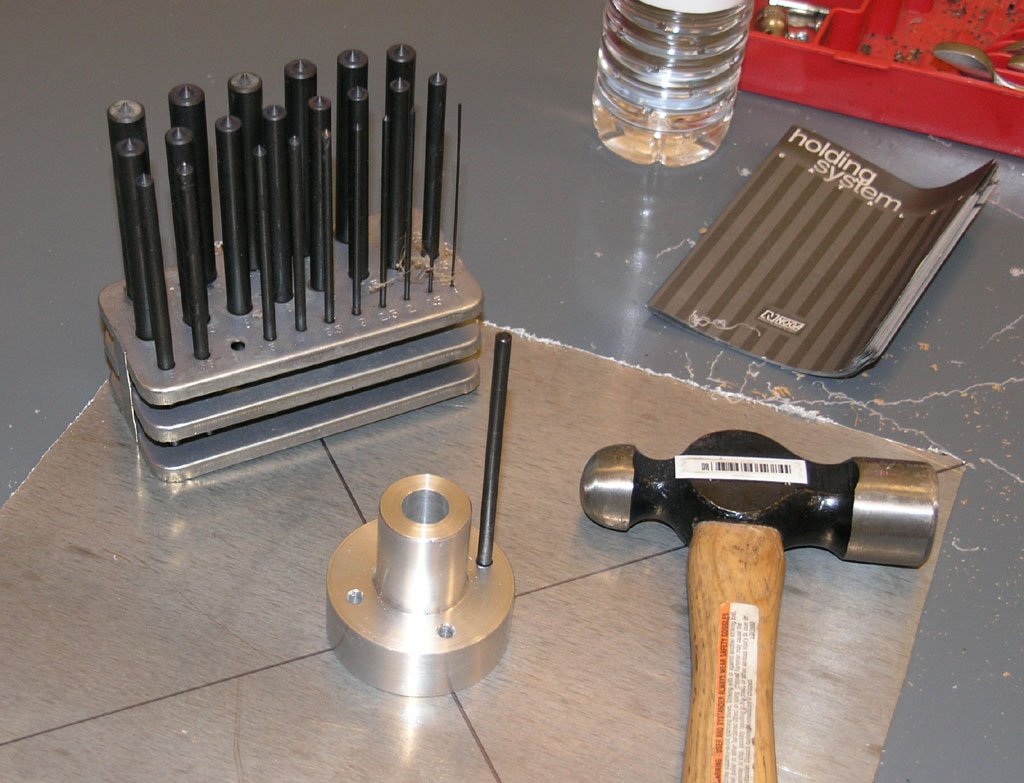
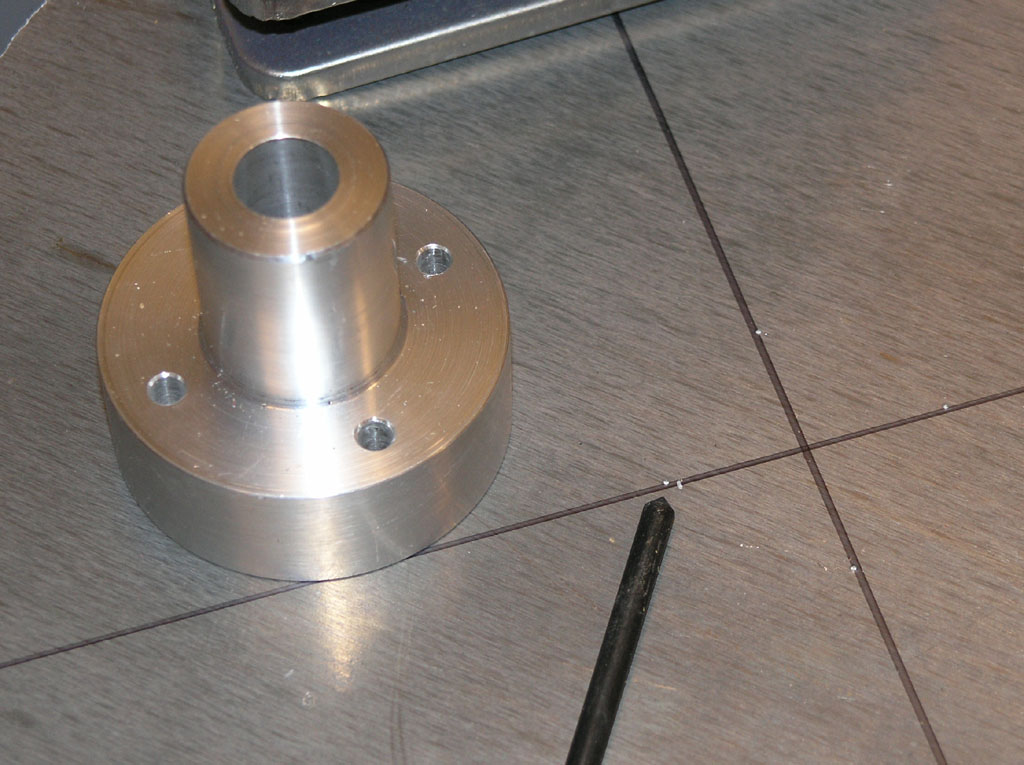
One of the most useful and used tools in my shop is my set of transfer punches:

P1010160.JPG


I know you experienced hands bought a set long ago, but for the newcomers, they are cheap and the best thing since sliced bread to transfer hole locations. This is not going to be awesomely accurate (lots of strategies for extreme precision), but for quick and dirty it can't be beat. You can also by transfer screws for blind holes. You screw them into the threaded hole and they have a point on the end like these transfer punches. Tap your piece and the point transfers the hole's location.

When done with my transfer punches, I had this:

P1010161.JPG


Transfer punches are easy to find from the Asian tool outfits. My transfer screws were harder to track down and more expensive. I bought both an English and Metric thread set from somewhere on the web, but I don't recall where.

Best,

BW
 
This is one of the things that everyone has and uses and forgets to tell anyone about. Make sure you just tap the punch. A lot of the cheaper import sets are not heat treated very good and you will mushroom the point. Just use these to mark your hole locations.

Hey Bob, What you makin?:O)

Wes
 
LOL, that's the hub for my 12" disc sander. Now I need a disc, otherwise I'll have a 12" "square" sander.

I just got that plate all nicely drilled and countersunk for some flat head socket screws:

P1010166.JPG


Now I'm mounting my new 6" 4-jaw chuck to my 8" Phase II Rotary Table. I wrote about the new chuck over on "Deals & Steals". It's a real nice one from Shars.

The plan is to get that hub concentric on the rotab, mount the plate to it, and spin that bad boy while the mill makes it round. At least that's the theory. I also got a Blake Coax clone, courtesy of this site's bad influencers like the Swede whom I asked on that other thread.

Anyway, it's an interesting operation (for me anyway, LOL), so I may do a post on it when I get it together.

If you want to follow the disc sander project's progress, it's over on my site:

http://www.cnccookbook.com/CCDiscSander.htm

I won't bore you with too many progress reports, but I'll be sure and post when I finish the darned thing. It's been a good excuse to buy more tools if nothing else. Coulda had a nice disc sander for all the time, frustration, and money, but then it wouldn't have been a hobby, eh?

Cheers,

BW
 
You know on those tranfer punch sets we made a ton of bushings for them so they go way up to any size we want.

We have a 70 ton ironworker to punch holes so it dont take all year, I sure love that machine.
 
yup, they are a very usefully tool. here's my spin on them and what I've learned over the years...

first, i make my own, not because I'm cheap (i am) but because there are a few advantages to home made ones in model making. doesn't take long before you have all the common screw sizes, national, BA etc,

imo the pips are too large on the commercial ones. I like the pip to be very small, often in models the length of bore is very short, so you want the pip small so more of the sides of the punch engage in the hole. I'm very gentle (tap very small hammer) with them because i don't want to disturb the set up - don't want the two parts to shift . since I'm being gentle, I use the transfer punch to make the smallest of marks and then enlarge with a prick punch & centre punch....the requires only a very small sharp pip. For more accurate work, give it the lightest of taps and then use an optical punch to pick up the mark the transfer punch made.

the commercial ones are all the same length - more fine model work something proportional is easier. i was using a small homemade 7BA one today, about an inch long, would have been a bit of pita if it was the full length of commercial ones and the pips are too big for fine work imo.

Next, you can make them a very accurate fit in the holes (drill the holes then measure then make the transfer punch to minimize clearance), the less clearance the better AND with a decent collection of drill rod, you can make what need on the spot. Its minutes to make...turn drill rod to size and face with a small sharp pip in one set up. heat the pip to red and oil quench. i don't bother letting it down. Its a good idea to keep a selection of drill rod in stock so tools can be made on the fly

Another tip, when you are doing something where a mistake is disastrous, like say 10 bolt holes from a cylinder head to a cylinder block casting, don't try to punch all 10 at once - something could move. I'd do two, tap them, drill clearance size in the head, then with the head firmly bolted in place transfer the other eight
 
Good tips, Mcgyver!

Now let's turn this around. For the experienced hands here:

Suppose you need to locate the holes much more accurately than a transfer punch allows. What's the best way to do that?

I know of a couple of methods, but I'd love to learn something new.

Cheers,

BW
 
Bob good advice:
I have the Three sets of Asian import transfer punches.the A-Z ,1-60 and fractional.
Mike and spin doctor :
I like the universal also for larger projects. I used it a lot while working in a steel fabrication shop. It saves time if you layout and punch one part then transfer the hole location to duplicates especially in a close counts get 'er done environment.
Mcgiver also good advice:
In the aircraft sheet metal shop the punches we had were only in a few common sizes and had the "small pip" unlike the commercial imports. Some of them were shoulder style ie the end to hold and tap with a hammer was one size and the pip end was smaller I see a real advantage here especial for the higher numbers and the small fractions. This also eliminates the need for a full assortment of drill rod just keep a few common sizes and turn down the business end to size. Another option I have considered is customizing the import ones they are pretty cheap when found on sale and they have the handy organizers. Double sided tape can be handy for keeping the parts from moving but have a posaitve index like you mentioned is a good idea.
Tin
 
BobWarfield said:
Good tips, Mcgyver!

Now let's turn this around. For the experienced hands here:

Suppose you need to locate the holes much more accurately than a transfer punch allows. What's the best way to do that?

I know of a couple of methods, but I'd love to learn something new.

Cheers,

BW

This all depends on how deep your pocket is.

Plenty of cash, go get a CNC machining centre, just program it and viola, perfect hole location.

Next best method, is go get some DRO's for your milling machine and let the DRO's do all the calculations for you. Very accurate and very easy to do.
Failing that, back to the good old mathematics tables and work out your bolt hole circle sequence, pain in the butt, but it does work. Only as accurate, as the person can be, who is doing this.
There is a method, where you know that the hole should be, you then make sure that the centre pop is exactly in place, then you mark out a box, the same size as the hole you want to drill. Then when you start to drill the hole, you can see if the drill is wandering away from dead centre. You can get good results from this simple idea.

Failing all of the above, just keep using the transfer punches and hope for the best, all your mistakes are then just a learning curve.

regards greenie


greenie said:
Failing that, back to the good old mathematics tables and work out your bolt hole circle sequence, pain in the butt, but it does work. Only as accurate, as the person can be, who is doing this.

Or use my BOLTCIRC program.
 
Hi
You could even scribe a circle on the face you want to put the bolt holes in and then step off the divisions with a pair of dividers. With care you should get as close as youl ever need. If you have to machine up a plug to go in the middle of the flange with a lite centre drill mark as a guide for the fixed leg on the dividers.

Even easier use the tables in the back of your Zeuss book.

Cheers kevin
 
compound driver 2 said:
Hi
You could even scribe a circle on the face you want to put the bolt holes in and then step off the divisions with a pair of dividers. With care you should get as close as youl ever need. If you have to machine up a plug to go in the middle of the flange with a lite centre drill mark as a guide for the fixed leg on the dividers.

Even easier use the tables in the back of your Zeuss book.

Cheers kevin

Did my first bolt circle stepping off with dividers. That's how I found the right circle when I made my first lathe chuck adapter. It works pretty well.

You could definitely use a CNC with a probe to find the hole locations, and it costs less than you'd think if you build the CNC as some on these boards have done.

The DRO idea is one of the best. There's a great thread by Widgitmaster over on CNCZone about how he used his DRO to reverse engineer hole positions when he converted a Hardinge turret for his lathe.

My favorite tool for finding locations very exactly is my surface plate and height gage. With a dowel pin in the hole, I can dial in coordinates pretty quickly. If you don't have a DRO, that may be the quickest and cheapest route for an HSM.

After I had assembled the hub, the other obvious thought came: I could've drilled the first hole in both, bolted them together, and then just drilled through both pieces. That would ensure that they match up exactly.

I hate how I figure out the simple stuff after it's too late!

Cheers,

BW
 
Hi BW
i have to say I never have found a good use for CNC in the one off field of work. I use CNC for mass production runs on bits and bobs but farm it out to a mates shop, for making 100 of one thing CNC is superb. The odd time I have had a go at CNC for one offs it always felt like I could have done the job faster on a manual machine.
DRO's are a great asset on any machine and a lot easier to read. Mind you with good dials on a mill its more than possible to use the Zeuss book and get perfect results every time.

I suppose im just old fashioned in the ways I do things.

Cheers kevin
 
Kevin, for some things you are undoubtedly right that it manual could be faster than CNC. What comes to my mind is quickly making a bushing or spacer to a particular spec on a lathe that is a one off.

However, conversational CNC is pretty darned easy these days, and there are one offs that you just couldn't do without CNC, DRO or otherwise. Just too many features that would take ages of fooling around with rotabs and odd setups that the CNC can profile out real fast.

Personally, even though I have more manual than CNC experience, I would not hesitate to take an "all CNC" situation over an "all manual" situation.

Best,

BW
 
Let's not loose the subject line of the thread here.

Personally I have both CNC and manual experience in the work area.

I have no CNC machines at home, but I am impressed by the home built CNC
conversions I've seen posted in on this forum. It's a hobby that supports a hobby.

For the CNC hobbyist writing the program may take hours.
Watching the machine run that program to make the part in minutes just adds
to the satisfaction and proof of their skills.

Rick


To accurately locate a set of holes I use toolmakers buttons.

Ian
 
I have a little CNC mill at home. It works great for drilling holes in precise spots, even on one-off parts, which is most of what I make. With a lightweight CAD/CAM system, it's only minutes to lay out and drill fairly complex hole patterns. Granted I'm sure I spend twice as long as I need to doing other stuff that would be quicker on a manual, but them's the breaks until I get another mill.


Latest posts

Back
Top