Threading dial question

Home Model Engine Machinist Forum

Help Support Home Model Engine Machinist Forum:

This site may earn a commission from merchant affiliate links, including eBay, Amazon, and others.

SmoggyTurnip

Well-Known Member
Joined
Mar 12, 2008
Messages
106
Reaction score
0
I have done some threading - not much. I have not yet used the threading dial. I always left the half nuts engaged. I want to try using the threading dial but something is bothering me. I know that when I engage the half nuts if the half nuts are half way between two threads on the lead screw the carrage could move a little to the left or right - a 50-50 shot. So what happens when you disengage the half nuts and the gear on the threading dial lands on one of those spots where it does not fit nicely into the lead screw, is there not a 50-50 chance that sycronization will be lost. I guess not because machinests aren't gamblers, I just don't understand it yet.
 
Once you make the first cut the leadscrew is synchronized to the work as long as you don't rechuck or move the toolpost. You should be able to feel when the halfnuts engage fully. Start with the tool away from the work and use a slow speed; if the halfnut doesn't feel like it engages properly disengage and start over.

You need to be looking at the threading dial and engaging on the proper mark(s).
 
My concern is not with engaging the half nuts, it is disengaging them. This is when the threading dial gets engaged and I wonder how it can always get in the right place.
 
Smogs,

A bit of confusion here, so I will try to talk you thru it.

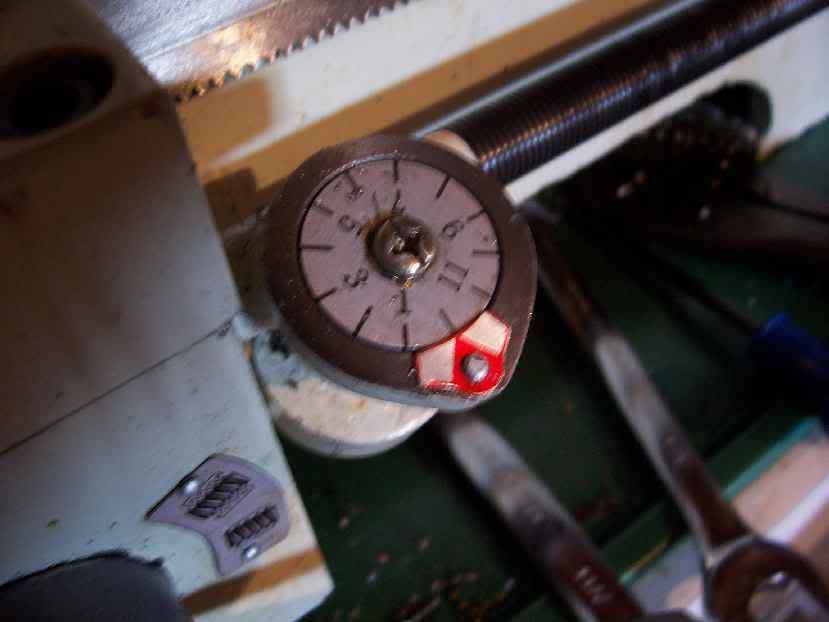
The threading dial should, when screwcutting, be permanently engaged onto the leadscrew. The threading dial tells you when the threads on the leadscrew are in the correct position for you to engage your half nuts.

When just starting out in thread cutting for the first time, it is best to disregard all the numbers on the threading dial except for one, and I would make that number No.1.

As kvom says, if you don't move the job in the chuck jaws, whenever you put the lever for the half nuts down, as long as that number you have selected on the dial is lined up with the pointer, the tool tip will be in the correct position for staying in sync with the thread you are cutting.

As I suspect, where your query comes from is when do you retract the half nuts when coming to the end of threading.

If you are a beginner to it, the usual thing is cut a runout section on the part for your cutting tip to enter before you uncouple the half nuts. Then you retract your cutting tool using the cross slide, wind it back past the beginning of your start, put your cut on again and engage the half nuts at the chosen number.
A sketch at the bottom shows what a runout area might look like.
As you gain experience, the runout area will get shorter and shorter, until after a time, you will find you should be able to do without it. Even now, I still usually put a small runout area for my threads as it allows nuts to run right up to the shoulder on the job without any binding. It is no crime to have a runout area.

I hope that this has answered your question.

John

runout.jpg
 
It dosent matter when you dis-engage the half nuts, but it should be in a thread stop grove or it will
make one of its own. :)
...lew...
 
The technique I learned to make coordinating the process easier is as follows:

1) When first touching off to the work, arrange it so that the crossfeed handle is on top. Then set the moveable dial to 0 on the crossfeed.

2) Watch the cutting tip closely as it nears the thread relief area, with left hand on the crossfeed handle and right hand on the halfnut lever.

3) As the tool tip clears the threaded area first make a fast movement of the crossfeed handle to clear, and then disengage the halfnut lever as fast as possible.

4) Move the carriage back to beyond the start point, and return the crossfeed to its zero position. Then advance the compound for the next cut. Remember that the deeper you go in the thread, the more material is being cut, so reduce the DOC as you go.

My first few tries at this I ran the lathe at 50 rpm; after getting used to the motion I moved up to 80 rpm.

The diameter of the thread relief area should be equal or greater to the minor diameter of the thread.
 
Bogstandard said:
The threading dial should, when screwcutting, be permanently engaged onto the leadscrew.
John

I am not always that good at explaining my thinking so I'll give it another try.
As I understand things the threading dial is only engaged with the lead screw when the half nuts are not engaged. So the sequence of events goes something like this.


1) Half nuts are not engaged but the threading dial is engaged.
2) Stand around waiting untill the dial comes up to the number 1.
3) Engage the half nuts - now the dial stops turning thus staying at the number 1.
4) Watch the carrage move to the left and cut some threads.
5) When the cutting tool gets as far to the left that you want disengage the half nuts.
This causes the dial to engage the lead screw with the dial still at the location 1 so that
sycronization can be maintained.
6) Retract the tool bit and move carrage to the right
7) Move the cutting tool back plus some.
8) Go back to step 1 untill done.


My question is about step 5.
Since the threading dial is not turning and the lead screw is turning
it is possible that a tooth on the dial may not land inbetween 2 threads
on the lead screw when disengaging the half nuts.

In this situation the threading dial needs to turn a bit to get back into
the lead screw - how does it know which way to go?


Smogs,

I now think where you are coming from.

Before you engage the half nuts, the leadscrew is driving the dial because the saddle isn't moving, when you engage the leadscrew the saddle then moves in sync with the leadscrew, so in effect the dial is not being driven any more, just one tooth is following the thread, so the dial actually stops turning. When you disengage the nuts, the saddle isn't moving in sync with the leadscrew any more, so with the saddle stopped the leadscrew is then driving the dial again.

The dial isn't disengaged at all during any cutting or moving back to the start. If you look at the dial as you go back to the start, it turns backwards, so showing it is still engaged with the leadscrew.

Total gibberish, but I hope that has explained it.

John
 
???

Step five is not very clear to a newguy.  

The threading dial is engaged to the leadscrew even before threading starts, and once engaged remains engaged through the entire threading process.  This synchronizes the threading dial to the leadscrew.  You only disengage the half nuts, not the threading dial.

Have your hand on the half-nut lever...The first thread cutting pass begins when the number 1 on your threading dial comes to the reference mark on the dial and you quickly engage the half nuts.  

When the first pass is finished, your tool point will be in the relief area... and you quickly disengage the half nuts, thus ending your first pass.

Then you back off on the threading tool point far enough to miss the newly cut thread diameter on your move of the carriage back to the right of your work.

Reposition the tool point to some random point to the right of your threaded section, then increase the depth of the tool point what ever increment you want to deepen the thread cut on this next pass (a couple of thousandths).  

Observe the threading dial (which is still engaged to the leadscrew and turning) and when your number (1) approaches the reference mark on the dial, quickly re-enage the half nuts for your next threading pass.

Repeat this process until your threads are cut to the diameter that was your target size.

You can even turn your lathe off for incremental measuring of the thread diameter, and as long as you don't disengage the threading dial, or move your carriage, you have not lost synchronization required for the threading process when you turn the lathe back on.

I hope this explanation of the single point threading process has been helpful.
 
Bogstandard said:
The dial isn't disengaged at all during any cutting or moving back to the start. If you look at the dial as you go back to the start, it turns backwards, so showing it is still engaged with the leadscrew.

THE LIGHT JUST WENT ON! All this time I thought since the dial stopped turning that it was actuall not in contact with
the lead screw. It is just an illusion, the threads on the dial might as well be the half nuts when the half nuts are engaged.

 
Now that you understand the use of the dial, you'll soon get tired of "waiting for your number to come up". That's why all those other numbers and lines are on the dial. Puzzling out what to do with them can be a challenge for the beginner. To that end, I wrote a brief explanation for our club which may help you to start using the dial the way it was intended to be used.

===============================================

USING THE THREADING DIAL

Some folks are confused by which marks to use on the threading dial on their
(assumed Imperial) lathe. Of course, you're always safe restarting on the
same dial mark on which you started but that means you'll spend a lot of time
'waiting for your number to come up'.

It's pretty easy to think through. Most dials have four numbered marks
labeled, unsurprisingly, 1-4. Between these marks are smaller, unnumbered
marks.

[Aside: A consequence of the four numbered mark dial is the fact that the
gear that meshes with the feed screw will have a number of teeth which is four
times the tpi of the feed screw, i.e., an 8 tpi lead screw will have a 32
tooth gear on its thread dial. This is worth knowing if you intend to build a
threading dial for a lathe that lacks one. Since there's no load on this
gear, a perfect match to the helix angle of the lead screw is not needed. Any
old gear with the right number of teeth can be pressed into service.]

The numbered marks almost always correspond to a carriage movement of one
inch. (However, you should confirm this by actual measurement on your lathe.)
By deduction, the unnumbered lines must then correspond to a carriage movement
of one-half inch.

Now, suppose I'm cutting an even-numbered thread (e.g., 32 tpi). If I move the
carriage by one-half inch, the tool will reenter the thread perfectly. If I
move the carriage one inch, the tool will also reenter. Therefore, I can
reengage the half-nuts on ANY line on the threading dial.

If I'm cutting an odd-numbered thread (e.g., 13 tpi), the tool will not reenter
the thread if I move one-half inch - I have to move one inch. Therefore, I
must reengage the half-nuts on ANY NUMBERED LINE on the dial. (If I started
the thread on an unnumbered line, I would then reengage on unnumbered lines but
that is generally too difficult to remember in the 'heat' of thread cutting and
should be avoided.)

If I'm cutting a half-fractional thread (e.g., 11-1/2 tpi), the tool will only
reenter the thread every two inches. Therefore I must reengage the half-nuts
on ONLY THE ODD NUMBERS ON THE DIAL (1 and 3) or on the even numbers (2 and
4). It's a good idea to decide on one of these options and always stick with
it. I always start the thread on 1 and then use either 1 or 3 to reengage.

Rarely, a lathe can cut a 1/4 thread (e.g., 1-1/4 tpi). This thread will only
repeat every four inches so, in cutting such a thread, one would reengage the
half-nuts on the same mark one used to start the thread.
 
Thanks mklotz. It is comming together now.


On my lathe there are 12 numbers on the threading dial.
I just got a measuring tape out and did a little test.
It takes 4 inches of travel to make the dial go once around.

So I guess that would mean there are 48 teeth on the dial?

Some time this week I want to do a 8tpi thread.

So if I want to do an 8tpi thread the tool must move 1/8, 2/8, 3/8 ... to reenter perfectly.
as each number on the dial goes by it is 1/3, 2/3, 3/3 ... etc
The only numbers that work as both 8ths and 3rds are 0=0, 3/3=8/8, 6/3=16/8 ...

So I could ust 1,3,6,9, or 12 - Is this correct?

Threading at 8tpi on my lowest speed (150 rpm) means:

150 reveloutions x 1/8 inch = 18.75 inches/minute or .3125 inches/second


(.3125 inches/sec) * 48 teeth = 15 teeth /second

Thats pretty fast.

So how does one ensure that they are engaging the half nuts at 1 and not 1.25 or .75 at that speed.


Seriously... practice is the answer. You will find that you will develop a feel for when to engage the half-nuts... and you will have to be pretty far off to screw up your threads.

 
Smoggy,

I must admit I've never seen a lathe with twelve numbers on the threading dial. (Would love to see a picture of that.) Are you sure you've got an Imperial lead screw? Twelve, with your indicated third of an inch per division, sure doesn't sound very convenient for cutting Imperial threads.

One way to check your understanding is to chuck up a piece of broomstick and "thread" it using a pencil as your threading tool. Try engaging on the (thread dial) marks you believe will work and see if the pencil marks on the workpiece track.
 
Marv,

My new lathe when it gets here, has a weirdly marked threading dial.
As far as I can remember it has 3 major marks, with smaller ones in each third division, and it is massive, if I remember rightly, about 2" across. It is a metric machine.
I noticed it, but never thought to ask.

John
 
mklotz said:
I must admit I've never seen a lathe with twelve numbers on the threading dial. (Would love to see a picture of that.)

Threadingdialat12.jpg


My first try at posting a picture, hope it works.
 
This is what it would look like if I was trying to engage it at 12 but missed by 1 tooth: (the first picture shows the dial at 12)

hreadingdialoffbytooth.jpg


So you have to courage to use this if you are putting 8 threads per inch on a part that you have spent hours on already.

 
Dang, I really don't understand what's going on there.

Three more questions...

Yours is definitely an Imperial lathe?

What is the pitch of the leadscrew?

Does your lathe manual have anything to say about using the threading dial?
 

Latest posts

Back
Top