


Spray Painting on the Cheap
Spray Painting on the Cheap The purpose of this post is to point out that you don't have to have expensive equipment to do a great job spray painting your equipment or projects and to pass along a few tips and techniques along the way. I always figured that any good project was worth a good finish. I have included both wood and metal projects because I often combine the two as exemplified by this wine press.
http://www.***************.com/attachment.php?attachmentid=38915&d=1343600150&thumb=1
When you are just starting, whether it be fishing or golf, the thing that needs the most improvement is your own skill. In this light I will approach painting as I started years ago. but today working on a current project, refinishing my front door and sidelights outside. You can use inexpensive equipment to do some really nice finishing. You can learn and add equipment over time.
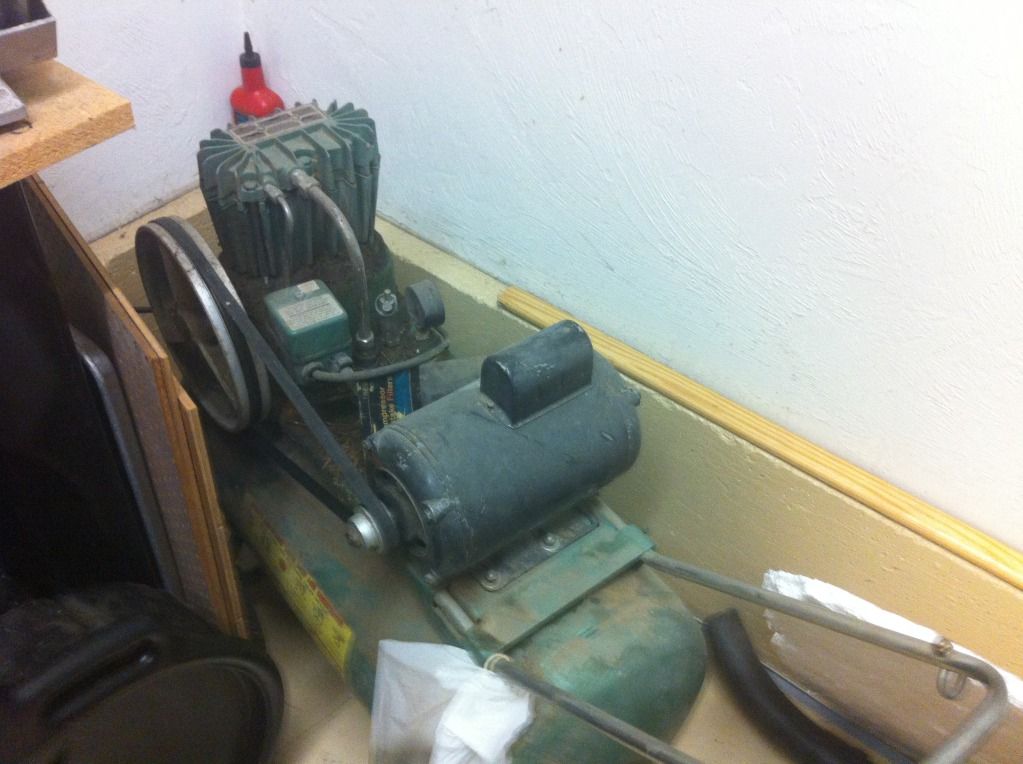
The compressor: In this case I was using my old garage compressor and my old setup for air regulation and filtering. You probably have a compressor around. You don't really need much to get started and I think choosing a simple project is perfect for learning to spray paint. So let me start off where I did many years ago. This is my old Sears air compressor. I have had this thing around for ages.

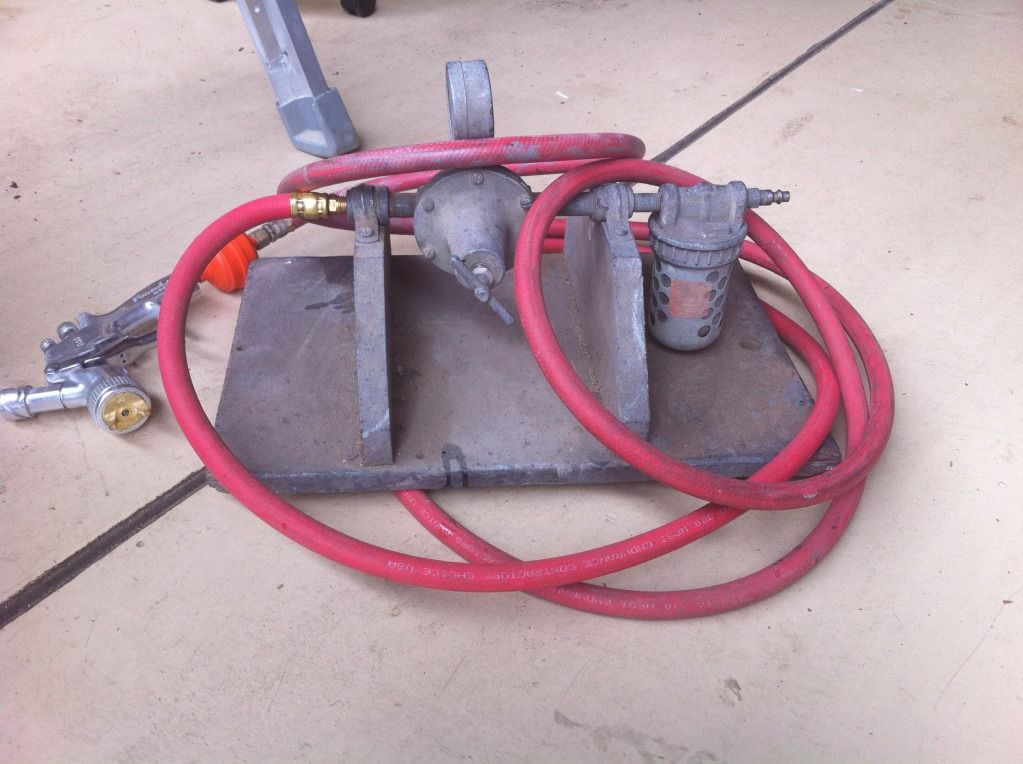
Regulator and filter: In my present project I had to string out 100' of hose from the compressor (I switched it to 220 volts and my other choice was to rewire my house).
 I built this little platform eons ago. The regulator came with the compressor and I added the water filter. Even with the 3/8" hose the pressure drop would have been enormous had the regulator been attached directly at the compressor.
This outfit lets me string out a lengths of hose at higher pressures to avoid line pressure drop. Notice I have only 15' of hose from the regulator to the gun. Set up, this includes a water removing filter and a regulator. At the gun I use a disposable final filter.
.
The gun: I am using a FinishLine gun from DeVilbiss. I just stick with DeVilbiss because it is a good brand with parts availability. I did spray quite a few projects with the old Sears gun but it just wouldn't hold consistent patterns.
On the cheap, I believe Harbor Freight actually makes a decent gun. Don't get hung up here.
The Project:
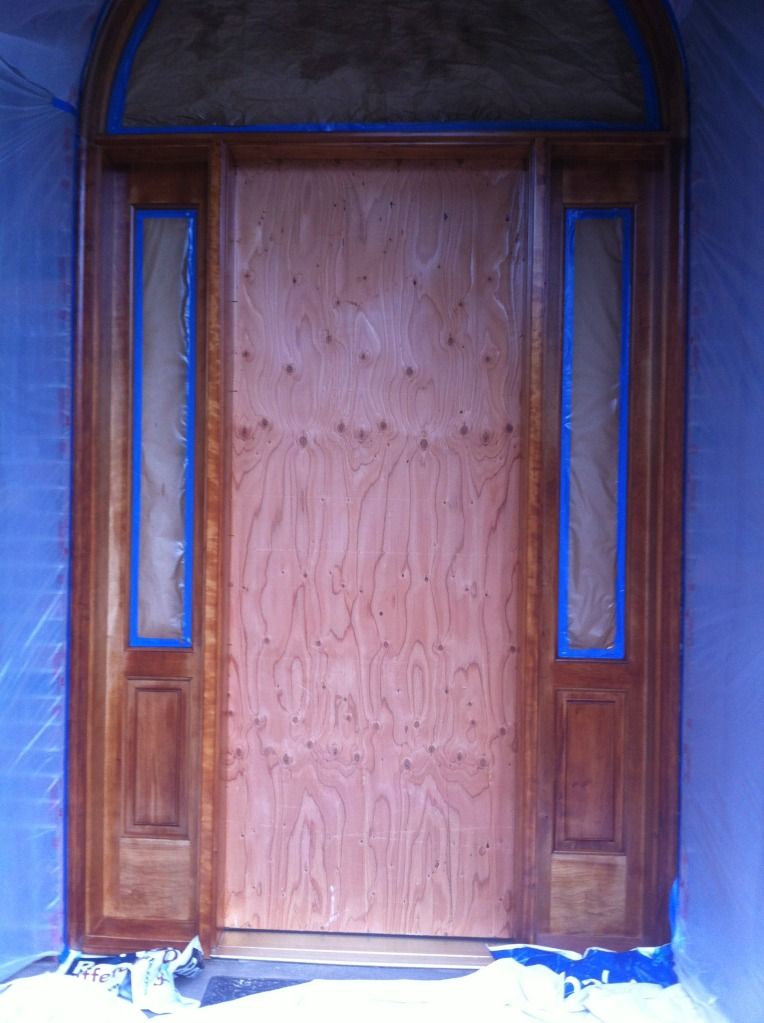
Today I am at home, working out of my garage. I am outside the confines of my shop, without my spray booth. I am working in conditions that I had most of my life--less than optimal. My project currently is refinishing my front door. I replaced the door with a plywood panel so I could sand and finish the door lying flat.
The door project is one of those "deferred maintenance" things that involved an incredible amount of sanding to remove the old failed finish.
Not wanting to go into the awful job of painting this again for many years I chose my paint well going on wood finishing forums. I settle on an epoxy, 2-part, finish sealer/primer and a two part urethane finish. The sealer was costly at $70 for two quarts, but I figure I don't want to do this again for many years.
I found out that the epoxy primer/sealer had to be brushed. I get through it but it makes me appreciate spraying. Anyway, I got through it and was then on to spray painting.
I am less fond of painting wood because the outcomes are many and varied and a lot of them are not good. Wood varies more than metal. It can absorb moisture--a real killer. It has irregularities and the grain absorbs paint differently. You can be spraying away to see your paint lift on a small place for some unknown reason.
Then there is staining which I never seem to have mastered. I tend to finish everything (like the wine press) clear. Were I to be building more fine furniture I would work more on my staining.
I do a lot of metal projects and have become familiar over time with metal finishes and primers. You can prime and finish your project in one morning.
Regardless, spray painting works good on both. You can spray something (especially like a lathe or piece of complicated moldings) and get into nooks and crannies and be done in a fraction of the time. The only things you have to contend with are masking and clean-up. In addition you can go from start to finish in one day using a good Notice the masking on the doorway.
Pictured below is the Scotchman Iron Worker. I primed it with epoxy primer. It went on beautifully. I turned around and used an epoxy finish. It went on beautifully as well. This was a one-morning paint job start to finish. Painting wooden projects typically can on for days with multiple coats and sanding in between.

I put many hours into cleaning and wanted the finish to reflect that. I purchased the paint from the manufacture and bought their decals as well. The paint is two part epoxy over an epoxy primer. The panels were beat up and take a beating in everyday use. I had them sprayed black at a bed liner place for $35. I don't have to do everything, do I?
Setting up your Spray Gun:
Setting up your spray gun is important because you are setting the pattern width and the amount of paint. It is almost analogous to choosing the width and kind of paint brush you are using. I like this video at [ame]http://www.youtube.com/watch?v=Sn1WNis5m8k[/ame]. Very entertaining, besides, where else can you see someone else giving this kind of demonstration. Remember, they are spraying the easy stuff. I will go over the points later.
The Paints and Their Uses: For your wood project. I would recommend a couple of things. First, your wood is going to soak up a lot of paint. Even if I were going to paint it a color, I often use clear urethanes as primers. I would start off using a one part Urethane Varnish (exterior). These are available, cheap, and effective. The only drawback is the slow drying time. Your first coat will really soak in, raising the grain so you need to let it dry a couple of days and then sand it lightly till smooth. Be patient. Finishing wood takes more time.
Then you can go to work spraying on your finish coats adding additional coats for filler and maybe a color coat. I used to use sanding sealers.
Don't buy cheap paint. Cheap paints do so by cutting down the pigment content in the paints. This means it takes a lot more paint to get a good finish and they tend to run like crazy.
For metal I use oil based enamels, acrylic enamels, two part urethanes and epoxies. For years I used Rodda Porcelite enamel over red oxide primer. It was a good paint at a reasonable price. I never had much luck with either Rustoleum rattle cans or bulk paints.
If you are on a budget look for mis-mixed paints. I have picked out mismatched paints (Oil Based Enamels) or mistakes for as little as $5 per gallon from Pittsburgh Paints, Rodda, Sherwin Williams. They are glad to just get rid of the paints. Each time I go into these stores I ask if they have the mistakes.
Pick the paint for the project. When I do machinery I like epoxies. They are practically impervious to oil and grease and they are durable. Two part urethanes are good. Acrylic enamels work well, too, and are easy to use. I did the DR Mower projects with these. (DR mower project: 2-part urethane primer, red--acrylic enamel, black--2 part urethane enamel). On the rusty parts I used a rattle can rust stabilizer before the primer. Can you imagine brushing this???
http://www.***************.com/attachment.php?attachmentid=38935&d=1343660516&thumb=1http://www.***************.com/attachment.php?attachmentid=38934&d=1343660469&thumb=1http://www.***************.com/attachment.php?attachmentid=38937&d=1343660727&thumb=1
Thinning: Get the right thinner to match the paint. Thinners are as important as the paint. Mineral spirits work with Clear Urethanes but they dry slowly which increases your chance of runs. Choose the thinner dry speed. Fast dry works in cold weather. Medium is what I used here. Slow dry is great when the temperatures rise above 80 degrees.
Here is shown a medium speed thinner that will thin urethanes, acrylic enamels and enamels. This particular thinner works well with acrylic enamels as well. I am sure it would work with regular enamels, too. (pictured below the thinner is the door with two coats of epoxy thinner and one finish coat of 2-part urethane with one to two more to come).
Viscosity is important. Too thick and you can't even seem to coax the paint out of the gun. In addition you won't get wide patterns. Too thin and you don't get good coverage and there is a tendency to run. Also it comes out in a mist.
You will get a feel of this over time. Pick the speed of the thinner. I always start a little thick seeing how the gun handles it. I thin as I need to, knowing that you can always go thinner but harder to go the other way. Thick paints narrow the pattern you are spraying which you can use sometimes for nooks and crannies.
So, just do it. There is a learning curve for anything. I just finished my milling machine. I know hardly anything about milling. I looked up some things on U-tube and read a couple of books. I know I have a lot to learn but I want to be able to use it successfully. So I know I am going to make mistakes on the the way.
Say you are doing your wood project. I would start with the cheap urethane, sealing the grain. Remember that this dries slowly and remember to seal the end grain of the wood so it doesn't pick up water. Then pick out the paint. You are looking for a good paint first with price secondary. If your project is going to be outside or want to be oil or gas resistant pick an oil base. Choose good brands. On my front door we spent hours and hours sanding the thing. In no way am I going to choose a cheap paint.
Metal is similar but it is not porous like wood. Pick your primer well. If you have rusty pieces spot prime them to stabilize the rust before you apply your primer. If you have an existing finish make sure your primer will not lift it. If your surface is scratched you may choose a filling primer. As a general rule I never use water based primers on metal. Prepare the surface well eliminating grease and rust. Find out as much as you can about the paint you are going to use. Read the instructions.
Prep:
Say you rebuild something like a trailer or a lathe. It has tons of nooks and crannies. It is going to get solvents and oils on it. You put a lot of work in on it and you want the finish to reflect it. Don't do it right off the bat. Take some easier projects to build some skills. Paint some of your outside furniture or and old tool.
Start in the morning when you are fresh. Every painting experience is different because you will use varying kinds of paints and they handle differently. The most important thing is to keep your poise. I learned this from my kids when they were young. They were good kids but at bedtime they became tired little zombies. Believe me a bad painting experience can make you into a zombie.
Do everything you can the night before you spray paint including laying things out, final sanding and touch up, and masking. Remember to think about over-spray. I was once spraying a finish on one of my commercial buildings, a bonding primer. I wasn't thinking about over-spray. The wind took the over-spray over the top of the building depositing on a row of cars on the other side. My insurance company paid for rubbing out the finishes on nine cars. Read the directions on your paints, thinners, and primers. Walk yourself through the process.
Spray Day:
1. Clean your surface again. I often use lacquer thinner followed by a tack cloth on bare metal. On wood I will run a tack cloth across, brush it off, and blow it using a blow gun. Wet down the area outside if you are spraying outside. I typically roll my project outside to paint and roll back in to let it dry. Don't spray in windy conditions. Make sure your neighbor's cars aren't in the path (or your own).
2. You have done your research and have picked a good primer that is compatible with your finish paint. Apply primer to an even gloss and see what your final project will look like before it dries to a dull color. If you see any bad spots or goofs this is the time to fix them before the finish really shows them.
Say I am spraying a lathe. I would use either a two part Urethane or an epoxy primer on the lathe. You can use good quality rattle can primers on many projects but only use tried and true ones. Remember one rule of thumb that applies to most primers. You can spray on your finish coat if applied within 24 hours without sanding. You may be able to apply the finish coat within hours (read your directions).
3. Set the amount of material and the spray pattern width. With two knobs it is easy to get lost. If something is not going right, stop and spray a flat area until you figure out the (just right) settings. Remember that they change with the width of the pattern. Remember you are looking a a 1/2 overlap. Set up a sacrificial smooth surface vertically to see your pattern. If things are going awry just stop, take out your sacrificial piece and work out the kinks.
You can open up the pattern width for the broad areas and make it smaller for the nooks and crannies. Remember that when you open up the pattern (usually the small knob) that you have to also open up the amount of paint going to cover it (the big nob). Close the pattern (clockwise) and close down the amount of material (clockwise).
Paint the nooks and crannies first. Narrow down the pattern and adjust the material to to match. If anything, use a smaller amount of material hitting the small areas several times lightly. Watch your paint and see how it is drying. When you are applying your finish coats remember that it is not going to be quite as forgiving as primer. Better two light coats than one heavy one.
If it looks good leave it alone. I learned that from a drywall guy.
Recovering from disaster:
We had to drive two hours to go to my daughter's birthday party on that day so I had a little added pressure. I would be okay if nothing went wrong. The previous evening I had masked off all my surfaces. I sprayed down my driveway with water where I would be painting the door to eliminate dust.
Early morning the day of painting I mixed my two part paint and let it set for 30 minutes as directed, poured in the thinner and found it was the wrong thinner, curdling the paint. Fortunately I had only poured half of the paint into the gun where I thinned it. I had to throw it out and start over again. Looking at the fine print I found out that it was only for their brushing varnish. Don't worry, every painter has had his own painting nightmares, even the best ones.
I remembered some of the past ones like the English Ford I painted in the afternoon. It was a new kind of paint I hadn't tried. It went on beautifully, almost too much so. Then it broke out in runs everywhere. I worked until midnight with lacquer thinner scrubbing off the old paint. I should have known better. I had to re-sand everything. I found a better paint and the next weekend the new paint went on without a hitch. I should have tried the paint on a sample before committing myself. I can laugh about it now.
I returned to my task and hand. I mixed up more paint and let it set. I went in and had a cup of coffee and relaxed a bit. I went back, started again and everything went just fine. I finished, cleaned up my gun and called it a day.
FINALLY, HERE ARE SOME GENERAL TIPS
1. EVERY PAINT IS DIFFERENT, EVEN ONES WITHIN THE SAME BRAND. SOME ARE VERY FORGIVING. SOME ARE FRUSTRATING.
2. MOST PEOPLE WHO SELL YOU PAINT KNOW LITTLE ABOUT PAINTING AND IF THEY DO THEY AVOID GIVING ADVICE.
3. IF YOU FIND A GOOD PAINT STICK WITH IT. WRITE DOWN YOUR RESULTSGOOD AND BAD.
4. WHEN YOU ARE PAINTING BRING YOUR PAINT TO A BRIGHT, EVEN FLASH. THE SURFACE SHOULD LOOK EVENLY GLOSSY. TOO MUCH AIR WITH NOT ENOUGH PAINT MAKES IT LOOK DULL. IT SHOULD NOT LOOK ORANGE-PEEL.
5. IF YOU ARE DOING A BIG JOB STOP AND REFLECT PERIODICALLY. TAKE A BREAK. DON'T FORCE THINGS.
6. THE BEST PAINTERS MAKE MISTAKES. THEY JUST KNOW HOW TO COVER THEM. YOU WILL LEARN THAT OVER TIME.
7. GET AND USE A GOOD MASK. THERE ARE MANY PAINTERS RETIRING EARLY. WEAR IT INCLUDING PREP AND CLEAN-UP.
8. TRY TO SEE EVERY PROJECT AS AN OPPORTUNITY TO LEARN NEW THINGS AND IMPROVE YOUR SKILLS.
9. MORE AND MORE PAINT COMPANIES ARE GOING TO WATER BASED PAINTS. IF YOU BUY A NEW EXPENSIVE GUN MAKE SURE IT WILL TAKE THOSE WHICH MEANS STAINLESS STEEL CONSTRUCTION. THERE STILL ARE LOW V.O.C. PAINTS THAT ARE OIL BASED. I USED A CLEAR COAT RECENTLY.
10. ALWAYS CLEAN YOUR GUN AS QUICKLY AS POSSIBLE. BE CAREFUL WITH WATER BASED PAINTS. OIL BASED SOLVENTS AND THINNERS MAKE THEM CONGEAL INTO A GOOEY MESS.
As you can see from my approach you can spray paint well with a minimum of equipment. Choose your paint according to the importance of your project. Remember all the work you put into getting it ready. Good luck.
Spray Painting on the Cheap The purpose of this post is to point out that you don't have to have expensive equipment to do a great job spray painting your equipment or projects and to pass along a few tips and techniques along the way. I always figured that any good project was worth a good finish. I have included both wood and metal projects because I often combine the two as exemplified by this wine press.
http://www.***************.com/attachment.php?attachmentid=38915&d=1343600150&thumb=1
When you are just starting, whether it be fishing or golf, the thing that needs the most improvement is your own skill. In this light I will approach painting as I started years ago. but today working on a current project, refinishing my front door and sidelights outside. You can use inexpensive equipment to do some really nice finishing. You can learn and add equipment over time.
The compressor: In this case I was using my old garage compressor and my old setup for air regulation and filtering. You probably have a compressor around. You don't really need much to get started and I think choosing a simple project is perfect for learning to spray paint. So let me start off where I did many years ago. This is my old Sears air compressor. I have had this thing around for ages.
Regulator and filter: In my present project I had to string out 100' of hose from the compressor (I switched it to 220 volts and my other choice was to rewire my house).
This outfit lets me string out a lengths of hose at higher pressures to avoid line pressure drop. Notice I have only 15' of hose from the regulator to the gun. Set up, this includes a water removing filter and a regulator. At the gun I use a disposable final filter.
.
The gun: I am using a FinishLine gun from DeVilbiss. I just stick with DeVilbiss because it is a good brand with parts availability. I did spray quite a few projects with the old Sears gun but it just wouldn't hold consistent patterns.
On the cheap, I believe Harbor Freight actually makes a decent gun. Don't get hung up here.
The Project:
Today I am at home, working out of my garage. I am outside the confines of my shop, without my spray booth. I am working in conditions that I had most of my life--less than optimal. My project currently is refinishing my front door. I replaced the door with a plywood panel so I could sand and finish the door lying flat.
The door project is one of those "deferred maintenance" things that involved an incredible amount of sanding to remove the old failed finish.
Not wanting to go into the awful job of painting this again for many years I chose my paint well going on wood finishing forums. I settle on an epoxy, 2-part, finish sealer/primer and a two part urethane finish. The sealer was costly at $70 for two quarts, but I figure I don't want to do this again for many years.
I found out that the epoxy primer/sealer had to be brushed. I get through it but it makes me appreciate spraying. Anyway, I got through it and was then on to spray painting.
I am less fond of painting wood because the outcomes are many and varied and a lot of them are not good. Wood varies more than metal. It can absorb moisture--a real killer. It has irregularities and the grain absorbs paint differently. You can be spraying away to see your paint lift on a small place for some unknown reason.
Then there is staining which I never seem to have mastered. I tend to finish everything (like the wine press) clear. Were I to be building more fine furniture I would work more on my staining.
I do a lot of metal projects and have become familiar over time with metal finishes and primers. You can prime and finish your project in one morning.
Regardless, spray painting works good on both. You can spray something (especially like a lathe or piece of complicated moldings) and get into nooks and crannies and be done in a fraction of the time. The only things you have to contend with are masking and clean-up. In addition you can go from start to finish in one day using a good Notice the masking on the doorway.
Pictured below is the Scotchman Iron Worker. I primed it with epoxy primer. It went on beautifully. I turned around and used an epoxy finish. It went on beautifully as well. This was a one-morning paint job start to finish. Painting wooden projects typically can on for days with multiple coats and sanding in between.
I put many hours into cleaning and wanted the finish to reflect that. I purchased the paint from the manufacture and bought their decals as well. The paint is two part epoxy over an epoxy primer. The panels were beat up and take a beating in everyday use. I had them sprayed black at a bed liner place for $35. I don't have to do everything, do I?
Setting up your Spray Gun:
Setting up your spray gun is important because you are setting the pattern width and the amount of paint. It is almost analogous to choosing the width and kind of paint brush you are using. I like this video at [ame]http://www.youtube.com/watch?v=Sn1WNis5m8k[/ame]. Very entertaining, besides, where else can you see someone else giving this kind of demonstration. Remember, they are spraying the easy stuff. I will go over the points later.
The Paints and Their Uses: For your wood project. I would recommend a couple of things. First, your wood is going to soak up a lot of paint. Even if I were going to paint it a color, I often use clear urethanes as primers. I would start off using a one part Urethane Varnish (exterior). These are available, cheap, and effective. The only drawback is the slow drying time. Your first coat will really soak in, raising the grain so you need to let it dry a couple of days and then sand it lightly till smooth. Be patient. Finishing wood takes more time.
Then you can go to work spraying on your finish coats adding additional coats for filler and maybe a color coat. I used to use sanding sealers.
Don't buy cheap paint. Cheap paints do so by cutting down the pigment content in the paints. This means it takes a lot more paint to get a good finish and they tend to run like crazy.
For metal I use oil based enamels, acrylic enamels, two part urethanes and epoxies. For years I used Rodda Porcelite enamel over red oxide primer. It was a good paint at a reasonable price. I never had much luck with either Rustoleum rattle cans or bulk paints.
If you are on a budget look for mis-mixed paints. I have picked out mismatched paints (Oil Based Enamels) or mistakes for as little as $5 per gallon from Pittsburgh Paints, Rodda, Sherwin Williams. They are glad to just get rid of the paints. Each time I go into these stores I ask if they have the mistakes.
Pick the paint for the project. When I do machinery I like epoxies. They are practically impervious to oil and grease and they are durable. Two part urethanes are good. Acrylic enamels work well, too, and are easy to use. I did the DR Mower projects with these. (DR mower project: 2-part urethane primer, red--acrylic enamel, black--2 part urethane enamel). On the rusty parts I used a rattle can rust stabilizer before the primer. Can you imagine brushing this???
http://www.***************.com/attachment.php?attachmentid=38935&d=1343660516&thumb=1http://www.***************.com/attachment.php?attachmentid=38934&d=1343660469&thumb=1http://www.***************.com/attachment.php?attachmentid=38937&d=1343660727&thumb=1
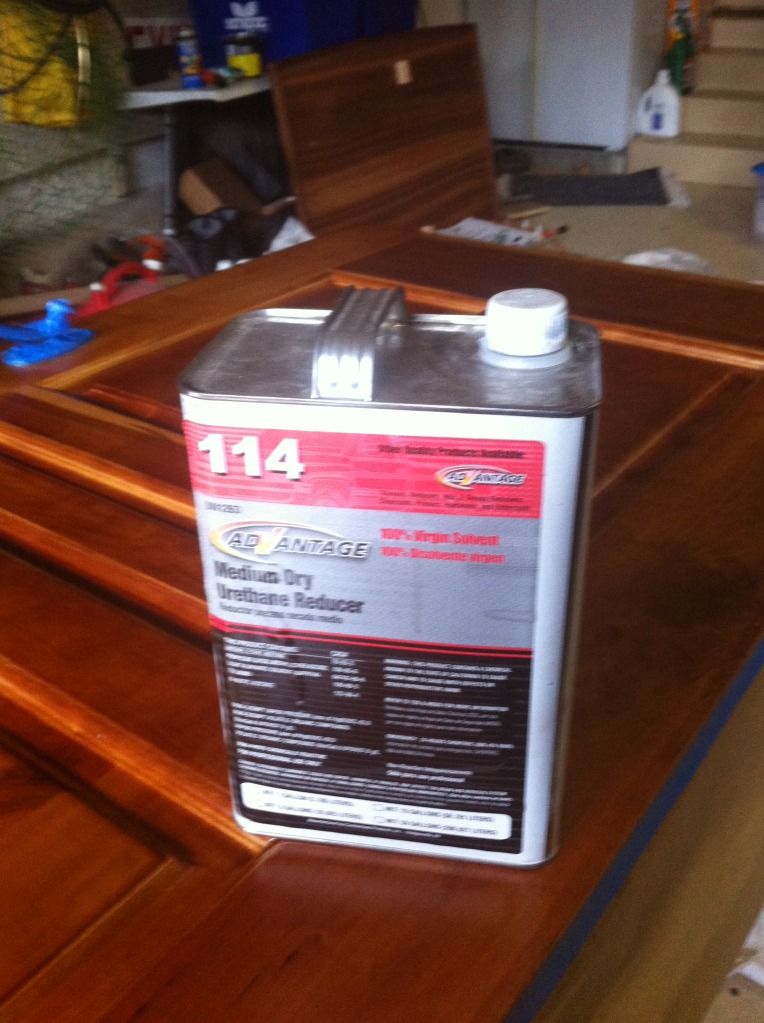
Thinning: Get the right thinner to match the paint. Thinners are as important as the paint. Mineral spirits work with Clear Urethanes but they dry slowly which increases your chance of runs. Choose the thinner dry speed. Fast dry works in cold weather. Medium is what I used here. Slow dry is great when the temperatures rise above 80 degrees.
Here is shown a medium speed thinner that will thin urethanes, acrylic enamels and enamels. This particular thinner works well with acrylic enamels as well. I am sure it would work with regular enamels, too. (pictured below the thinner is the door with two coats of epoxy thinner and one finish coat of 2-part urethane with one to two more to come).
Viscosity is important. Too thick and you can't even seem to coax the paint out of the gun. In addition you won't get wide patterns. Too thin and you don't get good coverage and there is a tendency to run. Also it comes out in a mist.
You will get a feel of this over time. Pick the speed of the thinner. I always start a little thick seeing how the gun handles it. I thin as I need to, knowing that you can always go thinner but harder to go the other way. Thick paints narrow the pattern you are spraying which you can use sometimes for nooks and crannies.
So, just do it. There is a learning curve for anything. I just finished my milling machine. I know hardly anything about milling. I looked up some things on U-tube and read a couple of books. I know I have a lot to learn but I want to be able to use it successfully. So I know I am going to make mistakes on the the way.
Say you are doing your wood project. I would start with the cheap urethane, sealing the grain. Remember that this dries slowly and remember to seal the end grain of the wood so it doesn't pick up water. Then pick out the paint. You are looking for a good paint first with price secondary. If your project is going to be outside or want to be oil or gas resistant pick an oil base. Choose good brands. On my front door we spent hours and hours sanding the thing. In no way am I going to choose a cheap paint.
Metal is similar but it is not porous like wood. Pick your primer well. If you have rusty pieces spot prime them to stabilize the rust before you apply your primer. If you have an existing finish make sure your primer will not lift it. If your surface is scratched you may choose a filling primer. As a general rule I never use water based primers on metal. Prepare the surface well eliminating grease and rust. Find out as much as you can about the paint you are going to use. Read the instructions.
Prep:
Say you rebuild something like a trailer or a lathe. It has tons of nooks and crannies. It is going to get solvents and oils on it. You put a lot of work in on it and you want the finish to reflect it. Don't do it right off the bat. Take some easier projects to build some skills. Paint some of your outside furniture or and old tool.
Start in the morning when you are fresh. Every painting experience is different because you will use varying kinds of paints and they handle differently. The most important thing is to keep your poise. I learned this from my kids when they were young. They were good kids but at bedtime they became tired little zombies. Believe me a bad painting experience can make you into a zombie.
Do everything you can the night before you spray paint including laying things out, final sanding and touch up, and masking. Remember to think about over-spray. I was once spraying a finish on one of my commercial buildings, a bonding primer. I wasn't thinking about over-spray. The wind took the over-spray over the top of the building depositing on a row of cars on the other side. My insurance company paid for rubbing out the finishes on nine cars. Read the directions on your paints, thinners, and primers. Walk yourself through the process.
Spray Day:
1. Clean your surface again. I often use lacquer thinner followed by a tack cloth on bare metal. On wood I will run a tack cloth across, brush it off, and blow it using a blow gun. Wet down the area outside if you are spraying outside. I typically roll my project outside to paint and roll back in to let it dry. Don't spray in windy conditions. Make sure your neighbor's cars aren't in the path (or your own).
2. You have done your research and have picked a good primer that is compatible with your finish paint. Apply primer to an even gloss and see what your final project will look like before it dries to a dull color. If you see any bad spots or goofs this is the time to fix them before the finish really shows them.
Say I am spraying a lathe. I would use either a two part Urethane or an epoxy primer on the lathe. You can use good quality rattle can primers on many projects but only use tried and true ones. Remember one rule of thumb that applies to most primers. You can spray on your finish coat if applied within 24 hours without sanding. You may be able to apply the finish coat within hours (read your directions).
3. Set the amount of material and the spray pattern width. With two knobs it is easy to get lost. If something is not going right, stop and spray a flat area until you figure out the (just right) settings. Remember that they change with the width of the pattern. Remember you are looking a a 1/2 overlap. Set up a sacrificial smooth surface vertically to see your pattern. If things are going awry just stop, take out your sacrificial piece and work out the kinks.
You can open up the pattern width for the broad areas and make it smaller for the nooks and crannies. Remember that when you open up the pattern (usually the small knob) that you have to also open up the amount of paint going to cover it (the big nob). Close the pattern (clockwise) and close down the amount of material (clockwise).
Paint the nooks and crannies first. Narrow down the pattern and adjust the material to to match. If anything, use a smaller amount of material hitting the small areas several times lightly. Watch your paint and see how it is drying. When you are applying your finish coats remember that it is not going to be quite as forgiving as primer. Better two light coats than one heavy one.
If it looks good leave it alone. I learned that from a drywall guy.
Recovering from disaster:
We had to drive two hours to go to my daughter's birthday party on that day so I had a little added pressure. I would be okay if nothing went wrong. The previous evening I had masked off all my surfaces. I sprayed down my driveway with water where I would be painting the door to eliminate dust.
Early morning the day of painting I mixed my two part paint and let it set for 30 minutes as directed, poured in the thinner and found it was the wrong thinner, curdling the paint. Fortunately I had only poured half of the paint into the gun where I thinned it. I had to throw it out and start over again. Looking at the fine print I found out that it was only for their brushing varnish. Don't worry, every painter has had his own painting nightmares, even the best ones.
I remembered some of the past ones like the English Ford I painted in the afternoon. It was a new kind of paint I hadn't tried. It went on beautifully, almost too much so. Then it broke out in runs everywhere. I worked until midnight with lacquer thinner scrubbing off the old paint. I should have known better. I had to re-sand everything. I found a better paint and the next weekend the new paint went on without a hitch. I should have tried the paint on a sample before committing myself. I can laugh about it now.
I returned to my task and hand. I mixed up more paint and let it set. I went in and had a cup of coffee and relaxed a bit. I went back, started again and everything went just fine. I finished, cleaned up my gun and called it a day.
FINALLY, HERE ARE SOME GENERAL TIPS
1. EVERY PAINT IS DIFFERENT, EVEN ONES WITHIN THE SAME BRAND. SOME ARE VERY FORGIVING. SOME ARE FRUSTRATING.
2. MOST PEOPLE WHO SELL YOU PAINT KNOW LITTLE ABOUT PAINTING AND IF THEY DO THEY AVOID GIVING ADVICE.
3. IF YOU FIND A GOOD PAINT STICK WITH IT. WRITE DOWN YOUR RESULTSGOOD AND BAD.
4. WHEN YOU ARE PAINTING BRING YOUR PAINT TO A BRIGHT, EVEN FLASH. THE SURFACE SHOULD LOOK EVENLY GLOSSY. TOO MUCH AIR WITH NOT ENOUGH PAINT MAKES IT LOOK DULL. IT SHOULD NOT LOOK ORANGE-PEEL.
5. IF YOU ARE DOING A BIG JOB STOP AND REFLECT PERIODICALLY. TAKE A BREAK. DON'T FORCE THINGS.
6. THE BEST PAINTERS MAKE MISTAKES. THEY JUST KNOW HOW TO COVER THEM. YOU WILL LEARN THAT OVER TIME.
7. GET AND USE A GOOD MASK. THERE ARE MANY PAINTERS RETIRING EARLY. WEAR IT INCLUDING PREP AND CLEAN-UP.
8. TRY TO SEE EVERY PROJECT AS AN OPPORTUNITY TO LEARN NEW THINGS AND IMPROVE YOUR SKILLS.
9. MORE AND MORE PAINT COMPANIES ARE GOING TO WATER BASED PAINTS. IF YOU BUY A NEW EXPENSIVE GUN MAKE SURE IT WILL TAKE THOSE WHICH MEANS STAINLESS STEEL CONSTRUCTION. THERE STILL ARE LOW V.O.C. PAINTS THAT ARE OIL BASED. I USED A CLEAR COAT RECENTLY.
10. ALWAYS CLEAN YOUR GUN AS QUICKLY AS POSSIBLE. BE CAREFUL WITH WATER BASED PAINTS. OIL BASED SOLVENTS AND THINNERS MAKE THEM CONGEAL INTO A GOOEY MESS.
As you can see from my approach you can spray paint well with a minimum of equipment. Choose your paint according to the importance of your project. Remember all the work you put into getting it ready. Good luck.
")