Small Locomotive & Boiler (ME Northumbrian)

Home Model Engine Machinist Forum

Help Support Home Model Engine Machinist Forum:

This site may earn a commission from merchant affiliate links, including eBay, Amazon, and others.
Looking real nice Pete and thanks for the compliment.
Don
 
Hi Pete

I like that, I really like that. Can I have it please ;D ;D Thm: Thm:

Cheers

Rich
 
Rich

Thanks; and that would be a nice idea but I've got people down here who are expecting it to be theirs....

regards, and thanks for looking in

Pete
 
Rich

I had meant to add; If it hadn't been for your "small boiler" thread back in 2010 this model wouldn't exist. It was finding your thread (and HMEM) that made me decide to try a boiler for myself, which set me on this journey.

Thanks

Pete
 
A bit more progress made over the last few days making the couplings, cylinder cladding, blower pipe and the super heaters, and header. So its time for a strip down of the frames, a session in the sandblaster, clean up and paint.

vqu2qy6z0l5bgrd4g.jpg


I'm using 3M heatproof paint so this just needs 24 hour to dry and then a session in the barbecue at 200degC to bake the paint.

Pete
 
Any colour as long as it's black?

I have found that there are degrees (pun intended) of heat proof paint.

650 degree Black only - usually sold for BBQs
Then there are two lower heat types - one for automotive engines in a selection of colours (300 degree) and one for calipers in a selection of colours
All available from your local automotive store. However I think my Northumbrian will be mainly 650 degree matt black like Peters
 
Not just black, any colour you like from 3M, including black, SuperCheap Auto stock it. I have "Rocket Red", but didn't think it appropriate. The benefit of using this paint is no primer is required and if its baked properly its pretty durable. However before baking its very susceptible to oil and solvents, even from your fingers, so keep your hands off it and get it baked as soon as you can.

I'm using the 650degC for the smokebox and backhead as its matt, but the frames, 300degC as its semi gloss. The temp range is not really relevant as if anything gets as hot as 300degC there's a major problem.

Pete
 
Not corrected, informed ;D

Anyway it was baking day today, gas mark 7 or 220deg C


elwjlkabcov5c5j4g.jpg


25 minutes in the barbeque, and job done. I've just noticed it says "temperature indicator" so really 220degC give or take a wombat - (its from Oz)

fyjsdem9n2dl8zz4g.jpg


Time to let it cool down and then re-assembly

u4u7rg288z0y4d34g.jpg


8pus02561zpxcqs4g.jpg


Now I must do something about those wheels and cylinder covers........

Pete
 
Thanks Pete, it's getting there

_________________________________________________

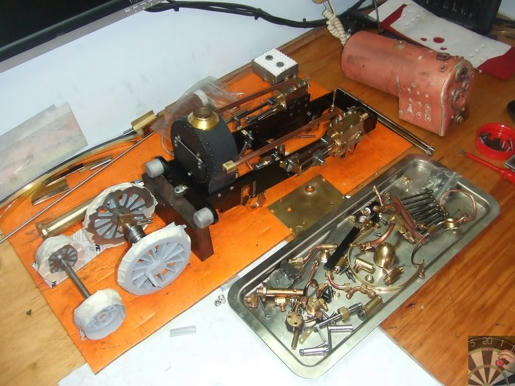
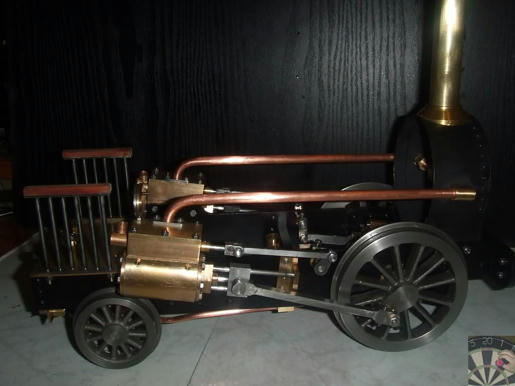
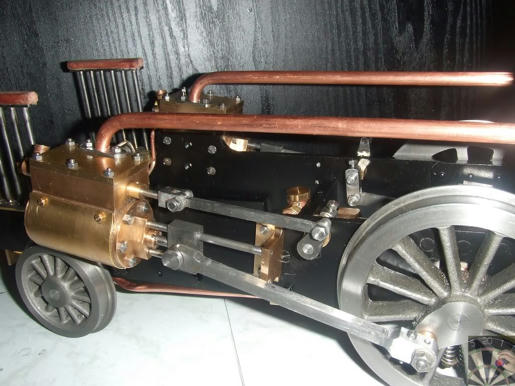
There were just a few more bits of pipework to do to complete the super-heater header and the connecting pipes to the steam chests. They took ages to get all lined up. I'd suggest that the way the drawings have the lubricator connection inboard of the steam pipes needs to be reconsidered. I've already suggested that the the connections need to be moved, but now I'd also suggest that the lubricator unions need to be outboard of the steam pipe elbow. They just get in the way otherwise. I had no choice so had to remake the elbows longer so it would all go together.

Anyway I got it done in the end and also added all the other fittings.

ntcl76hee5adg6o4g.jpg


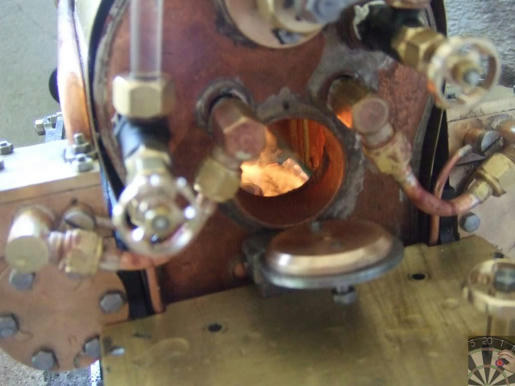
So the time had come to connect it all up and see what happens

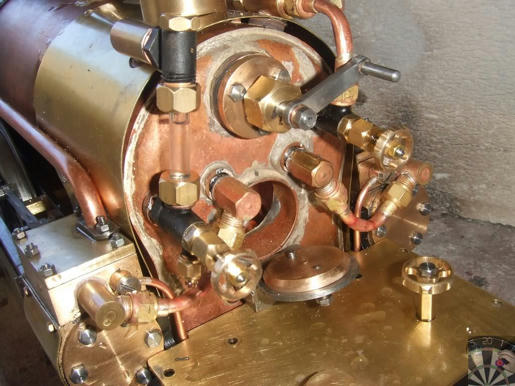
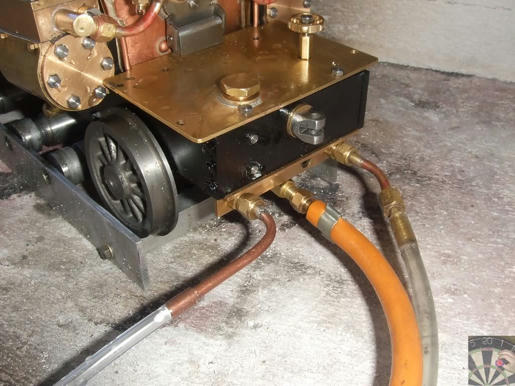
Water input and return feeds and gas pipe.

97eisvvhvniqtxi4g.jpg


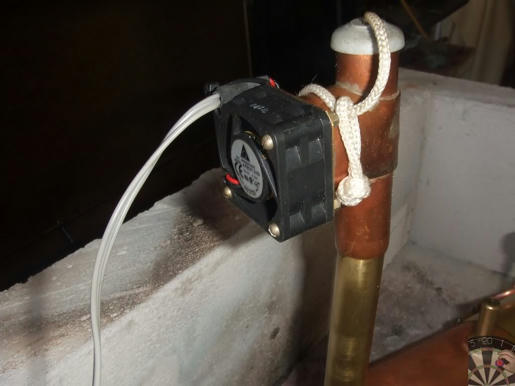
My 'micro blower' made from a computer fan. Its made this way in an attempt to stop steam going directly through the fan,

w5b161wav83lh5c4g.jpg


And of course light it up.

atraloloeug8xml4g.jpg


To be honest it took some work to get it going and as the boiler isn't certified (its done the pressure test) the plan was to keep the pressure below 30psi (working pressure is 80psi)

[ame]http://www.youtube.com/watch?v=5PBPEbrN-qY[/ame]

There's a bit of a knock in there somewhere and the burner needs a bit of work to get it to burn better, but its a start. Time for a complete strip down finishing, lagging, cladding, painting etc

Pete
 
Congratulations Pete,

progress is being made indeed. You state it took some work to get it going - was that in relation with the gas heater not performing as well as you had hoped?

I bet you're on a bit of a high at the moment :)

Well done again, and looking forward to some footage with it pulling you.
PeteH
 
That's Fantastic :bow:

Best Regards
Bob
 
Thanks guys

The timing was slightly out, it was OK on air but on steam it made the difference. This model doesn't have any cylinder drain cocks (maybe it should) I'm forming the view that with the timing out the condensate was causing one stroke or the other to hydraulic lock.

The burner is burning with an orange flame which I believe is due incorrect gas/primary air mix (not enough air). The jet is as far back in the holder as I can get it right now, but the rear air holes are still partially covered. It just needs looking at. I'll also play around with the jets, I'm using a #10 jet because that's the biggest I had spare, I have a #5 and my Rob Roy uses a #15. I also haven't included the "baffle" I have in the Rob Roy. It prevents the draw of the blower/blast pipe pulling the flame off the top of the burner.

jzc2tl5ytz1mynl4g.jpg


Plenty to play with. The thing is the grate area on this is not that much smaller than the Rob Roy however the boiler is much smaller. If I get the burner running like the Rob Roy burner it will just about be flash steam, In the right conditions I can get the Rob Roy from cold to safety's blowing in about 8 mins.

So yes feeling pretty good at the moment it's always a major milestone. Its not finished by a long shot but I like to get to this point early as soon as possible to be able find out what is wrong. I take the view the sooner you find out the better and you can do something about it. No point in building it to its final state to find out a major rework is required.

Pulling me may be a long way off. Our club track is in the process of being rebuilt and it doesn't look like it will be done before the end of summer.

Construction043.jpg


And the other local 3 1/2" gauge track is also out of action as the council are doing major works in the park it's in, so I couldn't run it if I wanted to.

regards

Pete
 
Well done Pete
Fantastic run :)
I loved the video
Pete


Now that's a busy backhead! Well done. :bow: :bow: :bow:
Looking forward to the video of it pulling you when the track work is done.

Ron
 
Thanks Pete/Ron

A bit of a way to go yet. I had a bit of a side bet with the club chairman as to what would be finished first, the loco or the track. As there is still some work to go before its capable of pulling a load and I haven't done the tender yet its likely to be the track.

Pete
 
It's small enough to bring to Perth mate ;D - our tracks fine :big:
 
Rich/Pete

Thanks; but its still going to have to stay in NZ and I'm afraid unlikely to get anywhere near the UK or do a quick trip to Perth. Sorry about that. In fact it's a pile of bits again as I prep for the painting.

i6uxt2bkhdxwmd54g.jpg


I did make something today, the boiler bands and prepared the hardwood cladding.

1undi654anen3ud4g.jpg


The wood is just strapped to a length of the copper tube with rubber bands while the finish dries.

regards

Pete
 

Latest posts

Back
Top