Quarter Scale Merlin V-12

Home Model Engine Machinist Forum

Help Support Home Model Engine Machinist Forum:

This site may earn a commission from merchant affiliate links, including eBay, Amazon, and others.
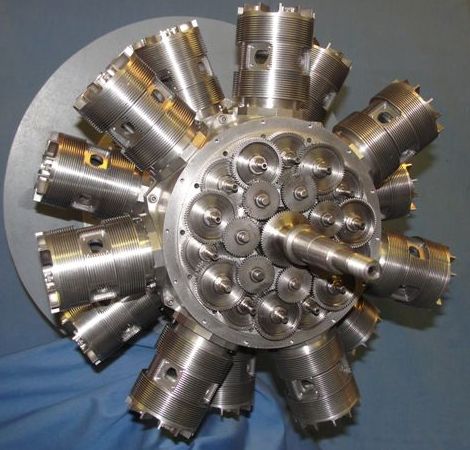
I took some time off for travel to visit my youngest son and to attend my newest grandson's first birthday party. With me I took a single Merlin drawing so I'd have something to keep my mind occupied during our quiet time. This drawing contained the design of a three-piece cover for enclosing the timing chain and sprockets. Four aluminum tubes interconnect two upper covers located at the rear of each head with a third cover enclosing the idler sprockets at the top of the wheel case. I spent many hours before and during our trip trying to visualize these upper covers from the flat views in the drawing. These two covers are the most complicated parts in the assembly, and their dimensions are critical. But, most of their design is contained in a sectioned view of a drawing detail taken from a top view of an assembly drawing of an installed cover. All the information was there, but with no photo or isometric view to help me get started, they just didn't want to come into focus for me regardless of how long I stared at them.
After returning from our trip, I began modeling them in my CAD software. After a couple days of trial and error but no 'a-ah' moments, parts slowly took shape that reasonably matched the drawing. To make things a little more interesting the drawing contained the design for only one cover, and it had to be mirrored to get the second one. Some of the dimensions had to be changed to fit my particular castings, and I also made some changes to the mounting screw locations since there appeared to be issues with the ones in the drawing. After compiling my own 3-D assembly it was obvious what the drawing was trying to tell me, and I'm embarrassed to admit how much I had struggled with it. In any event, I've included several photos of the final parts so the next builder will have a better starting point.
This timing cover was not part of the original Quarter Scale design. From what I can tell from translating Gunnar's diary, it came into existence after he complained to the original designers that the engine needed a cover and that he intended to design one. The designers apparently agreed, designed one of their own, and sent him the drawing that I've been working from. This drawing was included as an addendum to the rest of the Quarter Scale documentation, and it's dated without revisions to the time Gunnar was working on this portion of his engine. Notes accompanying the drawing warn that the design is intended only as a suggestion, and modifications and individual fitting may be required. I did find it necessary to make a few changes; but, over all, the design seems pretty well thought out, and it's nicely integrated into the engine's overall design.
The three machined covers will be connected by four metal tubes in a close-fitting rigid assembly that must clear the chain. I focused only on the two upper covers at this time and will probably make the third one later along with the rest of the wheel case components.
The top covers were every bit as complicated to make as their drawings were for me to understand. Eight different set-ups were required to machine all the features on each cover. Construction began by contouring their outer peripheries from chunks of one inch aluminum. A clearance notch was then milled along one side of each cover in order to clear a flange on its head. It's important for the depths and angles of the holes that are drilled and counterbored for the interconnecting tubes to be spot-on so the three covers can properly mate up without interfering with the chain. I used a sine plate to set the head of my mill for these operations. Although I got the angles correct, I managed to scrap several hours of work when I reversed the two degree angled holes on both parts. These particular holes were a constant source of confusion for me since, to me, they always seemed to be going in the wrong direction.
After re-drilling the holes in a pair of new parts I milled the shallow rectangular pocket in the top of each part which allowed me to compare the drilled hole intersections with those in my CAD drawing. When the intersections didn't match I realized the first two parts were actually correct after all. I exchanged my two new workpieces for the pair I had thrown into my scrap pile and continued on, hoping the brain cobwebs would soon clear.
The next step was to machine the clearance pockets for the cam drive sprockets. These pockets are contoured to fit very closely to the diameter of the sprocket with its chain. My piece of NOS chain had arrived while we were on our trip, and so I was able to use it later to check the clearances. I set the first cover up on my lathe faceplate in order to bore the pockets, but while I was trying to make up a one-off boring bar I decided to CNC the pockets using an ordinary end mill on my Tormach. The pockets came out looking great, but the end mill's diameter reduced the clearance to the chain a little more.
I filleted the rear outside corners of the covers. This wasn't a part of the original design, but I thought it was a nice touch to what had turned out to be a couple of really miserable parts. The final step was to drill and tap the five mounting holes in each cover and head. The drawings called out 1-72's but warned that washers might be required due to break-outs created by the limited drilling space. I dropped down to 0-80 button-head socket screws to avoid this, but I had to carefully match drill each pair of holes. I'm really, really glad these two covers are finally finished. - Terry

405.jpg


406.jpg


407.jpg


408.jpg


409.jpg


410.jpg


411.jpg


412.jpg


413.jpg


414.jpg


415.jpg


416.jpg


417.jpg


418.jpg


419.jpg
 
Very inspiring. Angles, angles, everywhere angles. Initially I wondered if the roller chain could install as a closed loop.. but now other bits enter the picture. Is it threaded through the assembly open ended & then linked together? Is there any tension tweak-ability with the intermediate sprocket? Re the sprockets you made, do those get hardened?
 
Peter,
I think the chain will have to be linked together after the cover assembly is assembled on the engine. The third cover is to be built as two halves so it can be closed up after the chain is linked. The assembly process will be tricky, but hopefully it will have to be done only once. One of the three idler sprockets inside the third cover will have limited tension adjustment, and so the chain will need to start out with the right number of links.
The cam drive sprockets are aluminum, the idler sprickets are stainless steel, and so only the chain is hardened. - Terry
 
Last edited:
The only adjective I can think of is 'extraordinary'! I can't think of many people who would even take on this task, let alone produce such ... extraordinary ... results. Respect.
 
While still procrastinating over the valve seats I decided it was probably safe to go ahead and machine the lower timing cover which is the third component in the timing cover assembly. Its drawing was much easier to follow, especially after my experiences with the top covers, but I'm pretty sure it is missing the dimension for its overall length. I had to use an actual measurement of the mating flange on the wheel case casting to complete my model.
The two pairs of interconnecting tubes from the top covers terminate inside this cover. Once its outer perimeter was contoured, the critical machining was basically more of the same angled drilling and counterboring that was performed on the top covers. This part had a slight twist, though, because it had to be split into two halves. Since the chain is completely enclosed by the timing cover assembly, the outside half of this lower cover can't be installed until the rest of the assembly is in place, and the chain is linked and moving freely without interference. The drawing for this cover recommends sawing it into two halves after completing its machining and then RTV'ing it back together during final assembly. I knew I wouldn't be able to live with the gap left by the saw kerf, and so I machined the part as two complete halves. The base of this cover is secured to the top of the wheel case with 14 screws, and there is a pair of additional fasteners pulling the two halves together.
After machining the two halves, I drilled and tapped them for the 1-72 cross fasteners. To help support the two halves in alignment in the vise while they were being match-drilled for the cross fasteners, I used a short piece of Delrin round whose diameter was turned to closely fit the contour in the center of the part. After drilling, the halves were screwed together so the four tube holes could be machined.
The cover's mounting flange made it difficult to support during the angle drilling, and so I screwed it down to a sacrificial block. This block was machined with the two angles required for the drilling so I didn't have to adjust the angle of the mill's head.
After the holes and counterbores for the tubes were completed, a shallow cavity was milled into the bottom of the cover to match the opening in the wheel case and to provide clearance for the chain.
Two pairs of temporary tubes were cut in order to tie the three covers together as a sanity check on the assembly, but its final fit to the engine really can't be verified until the engine itself is closer to its final assembly. - Terry

420.jpg


421.jpg


422.jpg


423.jpg


424.jpg


425.jpg


426.jpg


427.jpg


428.jpg


429.jpg
 
The last operation that I can do on the heads before I'm out of excuses to start on the valves is to machine the spark plug ports. The plans specify Viper Z2 plugs with their tiny 10-40 tapped holes because there just isn't enough room for anything else. I used much larger CM-6 plugs in my two radials because even though they were a poorer match to the scale that I was working with, they were much more immune to oil and fuel fouling. The Quarter Scale's plugs are located on the bottom outer sides of the heads just below the exhaust tips. They penetrate the sides of the combustion chambers right next to the exhaust valves, and so the hot exhaust gases may help to keep them clean.
Since the full-scale engine uses two plugs per cylinder, the plans suggest installing a second set of plugs on the inner side of the heads next to the intake valves. Functional spark plugs placed in such a location in a model engine would likely be continually fuel fouled due to the cool fuel/air charge constantly flowing across them. And, so, this suggestion was likely for cosmetic reasons rather than for any improved functionality. At $23 each, I opted for one plug per cylinder especially after I realized the second set of plugs would be buried under the intake manifold, never actually seen, and be impossible to service without disassembling a major portion of the engine. In fact, I'm not even sure there's enough room under the intake assembly to install them. I currently have only two spark plugs for test-fitting, and I plan to wait until much more of the engine is completed before I order the remainder.
The ports for the plugs were drilled into the heads at alternating ten degree angles in order to come up with usable plug depths, and so counterbores were required for sealing surfaces for the scary narrow compression washers. Having learned a lesson about deburring spark plug ports during my T-18 build, I spotted, drilled, threaded, and then counterbored each port in the same set-up; and this time I left the corners of the threaded holes sharp.
As the photos show, the ports had to be carefully placed because of the limited space around them. My measurements predict the clearance between the plug's ground electrode and the stock exhaust valve would be on the order of only five to ten thousandths, and this is with a minimum plug depth that barely un-shrouds the plug gap. I don't plan to use the stock valve configuration, though, for other reasons.
The drilled/counterbored holes between the spark plugs are for 'freeze' plugs that will be installed later. These holes were actually cast into the heads for core supports, and they penetrate the coolant passages. I'll likely press/Loctite the plugs into place after all the valve work is completed just in case the heads need to be heated for the valve guide/seat installation. - Terry

430.jpg


431.jpg


432.jpg


433.jpg


434.jpg


435.jpg


436.jpg


437.jpg


438.jpg
 
The valve guide/seat design supplied in the drawing package is similar to that used in the full-scale version. The full-scale heads were fitted with renewable steel alloy seats, while the intake and exhaust guides were machined from cast iron and phosphor bronze, respectively. The Quarter Scale documentation includes drawings for seats and guides, but the accompanying notes strongly encourage the use of integral seats instead. There's significant risk associated with installing seats in what, at this point, are irreplaceable heads. The floors of the combustion chambers are rather thin and known to be brittle, and I'm concerned about their ability to withstand the forces required for a .002" press-fit. In addition, the surfaces on which the concentric holes for the guides must be started and drilled through are pretty rough, non-parallel with the seat surfaces, and they may not be homogeneous. For good concentricity both the seats and guides should be press fit, although the guides can Loctited with a near zero interference fit. With 48 components to be installed, I'm concerned there's a good chance that at least one will end badly.
On the other hand, the critical machining required for a valve cage, although still no walk in the park, can be done on a lathe in a single set-up, and its accuracy can be verified before installation in the head. The precision of the required head machining can be relaxed some when using valve cages since high temperature Loctite can be used to seal and hold the cages in place.
I briefly looked at integral seats. I estimated the peak pressure on the stock seats during combustion in this engine to be 16.5 kps, and I compiled a table of what I thought were the pertinent properties of some commonly used seat materials in model engines:
.
Material...............Yield/Rupture.................Brinell
.............................Strength....................Hardness
7075 Al....................73kpsi........................150
6061 Al....................40kpsi.........................95
356 Al......................26kpsi......................70-100
544 Bronze...............57kpsi.........................65
932 Bronze...............20kpsi.........................65
954 Bronze...............37kpsi........................180
Grade 40 C.I.............42kpsi........................220
.
The seats need to be durable (hard), but in a model engine we typically like them to conform (yield) to the valves over time for a better seal than we can typically achieve solely with machining. In the above table, 356 cast aluminum does look like a good candidate for valve seats in a model engine.
I've included some photos that I used while studying the intake and exhaust ports in the heads as well as some sectioned CAD assembly drawings I made. I also found an online photo of an actual sectioned Merlin head for comparison. Although the cam and rocker arm assemblies are very different between the full-size and the Quarter Scale versions, the cross sections of the heads are pretty similar.
An issue that the modeling uncovered is that the stock exhaust valve will indeed contact the spark plug if the plug depth is extended, as I have done, to un-shroud the plug's electrode. Since the heads came with large cast-in starter holes for the seats, I'll have to reduce the size of my valves as well as the i.d.'s of the seats compared with the stock versions. Smaller valves are a negligible price to pay to get the plug gaps inside the combustion chambers, though. The stock .560" diameter valves are much larger than necessary for a 3600 rpm engine, and this was also an observation made by the Quarter Scale designers.
The full-scale four-valve heads have vertical dividers in the intake and exhaust ports to isolate the flows between the valve pairs. The Quarter Scale ports have the same dividers even though the heads have only single intake and exhaust valves. I initially thought the dividers might have been present for mechanical support, but they were likely added for esthetics.
I made two cross-sectional CAD assembly drawings: one showing the stock arrangement with individual (or integral) seats and guides and a second one using my valve cage design. I cut away a portion of the intake and exhaust port dividers in the cage version because they blocked the machined openings in the cages. The dead space in the ports behind the cages could be filled with JB Weld to improve flow.
The cage version is a bit complicated because I'm using a valve cage in an existing head that wasn't designed for it. As a result, I'm adding additional risk when the object has been to reduce it. So, I generated a third assembly drawing which shows a modified version of the stock design with smaller valves but slightly larger valve stems.
Before making a final decision I thought it would be wise to get some experience with shrink fitting some test seats into scrap aluminum. I made a seat pocket boring bar from a four flute end mill by grinding down all the flutes but the shortest one on an eBay grab-bag re-sharp. This established the i.d. of my seat pockets at .493". I had some 1/2" o.d. phosphor bronze round stock on hand which, with care, can be finished with an o.d. of .495". This established the o.d. of my seats for an interference fit of .002".
I drilled a number of .427" diameter holes through some 1/4" aluminum stock to simulate the seat starter holes in my heads. I then used the boring bar to open up .100" deep, .493" diameter pockets centered on them.
The .110" wide phosphor bronze seats were parted off from one inch turned/bored blanks, and a .005" chamfer was placed on their bottom outside edge to help ease installation. I also made an installation tool from a piece of drill rod to closely fit the .388" seat i.d. that I selected to use.
My first test was to tap a seat into place using the installation tool and a mallet in order to get a feel for the force required to seat it without heat. It took three healthy taps to fully seat it. The reason for the mallet is that my press is on the other side of the shop from my oven. Next, I heated the block to 400F and tapped in another seat. The effort required to install it in the heated block felt about the same as it did in the unheated block, and so I increased the temperature to 450F and tried again. The results were about the same with the third seat. Next, I purchased some dry ice to cool the seat and installation tool; and I reheated the block to 450F. With at least a 500F temperature differential the seat should have fallen into place, but again I got essentially the same results. At first I thought the seats might be warming up to the block before I could get them completely driven home. What was more worrisome, though, was that all the seats in my test block were sitting slightly crooked. I tried to section a couple of the installations to get a look at what was going on at the bottom of the pockets, but in both cases the end mill grabbed the seat and pulled it out. However, I found evidence of galling in the pocket wall as well as tell-tale aluminum slivers at the bottom of the pockets that were likely causing the seats to sit crooked.
I installed the next seat using the mill with the installation tool chucked into the spindle, and I pressed it into place immediately after boring its pocket. I didn't have enough leverage with the quill to completely set the seat, and so I had to finish the installation on my press. The seat appeared to be in straight, though I was left concern about the amount of force needed to install it.
Since I was sure the seats were being properly started on the mill, I decided to increase the size of their corner bevels to .010"-.015". This greatly reduced the installation force so I was able to fully seat three practice parts on the mill, and they finally looked straight. I also tried chilling a few seats with dry ice on the installation tool immediately before pressing them in. It was unclear, though, how much difference the dry ice made although I'm sure it likely helped.
These experiments told me that if I decided to use individual seats I would probably be better off installing them on the mill in the same set-up used to bore the pockets rather than trying to do shrink fits using a mallet. Of course a piloted installation tool would probably help. The logistics of adding heat into my mill set-up looked too tricky, but the truth is I never really did like the idea of applying heat and pressure to my already finish-machined heads. I think the dry ice, though, is probably a good idea. I once read a white paper that claimed that only about 30% of the area involved in a typical shrink fit really ends up in intimate contact. So, with the larger bevels I think the use of a bit of high temperature Loctite would be beneficial not only because of its holding strength, but it may act as a lubricant during installation. The dry ice, in addition to providing a bit of clearance, may prevent the Loctite from going off from the heat generated by the pressing operation.
Before making a final decision I need to machine a few cages and valve guides in order to make sure there aren't some surprises with them. If I'd have launched off with my initial idea of shrink-fitting the seats, the heads would now be sitting in my scrap pile.- Terry

439.jpg


440.jpg


441.jpg


442.jpg


443.jpg


444.jpg


445.jpg


446.jpg


447.jpg


448.jpg


449.jpg


450.jpg
 
Last edited:
Terry, is 356 aluminum commonly available as round rod, or maybe you will source from tooling plate stock or similar? Do you think the ring style valve seats can somehow lend themselves to a pre-testing apparatus along the lines of your vacuum method ie. pre-validates valve/seat before pressing them home? Ultimately, what would a remove & replace scenario look like?
 
Peter,
The 356 is likely available only in ingot form as it's used for casting. The reason I included it in my table is that I was considering the possibility of cutting integral seats directly into the heads which, I believe, were cast from 356. It might be possible to check the seal integrity of an installed valve and seat by pulling a vacuum on the port, but it will require a complicated silicone plug to fit tightly against and seal to the port opening. As far a removing a worn seat, I guess if I really had to I would try to mill most of it out and then pick at the rest with a dental pic. - Terry
 
The valve springs slip over the upper ends of the valve guides and cages. And, so, before the designs of those parts can be finalized the springs have to be defined. I would like to make the diameters of the valve stems as large as possible so the valves will be easier to machine, and this will require making the upper diameter of the guides as large as practicable. The clearances around the valve train will accommodate a maximum valve spring diameter of .310" at which there is a .010" minimum clearance between the edges of the keepers and the rocker arms. There was no design information provided for the valve springs, and so they will have to be designed from scratch.
The valve springs in a four cycle engine need to be strong enough to keep the closed valves tight on their seats with good gas tight seals. While I was leak-checking the valves during my T-18 build I found that 1 to 1-1/2 pounds of force on the face of the valve under test was sufficient to obtain each valve's best leak-down time. Another required function is that the exhaust valve spring must exert enough force on the exhaust valve to keep it from being sucked off its seat during w.o.t. If the springs meet both these requirements they will likely handle the rest of the valve train needs of a typical model engine. The unseating force on the exhaust valve that needs to be overcome is a result of atmospheric pressure operating on its face.
For a calculation we can assume this pressure is 15 psi plus some implementation margin for a total of, say, 19 psi. To calculate the resulting force on a valve we need to multiply this pressure by the effective area of the valve using its diameter measured at the i.d. of the seat. My seat diameter is .388", and so the effective valve area is pi*(.388^2)/4 = .120 square inches. The spring force required to overcome atmospheric pressure on this valve is therefore (19 psi)*(.120 sq in) = 2.3 pounds. Since this force is greater than the valve's gas tight seal requirements, the springs will be designed to supply a minimum of 2.3 pounds of force on each closed valve.
This spring force will be created by the difference between the free length of the spring and its installed height multiplied by a parameter of the spring called its spring rate. Spring rate is a complicated function of several physical and metallurgical properties of the wire used to wind the spring. It specifies the force in lbs/inch that must be exerted to compress the spring.
It's easy to calculate the spring rate of a spring using an online calculator such as the one at: http://www.acxesspring.com/spring-calculator.html. The inputs for this calculator include the wire material and its diameter, the o.d. of the spring, and the number of turns in the spring. This particular calculator also asks for the free length of the spring since the vendor sponsoring the calculator needs this piece of information to provide a manufacturing quote. The free length isn't actually used in the spring rate calculation, though. For a given wire material and free length, a stiffer spring can be wound by reducing its diameter, or its number of turns.
I have some .031" diameter 302/304 stainless steel spring wire left over from my Howell V4 build that I would like to use. The Quarter Scale valve train was designed for an installed spring height of .478" and an absolute maximum spring diameter of .310". I used the spring rate calculator to compute the spring rate for two options using my wire and the .310" maximum allowed spring o.d.:
.
Free Length------#turns-------Spring Rate
.650"-----------------5-------------10.7 lb/in
.700"-----------------5-------------10.7 lb/in
.750"-----------------5-------------10.7 lb/in
.650"-----------------6------------- 8.9 lb/in
.700"-----------------6--------------8.9 lb/in
.750"-----------------6--------------8.9 lb/in
.800"-----------------6--------------8.9 lb/in
.
I calculated the resulting force on a closed valve by multiplying the spring rate times the difference between the free length and the installed height of the spring for each case. For example, the 5 turn spring with a .700" free length will produce a force at its installed height equal to (10.7 lb/in)*(.700"-.478") = 2.4 pounds. This particular spring meets my requirements since the force it creates is greater than the 2.3 pounds exerted by the atmosphere. A force much greater than this will unnecessarily increase the stress and wear on the cam and valve train components. When the valve is unseated the valve train will see the 2.3 pounds plus the additional force created by the compression due to the cam lift. For the Quarter Scale cam this peak force will be 3.7 pounds.
The next step is to actually wind the springs. A photo shows a fixture that I made for my manual lathe that I used to feed spring wire onto a mandrel held in a collet chuck. For safety I normally set up the power feed to wind the spring toward the tailstock, but I forgot to reset the direction after interrupting my little production run for another quick project. When I restarted the run, I ran the carriage into the headstock and mangled the helical power feed gear located behind the lathe's apron. The repair was a two day diversion, but I managed make a shop-made replacement gear and get running again. The most difficult part of the repair was actually getting to the gear.
Coming up with the diameter of a mandrel on which to wind a spring of a particular diameter is a matter of trial and error since the spring tends to open up when the winding tension is released. It took me three tries to hit my target using my .031" wire:
.
Mandrel Diameter------OD-------Sliding Fit ID
------.203"-------------.320"-----------.250"
------.197"-------------.305"-----------.240"
------.190"-------------.295"-----------.220"
.
I selected the .197" mandrel, and so my spring's physical parameters are:
.305" Spring OD,
.031" dia. 302/304 Stainless music wire OD,
5 turns,
.700" free length,
.478" installed height, and
.240" sliding fit ID.
With each spring inserted on a snug fitting drill bit I squared up the ends with pliers, and I also made a simple fixture to grind the ends slightly flat. Even more important, though, I stoned the tips of the wires to prevent them from scratching the valve guides since I'm planning a minimum clearance between the two. The springs were inserted onto a .240" mandrel so their lengths and i.d.'s could be verified. Springs that didn't slide freely on this mandrel were discarded since I planned to machine the upper guides to this exact diameter. The springs were then tumbled in wet ceramic media for several hours to polish them.
A final step in spring fabrication that I routinely perform, but others often ignore, is to heat treat the finally formed springs. This heat treatment (a partial annealing) relieves the internal stresses created by the winding process, and it improves the spring's ability to hold its free length and spring rate with use over time. It makes the metal a little happier with its new shape. For my particular wire I held the springs at 400F for 45 minutes and then allowed them to slowly cool. i spot checked several completed springs by measuring the force required to compress them to what will be their installed height. The last photo shows the first part being checked that happened to come out at 2.3 pounds. The rest of the samples ranged from 1.9-2.4 pounds. The margin built into the original calculation will cover the spread on the low end. - Terry

439.jpg


440.jpg


441.jpg


442.jpg


443.jpg


444.jpg


445.jpg


446.jpg
 
My little afternoon project making a few prototype valve guides and cages for leak-down comparisons ended several days later with piles of finished valve-related parts.
I decided to machine the valve guides first, and for those I selected 932 bearing bronze. Its properties aren't specified at elevated temperatures, and so I'm not comfortable with using it inside a combustion chamber. It has excellent lubricity, and it machines beautifully; but I've had issues with keeping small diameter holes centered in bronze rod stock. So, I spent some time coming up with a drilling process.
The lower portion of the guide, the half that will be pressed into the head, is the portion with the concentricity requirements. The top half supports the spring and is not as critical, and so this half can be turned as a secondary operation in a separate set-up.
After turning the o.d. of the guide's lower half, I spot drilled its lower end using a 90 degree tailstock-mounted mill drill. I then drilled the hole using a 134 degree .142" diameter parabolic drill. These drills are designed for deep drilling, and they nearly eliminated the need to peck drill my .7" deep blind hole. (To make these parts in quantity I pulled a single workpiece through the chuck and parted them off as they were finished.) Next, I bored the hole out to about .150". The exact diameter wasn't important since the purpose of boring was to straighten out any drift created by the drill. I then reamed the hole to its final .157" i.d. The theory was that the reamer would follow the hopefully straight hole through the center of the guide and give me a perfectly concentric fit to the valve stem. I could have bored the hole to its final .i.d., but reaming was quicker and more repeatable than having to deal with tool changes and offset variations.
After parting off each half-finished guide I measured its TIR with a dial indicator while rotating the guide on a close-fitting gage pin. Care was taken to not allow the clearance between the two to influence the measurement. Allowing a few tenths for spindle bearings, the results were more inconsistent than I had expected. While trying to track down its source I ended up making some 37 parts that I separated into three bins:
-
# parts ------------ TIR
---10 -------- .0005" to .001"
---16 -------- .00025" to .0005"
---11 -------- less than .00025"
-
After parting off each half-machined valve guide, I found it important to cleanly reface the workpiece for the next part. It seemed that all traces of the center hole remaining from the previous part had to be removed, or the TIR of the next part could be affected. I think I also got more consistent results if I was careful to blow out the chips from the hole just before both the boring and reaming operations. Unfortunately, luck, or maybe the homogeneity of the bronze, seemed to have the last word on the results.
I scrapped the ten parts with the worst errors and then finished the upper half machining on the remaining 27 guides. At this point I had enough seats and guides for both Merlin heads plus a few test parts. All the guides were machined for a zero interference fit in the heads; and, if I use them, they'll be Loctite'd in place.
I also needed a few valve spring retainers and clips for my tests, but once I got set up and running I ended up making all that I will need for the engine. The retainers were turned from 12L14, and the clips were machined from A-2 tool steel. I made the clips by milling their profile into a short length of drill rod, and then individually parting them off in the lathe. I made plenty of extras since these seem to be the parts that go missing during assembly.
I'll also need a few valves for my tests, and so my next step will be to machine those. Since I now have a common valve design that should work with either the seats and or the cages I'll likely machine enough for the entire engine over the next week once I get running. I plan to review my notes from my T-18 build since I spent a long time coming up with a process for making the valves for that engine, and I'll likely re-use it.
I'm still curious about the performance of the double angled seats in my current cage design, but I'll be able to leak-check those just after they're machined. My plan is still to leak-check a couple practice guides and seats pressed into a scrap aluminum block before doing anything with the actual heads. - Terry

447.jpg


448.jpg


449.jpg


450.jpg


451.jpg


452.jpg


453.jpg


454.jpg


455.jpg


456.jpg


457.jpg


458.jpg


459.jpg


460.jpg
 
Last edited:
... machine the valve guides first, and for those I selected 932 bearing bronze. ... and it machines beautifully; but I've had issues with keeping small diameter holes centered in bronze rod stock. So, I spent some time coming up with a drilling process....

Hi Terry. Thus far I've been using 12L14 for my valve cage sizing/prototyping but 932 is the target material. I've also got some concentric drilling requirements, the larger port (8mm) on one side & the valve stem hole (3mm) on the other. Do you think its advisable to modify some dedicated drills for this operation like what they recommend for brass (reducing rake angle if I interpret correctly). Also any differences to note for reaming? I've heard varied opinions from no change to spiral work better on bronze for some reason.

10-31-2015 0000.jpg
 

Latest posts

Back
Top