Potty 3 Cylinder Radial Engine Build

Home Model Engine Machinist Forum

Help Support Home Model Engine Machinist Forum:

This site may earn a commission from merchant affiliate links, including eBay, Amazon, and others.
Joined
Dec 12, 2012
Messages
2,220
Reaction score
1,285
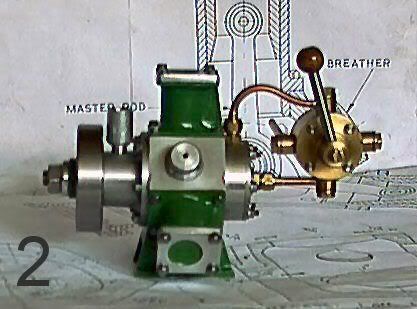
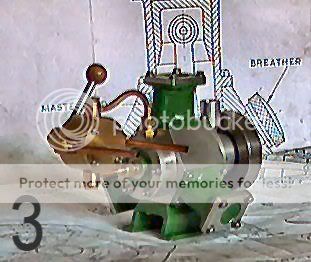
I liked the look of this engine and decided to make it my next project
I downloaded and printed the plans,my thanks to Stewart Hart
If anybody has made this engine i invite you to post on this thread
As usual i made a few changes but basically followed the plans
As i start this post the engine is approx 90% complete as i wanted to confirm
that i could do a reasonable job before advertising my limited skills
I wanted a slightly larger version so upscaled x 1.3.Then nudged the holes and screws etc to suit std items and tooling.I will post with photos but not in the order that the items were made.I made the cylinders,the photos show some setups.Also the conn. rods which were a little tricky.How i envy those with cnc
Lots of setups to make both the (casting) and machined faces and fitted brass bushes. Big end 8mm,small end 4.8 (3/16) to suit reamers.of which i dont own many.Long way round from the old fashion school of engineering.More work on jigs and fixtures than than on the parts.TBC
 
I made the Cygnet 3 Cylinder Steam Engine from the plans in Model Engineer
I had run it with compressed air but it sounds so much better using live steam

[ame]https://www.youtube.com/watch?v=E_UTqFTS-VM[/ame]
 
Hi Baz,
I have the drawings but too many engines to build. Looks like Gus will build this ''Potty'' sometime next year. Right Gys is Monkey See, Monkey Do. Will follow your Potty posts.
 
I made the brg housing first,with 2 no 12mm skate brgs,crankshaft was 8mm
I made the flywheel but did not make the alum locking collet,just a grubscrew and nyloc nut for now.The crankcase was made as drg with pistons at 20mm
The valve timing was tricky but got the the valve to bind at +2 thou then wiped the valve and end cap on wet/dry on surface plt until just able to turn stiffly
Wasnt confident on machining to half thou.The cylinders were finished and assembled.I prefered to make an alum block to the side rather than 2 small tubes.Trialed assembled and run in on the lathe.A few more details to do ,stand to make etc, then lets see if it works
 
Progressing well.The first video shows the sub assy run in just to highlight the
high spots,you can hear and see the conn rods knocking.Stripped down
cleaned up the high spots,included more clearance to a number of areas and
removed/cleaned up the bruising to the conn rods.Reassembled,finishing all items and aligned all the steam passages.Turns over by hand nice and stiff.
The second video shows the final running in.Im very happy so far,just the stand to make.I would like to replace the flywheel with a propellor,any ideas where i can get one ???.Would also like to add a circular perspex window to the blank face
 
Baz,

I built the casting version (Cygnet) many years ago and got the same running effects as Ruzzie above, and thought I would experiment a little.

Despite the rear valve controlling the direction of rotation, actually, it will run almost just as well in reverese.

I just made a simple reversing valve to swap over the inlet/exhaust port and it ran very well indeed.

cygnet2.jpg


cygnet3.jpg


John
 
The engine is all finished,now need air to see if it runs.I made the base.
I made a tapered alum upstand as drg and then an alum plinth
I used an ogee router bit to detail the edges.Note ,the mod i made to the 3"
swivel vice works well the clamp the larger range of sizes.
I have a piece of 30mm thk black granite that i use as a surface plate
just a scrap piece of kitchen worktop,could this be used as a base ?
I cut a 6" sq with an angle grinder and then trimmed to size with a diamond tile cutter.Drilled and counterbred with cheap masonary drills,then ground a chamfer to all edges.Works well with a plastic water spray bottle
Bit of a rough setup for the chamfers.I fitted a hinge to my drill vise and bodged up a 45o angle setup.No problems,finish was good,a little polish to finish.I now want to fit a prop instead of the flywheel and i can get one cheap from ebay but dont understand the sizing ? it gives 2 dims ?for example 9" x 7'
I assume the 9 is diameter whats the 7 for ???
 
The First number is the diameter and the second is the pitch the same as a screw.
hence the name airscrew or propeller
 
Hi Baz,

Very well done. Had planned to build this engine years but I chickened out. Same engine back on my ''must build list''.

30 years ago I put in a three cylinder Ingersoll-Rand Air Motor to power overhead crane travel. Worked very well. The previous rotary vane motor had a mind of its own. When the vanes are not in the best phase,it has very bad or no power to move from ''stationary'' position and bad for inching.
 
Hi Gus ,i found the engine easy to make and forgiving on tolerances.Only mistakes i made was not upscaling every dim.As a model at 1.3x it looks and feels good,hope to fit a perspex window to view the conn rods etc.Took me about 2 weeks with a couple of hrs each day.Best regards barry
 
Hi Gus ,i found the engine easy to make and forgiving on tolerances.Only mistakes i made was not upscaling every dim.As a model at 1.3x it looks and feels good,hope to fit a perspex window to view the conn rods etc.Took me about 2 weeks with a couple of hrs each day.Best regards barry

Hi Baz,

You have shown the way and blazed the trail,th_wavI will follow and build ''Potty'' with cut-off surplus after completing the Howell V-2 before going on to build the ''PIP'' 3 cylinder Radial Gas Engine.
 
Back
Top