EZ 45

Home Model Engine Machinist Forum

Help Support Home Model Engine Machinist Forum:

This site may earn a commission from merchant affiliate links, including eBay, Amazon, and others.

lampy

Well-Known Member
Joined
Feb 23, 2011
Messages
59
Reaction score
7
I started building my third "EZ 45" http://npmccabe.tripod.com/45engine.htm The first one I built about 2 years ago with hand tools and a lathe, ugly as sin but it ran great. About a year ago I purchased a HF mini mill and finally got around to building my second EZ 45 a couple weeks ago. This one turned out much better looking and runs well. Rather than try to purty up the second motor I thought I'd build a 3rd one since it is an easy build and I can use the practice. There are a few things I am going to change to clean up this motor. I try to squeeze in some shop time when I can, after work and on the weekends so I'll add pics as I progress through the build. This is my first real post so bear with me....
1st pic, the main body and cylinder cut from a 1" thick slab of aluminum with my $10 yard sale find band saw ;D
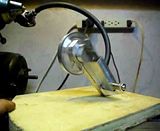
2nd pic, body and cylinder squared up and fly cut.
3rd pic, the 1/4" thru hole for the cylinder pivot and intake port are done.
last pic, 5/16" bore for piston and the cylinder is done.

ez 45 001.jpg


ez 45 003.jpg


ez 45 002.jpg


ez 45 004.jpg
 
I got some work done on the flywheel. One of the things I wanted to add to this motor is spokes to the flywheel. I was going to mark the positions for the holes, center punch and drill them since I don't have a rotary table yet. From past experience I knew this would produce less than satisfactory results (uneven spacing) While reading some other posts I came up with a way to index my flywheel to get better results. I chucked up my round stock for the flywheel, center drilled it for the crankshaft and faced it off. I then center drilled a piece of 3/4" hex for a 1/4" threaded hole, in the lathe, faced it and parted it off slightly shorter than the depth of the jaws my mill vice. I attached the hex to the flywheel with a 1/4" bolt through the hole for the crank, I now had a way to index the flywheel for the six holes to make the spokes in the flywheel. It worked out pretty well. Next I need to add some shape to the flywheel on the lathe.


ez 45 fly wheel 001.jpg


ez 45 fly wheel 002.jpg


ez 45 fly wheel 004.jpg


ez 45 fly wheel.jpg
 
Neat idea for indexing. Nice and simple, but I wouldn't have come up with that one on my own.
 
Your flywheel turned out great! Good idea on the indexing setup.

Chuck
 
Thanks for the replies rhitee and cfellows! I had planed on taking more pics of the 45 before I assembled it but I got going and forgot all about taking pics ;D It is assembled and running! I didn't really change anything on this build except the way it looks. I wanted to give this one a bit more detail and a cleaner look. It is running on 20 PSI and needs some more break in time. I fired up the first motor I built and was amazed, after sitting for months with out running it fired right up and ran. It actually runs a lot quieter than the other two and on a lot less air, I can turn the regulator down to almost nothing and it will purr away. I'm sure after some more run time the new 45 will smooth out and use less air. Now if I can get a proper base built for it and a good cleanup before I get sidetracked by another project ;D

ez 45 001.jpg


ez 45 002.jpg
 
Great engine Rick Thm:.
Bill L.
 
Thanks Bill. I thought I'd post a video of it running.
 

Latest posts

Back
Top