Coming together

Home Model Engine Machinist Forum

Help Support Home Model Engine Machinist Forum:

This site may earn a commission from merchant affiliate links, including eBay, Amazon, and others.

1hand

Well-Known Member
Joined
Feb 26, 2009
Messages
914
Reaction score
15
Put up some shelves weekend. The basement furnace room / machine shop is starting to come together.

shop001.jpg


shop002.jpg


shop004.jpg


shop007.jpg


shop003.jpg


shop006.jpg

 
That looks real good.
I may borrow your idea for the stock rack, as I am struggling with how to store my stock, keep it accessable and be able to find what I need.

Thanks

Jim
 
Jim

You sure can! I didn't really know what to do with my stock either. Thought about PVC rack at first but then its still hard to see what you got in there too. This will work for now. Actually it was a sitting bench I had made to take your boots off when you come into the basement from the garage, but all its done as a bench is collect junk for the last 5 years so I just added onto it and presto a stock rack.

Matt
shop005.jpg
shop006.jpg
 
1H :
Nice looking shop. lots of shelves and drawers.
here is shop rack I built from plans in hsm .You need to add a piece of plywood or steel plate in the bottom front section.
I built one for my boss at the fab shop as well for short pieces we had a place for the 20 footers.
normal_Stockrack_2.JPG

Tin
 
Great looking shop!

I stuck a piece of cardboard (can be anything) behind the lathe and against the wall so that anything thrown off the chuck wouldn't stain up the wall.
 
Thanks guys!

Hope it will stay neat and clean. I was going to build the same style of rack at work this week but, I jumped the gun last weekend and whipped it up quick with some 2x4s I had laying around the house. I still might, I have room for one. I have a tin guard to go on the lathe that it come with but just took it off to start on fabricating DRO mounts that are going to go on the back of the lathe. May have to do the cardboard thing. I haven't figured out how far the cross slide mount is going to stick out yet.

Matt:)
 
Hey Matt,

Great looking shop!

Just use it the rack the way it is for a while. After some time, you'll figure out the final solution.
Stock racks are funny things...they are different for everyone...depends on what your building and the kind of stock you keep.....keeping the aluminum. steel and copper seperate is a great start....mine is nearly identical because I have a bunch of shorts....seems like they multiply ::)

Dave
 
Hello all!

After installing some shelves a couple months ago, I've decided that they are functional, but could use a bit of customizing.


The before............................
001-11.jpg


The after.........................
002-10.jpg

003-9.jpg
004-9.jpg


Now I'll have room to add some 5c hex and square collets when the boss says so! ;D

It took a fair amount of drilling..........96 holes actually.
005-7.jpg


Matt
 
Looking good Matt!!! It will pay off in the long run.
 
Aaahhhhhhh.... I love that collet rack! (drool, drool) :bow:
 
Revised the shelve by the mill today.
007-4.jpg


Matt
 
"Psst. Hey buddy. Can you spare a collet?"

Damn, I wish I was that organized.
 
You made a great use of your space, Matt. You seem to have a gift for organization, and
it looks wonderfully neat and tidy.

Ya got da collets dere too, don'tchya now..

Dean
 
Very nice setup you are getting there Matt.

The more organised you can get around your machines, the easier it will get when you start your production exercise. You just need to train yourself to put things back from whence they came as soon as you have finished using it. I do that religiously on my machines, and it works like a dream, but my sit down workbench is like a bomb site.

I too have a fetish for collets, for both lathe and mill, and if I can make a small suggestion that might save you a few pennies.

You look to have a very close set of collets, maybe 1/64ths. If that is the case, unless you are going to be doing some very heavy hex metal cutting, you will find that you can easily hold hex bar in a close fitting round collet, just keep the corners away from the slots. I have been using that method for years, and I have yet to find the need to buy a hex collet.

The choice is yours of course, I am just making a suggestion.

Keep up the good work.


Blogs

Just a little add on.
I already have square collets in both imperial and metric, and have found that they are so precisely made, that any sign of oversize, even 0.001", and the stock just won't go into the hole unless it is brought exactly back to size, or minutely under.
 
Thanks guys. If you ask my wife, my organizational skills are a far cry from great. She is wondering where her husband is and what they have done with him. I thought with my worse case tool envy disease I have, I need a method to the madness. Actually is starting to rub off else where around the house, I now see a few other spots that could use some customizing. ;D

Bogs, Thanks for the info on the collets. The hex rod idea its great for now! Tool envy, What tool envy! ::) ;)

Matt
 
Matt,

This isn't a tool gloat, so no envy, but a way of maybe helping you with your difficulties, as my shop was also set up for a production schedule system, like you are attempting to do.

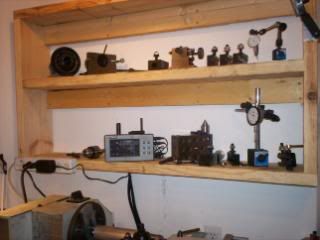
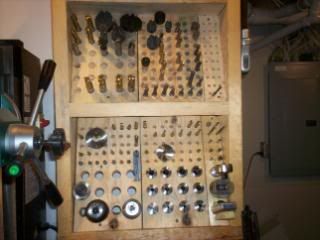
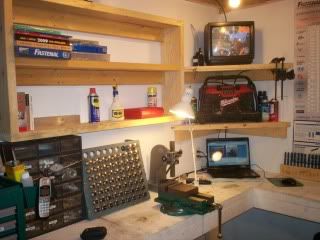
As I have mentioned before, I have a duff right arm, so I placed all my change tooling on the left hand side of my lathe. First pic.
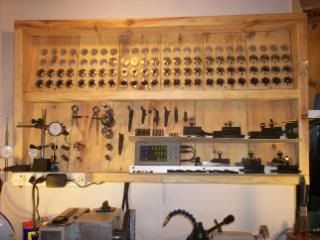
I have done the same with all my collets and most of my cutters for the mill as well. Keeping everything within easy grab range when I am sitting on my high swivel stools.

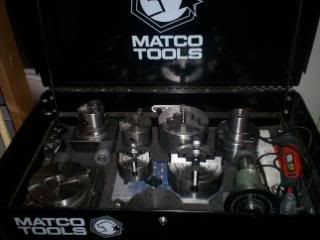
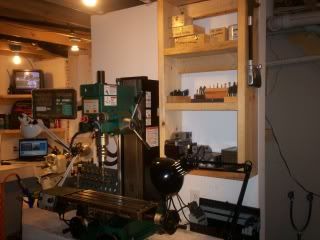
The second pic might be a thing you could consider. If you have air in your shop, you could do what I did, mount a 3/8" power wrench on a tool support hanging from the ceiling. For collet changes, which take a lot of spinning in and out, it makes the job so much easier, or even tightening and slackening a normal chuck, it really relieves the pressure, let it go and it retracts out of the way. I am just doing the same sort of thing with a 3/8" air powered butterfly wrench, for doing hand tapping. I saw it somewhere on the web, and it definitely looks a good idea. In the US you can get the tap adapters to fit, but here in the UK, I am having to make my own, as they are not available here.

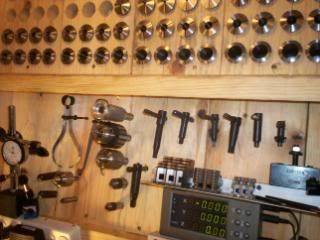
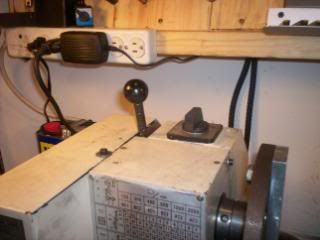
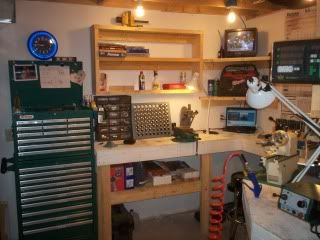
The third pic shows that everything that fits in the tailstock, is within easy reach on the wall behind it.

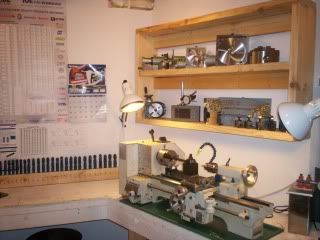
If you can spend a little time planning out where everything should be, you will find that jobs get just a little easier to do, and you aren't always trying to find that elusive bit of tooling.
Almost all the lower areas on the walls in my shop are dedicated to what is going on at that certain position in the shop. Very little is more than a short stretch away.

As I said before though, you do need to replace things when you have finished with them.

Blogs

Shop 02.JPG


Shop 03.JPG


Shop 05.JPG
 
I had seen your shop pics before, and that's where I got the idea to wall mount the collet racks. So thanks blogs. I did also notice the air wrench you where using for the 5c chuck. I plan on the same set up. Its nice to get the collets off the small bench to create some more room for storage drawers cabinets. I was using the existing shelves where the collets are now for the chucks and RT's. Which meant reaching with the one hand cross and above the lathe to retrieve these items. The 6" chucks and RT is quite a lift with one hand. So with putting the lighter stuff up top made that easier. And to keep the new acquired bench space from the collets for the bolt drawers, I brought down a rolling tool chest from my garage to put the chucks and RT's in. So now I can just roll it over by the Lathe or Mill when a change needs to be made, and the lifting is at the waist and up a bit. The drawers will house all the clamps and mounting hardware. So everything I should need will be right there on my RIGHT side within easy reach for the task at hand.
002-11.jpg


Maybe you could give me a few ideas on some other problem. Since installing the 6" chucks on the Lathe, I'd like to be able to use the belt tension lever to engage the chuck into motion like a clutch so to speak. A lot of mass to get spinning from a dead stop. I don't want to wreck anything. But using the tension lever in this matter requires me with my right arm to reach over the chuck to do this. I don't know if I should try to build some sort of hinged rod doohickey That would do this same function but over on the right side of the machine. I like to keep the arm I still have, but I can just see and aciddent waiting to happen here. My bench ends right there to my left so just taking a step to the left and getting directly across from the lever isn't possible. Here's a pic of lever in question.
001-12.jpg

As for the envy, I'm not here to gloat, but will admit that sometimes tools have an unusual way of making their way home with me. I just blame it on good deals. ;D
Matt
 
Just thinking out loud here, but maybe doing the DC variable speed motor modification would be the most practical solution for the problem. That way I could mount the switch where ever and get the benefits of both the variable speed, plus the ability to start from the stopped to speed up, nice and easy. ??? ???

Matt
 
Back
Top