Another Paddleducks Build

Home Model Engine Machinist Forum

Help Support Home Model Engine Machinist Forum:

This site may earn a commission from merchant affiliate links, including eBay, Amazon, and others.

kvom

Well-Known Member
HMEM Supporting Member
Joined
Jun 4, 2008
Messages
3,285
Reaction score
630
I have abandoned the CO2 engine, as I have come to believe that the laws of physics will prevent me from getting it running. Some things don't scale up well.

I think I will have a go at the Paddleduck plan Bogs posted on HMEM. I'l let this thread be a placeholder until I actually make some parts.

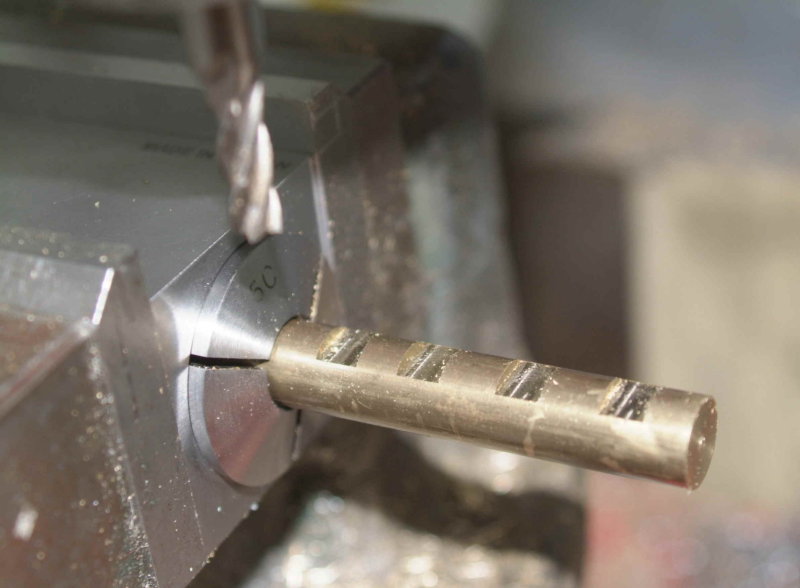
My current idea is to scale it up by 1.5 times and use Imperial threads and fasteners (I have a lot of 5-40 and 6-32 screws and nuts). I will also use non-metric drill rod in places where that's called for. Otherwise I will just multiply the dimensions by 1.5 and convert to inches. I have a DRO on both the mill and the lathe, so odd numbered lengths shouldn't be a problem.

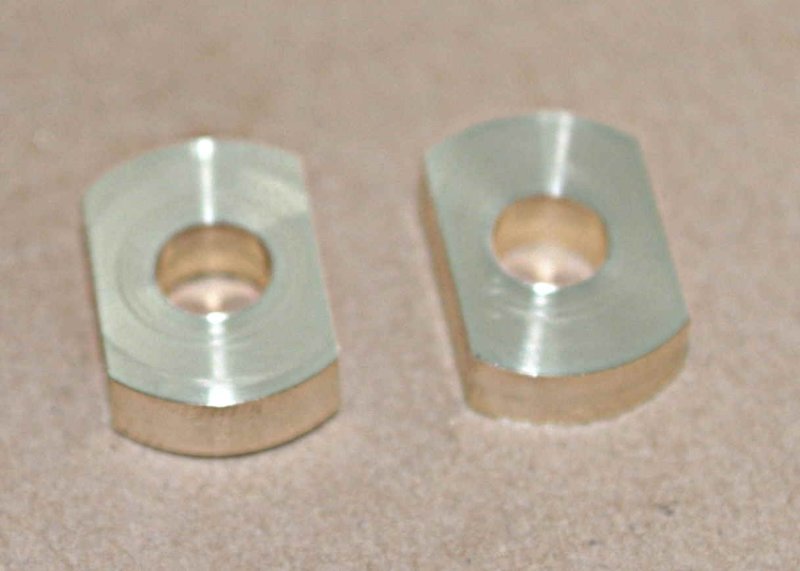
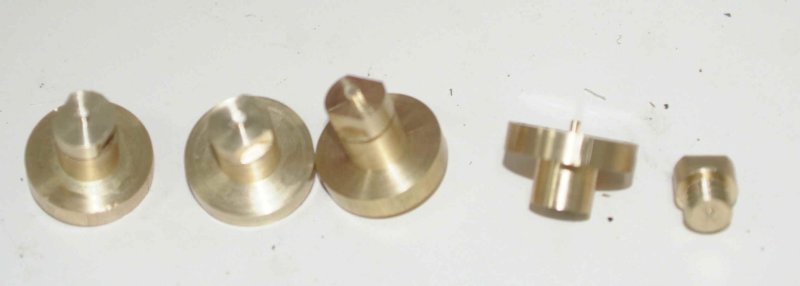
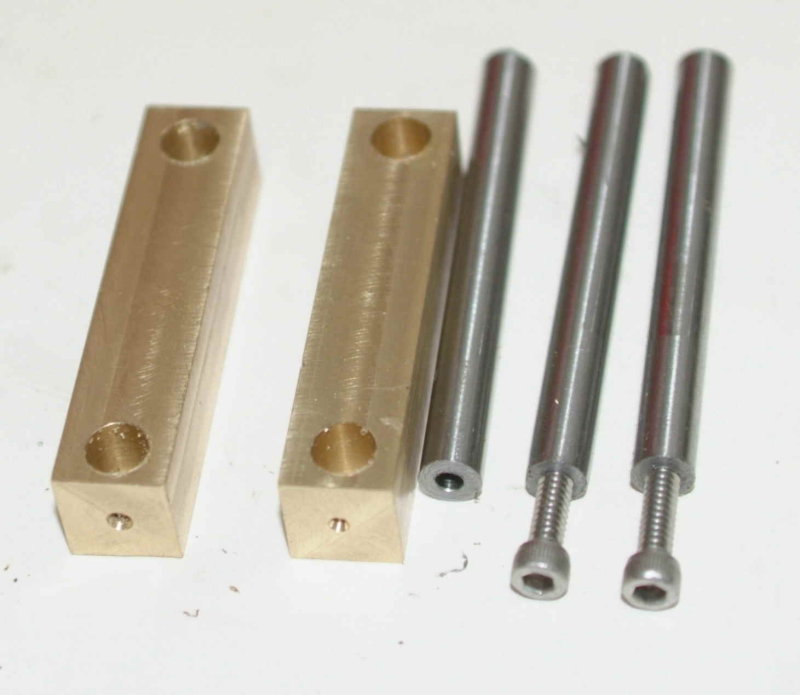
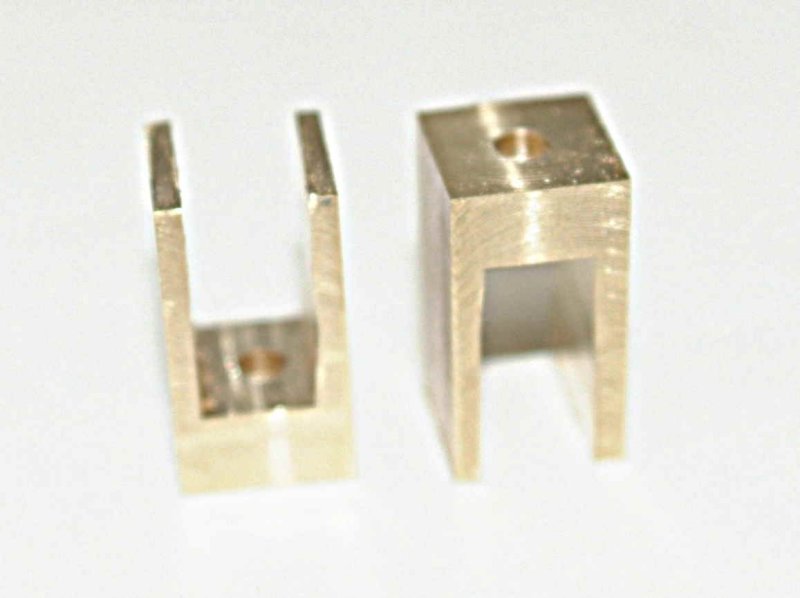
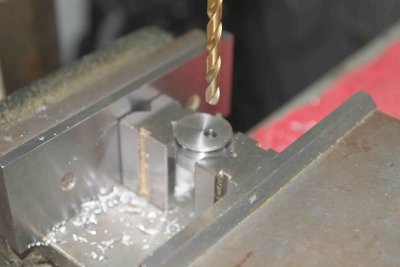
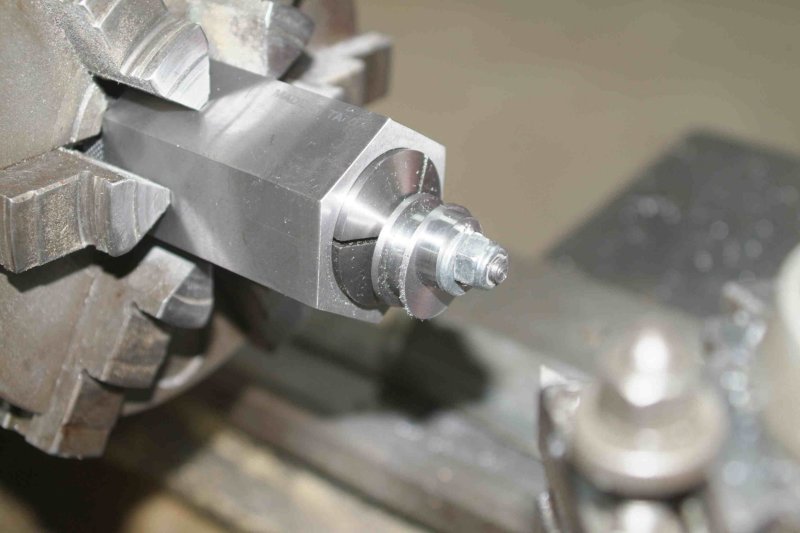
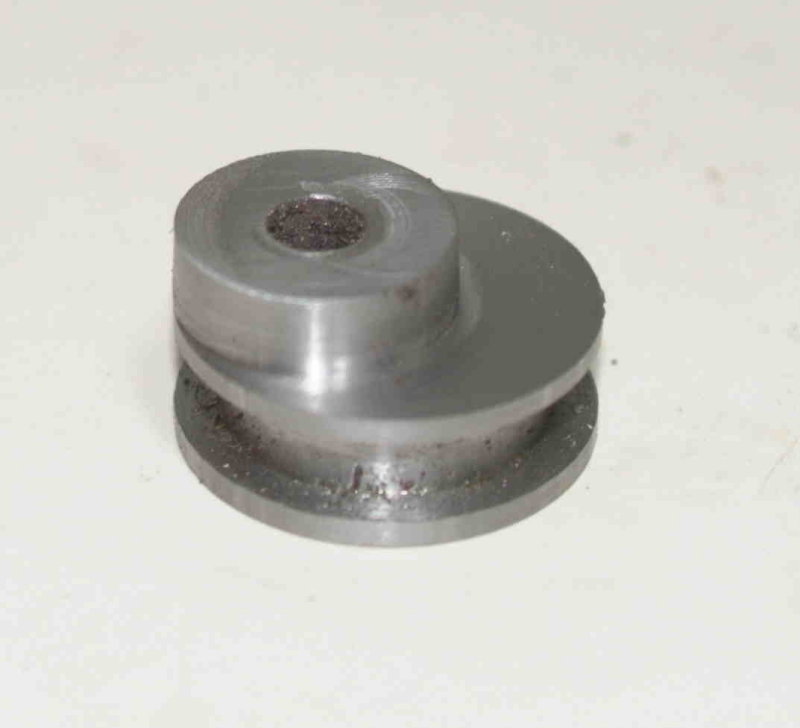
I will also go somewhat for the "bling" look. I probably won't try the separated cylinders as I don't yet have a good rotary table, and as I will be running it on air and not steam I think I can skip the displacement oiler. I'm pretty sure I have enough scraps lying around for most of the pieces (I plan to do the block in steel rather than cast).

I've skimmed through the "book" once, but now I'm going to read it more carefully before starting out. The printer is going as I type.

And of course I also have shred's build thread to reference. :bow:
 
"I will be running it on air and not steam I think I can skip the displacement oiler."
Remember that the engine will still require lubrication. One of the fellows in our engineering group builds fantastic models of steam engines, but only runs them on air. He uses the FRL (Filter Regulator Lubricator) units from Air Tools with them and has no problems.
Regards,
Gerald
 
OK, I have one part made to justify this thread. I decided to tackle the eccentrics, as the technique in the book is interesting. I also had some suitable sized steel cutoffs.

In interpreting the plans I calculated that 1.5mm = .059", so any dimension needed is quickly calculated needing to remember only one number. So the diameter of the eccentric is 18mm -> 1.06".

The initial turning to length and cutting the end flange and groove were not too difficult. I recently acquired a very veteran B&S height gauge and a cheap ENCO granite surface plate, so that I was able to measure the lengths and face to the desired dimension fairly easily, if slowly.

I don't have a rotary table, but I used the following setup clamp the disc in the mill vise and to find the center quite rapidly:

medium.jpg


The indicated 5mm hole defines the diameter of the crankshaft, and so would fall between 1/4 and 5/16 inches. I happened to have some 1/4" drill rod, so that's the size it will be. That said, I can always enlarge the hole should a thicker crankshaft be needed.

Then my trouble of the day started, as my run-of-the-mill automotive class die was incapable of cutting a 1/4-20 thread in the end of the hardened rod. So I had to resort to trying to thread the rod using the lathe. Once the threading tool cuts through the hard layer the interior of the rod is a rather gummy steel that resists cutting cleanly. So after any number of tries I finally got some partial threads cut and was able to finish them with the die. Then it was a matter of bolting the eccentric piece against the face of the 5C collet/block as shown here:

large.jpg


The reason for this setup is that the 6-jaw vise won't tighten on a 1/4" rod, so this is my "collet chuck" setup for small rods. The chuck is very accurate, so that the runout with this setup is quite low. It's necessary to really tighten the collet when taking the interrupted cut or else the rod will just turn in the collet jaw. My turning technique was to touch the lathe tool to the innermost point of the boss and set the DRO y-axis to zero. Then when turning I could watch the DRO count down and would know when to stop the cross feed, which was running at the lathe's slowest speed of .0006/revolution.

So after 4 hours work I have 1 part to show:

large.jpg


I used a lock washer under the bolt, which scratched the surface a bit. For the next one a flat washer might be better.

And of course as soon as I was finished I remembered that I had a piece of 1/4-20 threaded rod that I could have used instead of threading the drill rod.

At least I'm "underwauy" :proj:
 
Cool.. 1.5x is going to be a good two-hand size with lots of bling opportunities since some of the parts will have extra meat on them when scaled up. Weird your drill rod wouldn't thread-- it's usually soft as shipped and I've had no troubles until I hardened it. I do usually turn it down a little to match the correct thread diameter, which helps a lot.

 
The rod was air-hardened as ordered. In any case, today I fabricated the other eccentric using the threaded rod. It went much faster, about an hour start to finish.

I then went through the book noting the dimensions, calculating the 1.5x dimensions and writing them on the pages, and comparing these to the brass material I have on hand. It seems I either have pieces that are too small, much too big, or else I need to make a part to fit another part that gets made first.

However I do have a number of pieces of 1/4" thick brass sheet that was originally 3" wide. Since I now had the eccentrics made it seemed logical to make the straps next. I found two pieces that were reasonably close to the top and bottom sections, squared the sides on the mill, measured each with the height gauge to calculate how much needed to be milled off, and then milled both to the calculated size.

The only point of interest to a reader might be this "technique" for clamping a part in the mill that is thinner than your parallels:

large.jpg


These hardened precise cylinders are also useful in ensuring proper clamping when the surface against the moveable jaw is not flat.

Once both pieces were sized and precisely squared, I drilled the holes for the screws. I am using 6-32 screws. Once the top piece was drilled and tapped, and the mounting surfaces deburred, I screwed the two tightly together and camped in the vise in order to bore the hole.

The diameter of the groove in the eccentrics is ~.830, so I wasn't going to be able to find a "lucky fit" drill bit as Bogs did. So after edge finding to locate the center of the bore, I center drilled and drilled through with the 1/2" drill bit. Then I remembered that I have a .75" end mill, and used this to enlarge the hole further. Then I had to resort to the boring head to reach the final dimension. I recently acquired a set of bore gauges, and these were immensely useful in measuring the bore with the piece still in the vise. I used Bogs' tolerance of .05mm, which is ~.002.

Next I used a 1/2" endmill to reduce the thickness of the strap (still screwed together) to fit the width of the groove in the eccentric, taking equal amounts on both sides. This also cleaned up the surface on the sides.

When assembled onto the eccentric it turned, albeit stiffly. Some lapping and run-in should take care of the fit (I hope).

Then I reclamped the top portion in the vise to drill the holes for the coupling. It seems that 3/16" rod would be a bit too big, so I drilled it 5/32. Then drilling the oil hole completed the day's shop activity. Here's the result of about 5 hour's work:

large.jpg


large.jpg
 
kvom said:
I then went through the book noting the dimensions, calculating the 1.5x dimensions and writing them on the pages, and comparing these to the brass material I have on hand. It seems I either have pieces that are too small, much too big, or else I need to make a part to fit another part that gets made first.
That happens even with the regular-size plans.. lots of convenient metric dimensions are just a leeetle larger than common imperial stock; at least the stock in my scrap pile. If I'd really gone through the plans, I might have tweaked them some in that regard. The biggest chunk of material by far is the main block, after that the control valve and valve blocks, then the bearing blocks.

Next up for me happens to be boring the eccentric straps too.
 
Yer off to a good start KV, Thanks for sharing with us. Keep after it. :bow:

BC1
 
I spent a couple of hours in the shop after dinner starting on the packing gland.

For the screws, I decided to use a diameter of 15/32 so that later, when I need to turn the flange to fit the cylinders and drill for the piston rods, I will be able to hold the glamd in a collet rather than the chuck. The thread is 3/8-16. I had no real issues turning the screws as I had a piece of 1/2" brass rod to start with.

I then turned the gland itself, with the inner diameter 15/32 to match the screw, and the outer diameter 1", turned from a piece of 1" brass rod (took .001 off for finish). Then drilled and tapped to match the screw. After parting there is enough extra length left to turn the inner boss for the cylinder bore.

My only "problem" is that the screw won't go in all the way, because the tap won't cut enough threads (pointed part is too long). If I can find a bottoming tap at school I'll fix it that way; otherwise I can always shorted the screw portion.

Thoughts?

I finished only one gland, so the other is on the agenda for next time.
 
Don't know if its a good idea, but I solved the long point problem on a few taps with my grinder. I ground for less than a second then dipped in a container of water. This kept the temperature from messing up the taps hardness. The pointy ones do seem to need a trim.

Wish I had a dollar for every screw I had to shorten. Then I could afford more boxes of various screw lengths! ;D

-MB
 
Been there and done that many times as well. Unless a bottoming tap is available, grinding one down is my choice as shortening the screw lessons the clamping pressure supplied by the smaller fasteners. That's just my $.02 on the subject.

BC1
 
With a packing gland that's where the packing goes so it's not such a problem, but otherwise the bottoming tap is where it's at.

If you have enough thread, you can also turn down the end threads on the plug. Sometimes the problem is the threads on the plug aren't completed by the die. The trick I've used there is to flip the die around backwards and finish the threads.
 
The trick I've used there is to flip the die around backwards and finish the threads

Did that too. I ground down the tap this morning, and now the screws go "almost" all the way in, probably .01" gap left. I'll try a little more grinding on the tap, and then maybe a bit of filing on the end oif the screws.

I turned the other gland and tapped it. Then had to attend to family affairs. Still need to drill the mounting holes in the flange and mill the flats on the screws.

I also found a place on some cut up brass plate where another crankweb could be cut, and turned that. So one more to go.
 
A little progress this afternoon:

Reading through the book I noticed that the valve packing gland is almost identical to the piston gland (flange is a bit smaller). So since the 1" round stock was still chucked in the lathe, I turned two of these. I left the flange diameters to be turned down when the boss for the bore is turned.

I found out that my class is cancelled for tonight, so I won't be able to get any more brass material until Thursday, unless UPS arrives with the 1/2" bar I ordered.

I decided I could make the plain pipe flange from the 1" round stock. I chucked the bar in the billing vise using v-blocks and cut the flats wide wide enough for two flanges. Then I chucked the bar in the lathe and drilled it assuming 1/4" pipe.

large.jpg


Then it was just a matter of turning it down to the correct diameter and parting off.

large.jpg


Looking at the photo it seems they're slighly unbalanced, but I can correct that when it's time to drill the mounting holes.

Given the larger size, I'm wondering if brass will be strong enough to make the long flanges. I may try to make a couple.

Both of my packing gland screws need to be redone. One isn't straight, and the other got gouged cutting the flats. Since I need identical screws for both the piston and valve glands, I will be making 4 of them. I plan to mill the flats for all 4 before doing any lathe work. That way I can hold the bar with a collet in the square collet block.
 
Re unthreaded bits... I've ground all my taps (2mm-6mm) so that they are virtually bottoming taps and never had a problem. Mind you I've never used Aluminium so not sure how I'd get on with that metal ;)

A useful technique when the thread doesn't go all the way to the underside of the head on a screw is to cut a 'shoulder' (i.e. a groove) directly under the head to it will screw all the way in. A blade-type parting tool or pointy HSS bit is useful!

 
Spent the evening making 4 identical packing gland screws. Mounted a 1/2" brass rod securely in the square collet block in the milling vise. This allowed me to mill flats on opposite sides for all 4 screws. The flats fit a 3/8" wrench.

large.jpg


Then I chucked the bar in the lathe and turned the OD to 15/32. Then for each screw:
- turn the end section to be threaded to .370" for 3/8-16 threads
- undercut the end of the threaded section at the head
- single point the threaded section on the lathe to a thread depth of .06"
- finish the thread form with a die
- test fit to a glad for good measure
- part off

Took about 1:15 for the 4 pieces

large.jpg
 
I don't have much to show for 4+ hours of work.

large.jpg


My first goal was to mill the brass to size for the conrods, but I was having all sort of problems with the finish. After changing endmills a few times without success, I noticed a little light on the control panel of the VFD : rev. I had been running the spindle in reverse. :hammer: This is not something that would be likely to happen using the normal mill switch. Either I left it in reverse after boring the eccentric straps in back gear, or I fat-fingered the button (which is right above the run button. As I was running the mill at 2000 RPM I didn't really notice that it was turning back-asswards.

So after wating a fair amount of time I did manage to mill the brass to size, center drill the ends, and drill/ream the holes at 1/4". My intention is to turn the conrod like John's, between centers. Since I need to borrow a lathe dog from school to do this I'm leaving the rest of the milling for afterwards.

I then decided to make the crosshead guide bars from some 1/4" drill rod. After some calculations on dimensions I settled on drilling and tapping the ends for 6-32 screws. Rather than mess around with the collet blocks to hold the rod, I switched to the rubberflex collet chuck. Drilling the rods was not much of a problem. However, when I attempted to tap the first one still chucked, I broke my automotive-quality tap off in the hole. I was able to extract the tap, and decided to tap the rods later using the mill as a tapping station. This rod didn't take will to parting either, as once the parting bit is halfway through the rod snaps off, and also causes the chucked end to bend at the chuck jaws. So after the first one, I just used the DRO to mark the length, parted just enough to show where to cut, and cut it off with a hacksaw.

Now that I had the 4 drilled pieces, I proceeded to tap them at the mill. The first two went fine, but on the third I snapped off my only remaining, good quality, 6-32 tap. So that was then end of that for now. :bang:

I decided it was time to take a break.

Perhaps I need to anneal these rods before tapping!?
 
kvom said:
I don't have much to show for 4+ hours of work.
I know the feeling.. ;)
So after wating a fair amount of time I did manage to mill the brass to size, center drill the ends, and drill/ream the holes at 1/4". My intention is to turn the conrod like John's, between centers.
Did he do them between centers? I sort of assumed he stuck them in that self-centering 4-jaw he has (which I am mildly jealous of) and turned them with that.
Perhaps I need to anneal these rods before tapping!?
Probably a good idea. My drill rod turns and taps fine in it's 'au natural' state
 
Did he do them between centers?

I meant turn them as opposed to leaving them square bars.

According to the Enco site, there are two types of drill rod. I think I ordered the "water hardened", where I possibly want the oil hardened type.
 
This morning I attempted to machine an eccentric coupling fork. Unfortunately when I started to mill the slot I discovered that a 1/4" slot is too wide. It scales to .236. And in addition my 1/4" end mill is slightly oversize as well. So on to a redo with the 1/8" endmill. On the bright side I came to undestand that it's quicker to square off the stock for both forks at the same time and then cut them apart. :smart:

I had an excellent trip to school this afternoon to discuss my engine issues with the instructor, and to borrow some needed gear. So to total it all up:

- He recommended that for tapping the drill rod for the crosshead guides, I should drill the hole with 1 or 2 sizes up on the drill bit and somewhat deeper. That will lessen the chance that I will break the tap (and I got a new tap to try it with).

- borrowed a 1/16" slitting saw on an R8 arbor for slitting the crankwebs. Here he suggested that clamping all 4 of the discs together and slitting them at one time might make for a more rigid setup. By leaving the pins in the holes used for milling level, the setup can be the same, and the pins removed as the saw blade nears the hole. He suggested slow RPM and slow feed.

- Borrowed 2 lathe dogs for turning the conrods between centers (looks as if either will work). I also got a piece of steel from which I plan to make an adjustable dog that fits my chuck.

- scored a piece of brass plate 1/4" x 3" x 8" that will serve to make the bottom plate, the 4th crankweb, and some of the other smaller plates as well.

- Found that the block of mystery brass alloy in my lockers is large enough for the block, and possibly even two of them. Another piece of the same allow can make all 4 bearing blocks.

- The 2" round silver brass that Cedge gave me will get a slice cut off for the flywheel.

So it looks as if I am set for material except for the top plate. But there is a fellow on eBay who sells pieces that will be suitable.

Nothing stopping me at the moment but lack of energy.

Here's the result of the evening's efforts. Two forks for the eccwentric coupling. Haven't drilled the holes for the pins as yet.

large.jpg
 
Back
Top