Walking Beam Conveyor

Home Model Engine Machinist Forum

Help Support Home Model Engine Machinist Forum:

This site may earn a commission from merchant affiliate links, including eBay, Amazon, and others.
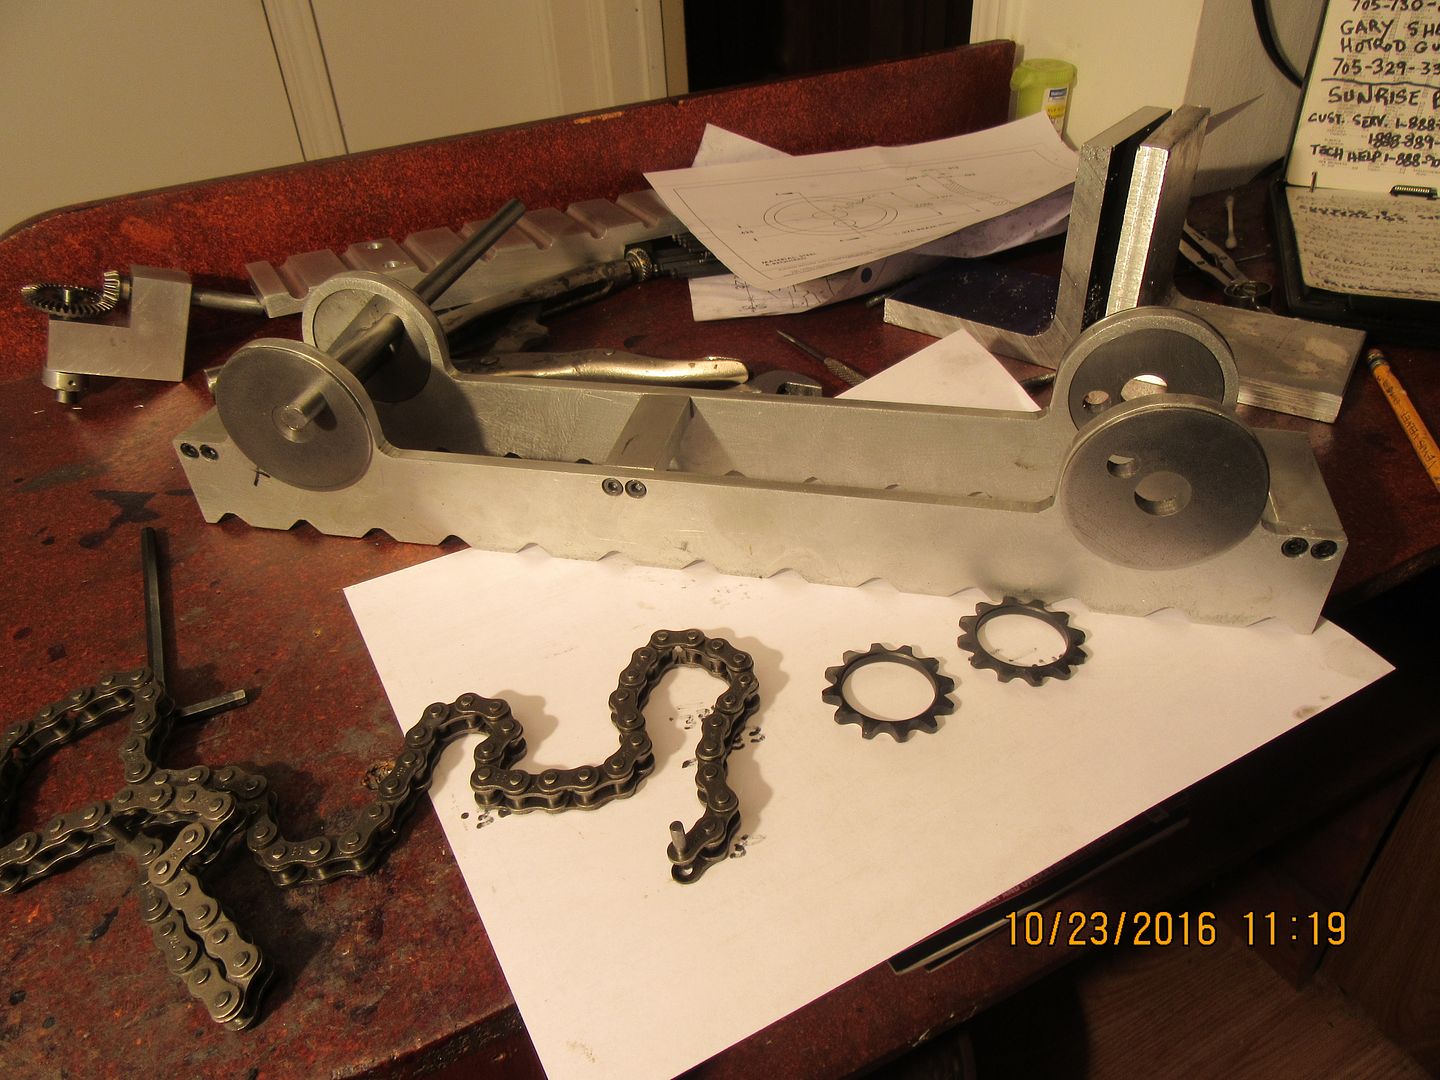
Things are changing and evolving as this build progresses. I have come to the conclusion that the miter gears I purchased from the hobby shop simply aren't going to have what it takes for this operation. I had to go across town this morning to Princess Auto to buy a piece of 5/8" cold rolled round stock, and while I was there I checked out their inventory of chains and sprockets. They had a pair of "weld on hub" 12 tooth sprockets for #35 pitch chain, which look to be just about perfect for the walking beam model, scale-wise. This will save me some headaches, and still guarantee that the head and tail-shafts turn at the same rpm. I will update the model this afternoon. I woke up to what is probably bad news. My lathe is DEAD!!! I checked the fuse, and checked the prox. switch which prevents the lathe from running if the gear cover on the end is removed. Nothing wrong there. I checked the electrical wall outlet, and I have power there. And there simply isn't much else I can check. I see a trip to BusyBee in Toronto in my immediate future. The trip doesn't bother me, it's less than an hour away. The problem comes in getting that big bastard of a lathe out of my shop, thru my office, into the garage and into my pickup truck. I paid some local machinery movers the outrageous sum of $400 for 30 minutes of work to put it in there from my truck when I bought it. This time it will be me and a helper that moves it.
 
Here we are with a roller chain drive. It doesn't look quite as funky as it did with the miter gears, but it has a better chance of operating successfully.
 
Aha!!!---Maybe the baby Jesus loves me afterall!! Closer inspection shows that the black plastic 15 amp fuse holder for the little glass tube style fuse right beside the on/off switch is broken. If I wiggle it a bit with my finger, the lathe runs fine. Of course the stupid thing is broken in a manner that can't be crazy-glued, but at least it is a repair that I can make here without having to move the lathe. I will contact BusyBee tomorrow and get a new fuse holder sent up to me.
 
I heard that sigh of relief from here Rof}Rof}
 
Forget the silly little fuse, just hook those two wires together. Your power line is already well protected by a fuse or circuit breaker.
 
I got up this morning and made a quick dash to BusyBee headquarters, an hour south (50 miles) from my place, where they assured me they would have the part I required waiting for me. They did have a part waiting for me, but certainly not the part for my lathe. (There has to be some kind of natural law that governs this kind of thing.) Fortunately, I had the broken part with me, and after I dragged the salesman out onto the showroom floor and showed him the same lathe as mine with the same part as my broken one, he rooted around and found the RIGHT part that matched my lathe.--(That was the head of their technical sales division!!) No charge of course, as my lathe is still under warrantee. Then an hour back to Barrie, 5 minutes with a soldering gun, and Voila!!--I'm back in business. Lathe is running again just like it should.
 
In this shot you get to see the ugly side of the walking beam. Ordinarily, I NEVER recommend welding on machined parts. However, as in all things, there are exceptions to the rule. When assembled, this side with the welds will be totally hidden. There is nothing particularly high precision about this, and welding the axles and spacers to the discs saves me a ton of machining work. The flanges on the outside of the wheels and the welded spacer on the inside keeps the walking beam centered. I can plainly see, based on tests that I have made this afternoon, that this thing is going to run at a low speed, or it will flail itself right to death. That's okay though----walking beams are supposed to run at a slow pace. If they ran fast, I suppose they might be called "running beams"----
 
Hi Brian,instead of chain and sprocket have you thought of using a
timing pulley belt.Im thinking of the ones I used on my bandsaw mod
The one I used was 9mm wide and 5mm pitch.I found it easy to machine the sprockets with a home made single point cutter and indexer.Just a thought
it might look better and quieter
 
A good idea Bazmak, but the chain and sprockets were cheap, and better yet, they were available here in town.---Brian
 
I have a very interesting mock-up of the walking beam, but I'm having a problem with Photobucket right now. As soon as the site will open up for me, I will post a picture. Things are getting really exciting!!!!
 
Well, give or take a bushing or two, I have almost reached the "Piggy point" of this build. the "Piggy point" of any build occurs after all of the parts are made, but you have to get everything freed up and working in concert with every other part. sometimes that can get, well,---Piggy!!!
 
I actually test drove this thing tonight. I haven't put the chain drive on yet, but used two pair of vice grips to turn the shafts in tandem. Ha!! I knew it was going to work. I just had to see it to believe it. The only fly in the ointment right now is that my lumpy welds on the spacer between the flanged discs is hitting the underside of the center portion, preventing a full rotation. I thought that might happen, but I had to try it and see. If I have time tomorrow, I will get my pneumatic grinder with a 3" cut-off wheel fired up and clean a lot of the weld off. I have no idea at the moment whether this thing is going to run slow enough with the current gear reduction set up or not. I have room for another set of gears on that drive end if I have to.
 
I'm hung up with this project right now. I have quite a bit of "real work" coming in, which of course takes precedence over "play work". I have the chain drive on and hooked up, but there seems to be a lot of stiffness in the mechanism and I haven't had time to really figure out if it is a matter of clearances or a matter of timing between the two shafts. I did power it up with my variable speed drill, but there is so much resistance and so much moving mass that by the time the drill overcome the initial resistance to turning, it tried to turn 500 rpm and just about self destructed. Hopefully, I will get some time to work on it more this weekend.
 
So, my friends--Here we have the maiden voyage of the walking beam conveyor. My variable speed drill runs it too fast of course, but it does work, as the movie shows. I think perhaps I need some more gearing to slow it down to a more sedate pace. It is an interesting thing to see working, and will be ran by one of my small gasoline engines when I have completed it.
[ame]https://www.youtube.com/watch?v=g6Yb9etbXNg&feature=youtu.be[/ame]
 
Great machine Brian. Where was the stiffness issue. Was it in the chain?
 
Herbie--whenever you have two cams in different locations driving a single "solid' entity, the timing or "phasing" of the cams to each other becomes critically important. If they are the slightest bit out of Phase with one and other, they tend to lock up and not want to rotate. The chain drive is intended to keep both cams rotating in synchronization, but it isn't easy to get the sprockets timed to exactly the rotation of the cams. Add into that the fact that there is always a bit of slack in a roller chain, and it compounds the locking cam effect.
 
Hi,

What final "step" speed are you looking to get? That might be the most difficult thing to attain of this build.

Dale
 
Dalee--I'm going to mount another set of reduction gears at the end where the current gear set is. Probably a 3:1 ratio. The speed I want to achieve is more of a visual thing than concrete numbers. Fast enough to see it working, slow enough to last for a 1 minute film clip.
 
I can´t help myself, but clearly this thing needs something extra. Let´s say maybe turntable and other type conveyor and different type cornering and maybe sawmill log type separator and and and.... oopps :p:rolleyes:
 
When your machine goes too darn fast--Make more gears and make them fast!!! Okay, I wasn't cut out to be a poet----I made up the gear blanks and hubs today for a second set of gearing. This will make things run 3 times slower. The dark blue gear is a 20 tooth and the redish brown coloured one is a 60 tooth.
 

Latest posts

Back
Top