
You are using an out of date browser. It may not display this or other websites correctly.
You should upgrade or use an alternative browser.
You should upgrade or use an alternative browser.
Tiny Inline 4 Cylinder IC
- Thread starter kcmillin
- Start date


Help Support Home Model Engine Machinist Forum:
This site may earn a commission from merchant affiliate
links, including eBay, Amazon, and others.
- Joined
- Aug 18, 2008
- Messages
- 343
- Reaction score
- 134
I have used O-rings on gear type water pump shafts on a couple of relatively high run time pumps and they work fine. I used one on an impeller pump immediately behind the impeller and it also seems to work, but I have very little run time on it.
Jeff
Jeff
I used an o-ring behind the pulley on my Silver Bullet water pump back in 01 and haven't touched it since. I pushed the pulley on the shaft until the pulley just made contact with the o-ring, the o-ring is sandwiched between the pulley and pump housing. I also used a 1/8" SS dowel pin for the shaft in a brass housing. This engine sits on a shelf in my bedroom and is taken out a few times a year and run at shows, No problems so far. Oh yeah, by the way, I really like your engine, Dave
- Joined
- Jan 19, 2010
- Messages
- 1,193
- Reaction score
- 41
Thanks Jeff and Dave. I will give the o-ring behind the pully a try. I just made a new bronze bushing and the leakage has gone down significantly, however it does mist a bit.
Kel
Kel
- Joined
- Jan 19, 2010
- Messages
- 1,193
- Reaction score
- 41
A bit of an update.
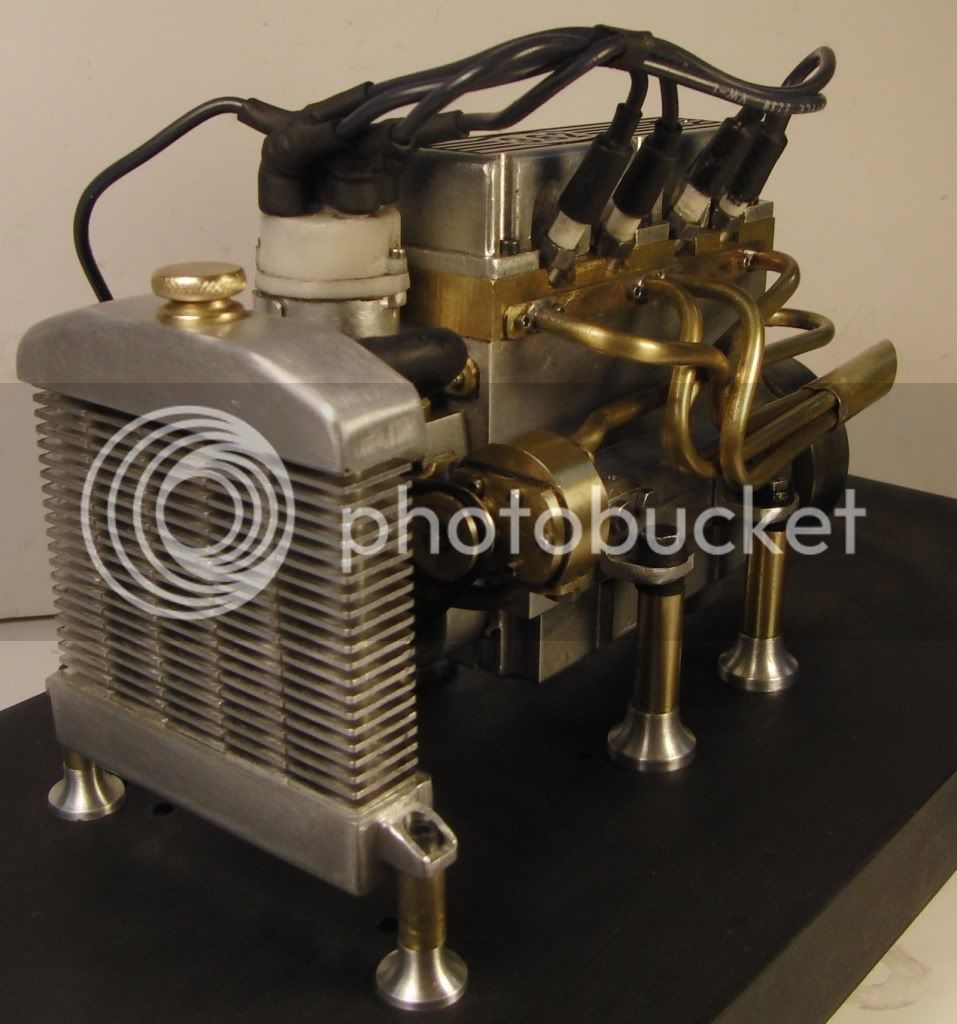
I finally got success with the water pump. By milling a 1/4" recess around the shaft behind the gear inside the pump, then installing an o-ring. I am happy to say the it does its job quite well. Before incorporating the cooling system the engine would be incredibly hot, even the distributor would be untouchable. Now with the radiator installed the distributor remains quite cool.
Sorry for the lack of pictures the batteries went dead as soon as I turned them on. I will get some 'Glamor Shots' up tomorrow.
Also, I made new spark plugs, which are working like a champ. I still have the odd trouble of a few not working and shorting out inside the distributor though. I can see a spark jumping from the center of the distributor to a working cylinders cable. It seems to correspond with the no spark condition in certain cylinders. What is strange however is that it seems to work better on the forward cylinders, and fail more often in the rear. :shrug:
Kel
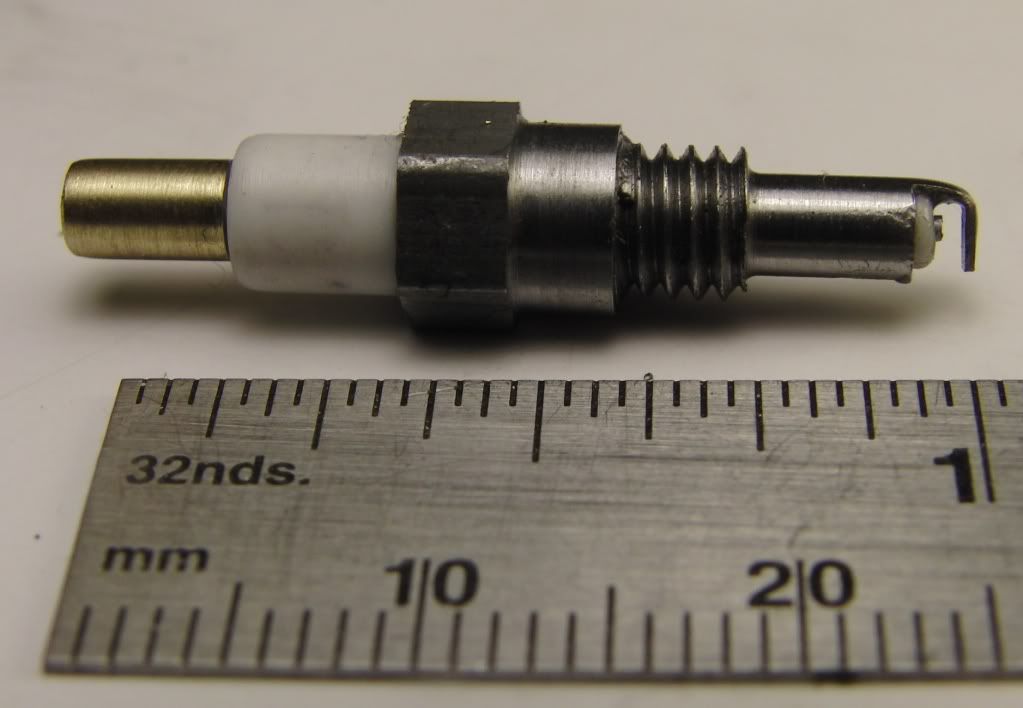
What size plugs are you using. I am going to work on the #8-40's today and the thing I did when testing was crack the insulator when rolling the steel over the insulator. It usually cracked above the step. I made a die that goes into an arbor press that will get the first run today. Had good results not cracking them as long as I dont crunch them to hard.
I also made insulators for a #6-56 plug but have no plans to assemble them any time soon.
I also made insulators for a #6-56 plug but have no plans to assemble them any time soon.
- Joined
- Jan 19, 2010
- Messages
- 1,193
- Reaction score
- 41
Steve, I am using a 1/8" spark plug, with 10-32 thread. They are just a bit smaller than the Tiny IC, which I based this off of.
I used epoxy to hold everything together, so as far as I know there is no cracks in the insulator. I have had one or two which did crack, and yes, that did creat a short, but this new batch of plugs is ship shape. What is funny is a working plug in the number one cylinder turns into an intermittent problem in the number 4 cylinder. I may have issues in the distributor, as that seems to be where the short is, the spark does not even make it to the plug.
I took apart the distributor and found there to be quite a bit of corrosion on the contacts, and the white delrin is turning green?? I am using brass contacts inside the cap and on the rotor. I cleaned it all up and will try it again today. Why would the delrin turn green? I was able to wipe it off.
Kel
- Joined
- Jul 16, 2007
- Messages
- 2,993
- Reaction score
- 1,061
Hi Kel,
To answer some of your questions here is what I've found.
First as to why the Delrin is turning green. With the inside of the distributor being sealed from outside air when it heats up from the engine running it forms condensation (cold to hot). This condensation, however minute corrodes the brass and this gives off the green film. I remember when I was a kid and they would have dime store rings or rings from Cracker Jack boxes that were made from brass. If you wore them they would turn your finger green, same thing. I have experience this on my Holt. To alleviate the problem I drilled a small vent hole in the cap.
Now the seeming problem with the spark in the forward cylinders and not the rear. If the cap is clean of any carbon paths, something that would give erratic spark, then the problem could be with the compression being different in the cylinders.
A spark plug will 'spark' in the open air even with a fairly weak ignition but when you put it in the engine, no spark. This occurs because it takes more power from an ignition to spark the plug under compression. The more compression the hotter the spark needs to be. To have a plug work in one of your front cylinders but not so well in the rear ones I suspect that this could be the problem.
Another problem could be fuel delivery to the cylinders. On a couple of my engines the wire ends on the spark plug don't have boots over them. When a cylinder gets wet and fouls the plug the spark will look for the easiest path to ground. I have found that if I flood my engine, hit and miss or other, that the spark will jump from the top of the plug down the side of the plug or to some other close grounding source. Once the engine clears out and starts to run the external spark will go away.
With these small engines we are trying to keep most of our ignition components within the scale of the engine they are being use on. Herein lies the problem. It' all to easy for the spark to go wherever is the easiest path. There's a reason that the ignition components on a full sized engine are the sizes that they are, spark plug wires, distributor caps, etc. It's to prevent the problems that we are having with our small engines. If you look back at pictures of early multi-cylinder model engines like the Challenger V-8 they have oversized distributor caps on them. I'm sure the designers of these engines went through the same things that we are. They knew the distributors and caps were way out of scale with the rest of the engine but this was done to help prevent cross fire and other problems.
I know that the instructions for the S&S and Jerry Howell ignitions say never to have a gap larger than say .030 but I have seen the spark jump from my distributor cap or wire end almost .350 at times. It's probably not good for the ignition but what I'm saying is the ignition is hot enough to deliver this kind of power so at times the spark can go anywhere.
I'm sure if you ran your engine in the dark you would see all kinds of sparking going on.
I know when I was a kid working on car engines with bad spark plug wires you could see this happening especially when the engine was damp.
George
- Joined
- Aug 18, 2008
- Messages
- 343
- Reaction score
- 134
Kel,
I am just catching up on your build after a long absence. You have done a great job on this engine probect. Unless I missed it somewhere in your build postings, I have not seen reference to a lubrication system for this engine. Could you explain the internal lubrication system you are using for this little engine?
Jeff
- Joined
- Jan 19, 2010
- Messages
- 1,193
- Reaction score
- 41
Thanks for the great information George. A vent hole sounds like a good idea. I seems to get it to run nicer now, at least all cylinders are firing MOST of the time. The rear cylinder still has problems with flooding, I should try to check the valves, perhaps there is a sticky one.
Jeff, it is a splash lubrication system, with wd-40 in the gas for the valves.
Kel
Jeff, it is a splash lubrication system, with wd-40 in the gas for the valves.
Kel
- Joined
- Jan 19, 2010
- Messages
- 1,193
- Reaction score
- 41
Well as promised, here are the pictures.
Still no gas tank or air cleaner yet.
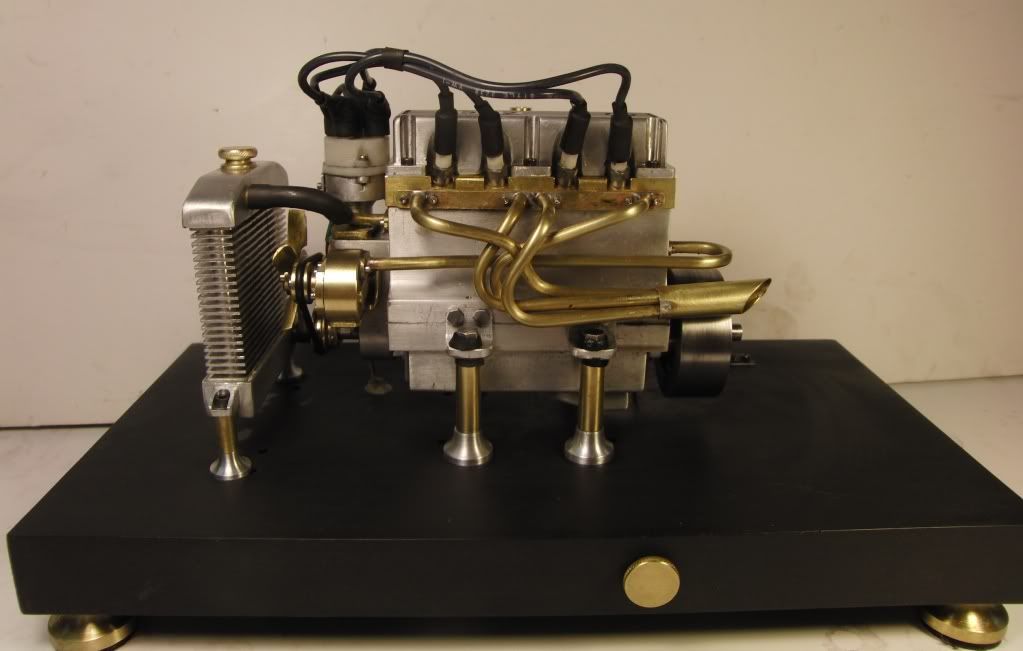
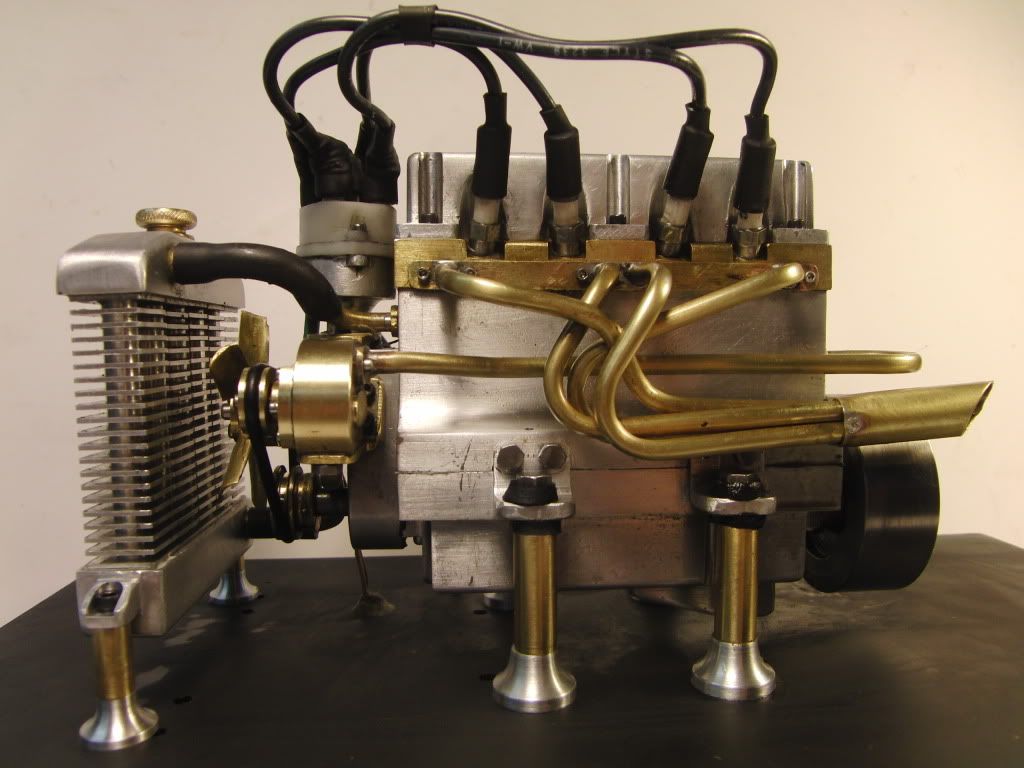
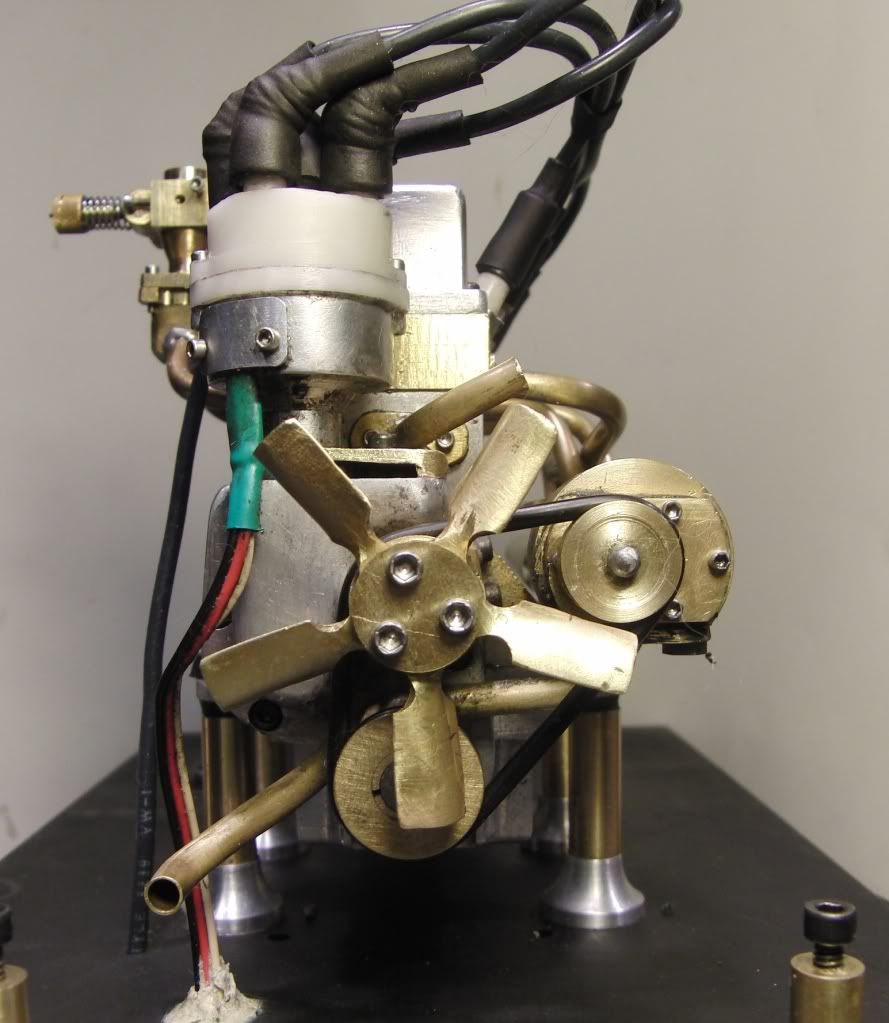
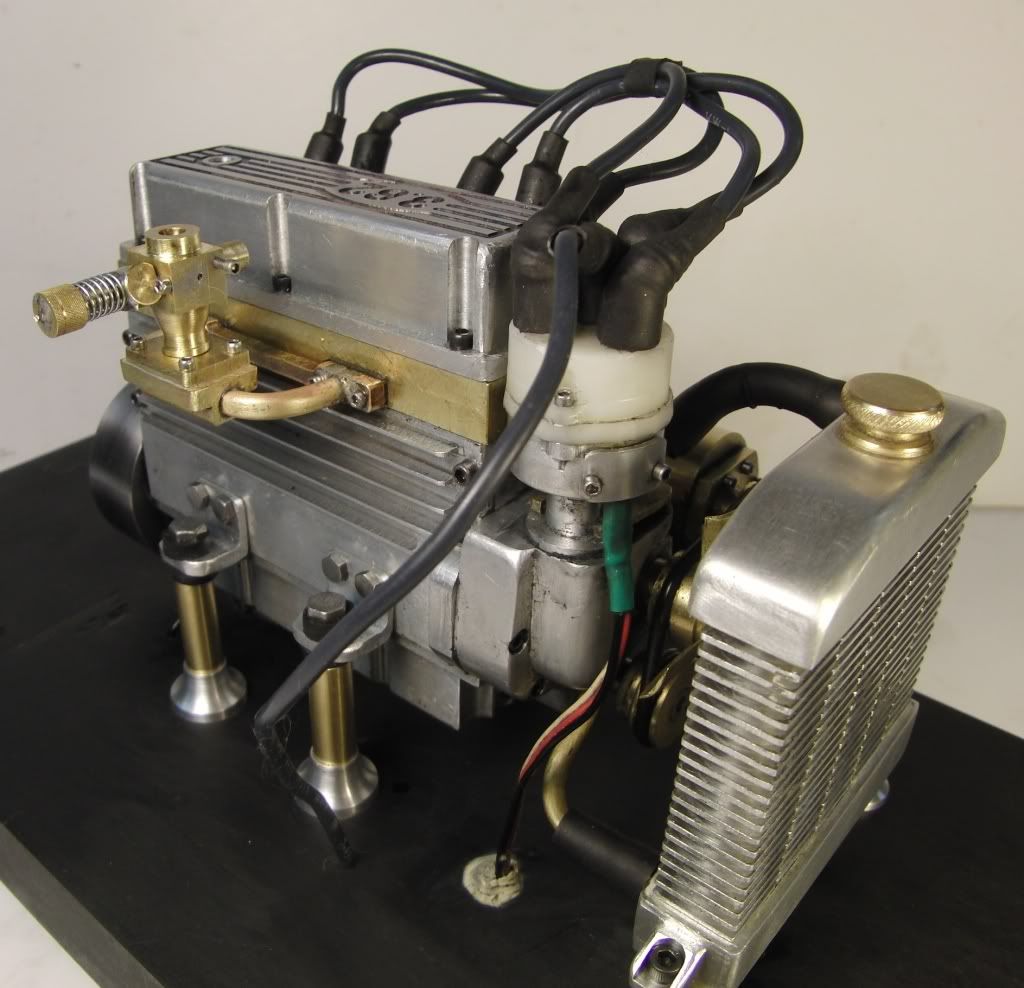
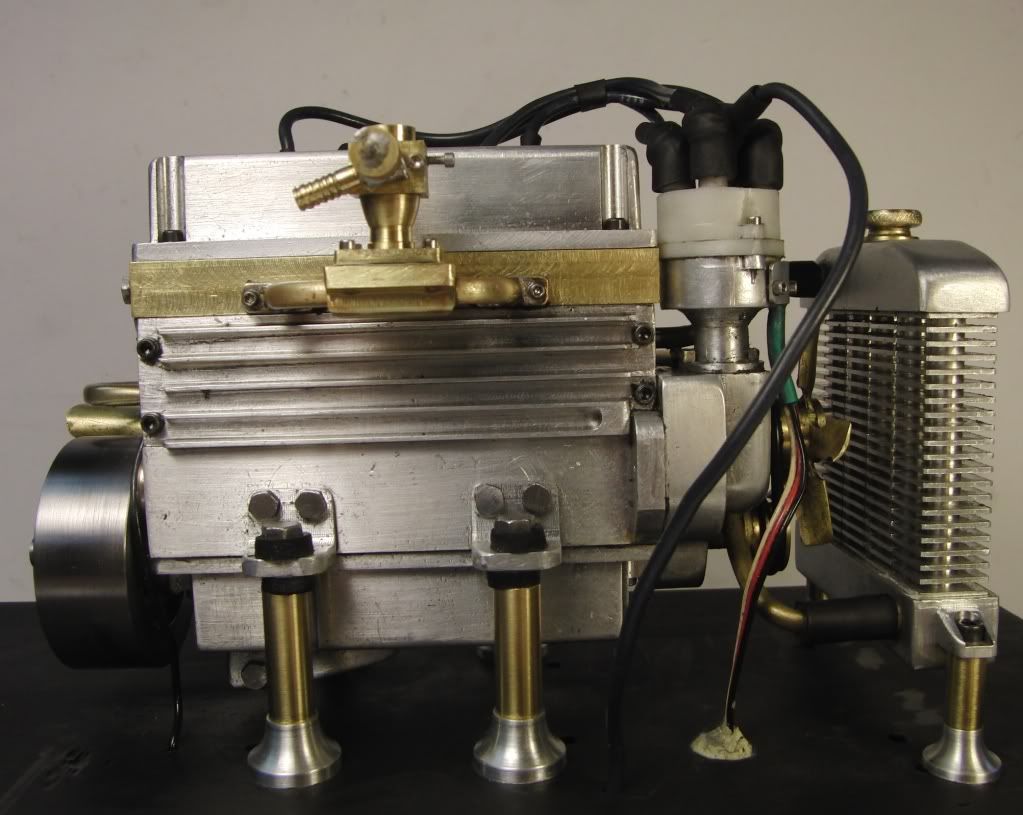
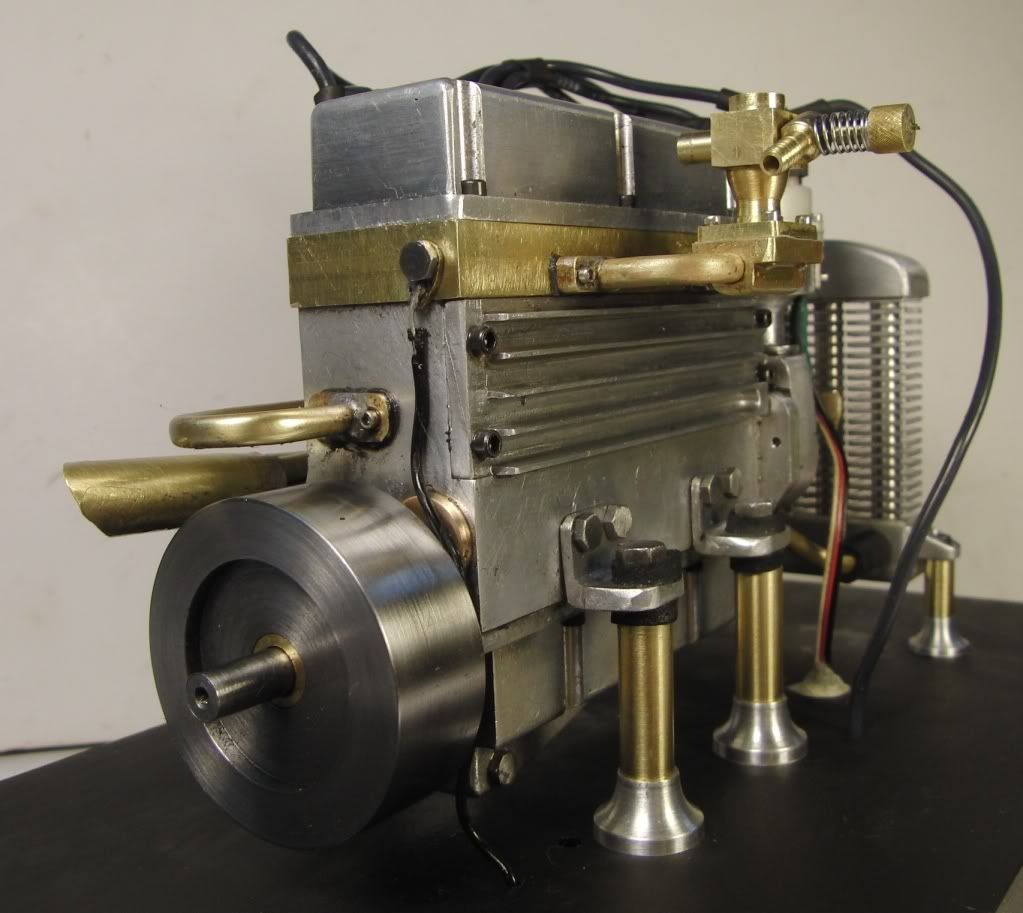
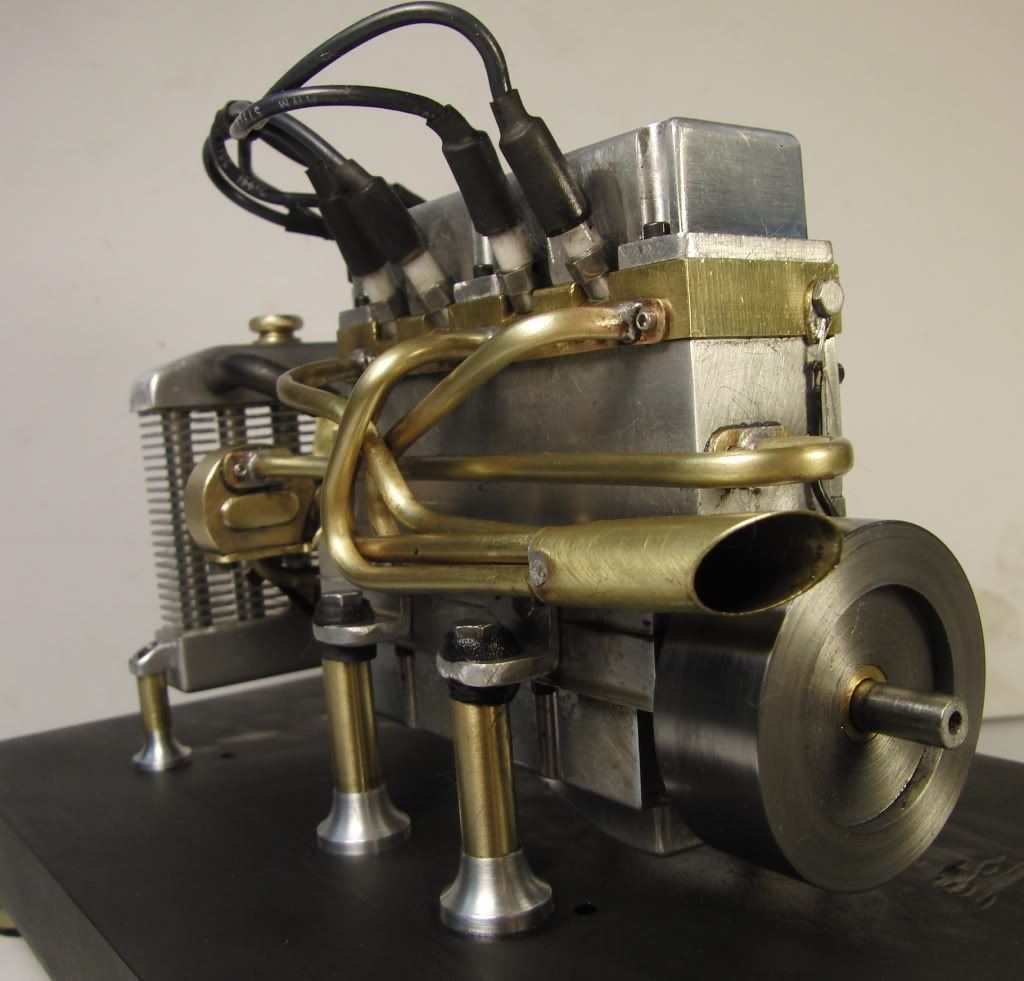
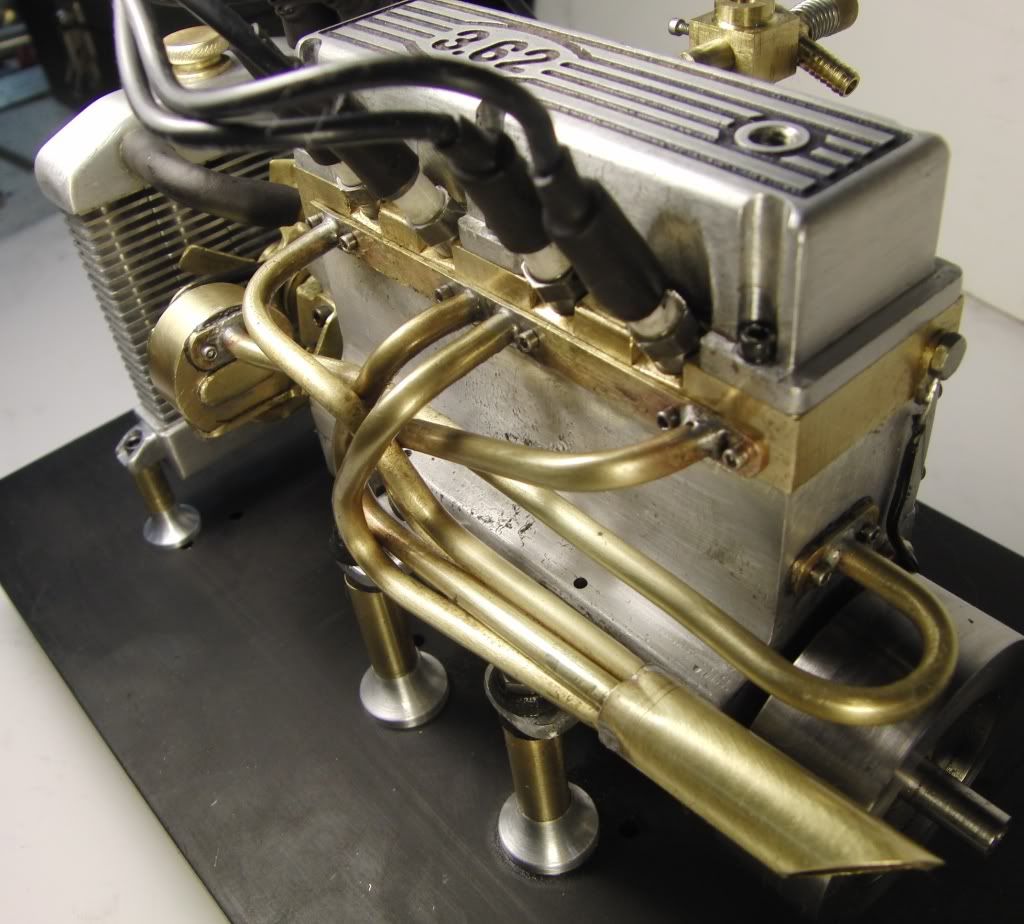
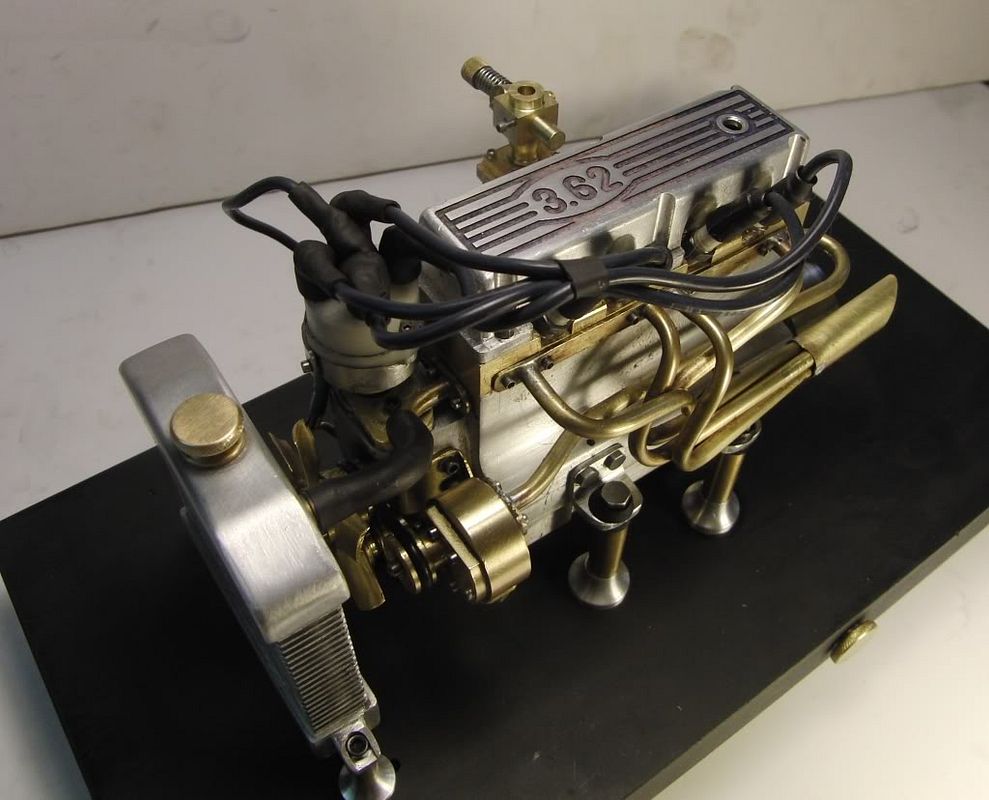

Well, thats about it. I can pretty much call this one finished.
Thanks everyone for looking in and giving your advice. It is very much appreciated.
Kel
Still no gas tank or air cleaner yet.
Well, thats about it. I can pretty much call this one finished.
Thanks everyone for looking in and giving your advice. It is very much appreciated.
Kel
- Joined
- Jan 19, 2010
- Messages
- 1,193
- Reaction score
- 41
George, In response to your great writeup on model ignition systems. What can I do with the gap on the spark plug? I have it at its max of 25 thou, which is only slightly more, a few thou, than the side of the ground strap, and un-coincidently the same as Gail is using on his Tiny IC.
I should have tried this already, but would decreasing the gap make it more likely to operate correctly? Or would I experience more 'flooding' conditions? I never quite understood gap on spark plugs.
Kel
I should have tried this already, but would decreasing the gap make it more likely to operate correctly? Or would I experience more 'flooding' conditions? I never quite understood gap on spark plugs.
Kel
Admiral_dk
Well-Known Member
- Joined
- Jul 15, 2010
- Messages
- 166
- Reaction score
- 0
The spark gap is a compromise. You would like it to be as big as possible, in order to get a bigger surface on the spark and therefor a more efficient ignition of the gas mixture. This requires a higher voltage from the coil than with a smaller gap and increases the chance that the spark jumps some where else.
A small gap can be the solution for a weak ignition system (can't count how many times this got one of the mopeds of my youth running), but there's a big chance that this will stop the engine running from time to time if there's any oil in the gas (carbon buildup).
I can only suggest that you experiment with the gap in a systematic fashion - E.I. : Write the results of plug inspection down for each gap size, starting with .02" and working your way up to .06" in .01" increments or for us metric guys .3mm. to .7mm. in .1mm. increments (not quite the same, but close enough).
I will admit that the fact that your Tiny isn't really working (having a load) isn't going to make it run better - quite the opposite. It will look stupid, but in order to make it run better, you could temporary mount it in such a way, that you can mount a propeller as a load and run it close to max. revs - alternatively, have a dynamo or generator in a propper size with a lamp as a load. This should make the sparkplug inspection a lot more accurate.
- Joined
- Jul 16, 2007
- Messages
- 2,993
- Reaction score
- 1,061
Hi Kel,
To be honest I've never experimented with the spark gap. When I make my plugs I machine the ground strap in place as opposed to bending it over, so I try for somewhere between .025-.030. I would think this would give you an adequate gap to prevent fouling and at the same time provide a healthy spark.
As with carburetion, at least from my perspective, I have a basic design for a carb, from there I play with the air bleed and when I get the engine to run to my satisfaction I don't go any farther.
When I first got into motorcycle tuning and repair there was a gadget called the color tune spark plug. One of my buddies bought one and we all checked out our bikes, more for the novelty of it than anything else. As I'm writing this I opened up another window and did a search and son-of-a-gun they still make it. I'm attaching the link to it.
http://www.gadgetjq.com/ctune.htm
What I'm getting at here is I make my plugs following automotive principal, except smaller naturally. I use different sizes of plug wire, some quite small that I get from S&S. Although it has a high KV rating it doesn't have much insulation as compared with full sized practice. I use some Jerry Howell ignitions and some S&S ignitions, I even have my old standby automotive type. As far as experimentation I don't have the electrical background, or tools to do this kind of work. Who knows what' going on inside these little engines. Surprisingly with these diminutive ignitions we don't have more problems than we do.
There's only a couple of things that should be followed when building an engine with a distributor, first make it as large as possible, and second if you're using an electronic ignition make sure that you provide a 'good' ground connection when using a Hall setup. As I mentioned earlier they seem to like more advance too.
I have heard fellows talk about trying to put the Hall sensor in the distributor and continually burning them out. One way to get around this is to have a crank trigger which gets the Hall sensor completely away from the distributor. I made mine like yours with the sensor mounted outside and down away from the rotor and cap. I have had very good results with this setup.
Just make sure everything is clean and hooked up well. You can also rotate the engine by hand an feel each cylinder as it comes up on compression. Each one should feel about the same. If one of your rear cylinders seems low that could account for the wetness and missing from that cylinder.
George
- Joined
- Jan 19, 2010
- Messages
- 1,193
- Reaction score
- 41
Hello All.
I am still working the bugs out. I made a new camshaft with a 260 duration on both, the original was 220. This made the engine breath better and decreased the compression ratio. I also made a dished spot in the top of the piston to accommodate the slightly longer spark plugs. This combination seemed to help alot with the spark issue.
Now when running the engine I can get it to idle for extended amounts of time and still have decent throttle response. Something neat now, after revving the engine up it seems to high idle for a few seconds then it drops another 800rpm or so and stays at that idling. It Idles around 2500 to 3000, kinda high but it don't want to run any slower, and it revs routinely to 7800rpm, and with tweaks to the ignition timing and mixture it will rev to 9000 rpm. I can run my finger on the flywheel and give the engine a significant load for a period of time without loading up the engine and flooding out.
All and all I am very pleased with its performance. It seems to like Coleman camping fuel and gasoline, but if I try pure naptha or alcohol it does not run very well. Perhaps I should try some of that racing fuel like George")
I am also thinking about increasing the duration on the exhaust valves to 280, and leaving the intake at 260. I would like to exhaust valve to open a little sooner. This would give it a louder, throatier, chopier sound.
Kel
I am still working the bugs out. I made a new camshaft with a 260 duration on both, the original was 220. This made the engine breath better and decreased the compression ratio. I also made a dished spot in the top of the piston to accommodate the slightly longer spark plugs. This combination seemed to help alot with the spark issue.
Now when running the engine I can get it to idle for extended amounts of time and still have decent throttle response. Something neat now, after revving the engine up it seems to high idle for a few seconds then it drops another 800rpm or so and stays at that idling. It Idles around 2500 to 3000, kinda high but it don't want to run any slower, and it revs routinely to 7800rpm, and with tweaks to the ignition timing and mixture it will rev to 9000 rpm. I can run my finger on the flywheel and give the engine a significant load for a period of time without loading up the engine and flooding out.
All and all I am very pleased with its performance. It seems to like Coleman camping fuel and gasoline, but if I try pure naptha or alcohol it does not run very well. Perhaps I should try some of that racing fuel like George
I am also thinking about increasing the duration on the exhaust valves to 280, and leaving the intake at 260. I would like to exhaust valve to open a little sooner. This would give it a louder, throatier, chopier sound.
Kel
kcmillin said:I made a new camshaft with a 260 duration on both
Now your talking!!
I made a 300/300 for the blown V8 and a 280/280 for the carbed V8
K
Kermit
Guest
air is an insulator to electricity. The higher your voltage the bigger the gap which it can 'jump'.
The resistance of the air DECREASES with an increase of pressure, meaning that a spark can jump at a lower voltage in engines with higher compression ratio's
Roughly speaking, for the same voltage, you need a wider spark gap in a high compression engine than you do in a low compression one to keep the timing identical.
Conversely you need higher voltage for the same gap size in a low compression engine.
- Joined
- Jul 16, 2007
- Messages
- 2,993
- Reaction score
- 1,061
Hi Kermit,
I was always taught the opposite. The higher the compression, the more spark power is required.
http://dodgeram.org/tech/gas/spark_plugs/s_plug_faq.htm
gbritnell
I was always taught the opposite. The higher the compression, the more spark power is required.
http://dodgeram.org/tech/gas/spark_plugs/s_plug_faq.htm
gbritnell
Kermit said:The resistance of the air DECREASES with an increase of pressure, meaning that a spark can jump at a lower voltage in engines with higher compression ratio's
Roughly speaking, for the same voltage, you need a wider spark gap in a high compression engine than you do in a low compression one to keep the timing identical.
As pressure increases the voltage required to jump the gap in the cylinder increases! Add rich mixture and dirty electrodes and even more voltage is needed. The voltage rise in the ignition is extremely fast. I'd like to see how many degrees it takes for the voltage to rise twice as high as typical. Racing engines (high compression, rich mixture) need high power high voltage ignition systems.
K
Kermit
Guest
That means my physics texts are lying to me?
Quote:
Sea level air resistance = 4 x 10^13 Ohms
@12Km above sea level = 1.3 x 10^16 Ohms
A much higher resistance at 12 Km above sea level, which indicates TO ME at least, that resistance DECREASES with increasing pressure.
Quote:
Sea level air resistance = 4 x 10^13 Ohms
@12Km above sea level = 1.3 x 10^16 Ohms
A much higher resistance at 12 Km above sea level, which indicates TO ME at least, that resistance DECREASES with increasing pressure.
Similar threads
- Replies
- 0
- Views
- 211