PM Research No. 1 Build

Home Model Engine Machinist Forum

Help Support Home Model Engine Machinist Forum:

This site may earn a commission from merchant affiliate links, including eBay, Amazon, and others.
Brian have you ever seen Ruby kouhoupt,s video on pin stripping, if you haven't you really need to see it. You would be amazed how he makes an engine look with pin strips. Just a suggestion instead of over polishing you cast engine.

Don
 
I have not seen the video, but its funny you ask because I would like to add some pinstriping to the flywheel spokes. However, I have never tried to pin stripe anything.

I'll look up the video. Thanks :)
 
One last photo for the weekend. Here is the flywheel back on the lathe after the final coat of paint so I could clean up the rim of the flywheel.

This worked out perfectly. Just a very light skim coat to take off all the paint, and I have a better edge that I could have ever masked with tape.

100_2077.jpg


I did manage to get the crankshaft webs and the bearing caps in primer today. Once I get the color on them, I am done with the paint. (Yay!) It won't be long now! I was eyeballing a piece of sassafras lumber I have had for a long time. It might make a good stand for this engine, but I haven't figured out the design for the stand yet.
 
Well, this was one of those evenings I should have stayed out of the shop. I intended to make the studs and nuts for the slide caps. I ended up scrapping one stud as it was almost finished, and of course I was so confident in my stud making ability that I didn't make any extra.

Then I thought, oh well, I'll go see how the side I have done looks on the engine before I remake the one I scrapped. While carrying the studs, standoffs and slide into the house where I have the rest of the engine, I got distracted and set the parts down "Somewhere".

After 45 minutes of looking, I found the slide cap in one place, the studs in a second, and the standoffs in a 3rd. Talk about scatterbrained. I have decided to give up on the shop tonight before I get hurt and see how posting pics works with the new forum software.

Here is a largely pointless pic of my studs peeking up over the slide cap. :rolleyes:

IMG_1824.jpg
 
Brian

There has been more than just a few times that I have miss placed a small part; and routinely spent more time looking for it than it would have to just make another one. The other night I lost a small aluminum alignment pin for a quick and dirty fixture I made and never found it! Finally after about 5 or 10 minutes of looking I just went over to the lathe and made another one.

I feel your pain.

Dave
 
Brian, I do this daily when I am working in my shop. Glad I m not the only one. Some times I think that Gremlins are taking my parts and moving them about my shop. I find thing in places I know that I didn't put them there. Well At least I don't think so. Yea I feel your pain also.

Don
 
Brian

You are not alone. I misplace things quiet often.

Vince
 
Gee, I knew you guys would understand :)

My daughters are having a few friends spend the night tonight. A house full of teenagers :eek:

I'll hide in the shop all night so I should be able to get some work done!
 
Well, nothing like having 6 13-year old girls in the house to get some uninterrupted shop time! I started reassembling the engine, tweaking the fit of each part as I went. I intended to stop when I got to where I had to use the kit hardware to continue assembly, but I was so close to being able to make it run that I threw the rest of it together with some ugly nuts and screws just to see it move again. Here is a short video of it running at about 4psi. It was moving right at 75rpm just before I took the video.

[ame="http://www.youtube.com/watch?v=2ScxxWTIyNw"]http://www.youtube.com/watch?v=2ScxxWTIyNw[/ame]

While staring at it I got the bright idea to make acorn nuts for the cross-head slides. I'll have to get more brass stock to do that, but I think they'll look cool. What do you all think about that?

I'll also replace the nuts on the main bearings with ones that are more to scale. I am starting to run out of steam on this build, but the end is near. I have some grand ideas for a wood base, but it will be a stretch to keep my momentum up to get it done. There are so many projects that I want to start, that it has been hard to stay on this one :)
 
Brian, that looks and sounds fantastic, good job:) Acorn nuts look tidy but I have never seen one on a full size engine so it's a matter of personal choice.

Jan
 
Brian

That is looking grand.

I am starting to run out of steam on this build, but the end is near.

I know how that feels especially during the summer. And that is the reason I only have one running project at a time.

Vince
 
Brian
... that is the reason I only have one running project at a time.

Yep, I have been keeping myself from starting another engine because I know I'll skimp on the finishing details on this one if I do.

After thinking about it this morning, I think I'll just do typical nuts for the slides. There are some interesting details I would like to do with the base so I'll divert the extra energy to that :)

I have a question about the base. I see a lot of people have the same style inlet in that they can hook an air supply to. They look nice because they are just a hole in the base. However, I have never seen an air fitting like that. Can anyone tell me what these are?

Jason used them in his Benson build here:
http://www.homemodelenginemachinist.com/f32/april-project-month-17307/
 
Brian that is a great looking and running engine. You have done it justice and I am sure the base will fit the engine.

Don
 
I spent some time this weekend on the base for this engine. I grew up in a wood shop, but I haven't done any serious woodworking for a few years. I was surprised how rusty I had become. There are lots of little mistakes, but let's call them "Charm".

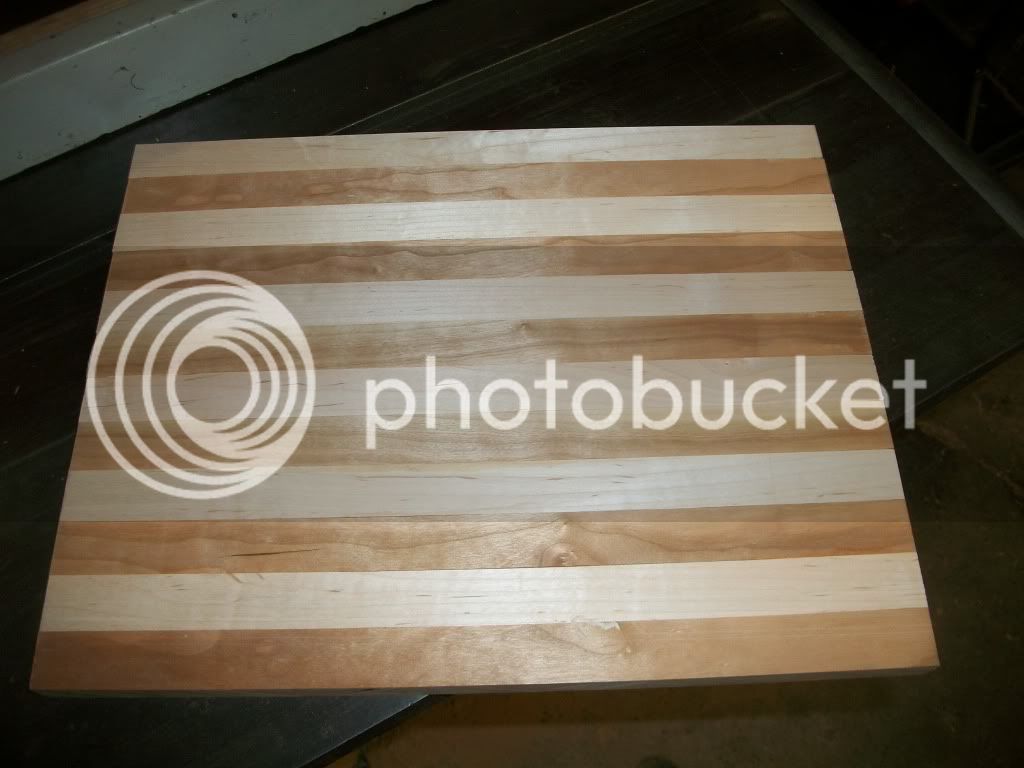
First I ripped up some 1" wide strips of maple and cherry and glued them up to make alternating stripes:

100_2081.jpg


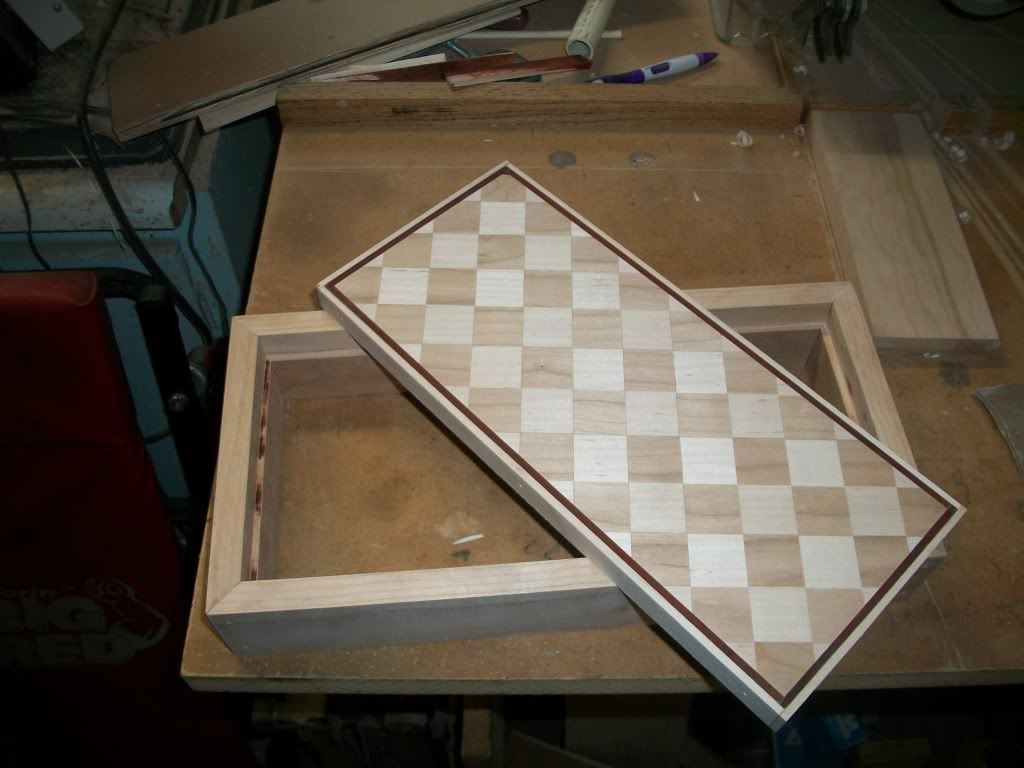
Then I cut more 1" strips at 90 degrees to the originals. If you flip every other strip 180 degrees you get a checkerboard pattern. Here it is in the clamps for the night:

100_2082.jpg


It isn't an efficient use of material, but I really wanted the checkerboard pattern to run at an angle, so I cut the appropriate piece out at 45 degrees. Then I wrapped it with an 1/8" strip of maple that had been dyed with red aniline dye. (To go with the engine) The I wrapped another 1/8" strip of plain maple around that. Finally I built a frame from cherry to hold the checkerboard.

Here are some of the pieces before assembly:

100_2083.jpg


A quick pass with a round-over bit on the router table and I was about done. I still need to cut and line the flywheel pit so I can't set the engine in place yet, but this will give you an idea. One interesting trait of cherry is that it will turn much darker with time and give a nice contrast with the maple.

IMG_1825.jpg
 
Looking good Brian,

For being rusty your wood working skills look pretty darn nice!

Dave
 
Wow, that base is excellent. If that is the result of you being rusty, then what would it look like if you were not rusty. Infact I suggest you make another one and send that one my way.:D I'm sure my Kiwi would appreciate it.

Vince
 
Brian that is awesome, I knew you would do it justice. It will look even better with a coat of polyurethane. Waiting to see it finished.

Don
 
Aw shucks guys. (We need a blushing smiley) The pictures hide a lot of sins...

Back in the day when I did a lot of antique clock restoration, I made replacement finials and turned the transitions and major diameters to +/- 0.005"

I'd still like to know what people are using for air inlets on their models.
 
Brian I want to ask you, what did you use for the brown outside trim?

Don
 
Hi Don,

I am not sure which trim piece you are asking about. However, the box contains only maple and cherry. The one thin strip that looks dark brown in the pic is actually a dark red color. It is a maple strip that I stained with aniline dye before attaching it. The very outermost trim that forms the outside face of the box is cherry.

-Brian
 

Latest posts

Back
Top