Cedge
Well-Known Member
- Joined
- Jul 12, 2007
- Messages
- 1,730
- Reaction score
- 29
Okay... I admit it... I'm a gadget junkie. I like tools whether I make them or buy them. Here are a few recent additions to my always growing arsenal.
First one comes with a huge thank you to Marv Klotz for the original idea. He long ago posted a link to his little manual radius jig and I had to have one. The first version was a quick throw together to get a specific job done, but it didn't take but one use to get hooked on this handy little tool. I kept thinking that I'd revisit the thing and make one that was a bit more permanent, but just never seemed get the "round tuit" with that project written on it.
As I said, version one was a working tool, but it was never meant to be a long term item. I pushed it a wee bit more than it could handle and it finally gave up the ghost while I was experimenting with a part I'll soon need. So, I decided to stop and build one that would last and fit my personal work style.
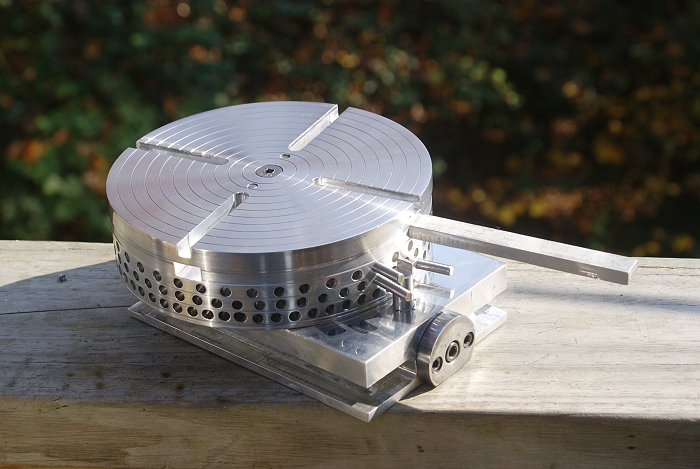
I'd never been comfortable with the work stops on mine ,so I took a bit of time to rethink how I use the tool and what would make it fit my needs a bit more closely. I spotted a piece of round aluminum in my stock pile and an idea began to form. Instead of the square table I'd copied from Marv, I decided to use the round and integrate the stops into the design to allow 360° positioning. Here is what I came up with.
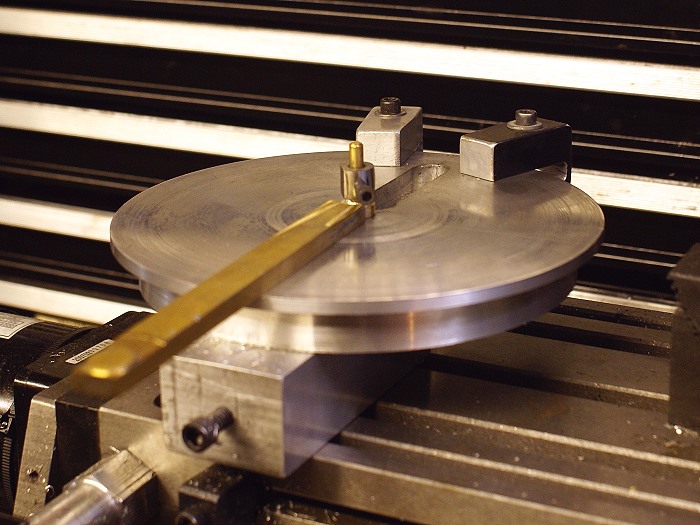
The removable center post is 3/16" brass in order to avoid the galling that I experienced using drill rod on the first version. Larger diameters can still be used by cutting a bushing with a 3/16 center hole. The small clamp is a drill stop, from Harbor freight, with flats milled on the sides to allow close in work with an end mill. It stops the tendency for the end mill to lift the part while cutting, but still allows for easy rotation of the work piece.
The bed stops are made to squeeze to the edge flange and can be positioned at any required angle by loosening the clamping screw. They will play a large role in making the side support arms for my current water engine project. Thanks again Marv.. you're generous ingenuity is definitely making my life easier.
The next item is one I'd be lost without. Everytime I used to need the wrenches that came with a machine I spent a bit of time looking for where I laid them down last time I used them. Yeah... I often get absorbed and before long every tool is on the work bench... somewhere.
I picked up a pack of Neodymium magnets (rare earth type) at Northern tool, mostly as an impulse purchase. I had no idea what I'd do with them at that moment, but I wanted to play with them, so I spent the $4.00 for 6 of them. Those six magnets soon grew from 6 to 12 to 24 to somewhere above 30 today. I use them everywhere...LOL. The best use so far is for keeping the above mentioned tools handy and in easy sight. As you can see below, I've finally beaten them at their hiding game.
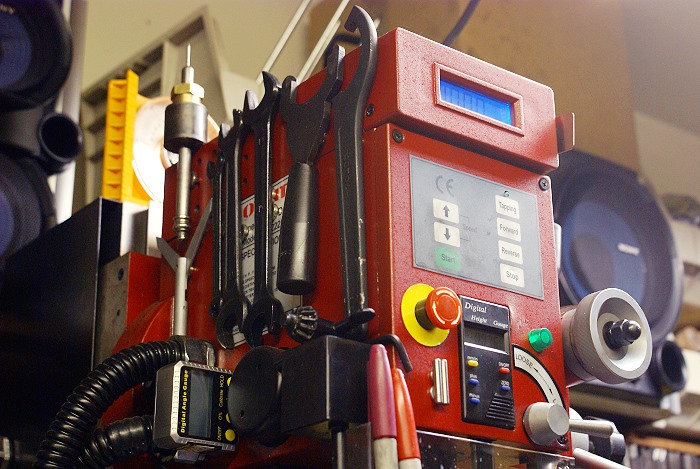
They even make keeping up with the small dowel pin stops for my indexing jig easy to keep up with. They now reside with easy reach right above the work space. Grab a few newt time you see them by the checkout counter.... you'll love them for holding that wayward chuck key.
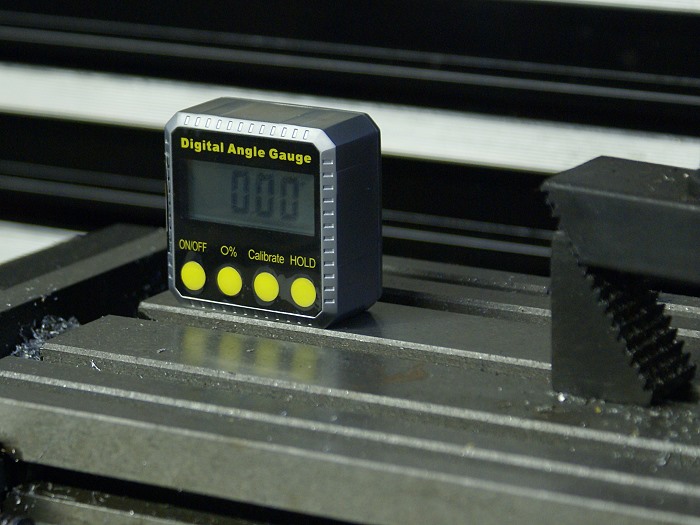
This next tool is one i bought last week at Harbor freight for $29.00 and some change. I bought it more out of curiosity than any real need. Now I'm wondering wher eit has been all my life...LOL. It is a Digital Angle finder. That sounds like an absurd idea until you see it measuring in hundreths of a degree. It has a calibrate mode that lets you zero it on a surface and then it retains that zero setting until reset. I can place it on the mill vise (the base is magnetic) and zero it.... then I can rotate it and move it to my mill's quill where it shows 0.0° (90.00°) variance. (Hey Tim... I trammed out that pesky that .20° we saw) That is a much closer look at the mill's tram situation than I can get using my DTI or my tram tool and .001 shim stock... and it's fast and easy.
Setting work up on an angle just got tremendously easier as well. The one negative I've found is that it can't read an angle on its back, but for vertical set up it is an extra right hand. Definitely a keeper around this shop.
Table angle
Quill angle (hold button activated)
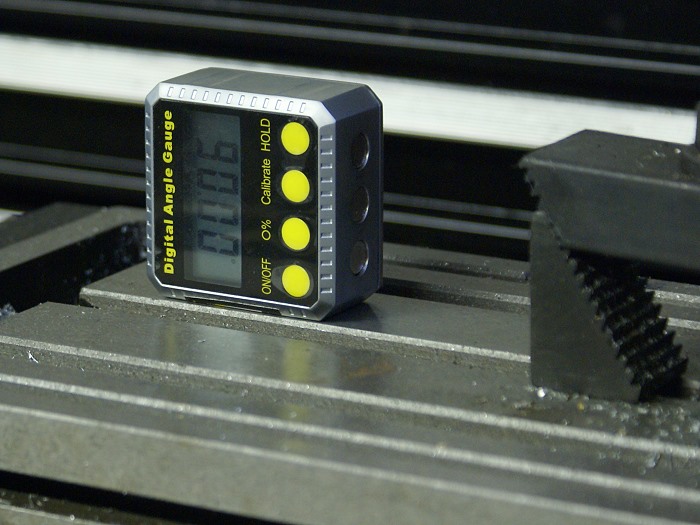
This tool also measures in % of grade mode, making it handy for off road safety as well.
These are some of the new tools that are making life easier here in my garage. I thought I'd share them with you.
Steve
First one comes with a huge thank you to Marv Klotz for the original idea. He long ago posted a link to his little manual radius jig and I had to have one. The first version was a quick throw together to get a specific job done, but it didn't take but one use to get hooked on this handy little tool. I kept thinking that I'd revisit the thing and make one that was a bit more permanent, but just never seemed get the "round tuit" with that project written on it.
As I said, version one was a working tool, but it was never meant to be a long term item. I pushed it a wee bit more than it could handle and it finally gave up the ghost while I was experimenting with a part I'll soon need. So, I decided to stop and build one that would last and fit my personal work style.
I'd never been comfortable with the work stops on mine ,so I took a bit of time to rethink how I use the tool and what would make it fit my needs a bit more closely. I spotted a piece of round aluminum in my stock pile and an idea began to form. Instead of the square table I'd copied from Marv, I decided to use the round and integrate the stops into the design to allow 360° positioning. Here is what I came up with.
The removable center post is 3/16" brass in order to avoid the galling that I experienced using drill rod on the first version. Larger diameters can still be used by cutting a bushing with a 3/16 center hole. The small clamp is a drill stop, from Harbor freight, with flats milled on the sides to allow close in work with an end mill. It stops the tendency for the end mill to lift the part while cutting, but still allows for easy rotation of the work piece.
The bed stops are made to squeeze to the edge flange and can be positioned at any required angle by loosening the clamping screw. They will play a large role in making the side support arms for my current water engine project. Thanks again Marv.. you're generous ingenuity is definitely making my life easier.
The next item is one I'd be lost without. Everytime I used to need the wrenches that came with a machine I spent a bit of time looking for where I laid them down last time I used them. Yeah... I often get absorbed and before long every tool is on the work bench... somewhere.
I picked up a pack of Neodymium magnets (rare earth type) at Northern tool, mostly as an impulse purchase. I had no idea what I'd do with them at that moment, but I wanted to play with them, so I spent the $4.00 for 6 of them. Those six magnets soon grew from 6 to 12 to 24 to somewhere above 30 today. I use them everywhere...LOL. The best use so far is for keeping the above mentioned tools handy and in easy sight. As you can see below, I've finally beaten them at their hiding game.
They even make keeping up with the small dowel pin stops for my indexing jig easy to keep up with. They now reside with easy reach right above the work space. Grab a few newt time you see them by the checkout counter.... you'll love them for holding that wayward chuck key.
This next tool is one i bought last week at Harbor freight for $29.00 and some change. I bought it more out of curiosity than any real need. Now I'm wondering wher eit has been all my life...LOL. It is a Digital Angle finder. That sounds like an absurd idea until you see it measuring in hundreths of a degree. It has a calibrate mode that lets you zero it on a surface and then it retains that zero setting until reset. I can place it on the mill vise (the base is magnetic) and zero it.... then I can rotate it and move it to my mill's quill where it shows 0.0° (90.00°) variance. (Hey Tim... I trammed out that pesky that .20° we saw) That is a much closer look at the mill's tram situation than I can get using my DTI or my tram tool and .001 shim stock... and it's fast and easy.
Setting work up on an angle just got tremendously easier as well. The one negative I've found is that it can't read an angle on its back, but for vertical set up it is an extra right hand. Definitely a keeper around this shop.
Table angle
Quill angle (hold button activated)
This tool also measures in % of grade mode, making it handy for off road safety as well.
These are some of the new tools that are making life easier here in my garage. I thought I'd share them with you.
Steve

")