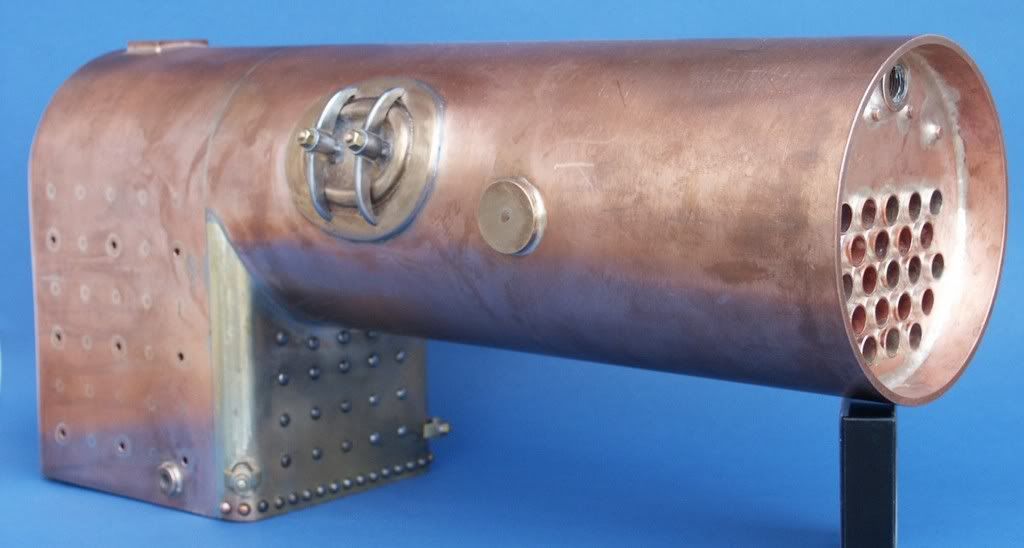
minnie boiler build.

Home Model Engine Machinist Forum

Help Support Home Model Engine Machinist Forum:

This site may earn a commission from merchant affiliate links, including eBay, Amazon, and others.

Lindo

Lindo
Joined
Nov 17, 2013
Messages
63
Reaction score
10
Reading LC Masons book he mentions the use of a converted oil drum and or a grocers scoop to encapsulate the barrel and the various plates for brazing,and using "coke" which was readily available whilst he was composing his book from the residues of the old local gas works after the coal conversion to gas.
Being a novice to boiler making, would it be feasible to use a Weber BBQ
kettle and pack the boiler parts around with hot BBQ briquettes?
Would the heat from the coals have any adverse effect on the copper pieces.
IE melt the copper.
Am I off track here?
Thanks
John
Spain
 
You also need to remember he was probably working with a kerosene blowlamp so did not have the ease of Propane that we do.

You would be better off making a hearth from insulating bricks. Not sure what you can get out in Spain but the ideal ones are Skamolex or Vermiculite based which reflect the heat back into the work. Failing that then our type of lightweight building blocks known as Celcon or Thermolite work quite well but I suspect you will only be able to get the hollow teracotta out there.

http://www.cupalloys.co.uk/brazing_ancillaries/

There are a couple of shots of a block hearth in this Minnie boiler build

J

PS did you see the drawing I added to your other minnie post?
 
When I made my Minnie I was able to do most of the boiler using a few firebricks which I placed around the parts being soldered. For the final joint of the mud ring, at which point the entire boiler was assembled, I placeed it on the BBQ grill, put firebrick all around it then used the BBQ to pre-heat the entire boiler. I was then able to solder around the ring with a propane torch.

On a later project that needed a lot of heat I tried using an oxy-acetelyne torch to work around the joint. This worked, but gave me some melted spots and some places where the solder lumped up and didnt flow well. It was very hard to handle. Oxy will melt your copper and brass parts.
 
Jason/Ron
Thanks for the advice,we have a few pottery companies local,with large
kilns,I will check around these first for fire bricks.
Thanks for the link
Did not see the drawing,please send again
PS What is a mud ring,I am assuming it is the round smokebox tube plate to the barrel to do.It seems to be one of the last things to join together as far as
the boiler section.
I have not read all of Mr Mason's book yet.
As Johnny Cash sang,one piece at a time.Phew,but I am going well.
Photo's of progress soon.

Regards
John
Spain
 
Drawing here

The "Mud ring" is not a common term, "Foundation Ring" is more common and what Mason uses in his book, its the square section copper bar that goes around the bottom of te firebox/wrapper.

It gets the name mud ring as all the sediment (mud) in the boiler tends to settle there and is why on the full siz eor larger models you have "mud holes/doors" to gain access for cleaning, you can see them on the dummy throatplate on my 2" Fowler.

A7-boilerfront.jpg
 
Jason,
Once again we have two countries divided by a common language. "Mud ring" is the most common of these terms in the USA although from time to time one will hear foundation ring used. Nice work on the boiler.
 
Jason
Beautiful work on the boiler.
I have a lot to learn.I have been practicing with some silver solder rods
on some scrap copper plates,I just cant get the material to flow,I don't think
I am getting the material hot enough.I will try again today.
The terms solder and braze have been used a lot in these recent posts but is the generic term "solder",just a variance on the material selected.
I have noticed from your photos silver solder and lead solder,or maybe not.
In Mr Masons book he uses C4 and Easy Flo.
I am assuming high temperatures around the boiler parts need to be
brazed with C4
Bare with me on this issue.
John
 
This is another UK/USA difference, we tend to say silver solder but in the US its Silver braze.

In both cases you want a solder that melts around the 620-650 deg C range. The C4 is not made anymore and in the UK and probably Europe the Easyflow cannot be sold to the public due to its cadmium content. You will have to look for something with a 55% silver content to ISO 17672 Ag 155.

The soft solder is a lower melting point lead bearing or now more likely lead free solder.

You need to get the parts until they are starting to turn red at which point the flux will turn to a clear liquid which is a good indication that things are hot enough.

Have a read of this

http://www.cupalloys.co.uk/best_practice/
 
Last edited:
This is another UK/USA difference, we tend to say silver solder but in the US its Silver braze.
Hi Jason an all,
Well I think it's a matter of yer pays yer money and yer takes yer seat. In the USA, whether it's silver solder or silver braze, depends upon who you talk to. Generally speaking it tends to be a matter of age. I'm in my 60s and for decades none of my mentors or peers called it anything but silver solder and there was no mistake about what was meant. "Brazing" to us, and all who went before, meant oxy-acetyl welding using brass filler rod (the braze.) Also if "silver solder" was good enough for the manufacturer of one of the most widely used ranges of silver solders (per the photo) it was good enough for us old dudes.

Then a change appeared in the marketplace - DIY shops began selling silver "bearing" solders which as we all know are nothing more than a soft solder with a dusting of sliver to keep it bright. The claims, which were eventually corrected, were sometimes brash, like "having the strength of silver brazing, without the heat." Coincidentally the number of newcomers to live steam in the USA was on the rise and perhaps the largest increase per capita was in the Gauge 1 community. The next step for many of these was to attempt to build a loco, and along with it the boiler, and very quickly a misunderstanding arose about which was the required "silver" solder. Contributing to the problem was a general tendency by many newcomers to try to do everything as cheaply as possible. I'm a great believer in economy, but not at the expense of proper technique and, by extension, safety.

For some years I tried to act as a mentor in this area, and took a while for the reality of this to sink in for those who hoped to avoid the relatively more expensive equipment for silver soldering, and there was some resistance to proper solver soldering in some quarters, but eventually this was sorted out and now most of those folks understand what to use. As a result however the newer generations of live steam builders, especially in small scales, have the tendency is to call it silver brazing to distinguish between a true silver solder and a silver bearing solder. It depends upon who you talk to.

BTW, I once fancied building a Minnie, which I liked very much, but I thought if you are going that way why not go ahead and build the Allchin. And then I thought well if you are going to commit that kind if time to it why not go a head and go for 3" scale and at that point I had run out of lifetime and had "thought" myself right out of the project.

SILV45.jpg
 
Last edited:
Being a novice to boiler making, would it be feasible to use a Weber BBQ kettle and pack the boiler parts around with hot BBQ briquettes?
John,
To return to your original thread, . . . oddly enough an old Webber BBQ kettle is precisely what I use as a brazing hearth. I place enough white/yellow clay firebrick to cover most of the wire grille and that has handled the majority of work I've had to do. If I need a bit more insulation or protection I will stand a couple of extra firebrick around the work. What I do need to do sometime is install a more substantial grille or grate. Occasionally when I'm using a large flame the relatively thin wire of the grille goes red and could potentially sag. Elsewhere in this section I've posted photos of a current boiler job which except for a few smaller components will be entirely too large for the Webber hearth, and indeed my work space, and the last phases will have to be soldered in the open air.

IMHO the problem with BBQ briquettes and or coke or any other consumable fuel is the potential for contamination of the work pieces and solder. I haven't had this problem, because I've chosen not to use it. Once upon a time I had a large boiler to solder and I decided to use an old wheel barrow as the hearth and fill the barrow with Vermiculite, a granular insulation material (expanded silicate) and this worked very well as a support medium and insulator but being granular it got all in the openings in the boiler and became a mess which was very difficult to remove.
 
Last edited:
Sorry if I'm resurrecting the silver solder / braze question. I have always considered silver solder is the one to use when you want the solder to flow between the joining faces, leaving minimum on the surface. Whereas, brazing is done with brazing rods, flux and an oxy/ acetylene torch (although I have done it with a Mapp torch) and generally builds up around the pieces being joined, like arc welding.

If someone told me they were going to braze something, I would not expect them to come and get some silver solder.

Paul.
 
  • Like
Reactions: gus
Another question for the experts and me a newbie to boiler making ref LC Masons Minnie.
Ref,the 2 longitudinal stays,looking at the book and drawings,I fail to understand how they can be threaded at both ends
into a couple of brazed in bushings in the fire box front plate and screwed into the smokebox tube plate.
There is no means to tighten as when you turn the stay it will just drift along.
My thoughts are to take a 5 mm dia bar,thread both ends 4 mm thus leaving a shoulder,screw into the firebox end,drill the smokebox end 4 mm,slide the smokebox tube plate onto the tubes (that have already been brazed firebox end) and longitudinal stays,add a couple of brass nuts and copper washers and solder all in one go.
Also the fire tubes,accurately finish to length( I am using 3/8" OD tube) machine down 1/8" long both ends to 9 mm dia
drill and ream both the firebox and smoke box plates for the tube 9 mm.this should then have a shoulder for the tubes to
locate against,secondly 2 of the top 3/8" dia holes for the tubes almost touch the side walls of the fire box plate,leaving almost nothing for the braze.and possibly risk burning through.
Hope this makes sense.
Newbie
John
 
John,
This is a bit off-topic but I would like for you to know, and you can make of this whatever you want . . . I've always disliked the term "Newbie." Over here it has come to have a mildly negative or even disparaging connotation, and that has never helped anyone. All of us at one time were new to this but the instant you begin making chips you've begun to acquire specialized knowledge and skills and are IMHO no longer strictly speaking a beginner, or "tyro" as they used to say in England. Your level of knowledge and skills will be apparent soon enough and no matter how limited those are at this point in your journey they should never be criticized nor should they be apologized for. However, that being said, it's also my opinion that as long as someone continues to call themselves a Newbie, they will be. The decision to no longer be a Newbie is of course yours.

I know what your last question entails with boilers in general but I will let Jason or someone with specific Minnie experience give you the answer and alternatives.
 
understand how they can be threaded at both ends
into a couple of brazed in bushings in the fire box front plate and screwed into the smokebox tube plate.

Thats not what the drawings show.

There are no bushes in the firebox, you just tap the copper sheet

Again the tubeplate is just threaded but a larger 1/4" dia to take the externally threaded nipples which pull things tight as they are threaded internally to fit the stays

All are soldered after screwing.

I'll come back to you on the tubes, need to dig out my drawings
 
The two top corner tubes will just be touching the flange which will tend to wick in more solder rather than leaving nothing.

J
 
Thought I would share a few photos of progress on my first boiler build.
There is an issue with the outer wrapper Mr Masons book first calls for a strip
to be cut 4" x 10 1/2" ref page 17,then he calls out for the length to be 11" long
page 20.So I hard soldered on 2 additional pieces of material which I now discover was not necessary.I will trim off at a later build stage.
I use a lot of MDF to form the shapes.naturally steel for the throat plates etc.

Thanks
John

SAM_0059.jpg


SAM_0057.jpg
 
I am waiting for rivets and screws etc to pre-assemble the boiler parts before brazing.
So in the meantime I have knocked up a holding fixture (NOT FOR BRAZING) to help me mark out the numerous holes (stays etc) accurately.The fixture/boiler will mount on the mill for accurate co ordinate positioning.
This should make it a bit more "hands free".
The barrel supports were roughed out with a rotary saw and then bored out accurately on my mill.
Hope this is of interest to the group.

John

SAM_0065.jpg


SAM_0066.jpg


SAM_0069.jpg


SAM_0060.jpg
 
Looking great John.

You are getting a long way in front of me now.

Mike
 
One of my most-often used boiler building dodges! (Great boiler-building minds think alike, or at come to similar conclusions as to how to get a grip on the matter.) Well-done so far John. Note in my photograph the stepped "Unibit" type hole drilling bit. This bit has made drilling in copper a pleasure rather than a catastrophy waiting to happen at every hole. (PS - In this setup there were also near-side clamps which were removed for the photo-opp.)

clampg.jpg
 
Last edited:
Harry
Nice set up.
I researched the Unibit's but could not find one that drilled a 1/16" dia hole.
I have a metric center drill 1.6 mm dia x 4 mm shank,it seems to do the job
but I still have to change to a drill for finishing the hole through,for example
when you have 2 x 13 g clamped together.
John
 

Latest posts

Back
Top