Kin Ya Tell What It Is, Yet??? ( App. Rolf Harris!!)

Home Model Engine Machinist Forum

Help Support Home Model Engine Machinist Forum:

This site may earn a commission from merchant affiliate links, including eBay, Amazon, and others.
Joined
Dec 18, 2009
Messages
16
Reaction score
0

Hiya again,
not been on much since my intro,.... I thought my time would be better spent 'tweaking' the lathe, and practicing marking, cutting, drilling, tapping, etc...Getting my eye in, so to speak

I also dare not come on without a picture, (Congratulations, Zeep, BTW! :bow: nice engine!!) so have also been playing (poorly!) with a digital camera, I am a lot happier with my Cannon T90,... but cant find the USB port on it.....
So, attached (hopefully!) are a couple of piccys of my first engine build, and first play on a lathe!!

I used stainless steel, (50mm x 6mm) for the base/chassis, mainly because I am going to have to learn how to drill/cut/tap it, and because I had a 10 foot length of it handy!! The valve body and cylinder body are cut from a piece of 2" x 3/4" Ali bar.
I marked, drilled and tapped the base without blunting too many drills, didn't snap a single tap!, then set about the valve and cylinder body. I cut them, marked them out, but had a lot of trouble trying to get a parallel hole through them with the pillar drill, ( ??? ???) the holes seemed to drift all over the place, so having read up online, decided to take the feared step of removing the 3 jaw chuck, and fitting the (still in its box!) 4 jaw independant on my chinese 7 x 14.

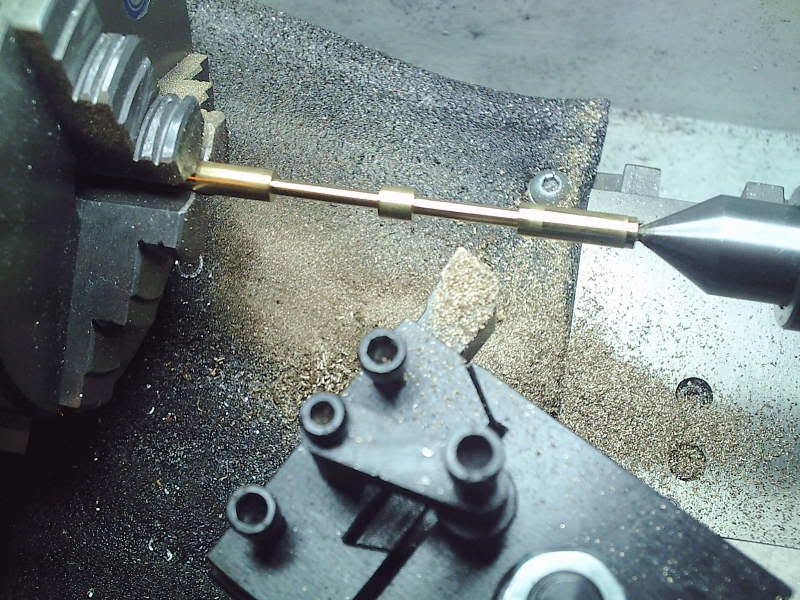
Fellow Newbies, dont fear it, do it!!! :big: :big: After centre drilling, away I went, drilled out the valve body to 5.5mm, then reamed to 6mm. Cylinder next, drilled out to 12 mm, then reamed out to 1/2", (Imperial, metric, bring 'em on!!! Things were going so well, I fear no man!!!! ;D)

As you can see, the bits so far seem to be somewhere near,... Soon, on to turning some brass bits!!

Cheers Guys, Fred

ez004.jpg

ez002.jpg
 
Looks like you are making some "EZ" progress. ;D Good job so far. Sounds like you broke the fear of the 4 jaw. Congrats. It is so useful and as you discovered much more accurate than a drill press. Thanks for posting the pics.
 
Thanks for the pics, Fred.
Keep banging away at it, and you'll have a runner to show us, soon enough.

Dean
 
Little_Freddie said:
Fellow Newbies, dont fear it, do it!!!

Exactly Fred. That...or do it anyway. ;D

Any updates?


And thanks for the congrats!


Hello again,... updates?? Not sure I want to bare my soul this early in our relationship, BUT!! ;D ;D

Ok, Ok, couple of hiccups while moving on to working on the 'easy' brass valve... I hasten to add, I am a raw beginner, and all the following was 'self inflicted' through ignorance.....

I was trying to turn down some 6mm brass rod for the valve,.. and was in all sorts of trouble,.. gouging, grabbing(?), bits of brass flying all over the place,... turnings coming out tapered.... :eek: :eek:, when I tried to part off with my parting tool, all sorts of chunking/banging,.. :-[ :-[
The lessons learn were, when turning 6mm brass rod with over 20mm or so out of the chuck, support the free end,... and when parting off, make sure the parting tool is rigid, and central!!!!!!
Some of the noises scared the pants out of me,... but I have learnt from the above...... I have purchased a QCTP, so can set my tools spot-on,

I am self employed, so havent had a lot of time on the lathe since Christmas,.. but have learnt the above lessons,.. as soon as some more 6mm brass rod arrives, off I will go again!!!!!!
(I have just received a 50mmx10mmx 200mm piece of Aluminum today,.. so will go play with the flywheel!!!)

Cheers, will update ASAP, (with pics!!) Fred


Hello Fred, it is good to hear that some lessons have been learned from your experiences. Brass can be a bear to work but as you found out, proper cutter height coupled with adequate material support goes a long way. (this can be said for any material being turned) The correct rakes (the ground angles) of the cutting bits is mandatory as well to produce a good finish, then there is feed rate and spindle speed to contend with. What's a guy gonna due?!? And you thought this was going to be a relaxing hobby, haw, silly boy. I'm just teasing you here an that last part but there are as you found out plenty of variables to deal with. Do your homework and ask questions here if you need some guidance, otherwise, clean out your shorts from the loud noises that were caused in your last outing and carry on. TALLY HO!!!!

regards

BC1
Jim


Ok, couple of pictures during tonights work,.... finished the valve, most of the flywheel, and piston,..... no real problems, till I realised I had turned, faced, drilled, & tapped a piece of 12.5 mm Alumin(I)um, and the flywheel can only be 6mm{ish!!} So, stuck it back in the lathe, and reduced it to 6mm,.... well, passed the time!!!!
I thought the higher mass would help it spin, once it was going,... but then realised it had to be somewhere near 6mm for the con rods to fit, not foul!! ( D'oh moment No:- 121, since starting this hobby,.......)

The valve was just a matter of taking my time, supporting the work at the far end,... and was very rewarding when finished!!! It is a 'snug' fit in the valve body, (Ali) and sure it will bed in OK.. (where is the 'fingers crossed' icon?? ;D)
Photos were taken half way through tonights work, will add piston, and any updates in next update!!


Cheers all, Fred

(P.S. sure I am adding pictures incorrectly, but dont know why?? not very PC literate, either!! ;D)

PICT0007.jpg

PICT0008.jpg
 
Freddie.
I am watching your build with enthusiasm. Your mistakes and your analysis of them is the best form of self teaching I have seen I a while. You will get to the end of this and be triumphant. Nice to see your having fun.


All the best. Anthony.
 
ieezitin said:
Freddie.
I am watching your build with enthusiasm. Your mistakes and your analysis of them is the best form of self teaching I have seen I a while. You will get to the end of this and be triumphant. Nice to see your having fun.


All the best. Anthony.

I agree with Anthony. :bow: :bow:

Best Regards
Bob
 
Well, it's coming along just great, Fred.
Don't worry about showing mistakes. If you're not making any, it's 'cause you're sitting on
your hands. Showing what went wrong will often get you suggestions for next time.

This one of mine showed up in some of my pictures for a few months.
It was definitely a mistake.

mistake.jpg


Keep making chips!
: )

Dean

 
;D Fred,

Finally found your site.

Hey, that's looking good and working with stainless is so hard. I am a yachtie and know how tapping into that stuff is deadly.

The shine on your flywheel is "wicked" how do you get that sort of finish?

You made your valve out of brass, whereas I used a 1/4" coach bolt from the local hardware store. I think I'll have to call my EZ the Cheapy EZ.

Got to agree with you, great project, bring em on!

KenM :big:
 

Hiya Ken, OK on the above,.... as for the shine on the flywheel, all you need is 2 things, some metal polish, and a "Sheila" who does as she is told... :big: :big:

To be fair, picked up a lathe tool from Ebay, it gives a very nice finish with a fast, shallow cut on Ali, (see link):-

http://cgi.ebay.co.uk/ws/eBayISAPI.dll?ViewItem&item=370285822576

and a wipe with metal polish, and away you go... OK on the stainless, yep, I was sweating with the last hole, drilling 2.5mm, then tapping M3, was sure I was going to snap something in there!!!

Now to business, NEED ADVICE FROM THE GURUS ON HERE!!!!!

Valve and body is good, but my cylinder bore is slightly tapered, due to the reamer taper. I have sized my piston to fit at the bottom of the bore, and this gives me a slight 'slop' at the top,. :'( :'( Do I A: drill through the cylinder, then ream, then cut a 'plug' for the end, B: make a slightly larger piston to just cover the area it moves over in operation,... or C: as there aint too much 'slop', forge on with what I have got???

I bought the reamers secondhand off EBay,.. there isnt too much taper, I think I will go for option C, I dont think there is a need for i.c. tollerences here, or am I wrong???

Cheers all, Fred
 
I usually go with; "try it and if it works, you are done". I only rework if I just can't get it going.

Option 2; bore slightly over sized and make another piston.
 
How much "slop", Fred?
If it's wallowing around in there all over the place, may have to re-bore and make a new piston. If you're just talking about a couple thou, then a little bit of oil in the cylinder will cover it.

If you have to re-bore it, try using a boring bar instead of the reamer.

I don't know how your reamer cut on a taper. It could seem that way if the hole is oblong from running the reamer in a tailstock that isn't on center with the lathe spindle. Check that out when you get a chance.
It doesn't seem like your reamer would actually cut a tapered hole by its own fault, unless you have one with a major defect.

Dean


"I don't know how your reamer cut on a taper. It could seem that way if the hole is oblong from running the reamer in a tailstock that isn't on center with the lathe spindle. Check that out when you get a chance. "

Dean


Give that man a CEEGAR!! You spotted something thousands of miles away, that I missed from 2 feet!!I skipped over the tailstock when setting the lathe up from new. In my defense, the tailstock had been modified by the manufacturer, with a tailstock camlock fitted,and didnt match any info/instructions I had. As it seemed OK, I left it as it was, with a view to looking at it 'later', ('later' is a modern version of a 'roundtuit', do you have them over there??) Having checked, I now find it is, indeed a tiny bit offcentre, and I did use it to ream the cylinder. I have aligned it as best I can, I will try the piston/cylinder as is, I think I can live with "try it and if it works, you are done", if it doesn't work, I will replace. It does not have much 'slop', just a tad (a 'tad' is an Olde Englishe measurement,. bit more than a Gnats, bit less than a Smidgeon :big: ), but I tend a little towards OCD.. :-[ :-[

Thanks once again,... onwards and upwards, Cheers, Fred
 
Fred.

A reamer is not just a reamer. Some reamers can and will cut tapered if you do not go all the through. They are made that way.

I don’t know what you used but people tend to think a reamer is just that, poke it through and everything is hunky-dory..

Little tips here for you. A hand reamer is one that has a square end on it, its not meant for using in a chuck due to the rpm needed to perform correctly.

A machine reamer has a round shank for it and is made for using in the machine. Also they come with MT shanks too.

Straight flutes are mainly for deeper holes lets say they work better for that application spiral flutes are for shallow holes and plate stock.

Lead edge reamers ( the ones with the little taper on top ) are meant to penetrate all the way through the hole. Then there are end-edge reamers ( one that look like an end mill end ) there for blind holes.

Best of luck fred. Keep going I am enjoying this. Anthony.
 
Fred.

I just re-read your thread here. You said you purchased reamers from ebay. I hate to burst your bubble my friend buying used cutting tools will without a doubt ruin your day.

I know cutting tools of quality are not cheap!. But consider the time involved in making a piece just to run a blunt reamer through it and the bore gets all chunked up and ruined.

There are two ways to solve this little dilemma. Buy good quality tooling and treat it like gold, using older for roughing out and using best for finishing only. Or by what ever tooling you want and buy a grinding set up machine for around $1200. Problem solved.

I hope you prosper from my costly mistakes. Anthony.


OK Anthony, thanks for the 'Reamer 101', none of which I knew,.... Learning curve kicks in every time I come on here!!! Done a little to the EZ, I was absorbed with the info, and doing research on reamers,... sad, aint i?? ;D

I purchased about 20 reamers, mixed imp & metric from an old guy who was retiring, (they go up to 1/2"), they are branded SKF, Dornier, and Osborn. (Most are stamped 'England', so they cant be all bad!!!) Some are square ended, some have a tiny chamfer at the end. The half inch one is square cut, like a mill, and as a picture is worth a thousand wards, photo enclosed. It measures 0.478" at the end, half inch in it is 0.485" and becomes 0.500" at 0.95 inch in. Perhaps my cash would have been better spent (with my weath of one whole months experience, and hindsight!!) on a good boring bar.

Never mind, I am learning fast, I will try it when all is ready, and if it dont run, I will put the reamer all the way through the cylinder, make a new piston, and 'plug' the end,... I am enjoying the errors as much as the engine, to be fair!!
So not too much done on the engine, as I say, but not too much more to do... photo of the bits so far,.... I loved turning the tiny spacers, not sure why!!!

Cheers all, thanks so much for input/info, Fred

PICT0004-1.jpg


PICT0005.jpg


Back
Top