How do I machine this?

Home Model Engine Machinist Forum

Help Support Home Model Engine Machinist Forum:

This site may earn a commission from merchant affiliate links, including eBay, Amazon, and others.

mgb

Member
Joined
Jan 17, 2016
Messages
8
Reaction score
0
I have been machining for about a year now, and every day is still a school day!!
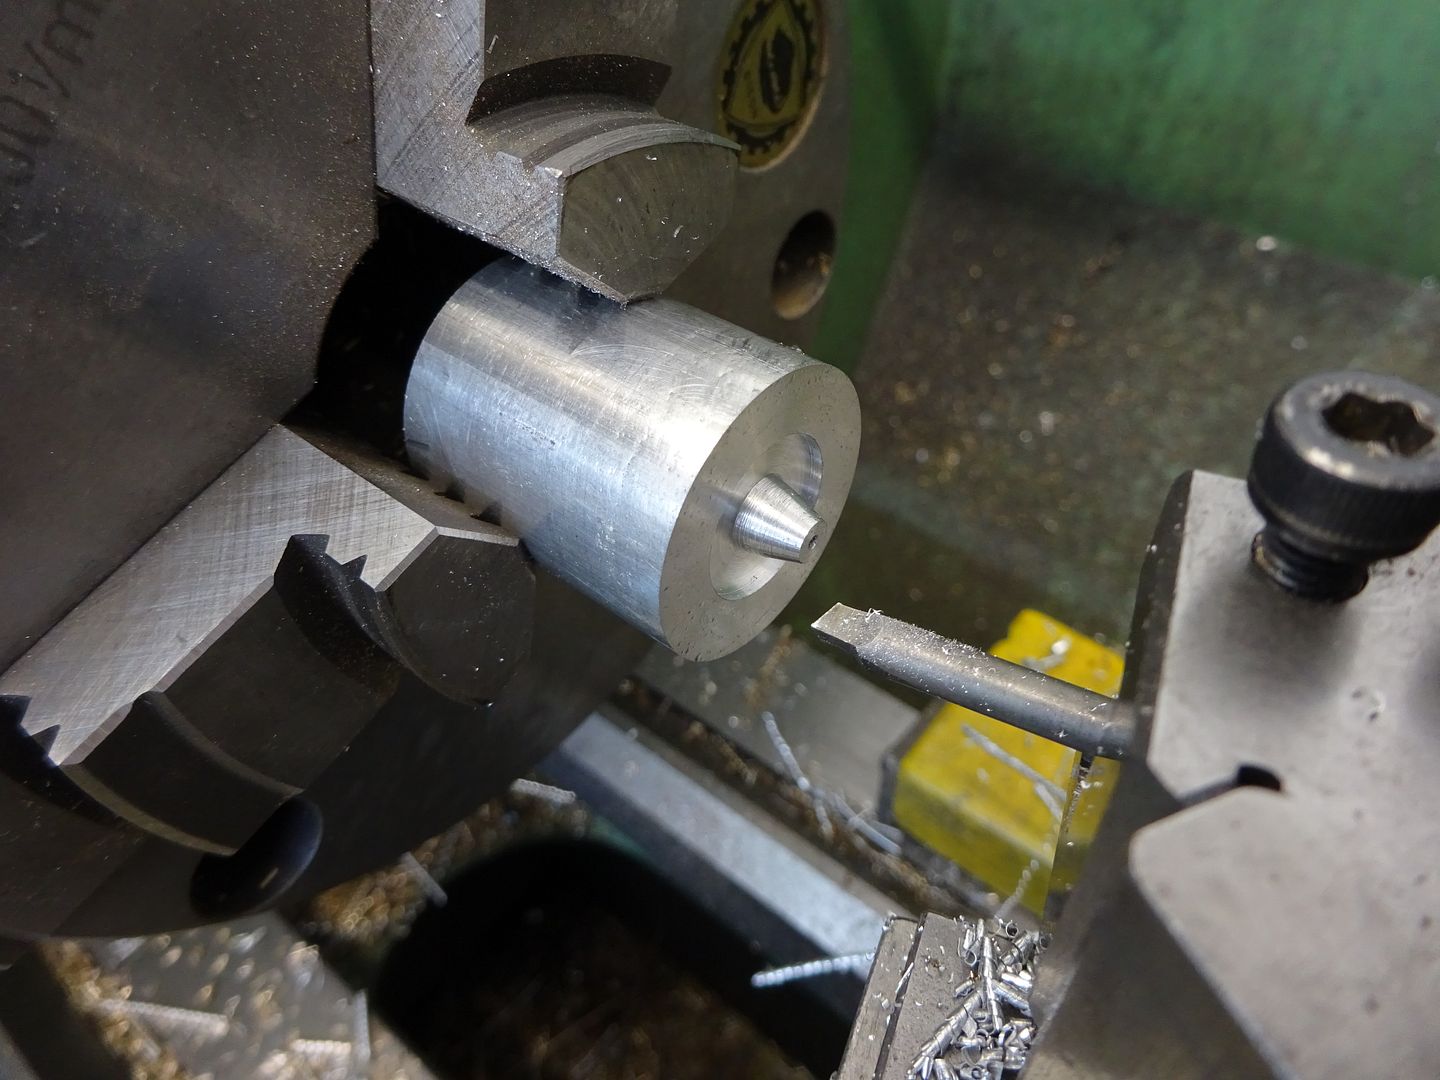
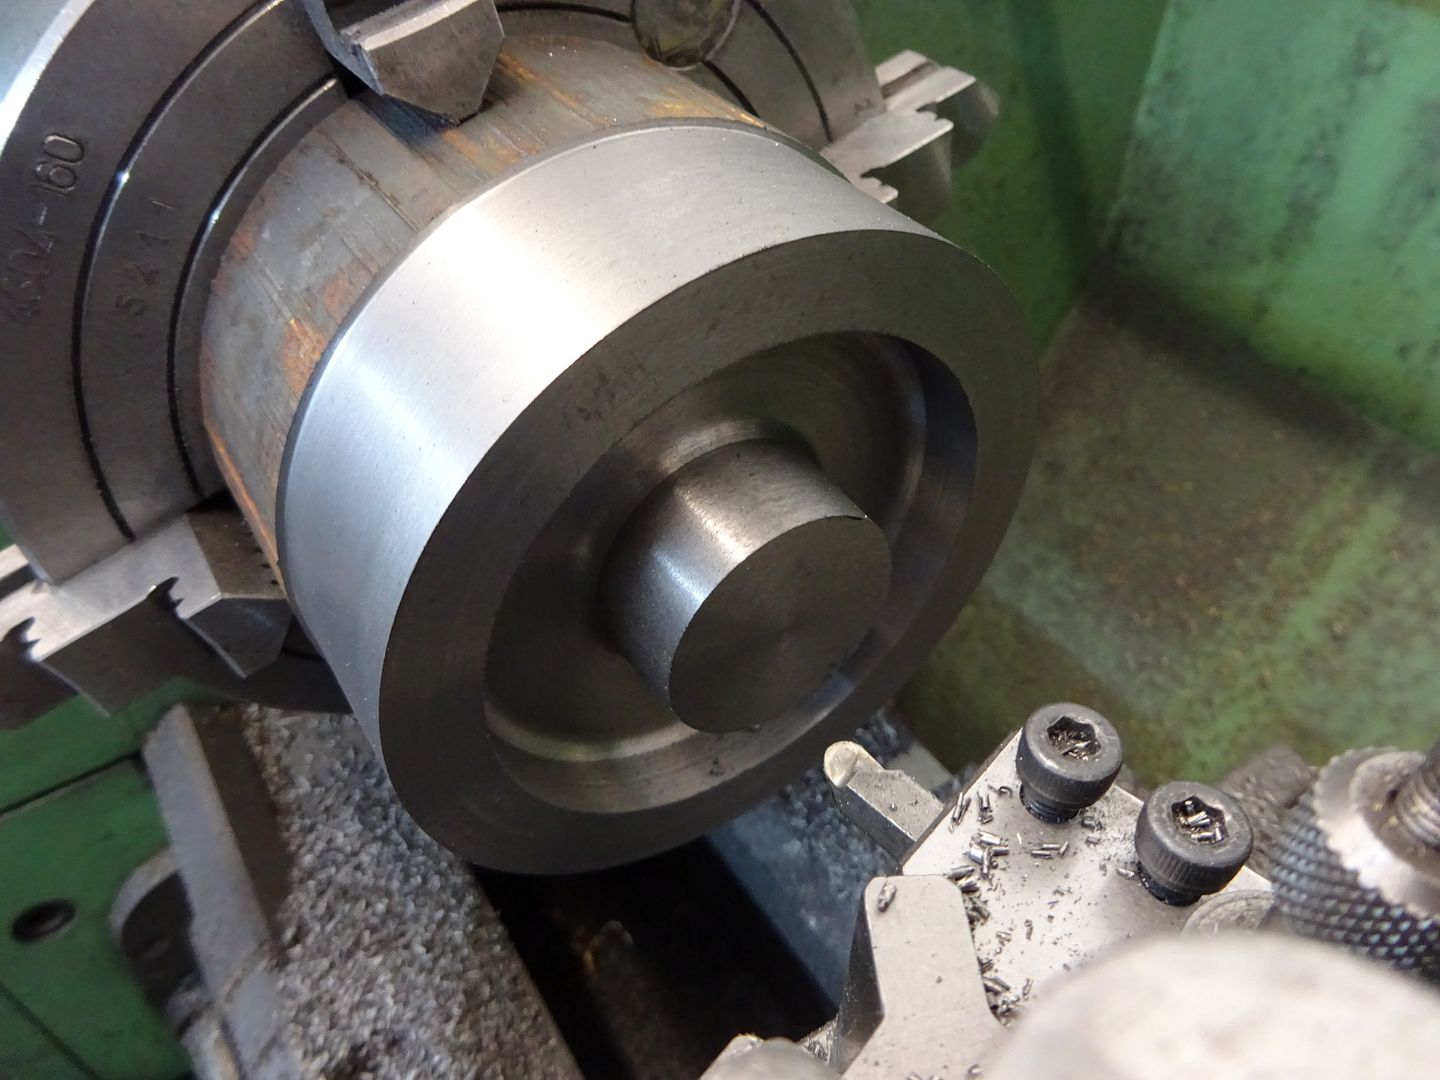
My current project is a Hemingway Power Hacksaw, which I have been working on for the last few weeks. Two of the parts are looking a little tricky. They are a top cap for the cylinder and the piston. (Parts 29 and 21)

Both parts are similar, in that they are cut from solid bar stock that needs to be hollowed out leaving a cup like feature that fits over the end of the cylinder (section of 1 1/4" tube) but needs to have a needle valve through the middle, so not a flat internal face which would be fairly simple with a boring bar.

I have a photo, but can't work out how to attach it to this post.

Thanks in advance of any help with this.

Piston_zpscdqlfcq8.jpg


Cap_zpsakil7qkg.jpg
 
Last edited:
I have a photo, but can't work out how to attach it to this post.

Thanks in advance of any help with this.

Open an account with Photobucket and upload your image there and it will have a ready built IMG url you can paste it into you thread and the pic will appear as if by magic.
 
Amongst my 'clutter', there is the first 3 pages on the construction in December 1964 Model Engineer. So that suggests from January 1965 for Westbury's construction notes .

It may prompt those who have retained their old ME's to help.

A further note suggests that either Ian Bradley or Dr Norman Hallows( Duplex) 'might' have done modifications to dashpots and as such, this may help you along your way.

I'm surprised that there are no construction notes along with WE5 plans!

Best wishes

Norman
 
Is the recess round the thread in part 21 really necessary (e.g. for clearance of another part)?
If not, ignore the recess and just drill the hole and use a D-bit or endmill to give the flat bottom.
If the recess is required, you will have to make up a trepanning tool. Basically this is a flat ended boring tool. A piece of 1/4" square HSS with a reduced shank to get into the recess with a convex curve on the outside and a concave curve on the inside. A bit of front clearance and top rake.

Slowly does it when digging out the recess - there's not a lot of room and the tool is going to be quite fragile!
Have a look at the end-on view half way down the page of this link: http://bbs.homeshopmachinist.net/threads/45764-Homemade-trepanning-tool-grinding-jig
Where his tool blank is full section behind the shape will be too big for your requirements. Don't worry about the fancy grinding jig, you can do it freehand on your bench grinder.

Dave
The Emerald Isle
 
How about this for a plan of attack for the piston part. Please feel free to say its completely wrong!
Stock is GR25 Iron 30mm Dia.about 35mm long.

1. Face both sides in lathe, keeping all available extra length.
2. Spot drill both sides (To allow centering in the mill later)
3. Drill face 1 to depth of 9/16", then open out to 51/64" internal dia with small boring bar.
4. ??? How to get recess towards bottom of piston???
5. Cut 20 deg taper with boring bar 20 deg top slide setting
6. Switch to Mill with DRO
7. Center job on face 2 with wiggler
8. Set DRO for 6 holes on 5/8" PCD drill through full length.
9. Drill center with M8 tapping drill then tap M8 full length.
10. Back to lathe, face 2 to chuck adjust final OD to fit in cylinder.
11. face 2 to chuck, and part off to 1" length

Any thoughts?
 
How about turning the blank and get it faced. Rough out the entire piece on the mill with a small rotary table and drill it. Then go back to the lathe to true up the surfaces and drill and ream the center hole.
 
Dave has already stated the obvious way , grind a suitable boring tool .
This is an very good example of problems encountered whilst model engineering and solving it will push you further along that curve
 
I had a similar situation a while ago and solved it by using a modified, partially chipped, dia. 3/8" two flute end mill with one flute ground back (the chipped flute) to about the center line over a length of 1/2". I used the modified end mill to remove about half of the interior recess towards the larger inside diameter to depth. Once at depth, I reversed the lathe direction and removed the remainder of the recess towards the smaller interior diameter without changes to the tool but positioned the tool to the other side of the part centerline, hence the reverse of the lathe direction.

Hope my description makes sense to the reader and its understood how I went about it.

Peter J.
 
I would go steves way,using the mill and rotary table or boring head to trepan
Start with oversize stock,ie od and skim down at finish.The 1/16w is too thin to try and achieveat start
 
Many thanks for all the replies.
Due to the lack of a rotary table, I have commenced the job along the lines of #4 i.e. ignoring the recess at the moment. All was going well until the lathe packed up:rolleyes:

How about the top cap part then?
Oversize stock, then a regular small boring tool to get to the large internal diameter, then grind a Left to right boring tool to take to the spindle bore OD?

This looks a simple part until you think about how to actually make it!!

First step is to fix the lathe, that looks to be a control board at the moment. 2 months out of waranty :mad:

Many Thanks
mgb
 
MGB,

This job could be made very easily if only you looked at it logically, split each of the complicated pieces into two parts.

Make the tube first, then the end pieces separately to fit into the tube ends, silver solder them together and then drill the 6 holes in the end.

Except for the drilling of the 6 holes, the rest are easy turning jobs before fitting them together.


John
 
Its just a job for a small boring bar or trepanning tool. Take a look at some of the posts here on how to turn the recess in a small flywheel and leave the hub proud and it is no different to that.

I would do it with boring bars. First drill the hole right through, then open out to the larger dia to where the central boss starts with a larger boring bar.

Then with a small boring bar start to form the recess working on the outer edge then run machine in reverse and use the same boring bar on teh back edge of the boss which save s changing tools or grinding up a trepanning tool.

This little bit was done with a 4mm bar.

DSC01308_zpsjypueqvo.jpg


And one a bit bigger with radiused internal corners, 6mm sq tool

DSC00520_zpsgtot6quy.jpg
 
Hi there,
Mended the lathe, and made a start. It was a broken brush in the motor BTW, so a £5 fix :D

This is how the part turned out in the end. Chose to ignore the recess in the piston for the time being, as it is just the help oil drain back through a damper/needle valve.

The holes are a little out due to being centred on the mill with a 60 degree point after the hole had been tapped. Also got 5 holes rather than 6 due to using 6 hole start 0 Deg stop 360 Deg settings on DRO....:hDe: Good job it will all be hidden inside the tube.

Attached are a few photos of progress.

P1030805_zpsqdcitmsa.jpg


P1030804_zps2kl2xnno.jpg


P1030802_zpssin2j80o.jpg


P1030800_zpseg1zbt3i.jpg
 
Last edited:

Latest posts

Back
Top