Hit me - Miss me?

Home Model Engine Machinist Forum

Help Support Home Model Engine Machinist Forum:

This site may earn a commission from merchant affiliate links, including eBay, Amazon, and others.
Steve,

From one of this forum's masters of gorgeous work, high praise indeed - Thank You. :bow:

Kevin and Dean,

Thanks guys for your continued support. :bow: :bow:

Best Regards
Bob
 
Bob that is spectacular gear work. You did a great job of explaining it. Jack B
 
Jack B,

Thanks for the kind words and continued support. :bow:

Today I was left in peace and I managed to get the cam profiled. As fully paid up member of, "Gerry and the Hat Tricks," it required all my concentration not to lose my place working round the profile in 2 deg increments. ::)

The cam blank OD

IMG_1272.jpg


Ready for transfer to the mill.

IMG_1273.jpg


Half way now it's time to change hands and go back the other way. ;D

IMG_1275.jpg


The profiling is complete - All it needs now is parting off, smoothing off, and voila ;)

IMG_1279.jpg


My idiots guide to profiling offsets - derived using Turbocad

IMG_1281.jpg


Avagoodweekend ;D

Best Regards
Bob
 
Bob,

Nice work on the cam lobe.

I don't believe I have the attention span required to cut a cam lobe with out missing a step of the procedure.

SAM
 
Bob,
Incredible work on the gears and cam lobe. Inspiring as always. Thanks for stopping in your work to take photos and posting them. :bow: :bow: :bow:

Cheers,
Phil
 
Very nice job on the cam Bob :bow:

Is that profile coordinate table a feature of TurboCad ? - that could be very handy!
;D - I had to smile at your description of your dad's sister. Maybe used them for locking on to the broomstick for sudden acceleration and braking ::)

Kind regards, Arnold
 
Sam and Phil,

Thanks again for your support. :bow: :bow:

Arnold,

Thanks for stopping by. :bow:

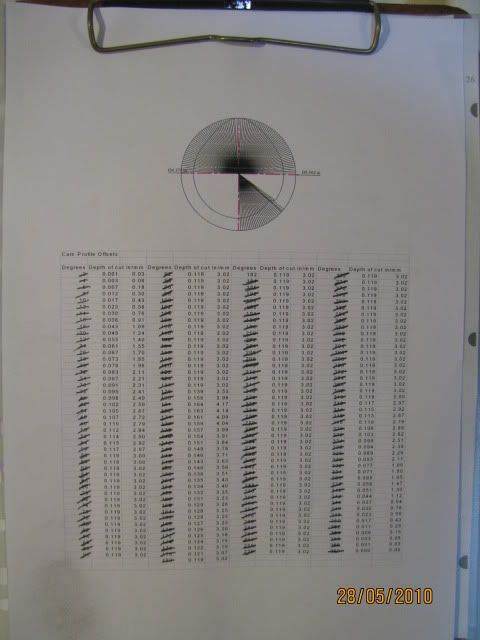
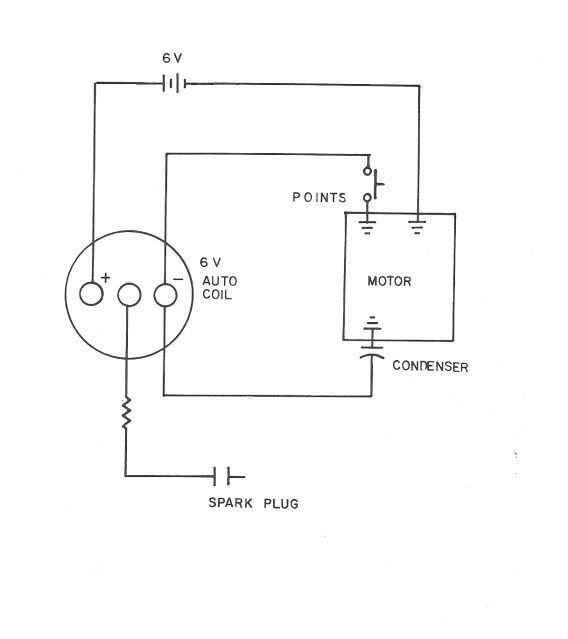
The table was built running Excel in parallel with Turbocad and transferring the offsets from datum measurements. If there is an easier way, I would be very happy to learn about it.

Best Regards
Bob
 
Hi Guys,

Not a lot to show for a mornings work but

I finished the cam and the cam/gear shaft is ready for fitting but before I do that I will make the head and then I will have a much better idea of what goes where. ::)

The finished cam

IMG_1284.jpg


The cam, gear and shaft.

IMG_1285.jpg


IMG_1286.jpg


Best Regards
Bob
 
Cam looks good, any progress is better than none

Rgds - Gavin
 
Bob, the cam really came out well after cleaning it :bow:
As to CAD & Excel - Thank you... Seems there's only one way to do it then - the hard way ;D

Kind regards, Arnold
 
The finished cam looks good, Bob. It has sort of a notch in it. Can you tell us the purpose of that thing?

Dean
 
Deanofid said:
The finished cam looks good, Bob. It has sort of a notch in it. Can you tell us the purpose of that thing?

Dean

Dean,

Thanks for following along. :bow:

The detente, (notch), is where the points open and close. I don't fully understand it myself yet but I hope all will be revealed as I get a bit more done. ::)

Gavin & Arnold,

Thanks for your input guys. :bow: :bow:

Best Regards
Bob
 
Bob

I suspect the notch is so the points open and close rapidly (ie snap open and closed) to suppress any tendencies towards arcing across the contacts. Does the wiring include a condensor across the points?

Rgds - Gavin
 
Gavin,

Picture of wiring diagram. There is a condenser but you tell me if it's across the points ::)

Wiring.jpg


Best Regards
Bob
 
Hi Bob. Indeed it is.

Looking good BTW.

-Trout
 
Trout,

Thanks for looking and your help. :bow:

As you may gather, my knowledge of auto electrics is such that you could write it on the back of a postage stamp and still have room for my name and address. :eek:

Best Regards
Bob
 
As trout points out, the condensor (capacitor in new speak) is across the points and will suppress arcing. The cam does double duty, driving the valve (which is a smooth ramp up and ramp down action) and driving the points (which needs to be an on/off action) - that would probably explain the notch?
 
Great work Bob. :bow: The discussion about the dual function cam was interesting. When I first started this hobby I thought it was necessary to fully understand the operation and function of all parts before making them. I now realize that there are cases when that becomes much clearer when mating parts have been made and the whole subassembly is sitting in front of you.

Thanks for posting

Cheers,
Phil
 
Cams can be a pain!...Glad yours went well!

Nice Job Bob!.......waiting on that distinctive sound of hit and miss!


Dave
 
Gavin, Phil and Dave,

Thanks for your continued interest and support. :bow: :bow: :bow:

Today seemed like a good day for a head job.................. so I made a start on the head.

I was lucky in finding a piece of round aluminium that would just do the job.

The underside and OD turned.

IMG_1288.jpg


Set up in the mill for drilling.

IMG_1289.jpg


The vale recesses and the plug hole.

IMG_1291.jpg


Next week will see the drilling of the head bolt holes, the drilling jig for the cylinder and last but not least the coolant passages. If I get time I will set up vertically and drill the intake and exhaust passages.

Best Regards
Bob

 
Back
Top