First engine, an RC aircraft 4 stroke

Home Model Engine Machinist Forum

Help Support Home Model Engine Machinist Forum:

This site may earn a commission from merchant affiliate links, including eBay, Amazon, and others.

digiex-chris

Well-Known Member
Joined
Dec 6, 2010
Messages
263
Reaction score
58
Way back when I became interested in radio control models, I dreamed about designing, building, and flying my own engine. At that time I was pretty good with a hacksaw and a file, but that's all I had, so that dream sat and waited for 15 years.

Now I'm equipped with a 10" lathe and an antique milling machine, and have built all of the tooling I'll need to do everything. It's time to start. A few weeks ago I put all of my knowlege and research together into a design, which I forgot to bring to work with me today to post for you. I wanted to document the build somehow, so I thought this might be a good place for it.

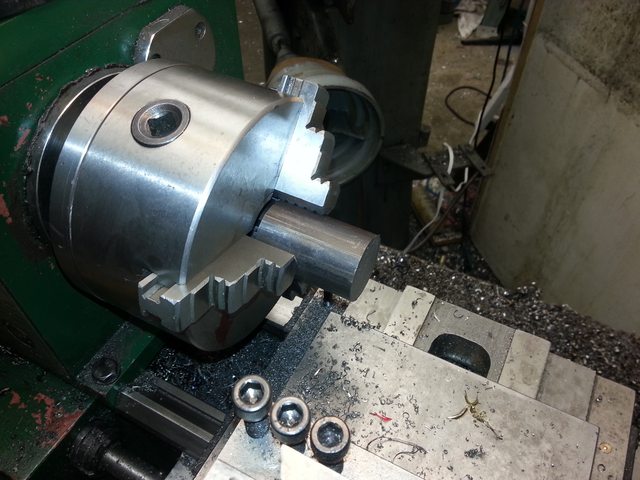
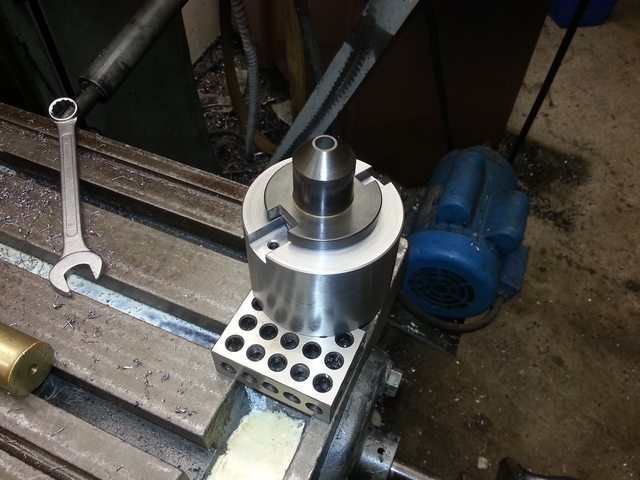
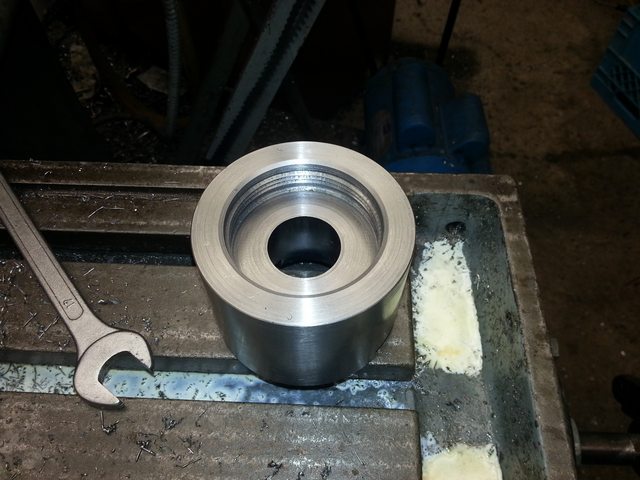
First step, I needed to make a quick modification to my mill to take the tooling I needed to use. My mill is a 100 year old Denbigh horizontal milling machine, that came with a relatively modern vertical attachment. The vertical attachment has a fantastically useful collet chuck, and an NMTB 40 spindle. The horizontal spindle is an odd taper. Does not match any known spec that I could find, including B&S, MT, and anything else I could look up. So if I was going to buy tools, it was going to be for the vertical attachment. Wanting to use those tools in horizontal mode too (because the vertical attachment doesn't have much space to the table), I needed an adapter. One $60 chunk of 4140 and a pile of hours taking light cuts on a lathe that wouldn't go slow enough, and this is what I've got.


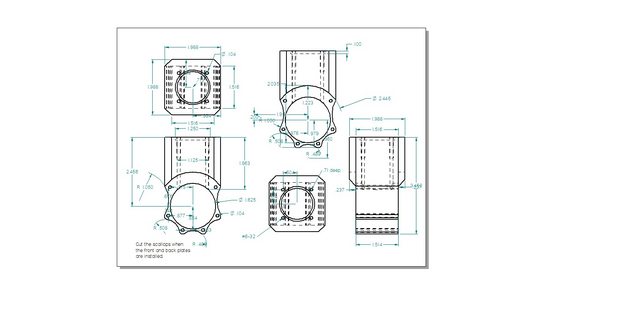
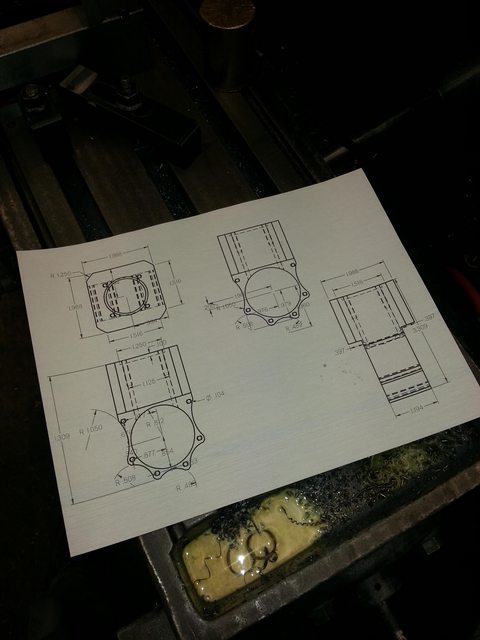
Today I gathered all of the material together, printed out the drawing for the block, and set out to square up the rough stock. I had noticed a few days ago that things on the mill seemed loose enough to cause a few thousandths of rock when the table was cranked over to one side. so I decided to address that. Yup, I can pivot the table 0.005" over 14". The mill came to me with every surface of it painted, including the ways. I stripped all of that off, but avoided going any harsher than paint stripper and an aluminum scraper, so it's still kinda settling in and smoothing off. So instead of spending the day squaring up the block and boring two perpendicular holes, I spent it pushing and pulling and adjusting gibs. Still a good day in the shop.

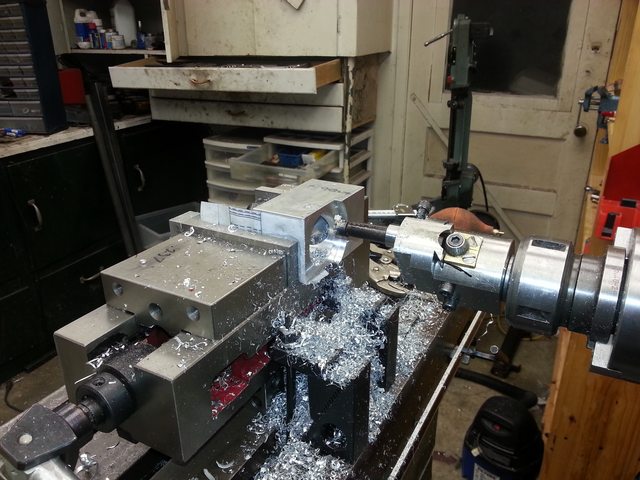
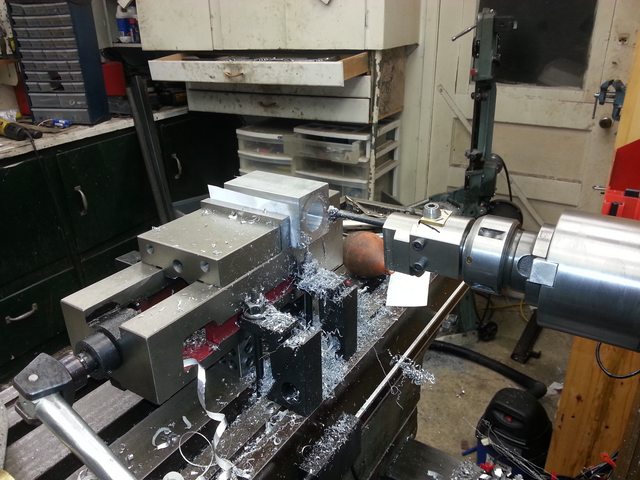
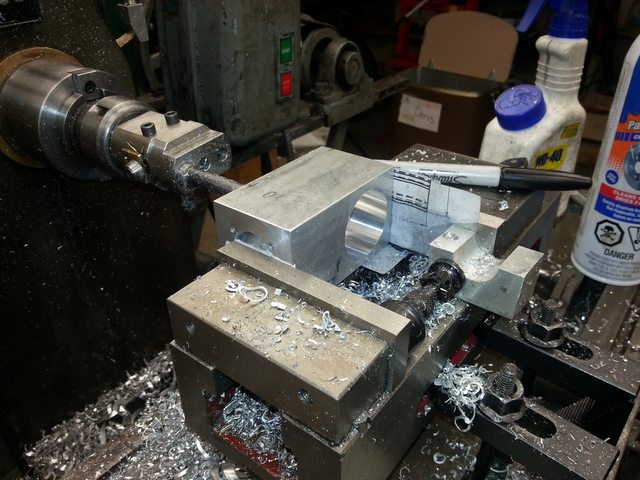
All set up and looking good, I took a skim off the top, flipped the block, stuck a round piece of plastic on the moving jaw, tightened the vise, and took another skim. It looked like it took more off of one side than the other, so I checked with a square. Yup, the fixed jaw needs bigger bolts, I can easily push it out of square and off the base a bit. I wish I could find a 3-4" Kurt. The base appears square though, so rather than using the round plastic I just tapped the block down into the vise so it sat flat on the base. Within 0.001 over 2", I'm ok with that. These are just going to be cooling fins later on. The more critical set up later on I won't need the vise for.

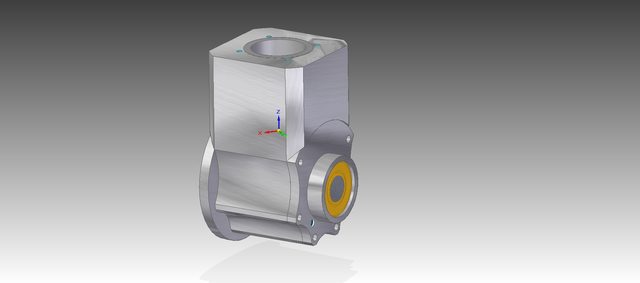
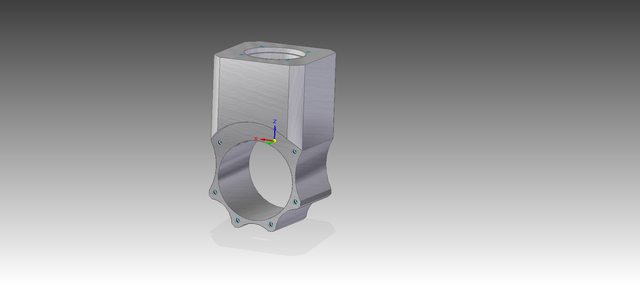
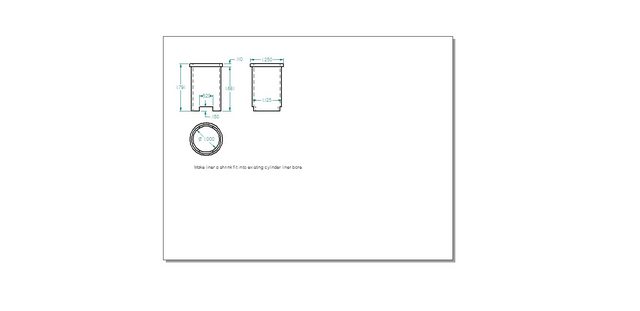
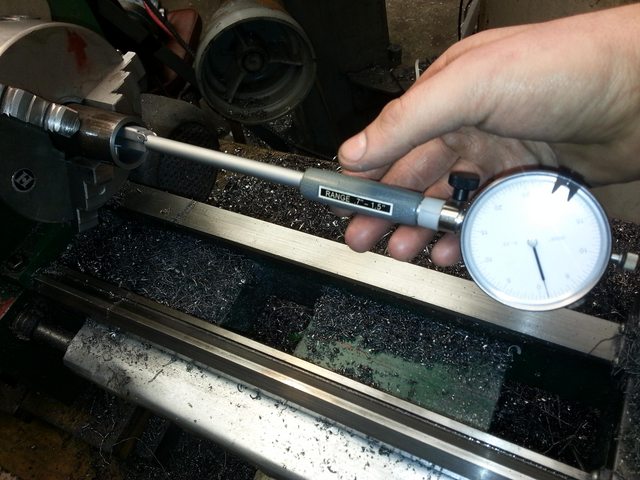
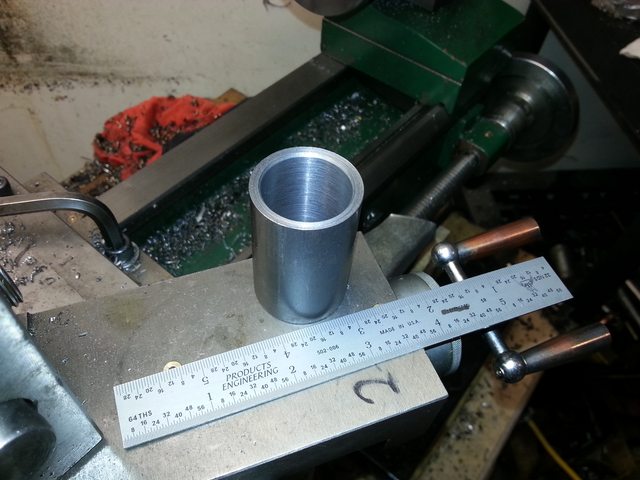
Here's the shape of the main block that'll come out of that chunk of aluminum. I don't have a need for an open rear anymore, but I think I'll bore it straight through and put a plate on the back so that I can put a plexiglas plate on the back and watch the oil level and splashing.


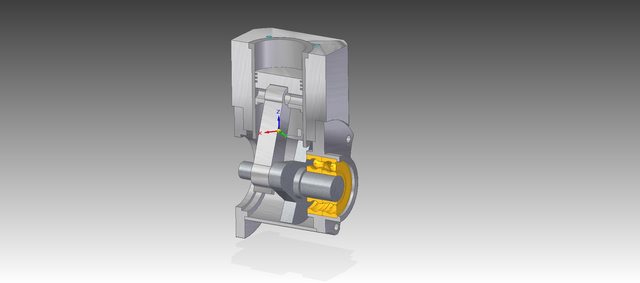
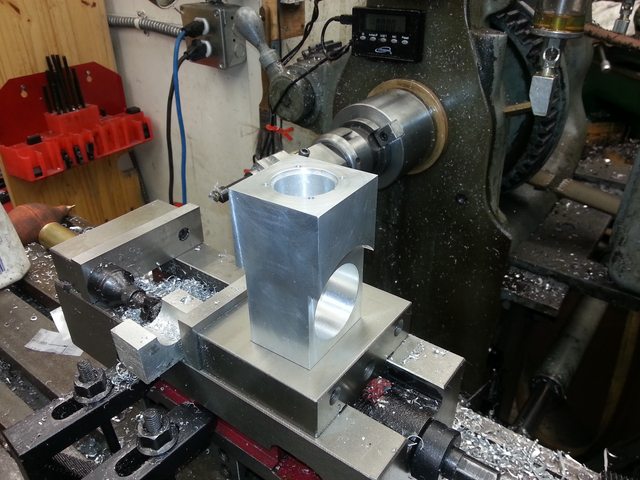
I'm planning on taking advantage of the horizontal mill in making perpendicular holes, by rotating the vertical head sideways to do the crankshaft bore, and without disturbing the setup, use the horizontal spindle to bore the cylinder (since I can lock the table axis and make it not succeptible to any table rock that might show up). That way I can get them perpendicular within the accuracy of the machine, which is quite good if I can keep the gibs where they need to be.

The horizontal spindle also makes it a piece of cake for squaring up the small end (the top and bottom, if oriented with a vertical cylinder). I just leave it on it's side in the vise where I did the last operation, rotate and indicate the vise in 90 degress, and install the fly cutter in the horizontal spindle. My vise isn't really deep enough to grab the bottom end of the block and face the top securely, especially with that tilting fixed jaw.
 
Last edited:
Got some holes bored. It's not very interesting.

Squaring up the end. There's a broken bit at the bottom of my knee screw so I can't get it high enough so I set the vise up on 123 blocks. A little sketchy looking, but it seemed to work fine.


Cylinder liner hole bored. I changed my tactic a bit realizing that I couldn't get the table up to center. I'll have to disturb the setup and indicate it in again. Hopefully as long as I put the same side of the block down, tap it down well, and indicate it in on the same edge using a 0.0001" graduation DTI, I can be as close as I want to be. Infact, I might be able to get more perpendicular than the mill is but it'll be fiddly I'm sure. I started with the cylinder liner bore because I'm not sure what this thin boring bar will do when intersecting a different sized hole, so I decided to do the one that needed to take the shrink fit first.


1.125" bore to take a liner for a final bore of 1". .062 liner wall thickness? Is that going to be enough? It'll be 4140, so I'm guessing it'll be fine. I'll bore it, then put it on a mandrel and do the outside, then install it in the cylinder. I'll do the lapping once it's shrunk in there.
 
Last edited:
oops, I left the oilers turned on and went to bed last night. I just emptied 3 ounces of fresh oil onto the ground.
 
That 3/8" shank 2" long boring bar wasn't doing the job. It narrowed down to 1/4" or less between the carbide tip and the 3/8" shank. I decided to modify my boring head to take my 5/8" shank boring bars. Much better. 1.625" crank case bore. It'll be a spacious crank case. I'm hoping to have a large sight glass in the rear case so you can look inside.


Was able to finish off the crank case bore with no squealing or chatter, and with a good finish, even where it intersected the cylinder liner bore. I changed the design a bit so the undercuts on the front and back of the block are now curved instead of having a flat top, so I can make the front and rear case covers entirely on the lathe in a single setup allowing good alignment for the bearing bores to the crank case. It also allows me to cut the undercut in the same setup using my well setup X axis, instead of using my Z axis. I'm not very confident in the knee gib setup at the moment and don't really want to operate with that axis unlocked. Being out of square 0.002" across the height of the block wouldn't be that bad in the direction I have the block clamped down, but I don't quite have enough travel with my current setup to sweep the face vertically with a fly cutter, but I can do it horizontally and avoid both problems at the same time. Either way, I want to do it without removing the piece from the setup that I used to bore the crankshaft hole. Feeding in a fly cutter from the right and leaving a curved termination instead of above and leaving a flat one should accomplish that.

I'll try to remember to get a render of that drawing.
 
1.125" bore to take a liner for a final bore of 1". .062 liner wall thickness? Is that going to be enough? It'll be 4140, so I'm guessing it'll be fine. I'll bore it, then put it on a mandrel and do the outside, then install it in the cylinder. I'll do the lapping once it's shrunk in there.

Newbie here. Working on this exact aspect & I did a table of comparable liners which I will dig up for you. Are you saying 1.125" cyl ID =~ Liner OD and 1.062" bore? If so, that's 0.0315" liner wall thickness. If I recall the comparisons correct, that's maybe on the thinner side, avg was 50-60 thou? Commercial 2-stroke-RC engines I've seen thicker yet, but maybe more to do with ports cut out, different materials used.

OTOH, I'm, not sure what factors into this & maybe thinner is fine? Maybe insurance against distortion during machining? My first test liner is 12L14 & something around & 0.059" wt. I machined the liner od to within 0.001", then work on the inside; drilled, bored & reamed bore. I couldn't measure any distortion in OD (was expecting some). But anyway that was my procedure. Now I want to try cast iron liner just to see the difference.

Another 'newby discovery' FWIW. My leaving 0.0065" bore dia from reamer to lapping is way too much. I'm trying to match an existing bore (commercial piston ring actually) & that's just how the numbers shook out from closest reamer size. Lapping, I've found, is very controlled but painfully slow even with coarse (150-220) grit to begin with. So next trial will be bore to within maybe 0.002-0.003" & lap to final from there. I still like the idea of a reamer for straightness & cleanup. I was committed to making matching piston rings I would target finished bore to 0.002" +reamer size & go from there.

Would like to see some of your pics & I will do the same.
 
Yeah I'm trying to get as many pictures as I can as I go, since I always have my phone on me. I tend to do all of my considering infront of a computer, then print out a plan and get to work machining with an audiobook playing. I'll probably be able to quote the job in units of completed audiobooks ;D

I've rebuilt a few antique two stroke RC engines by making new liners out of cast iron. I found it easy to do by starting with a reasonably thick chunk, thicker than needed, and turn and lap the ID first so you can bore it without having to worry about a thin wall distorting. then mount it on a close fitting mandrel, and turn the outside to the fit you want. The ID came out predictably. That's what I'm planning to do here. I decided to avoid anything cold rolled to avoid any internal stresses that could be relieved during boring. You won't have that problem with a cast iron liner, as long as it was well stress relieved (time or otherwise) before starting. I found cast iron easy to work with if you go slow enough. I also tend to leave only 0.001" for lapping if I can. Since I usually make pistons to go with my RC engine liners, I don't really care if I have to lap it slightly oversize to get all of the marks out.

The other way I could do it is make the liner OD, shrink it in, then mount up the block somehow and bore and lap the liner in-place. I think that might be overkill though. I'm going to measure well to see if that distorts anything but I think it'll be ok. If it does, it should be within what I can lap out.

I'm targeting a 1" bore, with a cylinder liner OD of 1.125", so 0.0625" wall. I'm thinking it'll be ok, it's around what I saw for one old OS that had a nickel plated brass liner. I don't really know what the concerns are though, other than problems manufacturing. Thinner might be better, to transfer heat to the aluminum easier?
 
Last edited:
Have you considered a monoblock cylinder of 12L14 with fins machined directly into OD. and leaving a .062" wall bore? Make the top fin extra thick so the head bolts have something to thread into and machine a 4 or 6 bolt flange on the bottom to mate with crankcase. This design works well. I have built two 4-strokes, a 9 cylinder Hodgson radial and a 4 cylinder boxer running on glow fuel. Both had 1" bores and strokes were about 0.865" . There were no problems with cooling at full load on a test bench. Might be a tad heavier than a regular sleeve with alum fins, but not much and easier to make. Besides, if you blue the cylinder it looks sharp against polished alum head and rocker boxes.
 
That's a really good idea. I haven't considered that. I definitely will consider that. If I screw up and have to make another block I'll definitely put some time into that, but I think I'm going to keep going with the aluminum cooling fins because I'm half done the block already and I intend to fly it, so weight is a concern. I've already eliminated a crank follower and another bearing from the rear with that goal in mind, to favor of driving a timing belt off of the front half of the crank.

You've also got me thinking about what the minimum thickness should be in order to make the top fin take enough bolt threads to be secure enough in aluminium. If I can do it with the top fin, I wouldn't need to leave a thicker wall in the aluminum block and it would be a simple parting operation once I mount it on a mandrel. Is there a minimum number of threads to keep in mind for aluminum? I've got 4 #6-32 bolts in mind for the head.

Also, while I'm thinking about cooling fins, is there a minimum temperature my cylinder should be reaching? I imagine I should I avoid over-cooling it, but is there an ideal target for a model gasoline engine for performance reasons?
 
Current design iteration. I expect it'll change again until too much cutting has happened. I keep cutting and cutting but it's still too short! ;)

I'll probably round the top corner of the front cover with the cooling fins. Might as well make it flush with the front too.


The piston design is changing. I need a longer skirt and to space the rings out a bit more, and put the oil ring near the bottom.
 
Last edited:
For the amount of screw engagement required, as a rule of thumb, I've always used 1.5 times the screw diameter as a minimum. Of course more is better, but with this you will get a reasonable amount of engagement.

Paul.
 
For the amount of screw engagement required, as a rule of thumb, I've always used 1.5 times the screw diameter as a minimum. Of course more is better, but with this you will get a reasonable amount of engagement.

Paul.


Useful info but ''Born Loser Gus'' been using 3 x d as thread length engagement. Will tune back to 1.5---2 times for aluminum. I have have stripping threads. Possibly due to burrs from sawing fasteners to length and not well deburred. With the Howell V-2,will follow Jerry's thread length requirement.
Just bought Japanese ''SKC'' 6-32 tap which is part of a complete set of taps and dies.
 
Last edited:
Thread engagement is a topic I learned in engineering school all those years ago. Without going deep into the math, the stress on the thread is the cross section of the thread form, not the bolt minor diameter.

When the calculation were done, it was demonstrated that the first three full threads took some 90 percent of the load with the fourth thread having sufficient holding power to break the bolt and not strip the thread.

So there you have it: four full thread engagement.

(But anything more certainly doesn't hurt)

...ved.

Thanks! Was that in steel? I noticed nuts often have only 3 or 4 threads, and now I understand why.
 
Yesterday's progress. Front and rear recesses cut.


Time to run down to the post office and grab the steel for the liner and do a bunch of lathe work on the front bearing holder.

Going to have to start planning out a head soon. 4 valve DOHC, or 2 valve DOHC? I want to use double camshafts so I can easily play with valve timing and get some more familiarity with that. Going to use a 1/4-32 spark plug, but still that's not going to leave much space in a 1" diameter bore. I'm thinking with the air not scaling problems, it might be better to use fewer but larger diameter valves than lots of tiny holes. All I know is it's rare for commercial aircraft engines to have more than two valves, but that could be for economic manufacturing reasons, or weight reasons, or price point reasons.

I'm having trouble searching down resources on that matter, so any comments would be appreciated.
 
Hi Chris,

Gus will watching every move you make. Another engine on my list.

Crankcase/engine block coming to shape. Take your time. You have come so far.


Time to think about the liner a bit more before I start making chips. I might attempt to thin out the middle of the connecting rod a bit so that it won't contact the cylinder liner at all, and I don't need to make that notch. If I make it a round cross section, the notch could be very small and simple. If I don't need to cut that notch, my mandrel to hold the thing gets simpler. I might also be able to get away with just filing some clearance into it. The notch was originally a compromise so that I could keep the total height of the engine as low as I could. 1/4" taller and that problem goes away, but I'm not willing to do that. The piston skirt could also peek out the bottom of the liner a little ways and probably be ok, it's only 0.150 on the cylinder length and only maybe 0.025" into the cylinder wall that I need.

The major trouble is that I can't (or don't want to) really remove the liner to test the fit once I shrink fit it in there. Eliminating a notch eliminates having to position it while rushing to install a shrink fit and then figuring out how to adjust it if I need more clearance later.

The next idea I just had was make a steel connecting rod. Could be significantly thinner. The 7071 connecting rod might be more than strong enough to thin it out some as well.

What are the major stress points on a connecting rod? Are there any other than compression and tension in the center of the rod? Are there any bending forces? I imagine the greatest stress is elongating or pulling open the rod ends.

The #6-32 spiral flute taps come in Friday, so I can always take a break and work on the front and rear cases while I think about that.
 
Last edited:
I encountered some similar issues for this radial design when I detected link rod interference with the liner. Its kind of geometry dependent, but in my case I was able to tweak a few things that collectively got it corrected
- slightly shortened the liner portion that extends/mates the crankcase hole (the excess wasn't doing anything useful beyond the contact area anyway, the piston doesn't run down there)
- chamfered vs notched the liner ID skirt at specific dimension (easier to do in lathe mode)
- slightly reduced the width of link rod & chamfered the corners to accomodate
- plan to make link rod of 7075 aluminum for strength

In terms of the liner fit, my prototype seems to have worked out according to plan. The liner is about 0.0005" interference. To assemble, I put cylinder in 350F oven, liner is room temp. Drops in place & remains firmly in position. That's the easy part. To remove, I pout assembly is same oven, aluminum expands more than steel, liner dropped right out no problem. Also I did not detect appreciable bore change of shrunk liner, but to be safe will do final lap in-situ. The general idea was to be able to replace a liner & not throw away the cylinder portion. Hope this helps (learning myself)

IMG_0423.JPG


1-26-2015 0000.jpg
 
thanks, that's extremely helpful! Similar bore, so I should be able to use your numbers for the shrink fit. I was going to go for 0.0015 over, but maybe that's too much. I like the idea to have it drop out so I can make adjustments later. I've made mistakes in the past that have caused excessive and fatal wear to a cylinder, and this could help minimize rework.

I think like yours, I can do some small cumulative things to deal with it. I can then deal with the connecting rod if there's interference later. It's close enough. The chamfer at the bottom is way smarter than notching!
 
Last edited:
  • Like
Reactions: gus
I use a chunk larger than necessary to do the cylinder liner so that the 3 jaw chuck doesn't distort it any amount that I care about. Grab it in any old chuck,


and pop a bore in it.


Oversize by 0.001". Darn. Not that it matters, I can just make the piston to fit whatever I end up with and it's well within range of my lap. I was hoping warm up my skills before it got more critical but I guess I got impatient. One more skim kit before taking my second-to-last measurement would have pulled it off right. I guess it hit my goal of re-aligning my boring bar expectations...

The liner ID is done (but not lapped, going to do that when it's installed in case it moves a bit when cutting the OD). It has about 0.0005" taper getting narrower towards the headstock, as expected from my lacking one of the two spring cuts I needed before hitting my size and the setup of my lathe. Again, well within the ability of the lap to fix.


And then I spent the rest of the evening making an expanding mandrel that I can operate through the crank case hole when the liner is installed in the cylinder, so I can turn the cooling fins without having to make an additional mandrel to hold it separately from the liner. I'll have to be careful to remember order of operations so I can take a skim on the mandrel to fit the cylinder liner, finish the outside of the liner, install the liner into the cylinder, mount the cylinder and liner back on the mandrel, and turn the cooling fins before removing the mandrel from the lathe.

I'll probably take a break on the liner and make the front and rear cases next, so that I can drill all of the bolt holes in the cases and crankcase at the same time. I don't think I want to be grabbing the cooling fins in the vise in order to do that later, so I'll do that before the cooling fins are formed.

Time to go find a box and some plastic bags. I've got more parts than 1 now, and they're starting to walk around the shop and hide.
 
  • Like
Reactions: gus
Back
Top