Edgar T Westbury's 15cc Petrol 4 cylinder engine - it could be a long post!

Home Model Engine Machinist Forum

Help Support Home Model Engine Machinist Forum:

This site may earn a commission from merchant affiliate links, including eBay, Amazon, and others.

Metal Mickey

Well-Known Member
Joined
Jul 5, 2008
Messages
612
Reaction score
6
Today I started on the building of a 15cc, 4cylinder, petrol engine from a design by Edgar T Westbury. I won't say the design is old but the construction article was published in the British magazine, Model Engineer. In fact it was over 62 years ago!

Having said that, it is a well known design, supported by comprehensive set of castings (available from Hemingway's in the UK http://www.hemingwaykits.com/acatalog/The_Seal___Edgar_T_Westbury.html

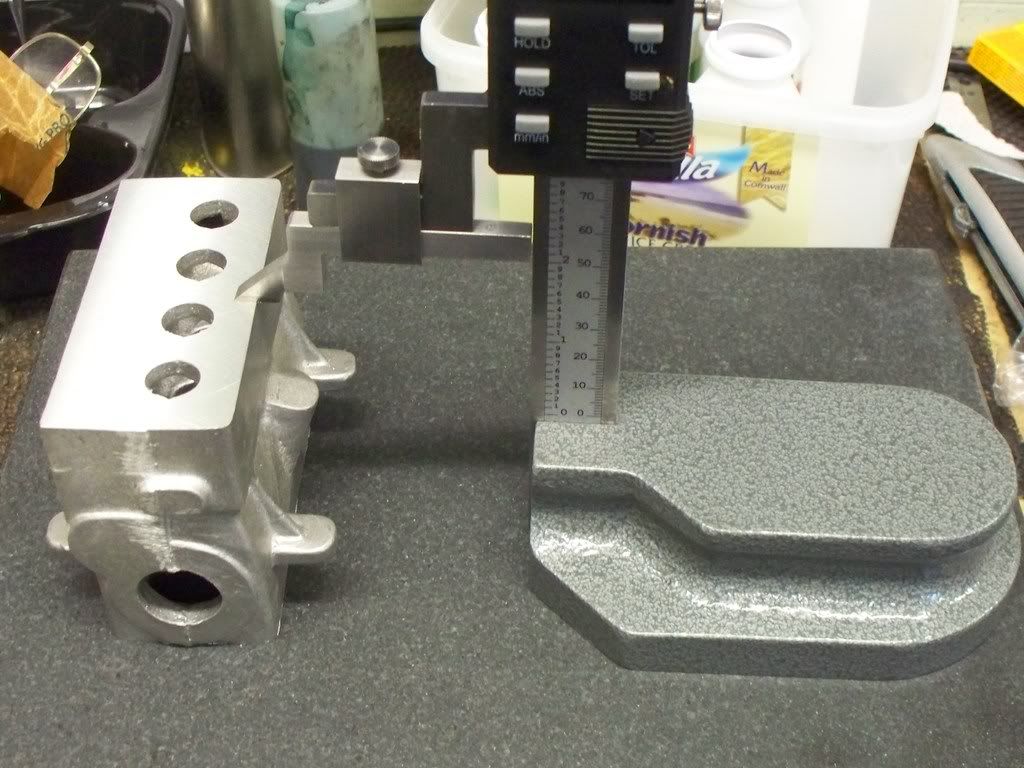
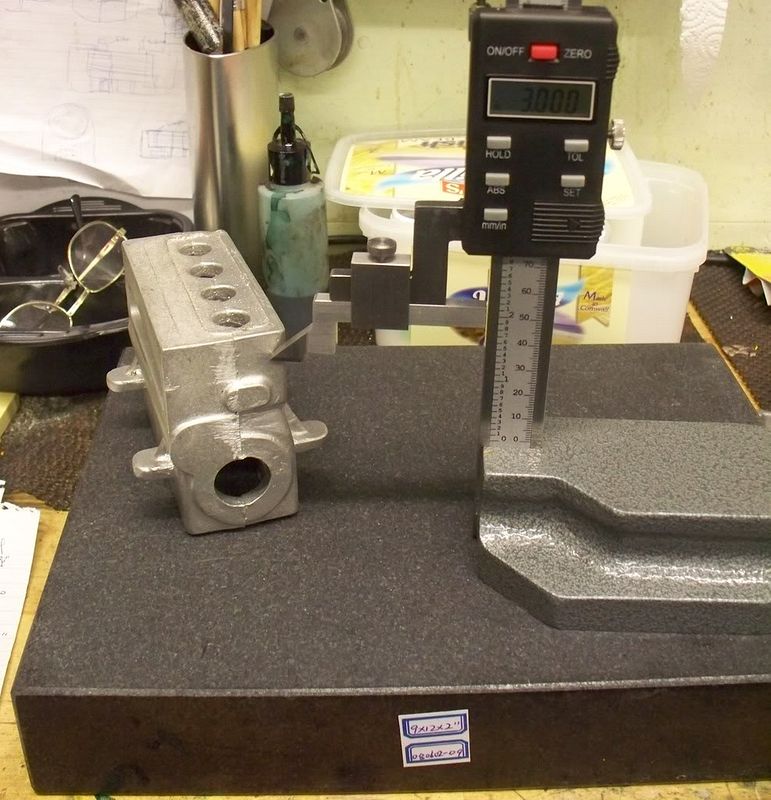
Since I have been a little unwell the total amount of work done today was to laminate the article pages, check castings over to see the tolerances (which are huge!). I also got to use one of my new Christmas presents, a granite surface plate. However I wouldn't call it a real start unless I turned some metal (that's not a true statement in my mind -preparation pays). Also I have been in correspondence with Steve Huck (camshaft fame) so thought that getting the camshaft made would get one large hurdle out of the way now.

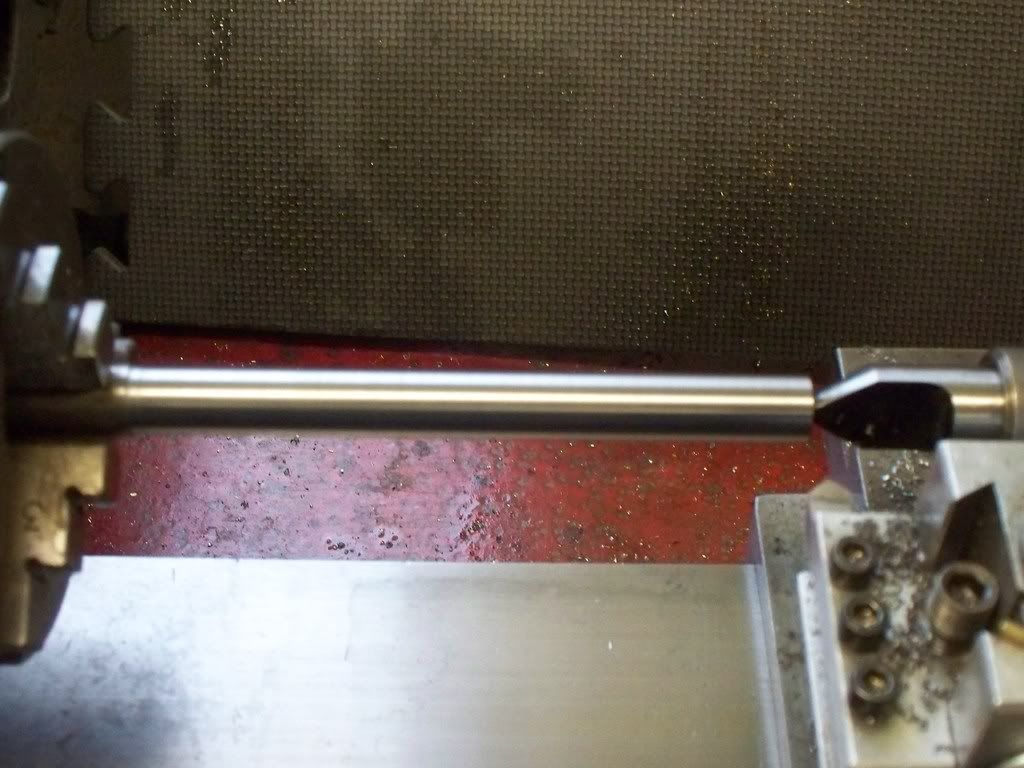
So I turned down a steel bar to 0.500" for 5". Yup, that's as far as I got. I didn't trust myself to play with any castings but I have more than one steel bar. Anyway a couple of photo's are always usefull.........

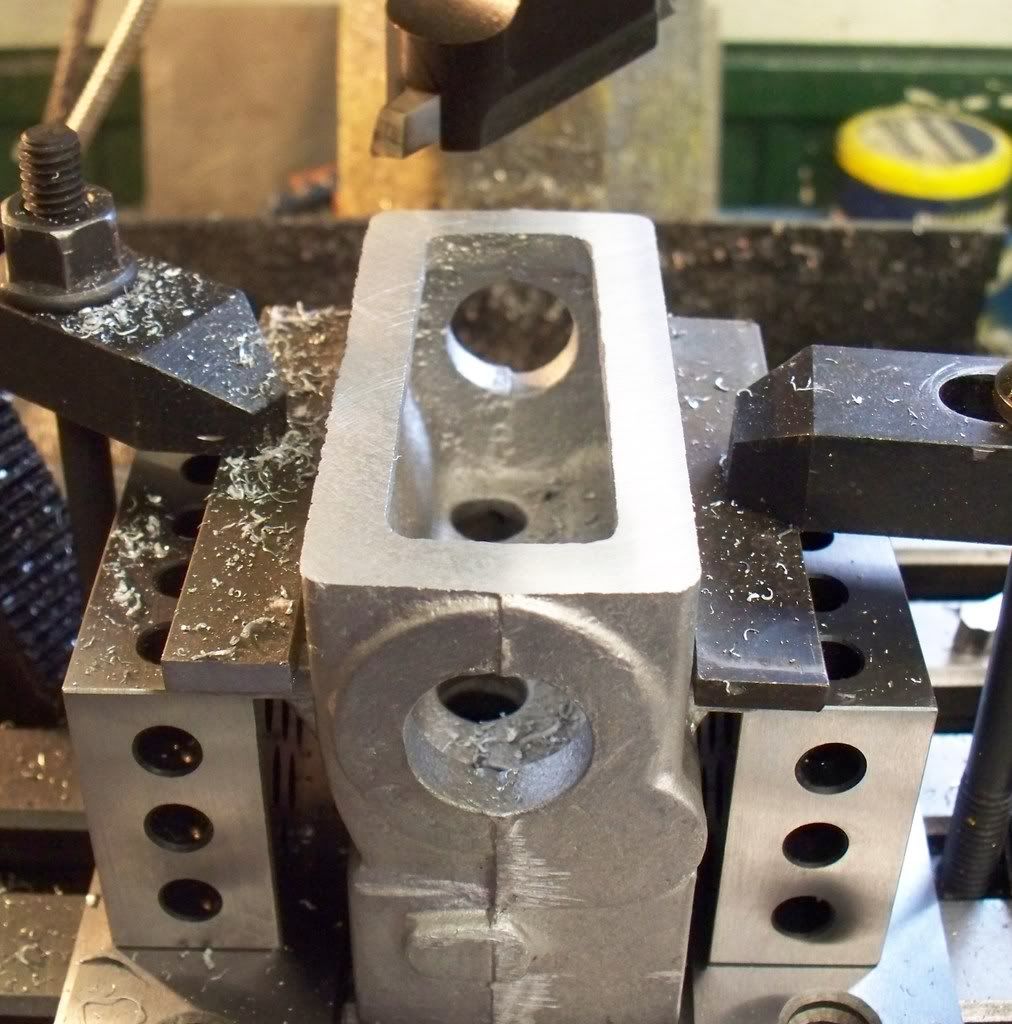
Quite a large tolerance for the head and base cuts......

sealenginebuild03012009006.jpg


The start of the camshaft.........

sealenginebuild03012009012.jpg


However I have a couple of questions to ask of you...........

1) The granite surface plate seems to be scratching, however lightly......is this normal?
2) Would you fly cut the cylinder block on the milling machine or turn it on a face plate on a lathe?

Anyway....its a start.......

 
MM,

Way to go Mickey, perhaps we can do a duet in WIP ??? ???

Best Regards
Bob
 
Metal Mickey said:
So I turned down a steel bar to 0.500" for 5". Yup, that's as far as I got.
The start of the camshaft.........

Just a little heads up before you cut anymore.

1. Make sure you are squared away on the fixture. I had to modify the Shores fixture to make sure it cleared my tooling. That way i could reach all the lobes with my right handed tool.

2. Make sure the tail end has some extra length on it so you can drill a hole in it for the pointer. Then you can part off the extra length after your done.

 
I don't know what it is exactly but there is a product and a need to clean the granite surfaces.

I've cleaned one several times but can't tell you what to use, I'll have to read the MSDS on our granite cleaning product. :D

Kermit
 
Mike,
I don't have a granite surface plate, exactly.
What I do have is a granite floor tile the seems to be pretty flat. There is very little distortion in reflections.
I don't know if it's the right thing to do but I'll put a coat of paste floor wax on the tile and buff it out real well.

I also very lightly lapped the bottom of my surface gage. It's a cheap Chinese knock-off and was full of burrs that had to be removed.

The next thing is make sure the plate and gage are totally and completely clean of any chips or dirt. Even dust can cause scratches.

Hopefully someone will jump in and correct or confirm this before anyone else picks up my bad habits.


Cheers,
Kevin
 
RE: Granite Plate Cleaning

Windex works fine, there is no absorption of the cleaning fluid in the plate and it gets off the fine grit and dust prevalent in a machine shop area. Clean the plate prior to any use of the height Gage or the base will drag those fine particles around and leave scratches.

Try to avoid laying spare tools and bits on the plate because it is handy....

Best Wishes

Chuck M
 
A recommendation from another site was to make the cover pyramid shaped, this will eliminate another flat surface to pile stuff on!

A friend told me that I need to come up with folding workbenches that were light-switch-activated. That way when I left the shop at night and turned off the lights, the benches would automatically fold up and dump everything on the floor...thus clean workbenches the next morning!

Kevin
 
If I may make a suggestion on your planning stage, I would get a flat surface on the block casting that will be repeatable (skim cut if necessary) and lay out any/all hole locations before making any chips from it. Actually, three surfaces to use for references that can wait till the end to be finished.

I had some experience with rough castings before I got into this hobby and thought I knew where I was going; but one engine I have is a result of not doing this. Almost everything is as it should be, but a couple of bosses cast on the side of the engine I neglected to lay out. The holes through these bosses are located from the crank, as they are supposed to be; but are a good bit off center in the boss. If I had done the layout work, I would have seen this and could have moved things around a bit to get a better looking job from it.

After rereading your original question, I like to fly-cut the block surfaces. It makes it easier on me because I'm not dealing with the interrupted cut and the changes in surface speed when facing a large surface. I also think it's an easier setup job on a mill, and easier to see the progress of the cut.

Kevin
 
MM
Have been looking at this engine as a project and would ask if I might pick your brain a little.
1. Have you taken the "full material route",or "the castings only".
2.The parts photo on the hemingway site shows what to me looks like a camshaft blank strapped into a fixture which does not look too dissimilar to the one described recently in the pee wee engine thread,if this is the case how much info is supplied for the cam manufacture?
looking forward to this build, hope it goes well.
ps At my last engineering firm all the granite surface tables were cleaned with "fairy liquid" washing up detergent mixed with water,quite a thin mix if I remember,probably about 10 parts water to 1 of detergent.Not very high tech but worked perfectly.

best regards Steve C.
 
Kevin,

Your points about flycutting rather than facing make good sense, I wouldn't have thought of those.

Nick
 
Maryak said:
MM,

Way to go Mickey, perhaps we can do a duet in WIP ??? ???

Best Regards
Bob

I am going to show my ignorance now and ask what WIP is.....but I will duet with you any time sir!
 
steamdave said:
And make a wooden cover, lined with baize to keep it clean once you have finished using it.

Dave
The Emerald Isle
Hello Dave,

Many thanks, I am fortunate that it came in a ready made box although even with my dislike of wood I will be making a better one as the supplied one comes above the top of the surface plate so it has to be removed. I have some baize so will be taking that tip of yours on board, thanks.

Been to Ireland a few times, both North and South. Love Dublin and the South West coast in particular, though my traveling days are over I still have fond memories of the hospitality the Irish give. Lovely place.
ksouers said:
WIP = Work In Progress

Doh!
 
scoop said:
MM
Have been looking at this engine as a project and would ask if I might pick your brain a little.
1. Have you taken the "full material route",or "the castings only".
2.The parts photo on the Hemingway site shows what to me looks like a camshaft blank strapped into a fixture which does not look too dissimilar to the one described recently in the pee wee engine thread,if this is the case how much info is supplied for the cam manufacture?
looking forward to this build, hope it goes well.
ps At my last engineering firm all the granite surface tables were cleaned with "fairy liquid" washing up detergent mixed with water,quite a thin mix if I remember,probably about 10 parts water to 1 of detergent.Not very high tech but worked perfectly.

best regards Steve C.

Hello Steve, sorry for the delay......

I bought the castings only and from a member of this forum, although he no longer posts here...Bogstandard. If I was buying from Hemingway's I would have gone castings only as I have quite a bit of stock material. I suppose it depends on what material you have already really. I don't know the value for money of buying it all from them or buying separate bits. One advantage would be postage (or shipping for our US cousins) may be less than getting material from many sources.......

Regarding the camshaft question, I am in fact going to be tackling this aspect of the build first. There is an article covering this engines build but it is 62 years ago. It is interesting to read some of the comments about materials because of course this build was only 2 years after World War II and supplies of everything being in short supply. None of this though affects the quality of the design. There is also a good pictorial source of a build by a group of model engineers throughout the World for the Internet Craftsmanship Museumhttp://www.craftsmanshipmuseum.com/sealeng.htm during 2007 so its very current.

I am being helped by Steve who posts here as stevehuckss396. Steve has made a post on this thread as well. He is about to be published in a UK model engineering magazine but you can download a copy of Steve's excellent article from my website mikes-models.com. You can use this direct link if you like http://www.mikes-models.com/camarticle.html and Steve is both friendly and helpful if you decide to have a go. I will be covering the camshaft build on this thread as soon as I am well enough to get into the workshop again. You can email me for further information anytime using this forums email system.

Finally thank you for your advice re granite cleaning. Much appreciated.

 
I'm very much looking forward to watching this build thread, MM, as I want to build a petrol engine myself in the not too distant...

I hope you get well soon.
 
joeby said:
If I may make a suggestion on your planning stage, I would get a flat surface on the block casting that will be repeatable (skim cut if necessary) and lay out any/all hole locations before making any chips from it. Actually, three surfaces to use for references that can wait till the end to be finished.....

.......After rereading your original question, I like to fly-cut the block surfaces. It makes it easier on me because I'm not dealing with the interrupted cut and the changes in surface speed when facing a large surface. I also think it's an easier setup job on a mill, and easier to see the progress of the cut.

Kevin

Hello Kevin, sorry for the delay in replying....Many thanks for the advice. I think your suggestions are excellent and may well go your route. thanks.
 
T70MkIII said:
I'm very much looking forward to watching this build thread, MM, as I want to build a petrol engine myself in the not too distant...

I hope you get well soon.

Many thanks Joeby.

I choose this engine for my first multi cylinder engine as it seems the design has stood the test of time, it is supported by castings and there is information on the net in addition to Edgar T Westbury's article. Also it will be used to power a Fairey Huntsman classic wooden boat being built by my brother (its his first major build as well) so it hopefully will have a purpose (even more pressure to make sure it works and works well!)

Just need to get out to the workshop! ??? Still it gives me chance to catch up on the computer work.......
 
I managed an hour yesterday so decided to attack the main cylinder block. The camshaft has been put on hold thanks to a very kind offer from Steve Huck to produce a cutting chart for me. The chart will be available to any other builder of the Seal in the future as Steve wants the information to be as open as possible. Thanks Steve.

Anyway back to the cylinder block. I decided to mill the top and bottom using a fly cutter, rather than face it on the lathe. It really is interesting to read how model engineers went about things just after the war finished 60 odd years ago. All the comments made are still valid its just the machinery and metals available to us now are significantly more variable.

It must have been very hard to even find metal in those difficult times. We really are fortunate. Imagine what Edgar T Westbury would have made of CNC!

I decided for the clean up to tackle the base first and held the casting away from the milling table by using 1,2,3, blocks.... Once the base was cut the casting was held securely to the milling table and the top surface fly cut as well. None of the milling so far is to measurement. I wanted to check if the two surfaces cut were indeed parallel to each other and using the digital height gauge and new granite surface plate, was pleased to see there was no recordable difference. As the height gauge goes to 0.0000 decimal places (although the last one only register 0 or.5) I was happy enough.

A couple of images should help.......

sealengine06012009003.jpg


sealengine06012009007.jpg
 
Way to go Mike :) :)

Best Regards
Bob
 

Latest posts

Back
Top