D bits

Home Model Engine Machinist Forum

Help Support Home Model Engine Machinist Forum:

This site may earn a commission from merchant affiliate links, including eBay, Amazon, and others.

Gordon

Well-Known Member
Joined
Jan 4, 2011
Messages
1,332
Reaction score
343
This is my week for asking questions of all of the fine experienced folks here. What luck have you had using D bits reamers or drills. Frequently plans call for a reamed hole a few thousands over or under a standard size. In many cases it is is possible to purchase the correct size reamer but it is not too practical for just one or two holes. I have read about others making D bits for this purpose. I have never done it but it would seem to be a good solution if it actually produced accurate holes. I am presently working on a piece where it calls for a flanged bronze bushing of .625 OD pressed into a .620 hole. In this case for me the obvious solution is to ream a .625 hole and make the bushing .630 but it is not always that easy. What has your experience been using D bits to drill and/or to ream to final size? My first thought is that with a half drill it would just get pushed off center.

Gordon
 
Gordon, D bits are easy to make and use but you do need the facility for hardening and tempering , I use silver steel (drill rod) and make counterbores and corner radius tools as well as drill/reamers.
 
I also have made other tooling from drill rod with great success. I have the equipment for hardening. My main question is to accuracy. It would seem like a half drill would tend to be pushed to one side.
 
And to expand on the original question, would a d-drill be a suitable replacement for a gun drill in producing a .310 diameter hole in a workpiece 32 inches long?

I do not have the facilities to utilize a gun drill and need a piece of heavy wall tubing of these dimensions for a project I am contemplating.

Thanks!
John W.
 
So if I were to make a D bit and wanted to make a D bit to drill the .620 hole mentioned above if I made a bit at .620 and just made a plunge cut without a pilot hole what are the chances that I would end up with a .620 dia hole at 1" deep? I may just have to make one and try it out.

My usual heat treat method is to heat the part up to carrot color, plunge in water and then place it in my toaster over for 45 minutes to one hour. So far it has worked well.

Gordon
 
Here are a few I have made over the years, and no, I can't remember what every one was made to do, but I do sometimes regrind the outside of one to do another job.
They are sometimes the only way to get what you need.


Straight D-bits, 6mm bolt for scale.

Dbit01.jpg


Tapered D-bits

Dbit02.jpg


D-bits really need to be treated like a reamer, get most of the material out first, say within 5 to 10 thou, then feed the razor sharp D-bit down the hole, just skimming out the remaining material.

If you have made it correctly and don't have any wobble in your chuck, you will end up with a correctly sized hole. I normally use them held in the tailstock of my lathe.

I hope this is helpfull


John
 
As an addition to John's excellent coverage, might I suggest that you learn to peck at the hole. It soon fills up with swarf /dust and if you are playing about with a 13" hole, it may wander- and pop out the side.

Don't ask-- don't ask, please.

Norm
 
OK I will just give it a try. Thanks for your input. My main question was accuracy and whether they could be treated like a drill bit and just drill a hole or if they were more like a reamer. Blogwitch says reamer and indicates good accuracy so I think I will give it a go just to see what happens.

Gordon
 
Here are a few I have made over the years..
John

That's quite the impressive arsenal! One thing I'm curious about particularly the longish slender tapered ones, do you halve them to final dimension prior to heat treating, or leave some allowance & dress them in a grinder or something after tempering?

I would have thought a shape like those (being so asymmetrical relative to the round shank) warping would have reared its head during quenching. I don't have a purpose quite yet for D-bits, but I'm keen to try making some one day.
 
Peter,

Every one was made in the same way, cut the profile, halve it + 1 or 2 thou, do not deburr, harden it, then flat down the half cut face on an oil stone to remove burrs and to sharpen it up.

In fact, I don't bring the temper down, just leave it hard and I have found they cut just right and don't break, the unhardened shank seems to take up any shock loads and twisting motions and protects the hardened ends.

The long slender ones were not for very deep holes, they were only hardened on the tips, I just most probably couldn't be bothered to shorten them.

I do have a bit of an article somewhere on the web showing how I make them, I will try to root it out for you.


John
 
Gordon, your concern about a D-bit being 'pushed to the side' is not a problem. Suppose, for a moment, the bit is pushed into the space it does not occupy then its diameter would no longer be on the diameter of the job, so it would be obliged to be cutting over size. This would enable it to relax back into line. Being pushed the other way does not seem to happen either. The result is that, in practice, it is self centering and cuts to size pretty well.

If you are concerned abot making your bushes a press fit, a Loctite fit would allow you a bit more latitude.
 
As an addition to John's excellent coverage, might I suggest that you learn to peck at the hole. It soon fills up with swarf /dust and if you are playing about with a 13" hole, it may wander- and pop out the side.

Don't ask-- don't ask, please.

Norm

I had heard that they do indeed load up since there's nothing to carry the swarf out. I had wondered about peck drilling, and even considered using a coolant flow to assist in carrying out the swarf, but with the creation of a rig to pull that off, I might as well just bite the bullet and attempt to build myself a gun drill rig with high pressure oil pump. For a one off job that seems excessive! I guess I'll have to bit the bullet and have someone else drill the hole and I'll do the reaming...

Thanks for the info, and I won't ask about the wandering hole experience!

John W.
Camp Verde, AZ, USA
 
Might I explain how I peck drill? Obviously it is better to remove the poppet in the tailstock and insert a drilled sleeve to take the D bit.
I have drilled 1/8th x13" sort of thing with the D bit part of perhaps 1/2". So with the lathe running and the work held in a fixed steady, it is possible to peck, remove the swarf with a thumb nail- and re-insert and so on.

Well, that is the way that Northumbrian and Irish small bagpipes are made. The full Highland one's and the Half longs are tapered and the normal reamer is a tapered Napoleonic bayonet.

I jest not!

Meantime, I hope this is useful

Norm
 
And to expand on the original question, would a d-drill be a suitable replacement for a gun drill in producing a .310 diameter hole in a workpiece 32 inches long?

I do not have the facilities to utilize a gun drill and need a piece of heavy wall tubing of these dimensions for a project I am contemplating.

Thanks!
John W.

Hi John,

Short answer, yes.

Long version, drill a hole, say 0,250" (6mm diameter) down the barrel first. Then open it out with another drill to say 0.290" (7.30mm) that gives you 0.02" or 20 thou to play with (0.5mm) and go from there. You need to leave room for the rifling as well.

Your drills need to be dead straight and supported properly in line with the barrel.
 
I had heard that they do indeed load up since there's nothing to carry the swarf out. I had wondered about peck drilling, and even considered using a coolant flow to assist in carrying out the swarf, but with the creation of a rig to pull that off, I might as well just bite the bullet and attempt to build myself a gun drill rig with high pressure oil pump. For a one off job that seems excessive! I guess I'll have to bit the bullet and have someone else drill the hole and I'll do the reaming...


Thanks for the info, and I won't ask about the wandering hole experience!


John W.

Camp Verde, AZ, USA


You could always use pressurized air, maybe even a mist coolant. Anything that helps to remove the chips. Of course then you have to be able to drill a deep hole in the tool steel. Pecking is cheap and easy. Further peck drilling is a good habit to develop.
 
Hi,
I've had success making reamers as described in this video by clickspring, the clock guy.
[ame]https://www.youtube.com/watch?v=5rwl-e_KI4U[/ame]
I used silver steel which I hardened without annealing. They are relatively easy to make and use.
Regards,
Alan C.
 
I couldn't find my article on making a D-bit, so I have made up one from my photo archive.

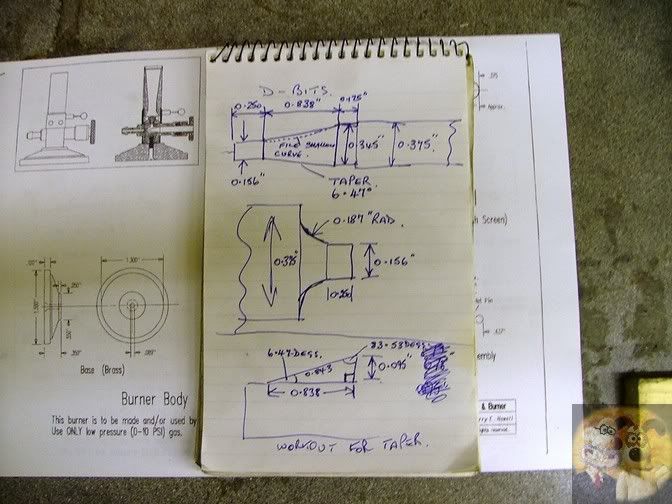
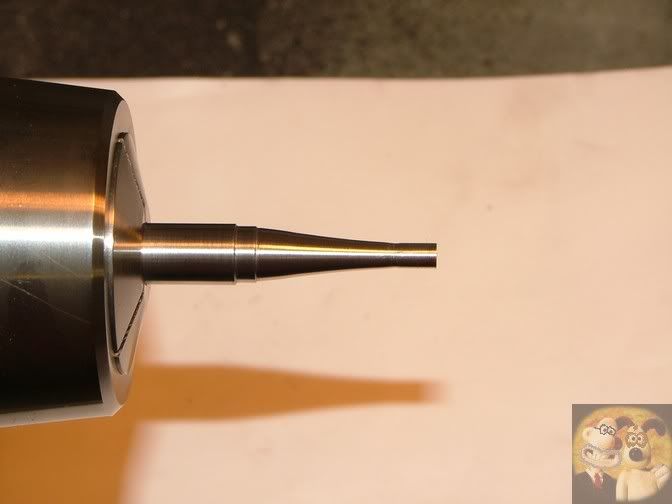
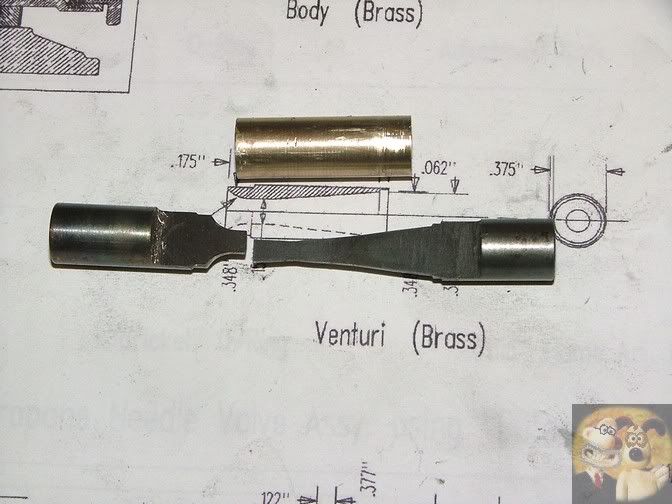
First off I worked out from the drawing what was required to get the correct shapes at either end of the venturi. Part on the upper left next to the notepad.

Bunsen02.jpg


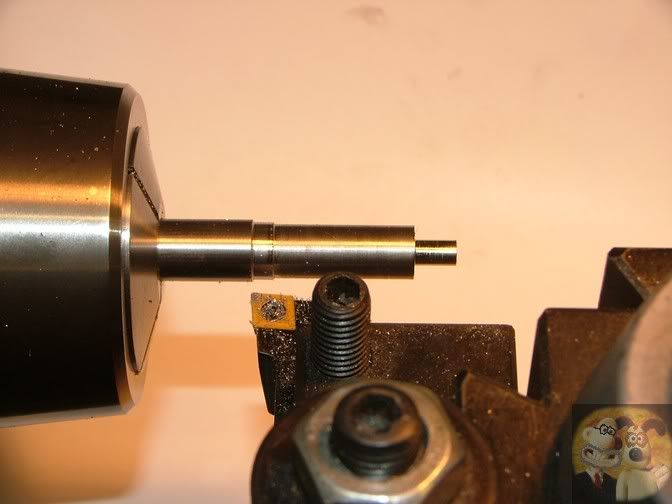
A piece of the correct diameter silver steel mounted into chuck.

Bunsen14.jpg


The front and rear profile turned up either end of where the taper will be.

Bunsen17.jpg


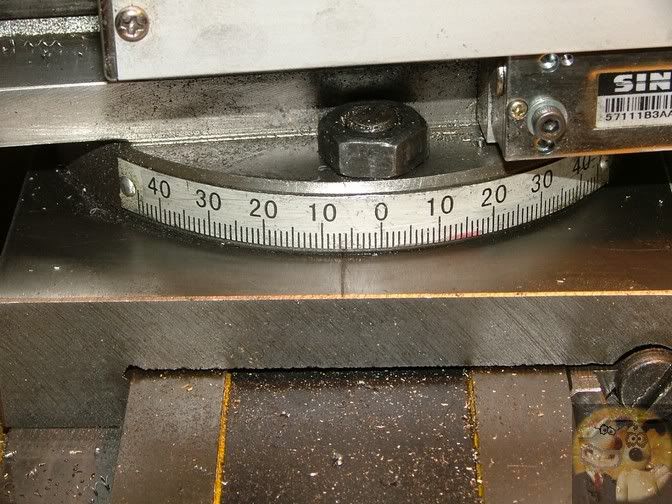
Topslide set over to the correct angle.

Bunsen18.jpg


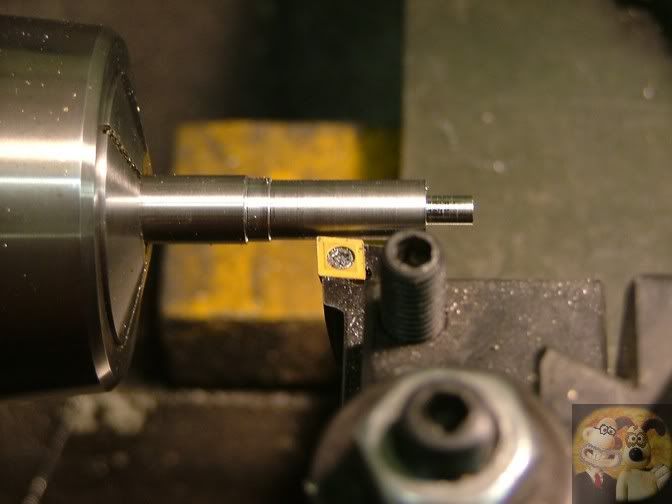
Starting to cut the angle between the two end diameters.

Bunsen19.jpg


Bunsen20.jpg


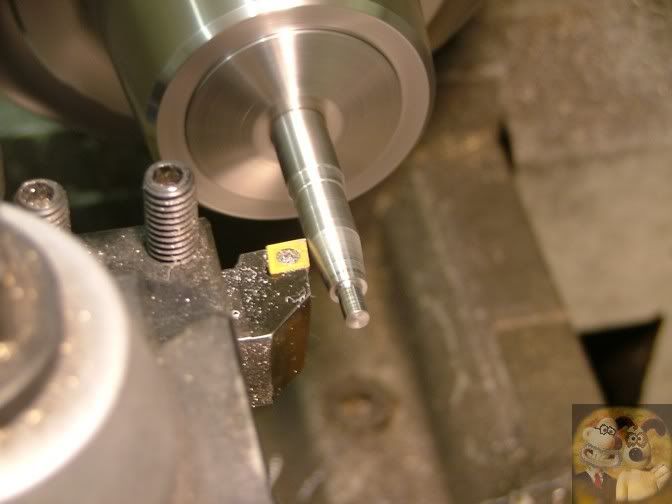
Finished angle after filing on a slight curve and polishing with emery and wire wool.

Bunsen24.jpg


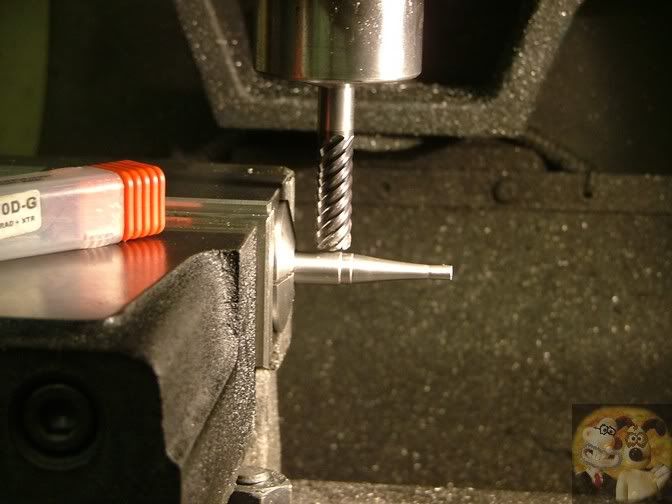
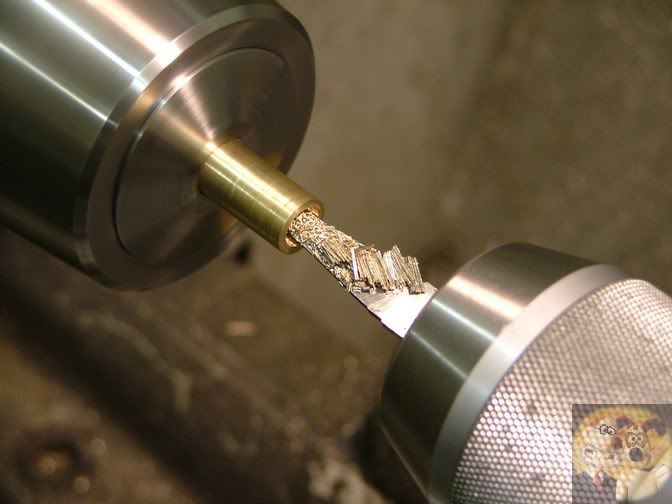
Now transfered onto the mill to start the cutting down to halfway + 1 or 2 thou. Notice that I am cutting into the original size of silver steel, this is where I am going to take my measurements from.

Bunsen25.jpg


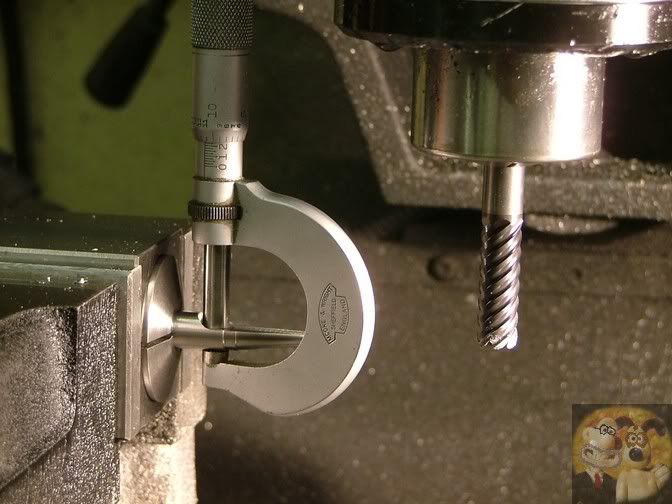
Measuring up, half the original diameter plus a bit.

Bunsen26.jpg


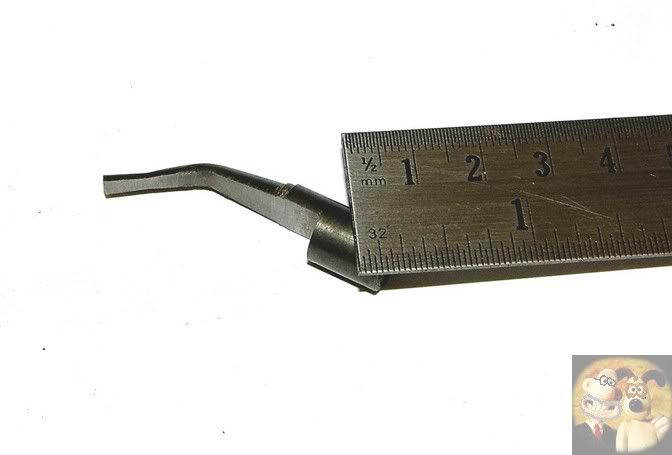
Notice that I haven't removed the burrs, if you do that, you are liable to round over the cutting edges and the D-bit won't cut. Disregard the mic readings as these were just set up to show where to measure it.

Bunsen27.jpg


Heat up the bit and hold it there for at least a couple of minutes, then quench. It should end up rock hard.

Bunsen28.jpg


Now onto an oil stone or W&D paper and gently flat down the cut face. You should be able to remove very little material and still retain a thou or two oversize. This should enable you to resharpen a few times if it goes a little dull without going below the half measurement.

Bunsen30.jpg


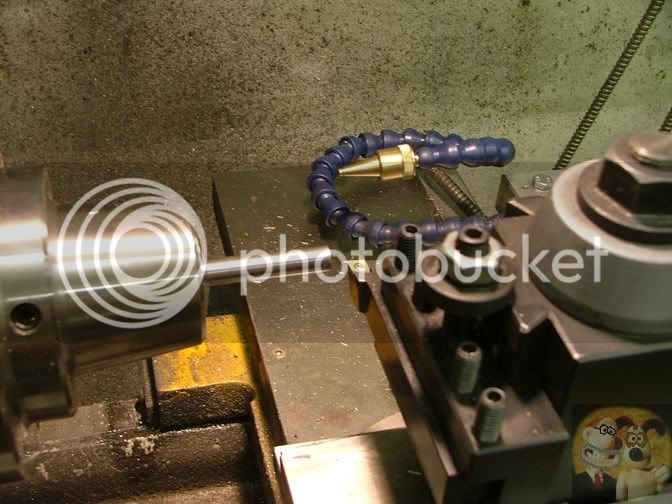
The two cutters made to allow me to make the venturi.

Bunsen05.jpg


Cutter in action. Because it can't get it's own swarf away, you peck at the job, cleaning off the swarf as you go deeper. See how nicely it shaves the material out if you have made the D-bit correctly. If it doesn't cut this well, there is something wrong.

Bunsen31.jpg


Unlike this one, which I completed then found that my supplier had slipped a bit of the wrong stuff into my silver steel order. It cut on the lathe like the right material, but it wouldn't harden,

Bunsen11.jpg


D-bits are a method of getting precision holes bored without resorting to special sized or specially ground reamers. At times they can be the only way out of a sticky situation.

I forgot to mention, these two bits followed a previously drilled hole so didn't need to cut on the very front tip. If that is needed, then the front edge needs to have a cutting rake ground onto the very tip of about 5 degrees.

I hope this helps


John
 
Last edited:

Latest posts

Back
Top