Collet chuck and backplate

Home Model Engine Machinist Forum

Help Support Home Model Engine Machinist Forum:

This site may earn a commission from merchant affiliate links, including eBay, Amazon, and others.

kevincoxshall

Member
Joined
Feb 20, 2010
Messages
21
Reaction score
0
Hi all,
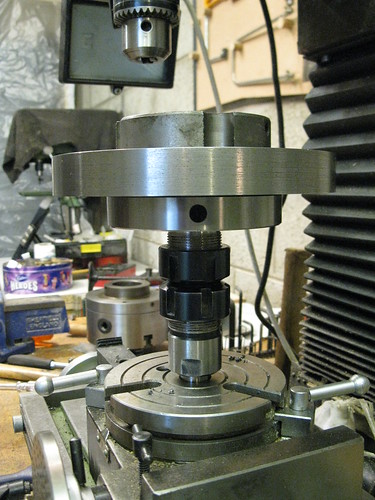
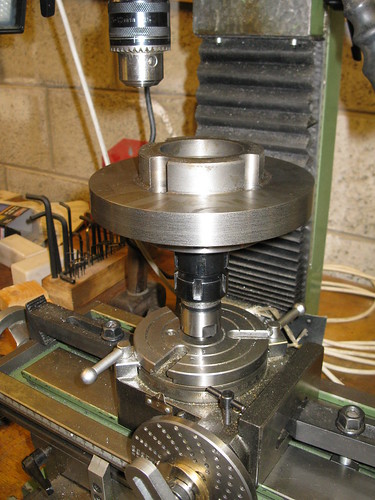
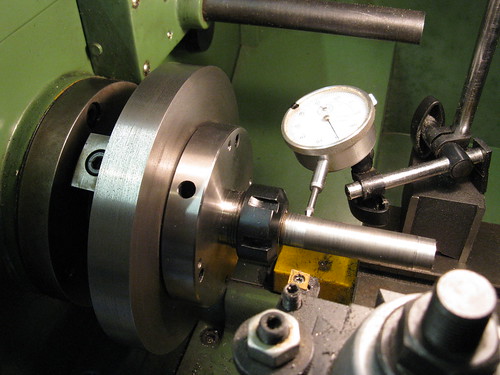
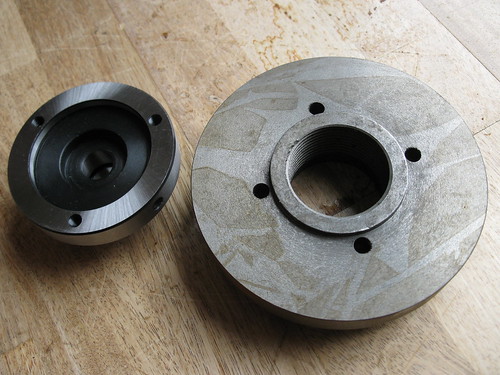
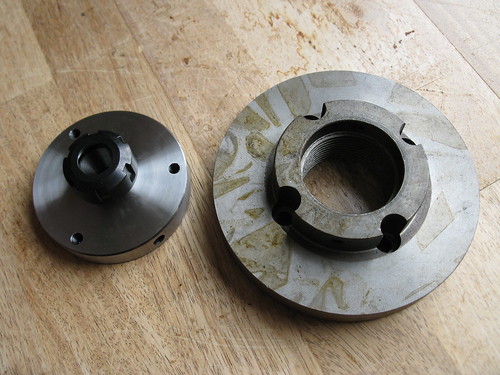
I have just purchased an ER25 collet chuck and backplate for my lathe. The chuck has 3 tapped holes and the backplate has 4 clear holes. I can't easily drill more holes in the back plate so are there any suggestions how to fix the 2 items together?

I have thought about an intermediate plate between the 2 items.

Are there any other ideas............

7527425190_0c8d68cfd6.jpg
[/url][/img]
7527412680_76399114c7.jpg
[/url]
[/img]
 
You should use your idea of an intermediate plate between the two.

Fix the interplate onto your backplate with the four screws (only penetrating in say 4 threads), then machine up the interplate from the front with the backplate attached to your lathe, that way everything will be perfectly concentric, and then machine on the front your location spigot.

Fit your collet chuck from the front onto the interplate with three screws, penetrating say 4 or 5 threads.

If you use metric (say 6mm), then the plate would only need to be about 10mm thick plus your spigot length to accommodate the two sets of screws coming in nose to nose.

John
 
Make sure the spigot on the backplate is concentric before you do anything else, then as John says I reckon.
 
I'm busy making an ER32 collet chuck mount exactly like yours. The original MT3 mount stick out way too far and limits barstock use.

I'm going to give the back register diameter and face a final "tickle" by mounting it reversed on to a pre-turned shaft to gaurentee the concentricity.

Ken
 
John I follow your interplate method up to a point. But doesn't the ER 32 Collet Chuck need clearance holes instead of tapped holes to mount it to the front of the interplate?

Brian
 
Brian,

I didn't realise that the collet chuck itself was threaded.

Most of these items are not hardened to such an extent that you can't drill them out. A tiny file test should prove that. You could even counterbore slightly on the front if there is enough meat available.

On anything that I fit to my backplates, I always go up half a size on the clearance holes, so if they are 6mm bolts, I will use 6.5mm holes. That ensures that it is the chuck register that is doing the centring, not the bolts.

I suppose you could try, if you didn't want to cut out the threads, to see if you could fit the screws in from the back of the interplate, missing the four chuck backplate holes. But you would then definitely need to counterbore to get the bolt heads flush.


John
 
John

If that's a arc chuck them things are hard /tough you name it, took a skim off the dia of mine to tidy things up ( because I wanted the whole set up slim ) at 100 rpm with a light cut with carbide the chips where blue/purple along with sparks to boot .


I would not like to drill out the thread on mine but the OP milage may vary ( I have enough drill that are 'K ' for no good ) trying to drill thing that I should not them be no good when they have gone blue


Stuart

 
Myself I can't see why you "can't easily" drill and counter bore new holes in the backplate, its easy enough to fit 3 holes between the existing 4. or if the PCD is correct use one of teh existing and just two new ones but the hole opposite the used one may need plugging to maintain balance.

J
 
Thanks for all the replies.

In the end I machined the backplate in the lathe.....

then I drilled 4 new holes to take m6 threads into the chuck using the backplate on top to line everything up for the first hole only. I rotated the table for the other 3 holes. I believe the chuck is hardened but with cobalt drills and a steady feed it drilled fine. Tapping the threads however was not so easy. It took the taper, second then plug tap to get only 4 full threads. I used HSS taps as I couldn't justify anything fancier.

7544942460_068d2a26e9.jpg
[/url]
7544956012_d36b8ee723.jpg
[/url]

Then for testing.......
I put the clock on the inside of the chuck and saw 0.15mm runout - not good. So I loosened the securing nuts on the chuck, gave them a tap in the right direction, tightened everything and now the runout is about 0.01mm which I am happy with.

7544967474_d75bd16707.jpg
[/url]
7544928204_3a5b44937b.jpg
[/url]
With a test piece the runout was 0.02mm after replacement and I am happy with this.

Thanks for looking.

PS is there such a thing as a chuck key for this chuck? I guess the 3 radial holes on the chuck are for this purpose.
 
Congratulations Kevin in achieving 0.01mm runout. Did you need to machine the spigot in the backplate? Do you have to keep the backplate and collet chuck bolted together to maintain the runout or is it easily setup again after separation?

Brian
 
PS is there such a thing as a chuck key for this chuck? I guess the 3 radial holes on the chuck are for this purpose.

a rod of the appropriate diameter will do.
I've added an handle to it the second or third time I've realized I had mistakenly put the 'key' into the collet.

Marcello
 
Runner said:
Congratulations Kevin in achieving 0.01mm runout. Did you need to machine the spigot in the backplate? Do you have to keep the backplate and collet chuck bolted together to maintain the runout or is it easily setup again after separation?

Brian

Hi Brian
The backplate came with a spigot but I had to machine it down to size with a small undercut. I always planned on keeping the 2 items together, but as there is hardly any movement between them, it would be a quick job to re-align if needed.

mzt said:
a rod of the appropriate diameter will do.
I've added an handle to it the second or third time I've realized I had mistakenly put the 'key' into the collet.

Marcello
Marcello thanks for confirming my suspicions, I'll add a handle to the project list.

Regards

Kevin
 

Latest posts

Back
Top