
You are using an out of date browser. It may not display this or other websites correctly.
You should upgrade or use an alternative browser.
You should upgrade or use an alternative browser.
Building a 56mm boring head
- Thread starter arnoldb
- Start date


Help Support Home Model Engine Machinist Forum:
This site may earn a commission from merchant affiliate
links, including eBay, Amazon, and others.
Turning down a little piece the root dia (if that's the right word) is a good idea,
As i can't cut threads on my machine and the biggest thread I've ever done is 6mm
using a split die in the tail stock withe the die screwed fully open for the first pass it wouldn't be any hard ship to incorporate this as well as testing with a nut.
Thanks Arnold
Who said you cant teach a old dog new tricks.
arnoldb
Well-Known Member
- Joined
- Apr 8, 2009
- Messages
- 1,792
- Reaction score
- 12
Thanks Dean ") - Now that you mention it, id does look like Caterpillar yellow... But its not from a CAT - the engineering company where I got it buys full lengths of steel rod in this diameter; apparently they use quite a bit of it. The storeman there gave it to me for free when I bought some other stock ;D
- Now that you mention it, id does look like Caterpillar yellow... But its not from a CAT - the engineering company where I got it buys full lengths of steel rod in this diameter; apparently they use quite a bit of it. The storeman there gave it to me for free when I bought some other stock ;D
Stew, Thank you
Thanks Steve A short section turned down to root diameter will also help a die to start nice and square and thus prevent a drunken thread.
Today's little bit...
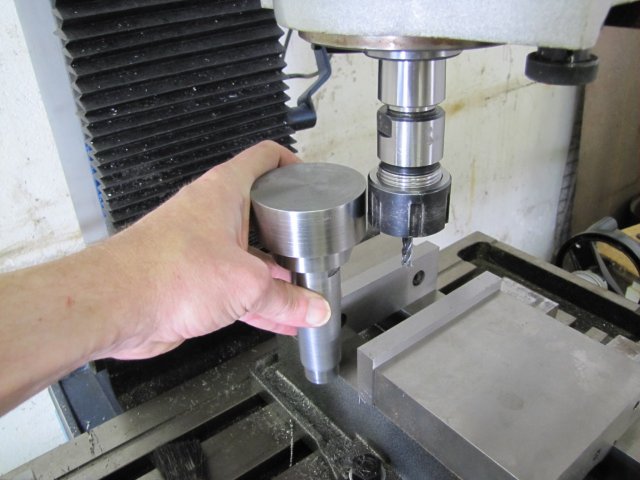
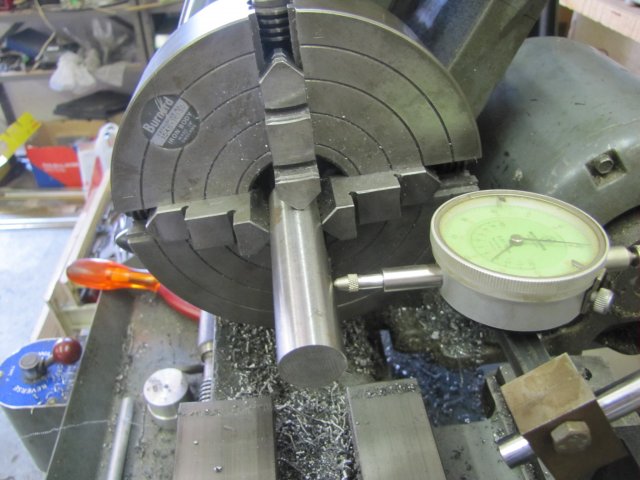
I first bored out the hole to the 22.4mm root diameter I needed, and also squared up back face to remove the taper left from drilling:
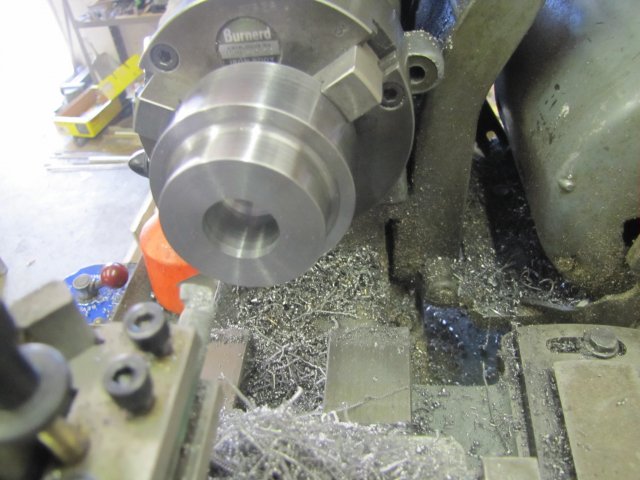
(Sorry; fuzzy photo)
Next I needed a way to make a thread run-out groove in the hole as close as possible to the back face. No bits in my collection for that... So I started with this:
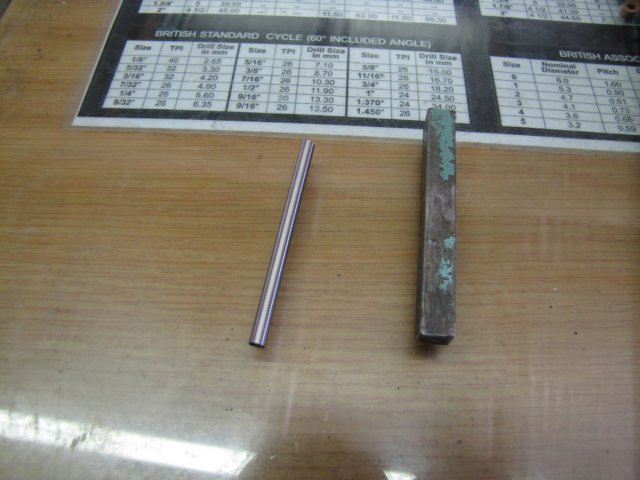
A bit of round 4mm HSS and a shank from an old carbide tipped tool.
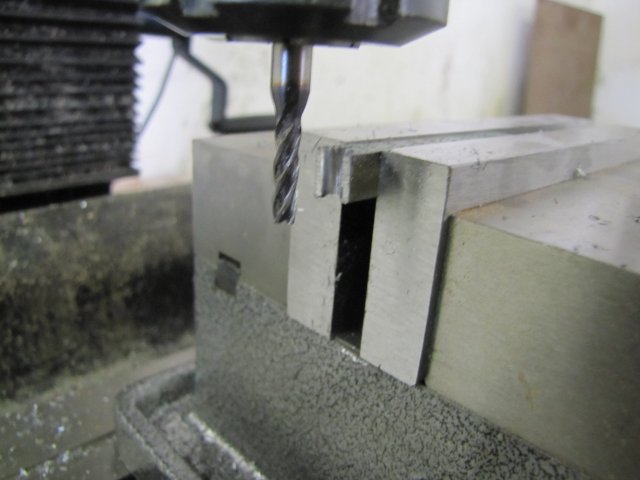
I milled a 4mm slot into the end of the shank:
I needed a short section of the HSS so I cut part-way through at a suitable length with the dremel and a cutoff disc:

Then with a pair of pliers snapped off the bit. If you try this method for snapping off HSS, remember to wear your safety glasses! - the HSS breaks like glass ad bits can go flying.
Assembled and fluxed with a bit of silver brazing rod lying at the ready:
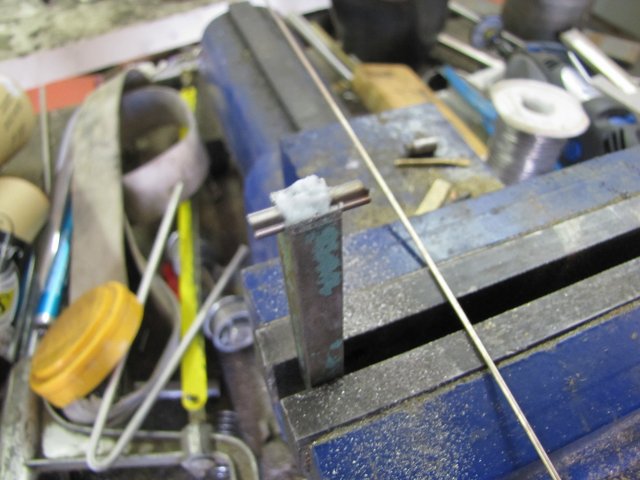
I used a butane torch to heat up the assembly just below the HSS bit. After the flux flowed and things got nice and cherry red, a dab with the silver braze stick and job done; took all of 30 seconds. All brazed up and cooling down:
I've found that HSS brazed up like this works just fine afterwards even though it was heated so high.
A quick trip to the bench grinder, and I had a parting side and a threading side oriented upside-down from each other but on the same center line. The threading side was also ground to be nice and square to the shank. I'm lazy It's not a pretty tool though - but functional:
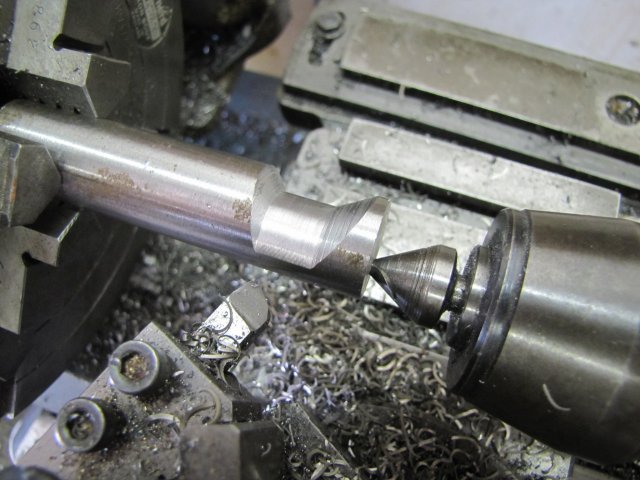
I then mounted the toolbit on the lathe, with the parting side facing the front of the lathe and on center height. With the lathe in middle back gear speed, I turned in the groove at the back; barely visible in this photo:
Next I turned the thread. I prefer to do internal threading with the threading tool upside down and on the back face of the workpiece. So no need to re-set the cutter or anything - the way I made it everything was already set up to do just that. As I told you, I'm lazy ;D:
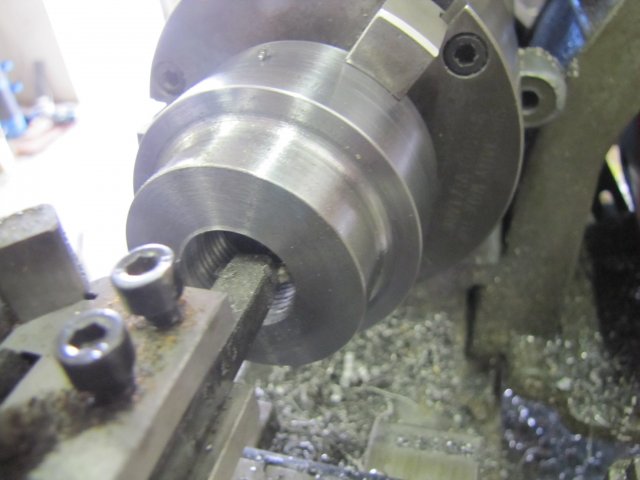
As there was not a lot of space to stop before crashing the toolbit into the back of the workpiece, I settled on using the same number on the thread indicator for each pass. A manual test to take the reading on the leadscrew handle at the point of touch, and I had a reference for the threading passes; stopping each threading pass a couple of thou short as indicated on the leadscrew handle.
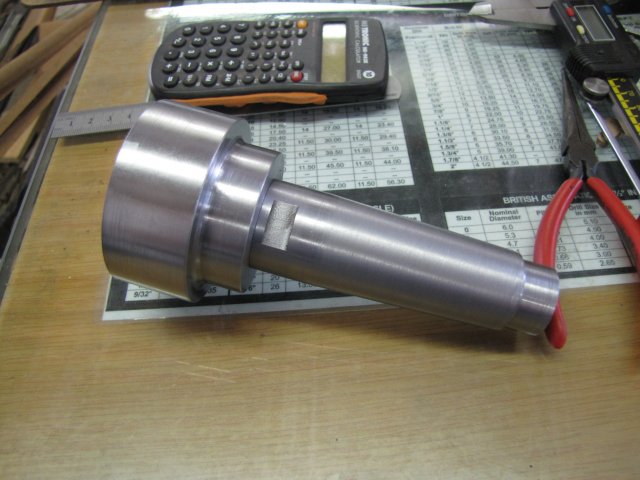
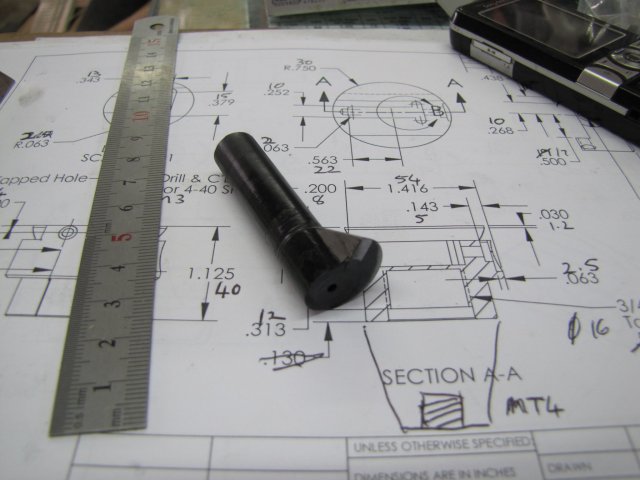
Finished - and ready for some milling to commence:
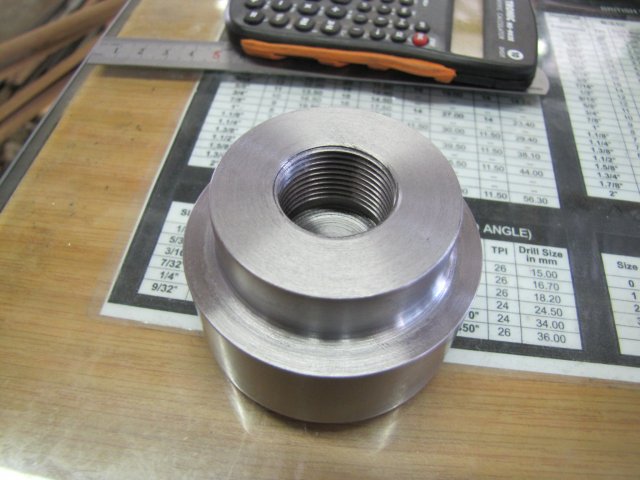
And the arbor screws in very nicely; smoothly but with no play at all in the threads:
Thant's me done in the shop for a while; this coming week I have to attend to other matters in the evenings, so most likely I'll only carry on next Saturday.
Regards, Arnold
- Now that you mention it, id does look like Caterpillar yellow... But its not from a CAT - the engineering company where I got it buys full lengths of steel rod in this diameter; apparently they use quite a bit of it. The storeman there gave it to me for free when I bought some other stock ;DStew, Thank you
Thanks Steve
A short section turned down to root diameter will also help a die to start nice and square and thus prevent a drunken thread.Today's little bit...
I first bored out the hole to the 22.4mm root diameter I needed, and also squared up back face to remove the taper left from drilling:
(Sorry; fuzzy photo)
Next I needed a way to make a thread run-out groove in the hole as close as possible to the back face. No bits in my collection for that... So I started with this:
A bit of round 4mm HSS and a shank from an old carbide tipped tool.
I milled a 4mm slot into the end of the shank:
I needed a short section of the HSS so I cut part-way through at a suitable length with the dremel and a cutoff disc:
Then with a pair of pliers snapped off the bit. If you try this method for snapping off HSS, remember to wear your safety glasses! - the HSS breaks like glass ad bits can go flying.
Assembled and fluxed with a bit of silver brazing rod lying at the ready:
I used a butane torch to heat up the assembly just below the HSS bit. After the flux flowed and things got nice and cherry red, a dab with the silver braze stick and job done; took all of 30 seconds. All brazed up and cooling down:
I've found that HSS brazed up like this works just fine afterwards even though it was heated so high.
A quick trip to the bench grinder, and I had a parting side and a threading side oriented upside-down from each other but on the same center line. The threading side was also ground to be nice and square to the shank. I'm lazy
It's not a pretty tool though - but functional:
I then mounted the toolbit on the lathe, with the parting side facing the front of the lathe and on center height. With the lathe in middle back gear speed, I turned in the groove at the back; barely visible in this photo:
Next I turned the thread. I prefer to do internal threading with the threading tool upside down and on the back face of the workpiece. So no need to re-set the cutter or anything - the way I made it everything was already set up to do just that. As I told you, I'm lazy ;D:
As there was not a lot of space to stop before crashing the toolbit into the back of the workpiece, I settled on using the same number on the thread indicator for each pass. A manual test to take the reading on the leadscrew handle at the point of touch, and I had a reference for the threading passes; stopping each threading pass a couple of thou short as indicated on the leadscrew handle.
Finished - and ready for some milling to commence:
And the arbor screws in very nicely; smoothly but with no play at all in the threads
:
Thant's me done in the shop for a while; this coming week I have to attend to other matters in the evenings, so most likely I'll only carry on next Saturday.
Regards, Arnold
- Joined
- Jun 4, 2008
- Messages
- 3,285
- Reaction score
- 630
Looks good. But I'm wondering why the arbor and head couldn't just be one piece rather than screwed together.
deere_x475guy
Well-Known Member
Arnold, thanks for taking the time to post your build on this and nice job of the threading tool. :bow:
As I told you, I'm lazy ;D
Not in my book, my friend. You're using the ol' noodle.
Besides, lazy people don't do this kind of stuff.
Thanks for showing the cutter making process. I learn something every day, (if I'm
paying attention). You're way is a lot better than me trying to file a square hole in
a boring bar! I can see how it would easily work for square bits, too.
It's all looking good, Arnold!
Dean
arnoldb
Well-Known Member
- Joined
- Apr 8, 2009
- Messages
- 1,792
- Reaction score
- 12
Thanks kvom - One could make it as one piece, but there is quite a bit of milling work to do on the face, and having it as one piece would make for some awkward work-holding moments. And I'm a cheapskate as well; can't stand to see too much good metal turned to swarf unless its absolutely necessary
Thanks very much Bob ;D
Dean, Thank you ;D; I'm glad you like the method; I can't recall where I got the idea from though.
Kind regards, Arnold
- One could make it as one piece, but there is quite a bit of milling work to do on the face, and having it as one piece would make for some awkward work-holding moments. And I'm a cheapskate as well; can't stand to see too much good metal turned to swarf unless its absolutely necessary Thanks very much Bob ;D
Dean, Thank you ;D; I'm glad you like the method; I can't recall where I got the idea from though.
Kind regards, Arnold
Hi Arnold, thanks for the info on how you did the internal threading, now I see how I should have done it! a light bulb on moment for me :idea:
I've only made one internal thread to date, a fine thread for an OS 91 FS aero engine exhaust extension. I used an upside down tool, ran the lathe backwards but rather than make an undercut first I just fired up the lathe wound in the full cut and then started the auto feed. On this ocassion it worked out fine but I knew the method was clunky.
I like your tooling too, means you can get the thread very close to the blind end of the hole.
BTW what RPM did you use to cut the thread.
Nick
arnoldb
Well-Known Member
- Joined
- Apr 8, 2009
- Messages
- 1,792
- Reaction score
- 12
Thanks Nick ;D - Yes, if you can do a full cut in one go, there's nothing wrong with your way of doing it. And if you can run in reverse to get the tool coming out of the hole like you did, that's even easier. For deeper threads, you can use that very effectively if you make the undercut Thm: I don't do reverse cuts on my lathe, as the chucks screw on; it can be done but I'd prefer not to have a chuck unscrew while working. I quickly had to look up the speed; 62 RPM; not fast at all. If you search HMEM, Rick (Rake60) had a video somewhere where he demonstrated some threading - at speed!
Thanks for checking in Florian. Yes, raw material pieces could be welded (or brazed) together. In my next update you'll hopefully be able to see why it is easier to make the arbor and head base in two pieces. One could of course machine both pieces and then weld/braze together, but that could potentially lead to distortion or warping because of the heat, and could render the tool less-than-satisfactory. Another option (if you don't want to turn threads) would be to make both pieces - and where I turned the threads just make a light press fit, press both together, and then pin them together with a steel cross-pin. I wouldn't recommend doing that without the pinning nor by using grub (set) screws or Loctite - the boring head will be rotating in use - in many cases unbalanced - and it could be quite dangerous if it came off the arbor during use.
Kind regards, Arnold
Thanks for checking in Florian
. Yes, raw material pieces could be welded (or brazed) together. In my next update you'll hopefully be able to see why it is easier to make the arbor and head base in two pieces. One could of course machine both pieces and then weld/braze together, but that could potentially lead to distortion or warping because of the heat, and could render the tool less-than-satisfactory. Another option (if you don't want to turn threads) would be to make both pieces - and where I turned the threads just make a light press fit, press both together, and then pin them together with a steel cross-pin. I wouldn't recommend doing that without the pinning nor by using grub (set) screws or Loctite - the boring head will be rotating in use - in many cases unbalanced - and it could be quite dangerous if it came off the arbor during use.Kind regards, Arnold
arnoldb
Well-Known Member
- Joined
- Apr 8, 2009
- Messages
- 1,792
- Reaction score
- 12
A bit of a quiet week in the shop...
Grabbed an hour or so today though. At least I had a luxury in the shop; my grandparents are visiting from the RSA, and my grandfather volunteered to be the "lubrication system" - standing to one side of the mill with the squirt bottle while I cranked the mill ;D
First, I milled two identical opposed flats on the threaded side of the base:
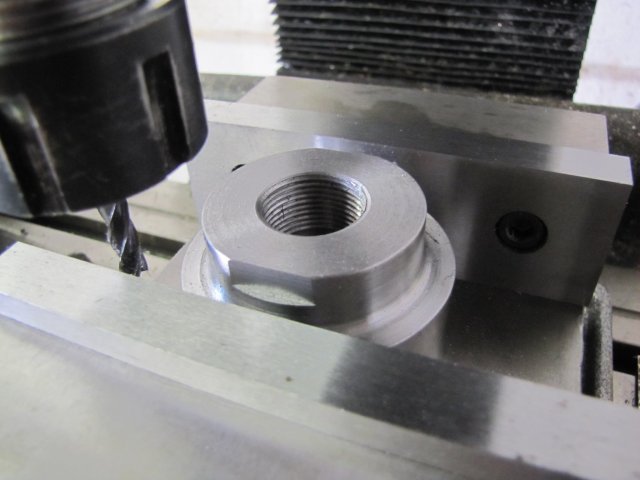
I remembered about the questions of making the arbor and base as one part - the next photo shows why it would be difficult to clamp the workpiece and mill on the face:
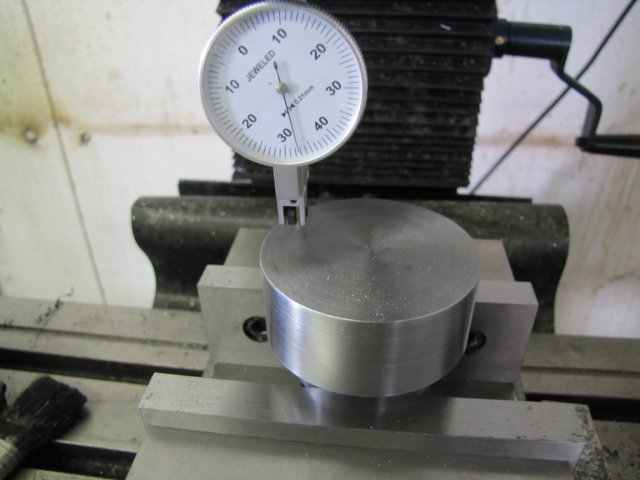
With the base clamped on the flats I milled earlier, I did a quick check on both X and Y to check that it was sitting flat using a DTI:
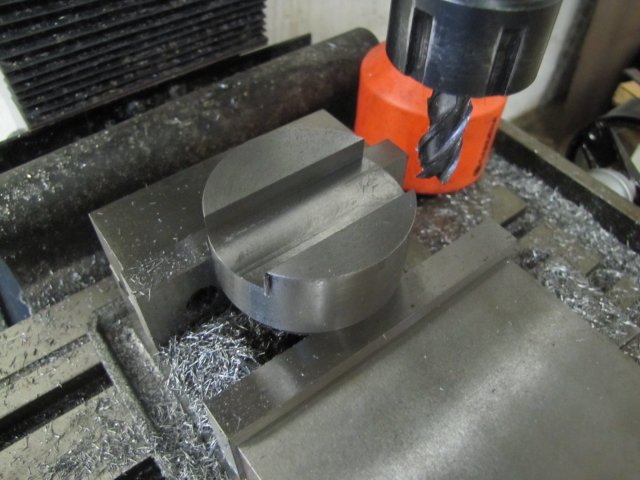
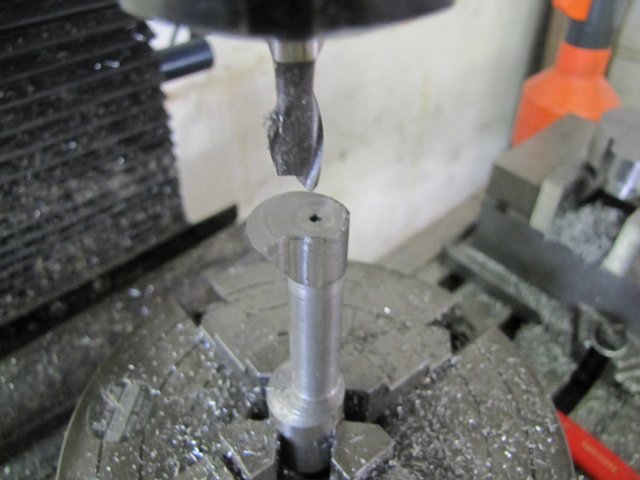
Then I started milling out the center of the piece with a 14mm end mill - with Gramps operating the squeeze bottle and a brush to brush chips away. There was a brown-pants moment when the cutter dug in (not the cutter's fault - mine; greedy pig that I am!) and pulled slightly from the collet. Fortunately, it also slipped in the collet then, and I was able to hit the stop without any damage except for an unsightly mark at the one end of the slot. Fortunately that will still be removed when finishing and I was able to pick up all the necessary measurements to continue:
I called it a day there; I doubt if there will be much updates in the coming days, as I'm spending some quality time with my family.
Regards, Arnold
Grabbed an hour or so today though. At least I had a luxury in the shop; my grandparents are visiting from the RSA, and my grandfather volunteered to be the "lubrication system" - standing to one side of the mill with the squirt bottle while I cranked the mill ;D
First, I milled two identical opposed flats on the threaded side of the base:
I remembered about the questions of making the arbor and base as one part - the next photo shows why it would be difficult to clamp the workpiece and mill on the face:
With the base clamped on the flats I milled earlier, I did a quick check on both X and Y to check that it was sitting flat using a DTI:
Then I started milling out the center of the piece with a 14mm end mill - with Gramps operating the squeeze bottle and a brush to brush chips away. There was a brown-pants moment when the cutter dug in (not the cutter's fault - mine; greedy pig that I am!) and pulled slightly from the collet. Fortunately, it also slipped in the collet then, and I was able to hit the stop without any damage except for an unsightly mark at the one end of the slot. Fortunately that will still be removed when finishing and I was able to pick up all the necessary measurements to continue:
I called it a day there; I doubt if there will be much updates in the coming days, as I'm spending some quality time with my family.
Regards, Arnold
zeeprogrammer
Well-Known Member
- Joined
- Mar 14, 2009
- Messages
- 3,362
- Reaction score
- 13
arnoldb said:(No guesses as to my second-to-build locomotive's name!)
Aha! A second-to-build locomotive! When!? What kind? What size? Tell me, tell me.
arnoldb
Well-Known Member
- Joined
- Apr 8, 2009
- Messages
- 1,792
- Reaction score
- 12
I managed a bit of time in the shop today
First off, I needed a way to cut the dovetail on the head. I priced some dovetail cutters locally here in Windhoek, and after recovering from the ridiculous prices wanted, I had an option - order from overseas for 1/5th of the price (and wait 6 weeks for delivery) or make my own.
It was worth a try to make my own - so I thought a bit. I could have gone for HSS and spent a lot of time trying to grind an accurate cutter... OR - I could get back to basics and do it the really old fashioned way - with silver steel. I've made a fair lot of silver steel (drill rod) bits and cutters, but have never tried to use them on steel; well, there's a first time for everything.
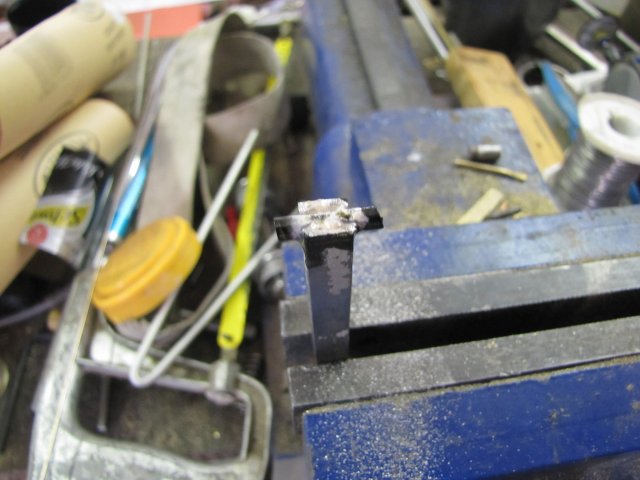
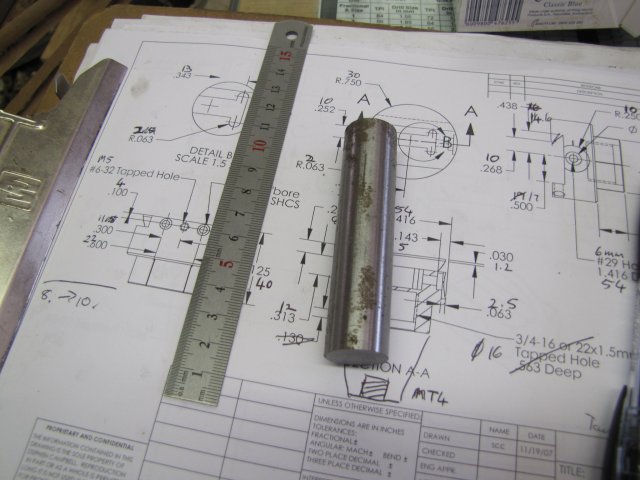
My biggest piece of silver steel rod is 20mm in diameter; slightly too small to make a cutter as-is, but I had a plan. This is what I started with:
I mounted the rod in the 4-jaw, and offset it so that I could get a shaft diameter of 12mm with an 8mm "lobe" projecting when turned down a bit:
With the tailstock set over to 30 degrees (I decided on a 60 degree dovetail), I turned the lot down. Here, its part-way; you can see the lobe forming:
Once the shank part got down to 12mm, I finished off the taper on the lobe as smoothly as I could, and also turned a light undercut towards the center of the face on the end - this is for chip clearance at the bottom when in use.
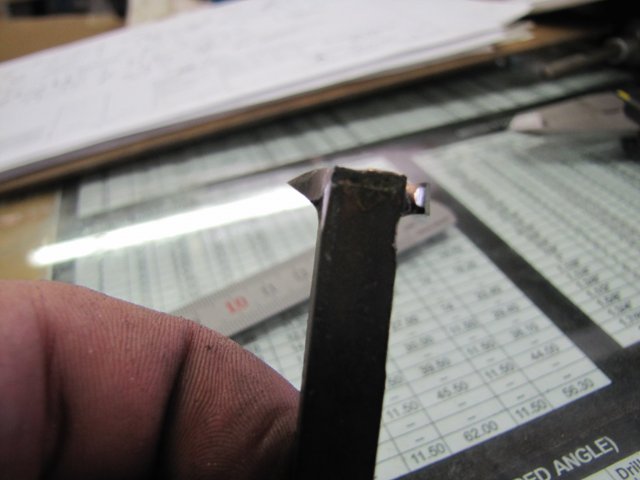
Then I removed the lot from the lathe - chuck-and-all, and mounted it on the rotary table on the mill and whittled away half the lobe to get the cutter form done:
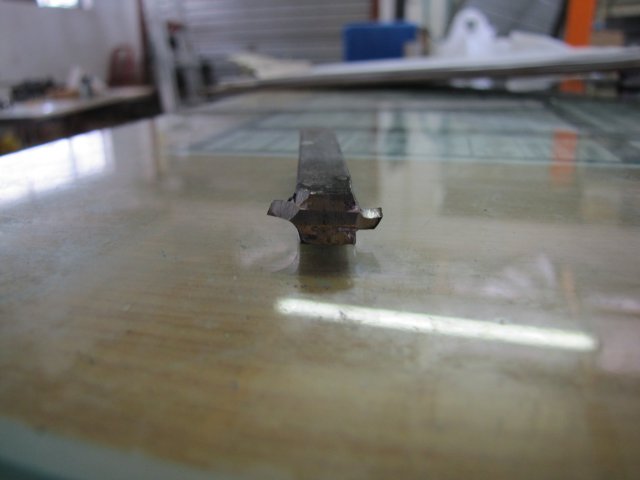
Removed from the chuck, I sawed the eccentric part that was gripped in the chuck off, then heated the cutting bit red-hot and quenched in oil to harden up the bit. A test with a file showed the shank part not completely hardened, but the cutting face was good and hard, so I had a very hard cutting edge and a slightly softer core on the bit. Because of this, I decided not to temper it - I just used a couple of strokes on an oilstone to hone up the cutting edges. This is what the cutter turned out like:
Poor photo; the light gray parts on the cutter was actually shiny from the honing. The light gray rectangle on the bottom is where I stoned in the bottom relief, and the light gray on the face is honed for the cutting edges.
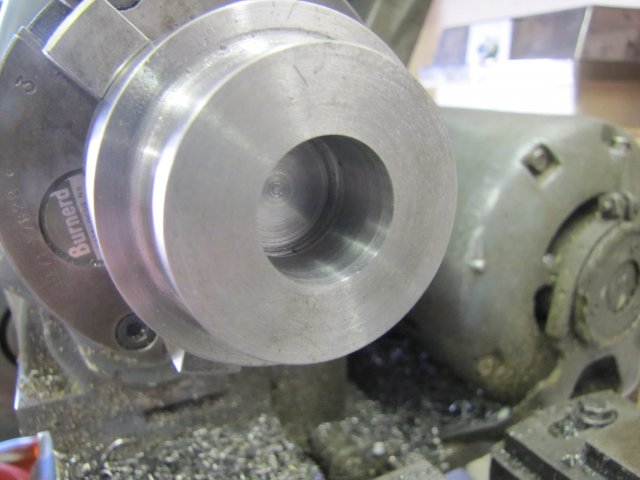
Would it work ??? - the first cut; slow speed (150RPM), slow feed, and LOTS of cutting oil - and the first pass was done - and seemed to work well:
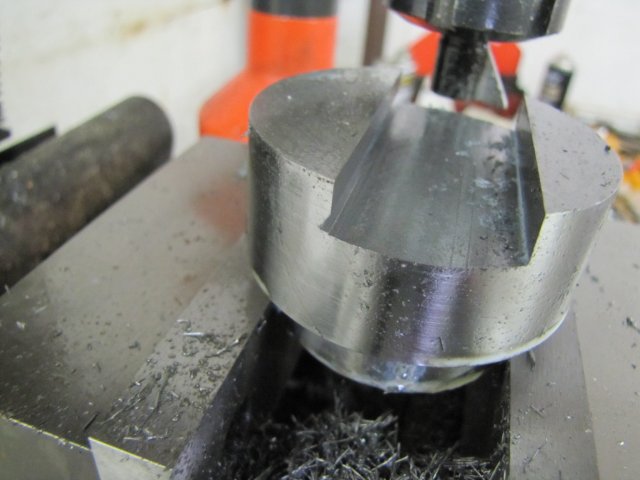
I'm a fan of Asterix... - in the books the authors (translators actually for the English books) always say "A little while later" for a journey that would have taken days (or weeks)... - but in my case, "A little while later" - in hours:

It was slow going; I didn't want to push the cutting bit too hard (heat is enemy #1 to silver steel!), and spent a lot of time squirting coolant on it. But it cut ;D - the dovetail itself has a very near mirror finish, though I'm a bit disappointed with the bottom finish I got; it could have been a lot smoother.
Overall, I'm happy though ;D - I had some time in the shop, made a single-point dovetail cutter from scratch, and cut my very first dovetail (at least part thereof!) on the mill. A good day ;D
Regards, Arnold
First off, I needed a way to cut the dovetail on the head. I priced some dovetail cutters locally here in Windhoek, and after recovering from the ridiculous prices wanted, I had an option - order from overseas for 1/5th of the price (and wait 6 weeks for delivery) or make my own.
It was worth a try to make my own - so I thought a bit. I could have gone for HSS and spent a lot of time trying to grind an accurate cutter... OR - I could get back to basics and do it the really old fashioned way - with silver steel. I've made a fair lot of silver steel (drill rod) bits and cutters, but have never tried to use them on steel; well, there's a first time for everything.
My biggest piece of silver steel rod is 20mm in diameter; slightly too small to make a cutter as-is, but I had a plan. This is what I started with:
I mounted the rod in the 4-jaw, and offset it so that I could get a shaft diameter of 12mm with an 8mm "lobe" projecting when turned down a bit:
With the tailstock set over to 30 degrees (I decided on a 60 degree dovetail), I turned the lot down. Here, its part-way; you can see the lobe forming:
Once the shank part got down to 12mm, I finished off the taper on the lobe as smoothly as I could, and also turned a light undercut towards the center of the face on the end - this is for chip clearance at the bottom when in use.
Then I removed the lot from the lathe - chuck-and-all, and mounted it on the rotary table on the mill and whittled away half the lobe to get the cutter form done:
Removed from the chuck, I sawed the eccentric part that was gripped in the chuck off, then heated the cutting bit red-hot and quenched in oil to harden up the bit. A test with a file showed the shank part not completely hardened, but the cutting face was good and hard, so I had a very hard cutting edge and a slightly softer core on the bit. Because of this, I decided not to temper it - I just used a couple of strokes on an oilstone to hone up the cutting edges. This is what the cutter turned out like:
Poor photo; the light gray parts on the cutter was actually shiny from the honing. The light gray rectangle on the bottom is where I stoned in the bottom relief, and the light gray on the face is honed for the cutting edges.
Would it work ??? - the first cut; slow speed (150RPM), slow feed, and LOTS of cutting oil - and the first pass was done - and seemed to work well:
I'm a fan of Asterix... - in the books the authors (translators actually for the English books) always say "A little while later" for a journey that would have taken days (or weeks)... - but in my case, "A little while later" - in hours:
It was slow going; I didn't want to push the cutting bit too hard (heat is enemy #1 to silver steel!), and spent a lot of time squirting coolant on it. But it cut ;D - the dovetail itself has a very near mirror finish, though I'm a bit disappointed with the bottom finish I got; it could have been a lot smoother.
Overall, I'm happy though ;D - I had some time in the shop, made a single-point dovetail cutter from scratch, and cut my very first dovetail (at least part thereof!) on the mill. A good day ;D
Regards, Arnold
Again I'm amazed the ingenuity of some of the people here. Quite a successful day, Arnold!
The lack of tooling, or their high cost in your area, is turning you in to quite a tool maker. What
some of us would call a major inconvenience, you make into a learning exercise, and are becoming
a hard thinking machinist in the bargain.
Well done!
Dean
The lack of tooling, or their high cost in your area, is turning you in to quite a tool maker. What
some of us would call a major inconvenience, you make into a learning exercise, and are becoming
a hard thinking machinist in the bargain.
Well done!
Dean
Lew Hartswick
Well-Known Member
- Joined
- Sep 20, 2007
- Messages
- 505
- Reaction score
- 10
I did something like that a few years ago when I needed a special angle for a brass
fitting for an antique transit. I had the advantage of working in brass and so didn't
even harden the cutter.
...lew...
fitting for an antique transit. I had the advantage of working in brass and so didn't
even harden the cutter.
...lew...