Arnold on Elmer's #43

Home Model Engine Machinist Forum

Help Support Home Model Engine Machinist Forum:

This site may earn a commission from merchant affiliate links, including eBay, Amazon, and others.
7 instead of six holes!
Looks like someone likes doing maths! ;D

Looking great Arnold!
At this rate you will be finished this one and be able to do one more before you return to work!!! :big:

Are we going to get a video of this one running??

Andrew
 
Looks like you're in the home stretch now Arnold...still looking very good and nicely documented too!!

Bill
 
Thanks Dean :) - In stereotypical male fashion I went to the shop this afternoon to buy M&Ms and ground coffee, and returned with a whole lot of stuff except for those :big:. The rule will have to do for today's photos, and I'll have to drink instant coffee tomorrow morning ::)

Andrew, Thanks; And yes, I quite like doing maths ;D I doubt I'll be able to finish another during my leave; there are some other things that need attention, but I'll start on another project - though not in as much detail, as that one is pretty well documented here on HMEM. Yes, I will post one of my bad videos once it's running :big:

Thanks Bill :) - The home stretch is longer than I thought though :big:

The last bits are always the hardest - and time consuming!

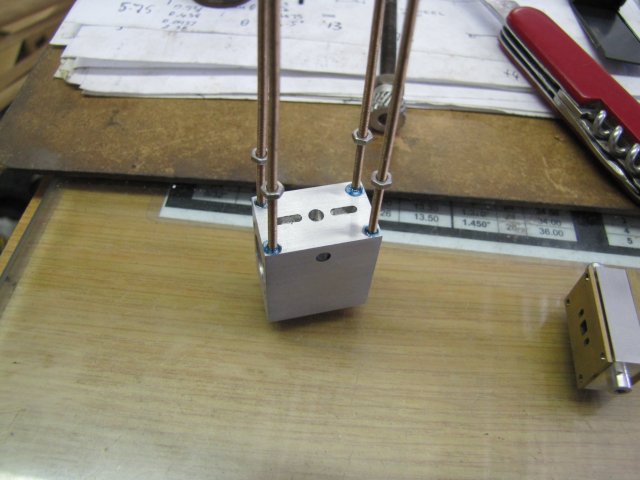
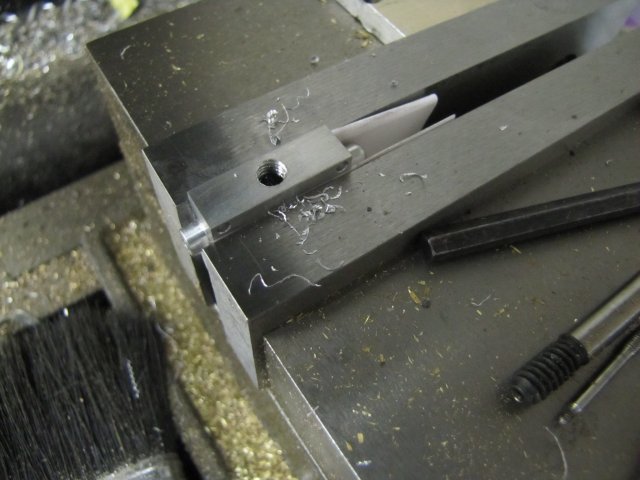
I gave the cylinder block the once-over with the set of M2 taps - which fortunately turned out well, then a final rub-down on emery in all the needed areas to get the finish I wanted and then started to add the studding - with a bit of thread retainer on each stud, and some stainless steel nuts to unscrew off the studs once cut to "clean" the threads:
normal_IMG_2556.JPG


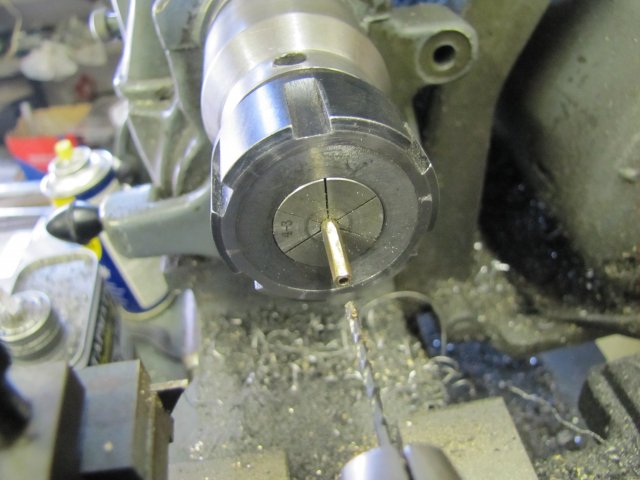
While waiting for that lot to set a bit, I started making nuts. The nuts in the previous photo are normal M2 stainless steel nuts, and while I could use those, they don't have pleasing proportions (at least to my taste). So I went about the business of filing a bit of hex on some 3.2mm brazing rod, center drilling, drilling it 1.6mm and tapping it M2, and then parting off 2 nuts at a time with the jig-saw-blade parting tool. :
normal_IMG_2557.JPG

As usual, some nuts went flying while parting off, so the shop monster ended up with a selection of small nuts called "Dammit", "Sheisse" and so on - I hope he enjoys their company :big: A simple process followed; make a couple of nuts, clip off studding on the block and add more to it and so on.

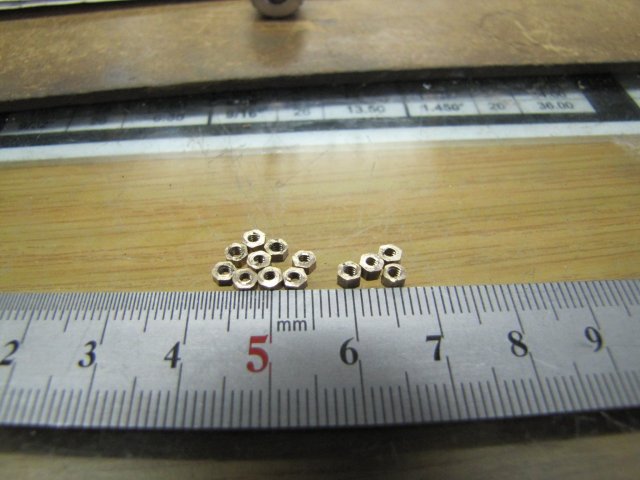
I eventually ended with a selection of nuts - four thicker ones for the cylinder cover, and eight thinner ones for the cylinder heads - with an extra one that was christened "Lucky" - all still needing some de-burring:
normal_IMG_2558.JPG


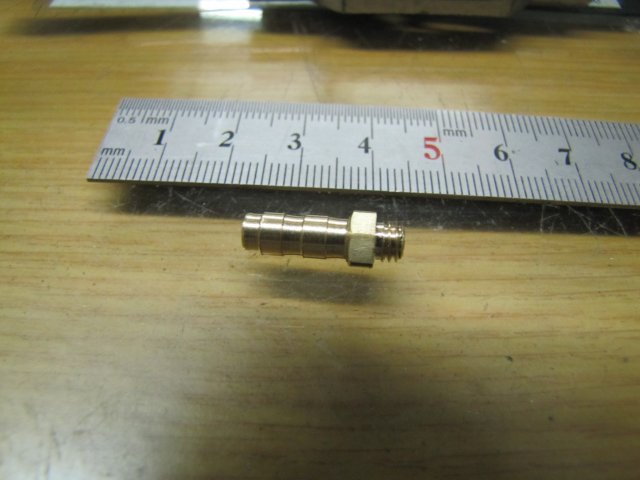
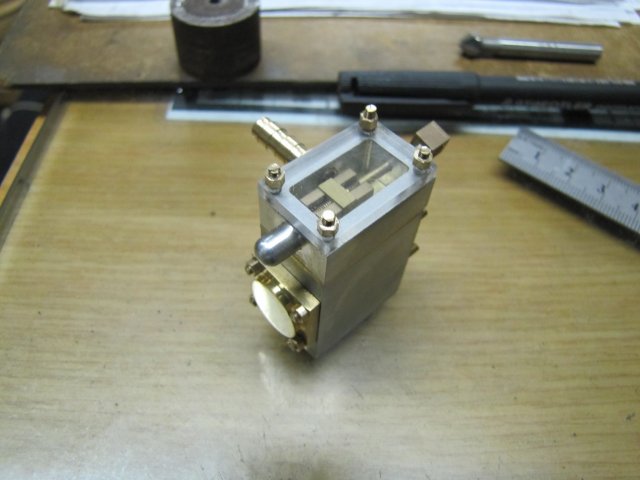
As I started putting bits together, something became obvious... Steam or air would run through the valve chest, push down the valve and go through the port faces and so on - except for ? - Where the heck would it come from ??? I'd not made a steam connector! And even worse, I never even made the hole in the valve chest to fit it to Rof} That was easily remedied with a quick bit of turning:
normal_IMG_2559.JPG


And a bit of drilling and tapping:
normal_IMG_2560.JPG


Now things are coming together:
normal_IMG_2561.JPG


Still quite a bit left to do though... Like watching paint dry... Again... :big:

Regards, Arnold
 
And I'm still stuck back on dividing a circle into 7 equal parts. Let's see now, divide 360 by seven and carry the ones and then.... oh never mind. ;D A truly inspirational job Arnold, as always, good clean entertainment at it's finest. Good thing you discovered the missing air connection, that could have been a real embarrassment come 'show time'. :big:

"uh, pardon me folks for just a moment, uh, we are experiencing some uh, minor difficulties here and, uh, we expect to have them fixed sometime .... soon, uh, I hope" Rof}

BC1
Jim
 
And yes, I quite like doing maths

Ah, a kindred spirit. But, you realize, Arnold, that saying that is grounds for getting us kicked out of the machinists' fraternity. :)

"Sheisse" and so on

Funny, I've got a shop monster named that too. His twin is "Blauen Donner Wetter", whom I inherited from my Grossvater.

Great work on the engine. I have a particular fondness for that one. It was the third engine I built and I still use it to show people how a D-valve functions. (Like you, I made a transparent cover for the valve chest.)
 
Arnold,
When I gang part off parts like your nuts - I prefer not to feed the shop monster (mine is a particularly mean spirited beast).

So I hold a piece of rod or wire down the drilled hole with my right hand whilst parting with my left.

I'm left handed which makes it easier I suppose - but you could also use a rod in the drill chuck / tailstock.

Ken
 
Coming along nicley! watching with great intrest
 
Thanks Jim :big: - I gave myself a good kick in the butt over the steam connector.

Marv, Thank you - I "stole" YOUR idea for the valve cover; imitation and all that ;D. I'll take my chances with the maths, just like you; it's just too handy to have around the shop for me to ignore it! At least I didn't inherit a second shop monster - my grandfather appears to be hanging on to his :big:. I hope my rendition of the #43 will also attract interest when I show it; it's been on my to-build list for quite a while.

Thanks Ken; I never thought of doing it manually! I simply skipped the step for clamping up a bit of rod to catch the nut because of the extra tool change; as I would have to remove the tap from the tailstock and insert it again just after each part-of to clean the starting threads for the next nut... I have a new mini lathe on order mostly to cope with making these small bits; I'll definitely build a turret for it; that will make life a lot easier.

Thanks Chaffe :)

I've been playing around with paint rattle cans in between for the last couple of days. This was the lion's share of my learning experience on this build. I planned to add a wooden base to the engine, but completely forgot to make mounting holes in the base for that, and only after I got a half-decent paint finish on it realised that, so for now the engine will remain without it. I'll make the wood bit later; once the paint has cured well enough so that I can modify the engine base.

The flywheel and base went OK with the painting, but the column gave me hell; I ended up stripping and re-doing it three times... It's still not quite up to what I'd like, but I just couldn't bring myself to do it another time... For the next paint jobs, I'll invest in better paint and get my airbrush up and running; the rattle cans just does not do it for me. Also, I wanted a slightly lighter shade of blue; this one is bordering on black.

So for now, the engine is done:


A video of it running; this was just after I got it going, so things were a bit stiff; here running at about 7 psi for the most part. Please excuse the dang dirty paws, painted fingernail and oil dripped everywhere on the engine :-[
[ame]http://www.youtube.com/watch?v=5At2gCa7oyo[/ame]

After about 10 minutes of running, it settled in nicely, and I could bring down the pressure to about 3 psi:
[ame]http://www.youtube.com/watch?v=Tx8MQjtY56g[/ame]

Thank you to all who followed along and all the nice comments and valuable input.

Kind regards, Arnold
Darn - it's good to be back in the shop ;D
 
Congratulations Arnold, runs beautiful! Very well done and sooo quick! :bow:

Nice color too, matches very well with the metal and brass parts.

Regards Jeroen
 
Very nice Arnold.

Not only an excellent engine at the end but also a most informative thread too.

I really must improve my skills and get around to finishing one of my projects.

Cheers

Andy
 
Great finish to a most enjoyable thread Arnold. And a nice runner it is too!!!!

Bill
 
Hi Arnold

VERY VERY VERY NICE th_wav

Cheers

Rich
 
You did a great job Arnold... Again!
It sure runs down nice, and the paint scheme looks just right. Good job man!
 
You have done it again Arnold! th_wav

Beautiful engine and great paintwork!
Runs really well!

Now i have to really start focusing and start building something!

Andrew
 
Most enjoyable sequence and a fine model - Arnold is an artist!

You could run that on CO2 so it would really stay cool! A seal-able container with a delivery tube to a throttle valve and a chunk of CO2 (dry ice) and some water.....choo-choo...

BillC
 
I love Elmers Engines. You make it look easy! You made this engine look AWSOME!!!!!!!!!!

:bow: :bow: :bow:

Chris
 
What a beauty Arnold. You DO make it all look so very simple and easy. Runs a treat as well.

BC1
Jim
 
Arnold,
You have a great talent. Thanks for sharing it with us!

Ronald
 

Latest posts

Back
Top