a rather unspectacular stirling engine...

Home Model Engine Machinist Forum

Help Support Home Model Engine Machinist Forum:

This site may earn a commission from merchant affiliate links, including eBay, Amazon, and others.
Hey there,

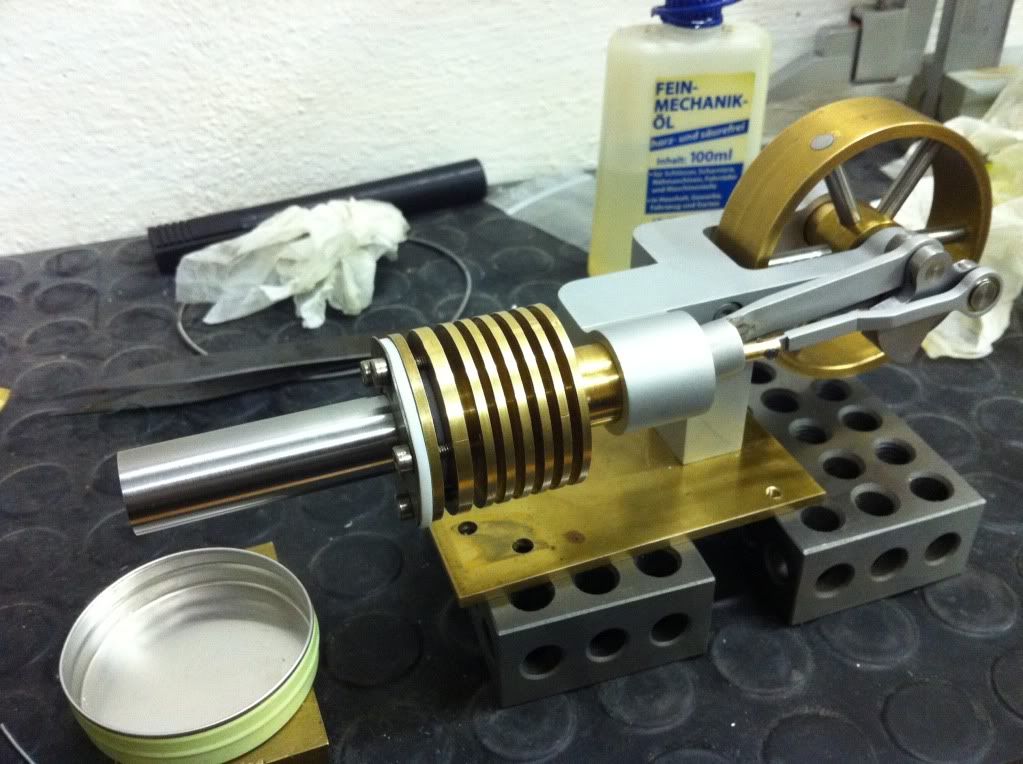
couldnt resist to assemble in between and fire it up...
And it runs- not that big surprise since I re-used most of the running parts, but its still nice to see. At the end I'm quite happy with the balancing, as well with the dynamic balancing...
The little dinging happens when the displacer hits the end of the firetube. So there will be a little bit more room with the stainless steel firetube I'm on.
(sorry for the crappy video- one more hand would be helpful...)

stirling
http://s1056.photobucket.com/albums/t370/kutzdibutz/stirling/?action=view¤t=IMG_1311.mp4

Cheers, Karsten
 
Excellent work!!! I was setting back in the bush with heavy doubts---It looked too heavy to run. It appears to run great. CONGRATULATIONS!!!
 
Well done Karsen! I really like your decision to use glass beads. I notice it has a built in governor. If it runs too fast it turns away from the flame to slow down :)

Pat
 
Thanks guys!

Brian, completely out of curiosity- at what point / which part did you expect too heavy for it to run? The piston and displacer I re-used, so no weight added, the rods (especially the main rod) look a bit beefier, but they are made from aluminum, so not that much added weight either. Havnt directly compared them to the 'origina' parts, but I guess its about break even. The parts with the massive weight added is the crankshaft and I did this intentionally in order to have a chance to compensate the reciprocal piston movement. (which works reasonably well- could be done better for sure, but I'm quite happy with the result)

And Pat- well spotted, well spotted... ;)

Laters
Karsten
 
About post #19 and #20 I was thnking "Too much mass".--Parts look to heavy for a Stirling engine. Then again, I have never built a Stirling engine. Most of the ones I have seen on this forum are rather delicate, fragile looking things. Your's looks like it could be used to pull stumps.:eek::eek:
 
Hmm- #19 and #20 are the body parts. Correct me if I'm wrong, but to my oppinion they could be as heavy as they like and it still would run as long as the moving bits dont get too heavy. There I think its a matter of taste if one likes elegant or sturdy. Obviously I'm more the sturdy-type, mainly because I judge my machining skills as too clumsy... ;D (or I want to keep it simple if possible)

Cheers, Karsten
 
Karsten the tille of the thread does not do justice to the engine. the engine looks great. looking through the posts it does look like a lot of redesign and remaking of frame parts. but I love the end result.
Tin
 
Thanks Tin,
the title of the thread aims more at the initial stiling with all that bent metal- and 'that thing' before the re-design looked rather crappy... And it was about that time of starting the tread I got the idea about doing something to the looks of the stirling. Nowdays I would maybe name it different but thats how things grow and they still have the same name... ;)

So 'Stage 1' of the makeover is almost completed, 'Stage 2' will include a actual working performance upgrade. (a cooling fan that actually adds some net power output, not only spins and consumes more than it delivers) But there I first need to get into CAD a bit more again...

Cheers, Karsten
 
So ladies and gents,

machining the stainless firetube I thought- this better be key... But at the end it worked quite allright. Startet with the bore to the desired depth, then the outer contour and parting at the right location. ;)

IMG_1312.jpg


IMG_1313.jpg


hands filthy, part shiny- thats how its supposed to be!
IMG_1314.jpg


Used some grinding paper for a nice smooth surface finish just before parting. The frietube has a wall thickness of 0.3mm, further I didnt want to push it (sissy me...) and the stainless really works well- the heat doesnt travel as into the 'cold' part as with the brass. Nice hint Marv (mklotz).

Mounted the stirling on the very temporary base plate and officially declare stage1 of the re-make completed.
IMG_1315.jpg


And I also made a bit nicer video of it running...
http://s1056.photobucket.com/albums/t370/kutzdibutz/stirling/?action=view¤t=stirlingre-makestage1complete.mp4

As said already- next up will be an actually working performance kit, a proper burner and a nice baseplate. So CAD again for a change...

Cheers, Karsten
 
Hmm- big question mark poppingup. After some fiddling around in CAD I'm not so sure about the cooling fan anymore. Somehow the proporions look a bit ridiculous... Side view of the fan housing- I could reduce the outer diameter slightly but not too much really.
fan1.png


The housing I dont want to skip. I want some guidance of the flow and better fan efficiency. Here some other view of the desaster... (havnt bothered to model the fan blades and guide vanes yet).

fan2.png

fan3.png


There should also be a connection piece to the cooling ribs. Couldnt figure out how to model that yet- its a bit of a weird shape with the transition from round crossection to rectangular following the outer diameter of the ribs...

I would really be looking forward to designing the blade and vane angles and then make the stuff but at the moment I'm 50/50 between do it or not do it at all... scratch.gif

Any inputs and ideas welcome and highly appreciated!

Cheers, Karsten
 
Hi all,

had some time to think about that 'upgrade kit' with the cooling fan and stuff. Some headscratching and a measurement later it becomes more or less apparent to me that the fan installation is not only looking pretty silly but there is also no big benefit to expect. The stirling lives off the temperature difference between the hot and cold part. One could maintain a sufficient temperature delta by
a) having a good and focussed heat source on the hot side
b) take the heat away as good as possible on the cold side
c) stop the heat from travelling from hot to cold (or better say hinder the travel as much as possible, it cant really be stopped)

a) I need to work on, there is no question.
c) is fairly well considered thanks to the recommendation to change the material of the fire tube. Next to that I introduced another seal so its not too easy for the heat to travel.
Concerning b) I thought a fan would assist the cooling. Which it would for sure. But looking at the actual situation with the stirling in operation I would guess the hot part to have app. 500°C, the firetube starts to glow in a dark red. And the cooling ribs I can touch without burning my fingers. Thats when suspicion started to grow if a fan would help or not. So I measured the temperature of the cooling ribs and they are at app. 50-60°C. So there is a temperature delta of around 400K. With the fan I could maybe gain another 20-30K but thats not that impressive compared to the 400K available and a fan would need to be powered... So with that in mind I will skip the fan- and it also tells me that c) works reasonably well. 8)

So next thing will be a proper burner.

Cheers, Karsten
 
Hi folks,

so this weekend I had a friend coming along and we did some speed measurements. Max speed measured was 1250rpm! Relly pleased with that!

In the meantime I must have lost my motivation to make a nice burner and base plate... If someone spots my motivation- please direct it back to me otherwise I will struggle to really finish that project...
One other thing, I'm thinking of a consumer for the stirling- preferrably something pretty stupid and useless... But so far only a water fountain came to my mind. Hmm- lets see if I get a better idea. Any suggestions?

Cheers Karsten
 
Very nice and neat construction. I really like it.
I am planning to build a Stirling as soon I have finalised the 2-stroke motor.
Good inspiration.
Cheers,
Giacomo
 
Hi Karsten
in your lovely build, is the joint of the Hot cylindar to the cold side there to provide a thermal brake?
I have built severall Stirlings but none a pretty as yours and have not yet used a thermal break although common sence tells me it
should help a lot?
Cheers Frans
 
Thanks Giacomo.

Frans,
yes, the flange works as thermal barrier and yes, I think it is key. Having said that it doesnt mean a stirling wouldnt work without that... But as I mentioned in the post on top of this page you can do two things- b) and c) and if you do c) reasonably well you can skip certain things at b). Thats where I decided to skip the cooling fan.
The thermal barrier in my design works like this: (the weird hatch represents insulation material, in my case PTFE)
insulation_zps3ed40381.png


Cheers, Karsten
 
Thanks very much,
I am trying to develop a low power Stirling made from an oil barell that can be made by Poorer communitys for lighting ect so at present making a crude small scale test 10W Stirling so I really appreciate your answer.
Cheers Frans
 
Back
Top