1/3 scale Galloway construction

Home Model Engine Machinist Forum

Help Support Home Model Engine Machinist Forum:

This site may earn a commission from merchant affiliate links, including eBay, Amazon, and others.

gbritnell

Project of the Month Winner!!!
Project of the Month Winner
Joined
Jul 16, 2007
Messages
2,993
Reaction score
1,061
Gentlemen,

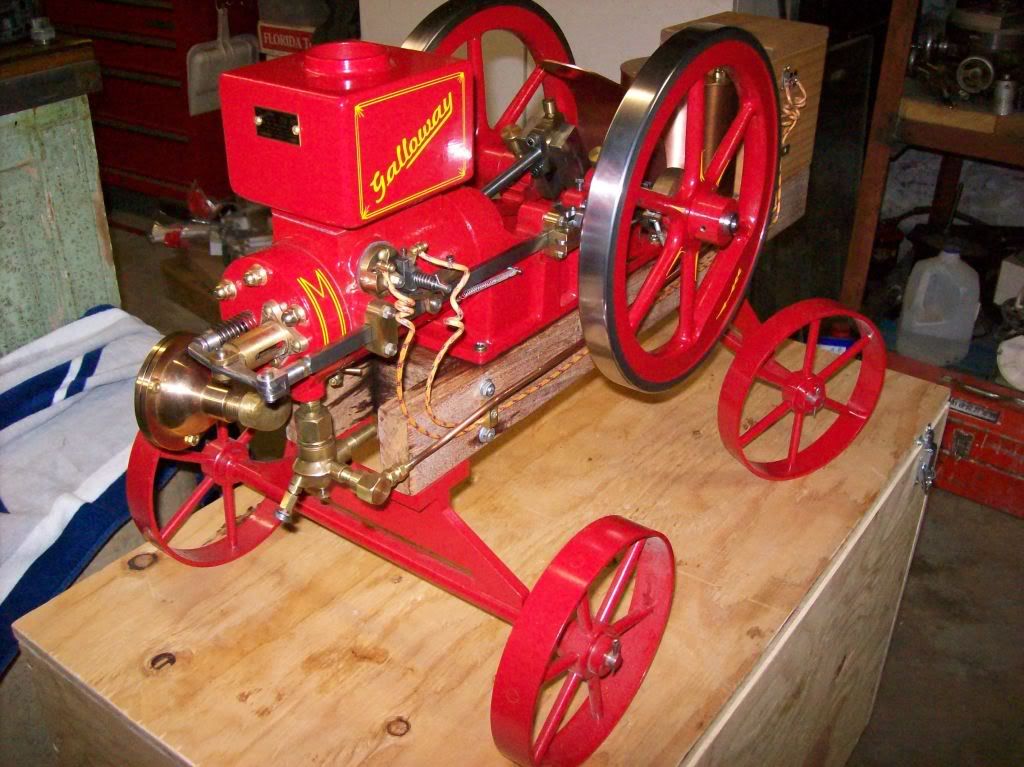
In my thread about building the 5 speed transmission I mentioned that I would be taking a hiatus to build some hit and miss engines for a gentleman. Well the first one is a 1/3 scale Galloway engine. Boy is it big!!! It has 10.25 inch flywheels. I have been using some of my buddies machine tools as mine are just a 'little bit too small'.

Anyway, the drawings are a little on the crude side so I will be using this thread from time to time to hopefully draw a little bit of information from anyone who has built one of these engines.

Originally the cylinder was mounted to the base with 3 set screws. The set of drawings I received with the castings has an addenda sheet that show 3 through bolts coming from the frame into the cylinder. The only way to counterbore them is with a back spotfacing tool.

Now the clincher. The socket head screws can be no larger than 8-32 so that makes the back spotfacing tool a little on the flimsy side (1.75 long)
How have you builders mounted your cylinders and if you used the set screw method have you had any cylinder distortion?
Thanks,
George
 
I'll be following this as I have the 1/6th scale version to do. This seems to just rely on a press fit for the liner into the base casting!

You may find a few who have built the engine on Smokestak which I have seen you on before.

Jason
 
100_0432.jpg


I glued my cylinder together many years ago, it's not showing any signs of moving.

Used Devcon retaining compound.

Tom
 
Hi Tom,
Do you know exactly which epoxy you used? I went to their site but they offer so many different types.
Thanks,
George
 
George

The bottle is sitting on my bench at work and I will get the number on Monday.
Tom
 
George, As you know I don't have anywhere near enough experience to be offering advise to a very experienced model engineer like yourself. But I have to agree with the method used by a previous poster.

This type of assembly is perfectly suited for the use of a Loctite retaining compound. The #609 is the lowest viscosity and good for press fits, and close tolerance fits up to .005". With close fitting parts the fixture time is reduced considerably, and could be as little as a matter of seconds. With this in mind, adding witness marks for a quick line-up might be a good idea.

http://www.sjgogo.com/pdf/609-en.pdf

-MB
 
George

Had to go to work and I got the info you wanted. I used

Devcon
Super Lock #2680
For Cylindrical parts
High Strength
Retaining Compound
Fill gaps up to .016

Tom
 
Hi George

My good friend Max just got his 1/4 scale Galloway finished up and running; except for finish and paint. I believe he loctited the cylinder liner in place; probably with 609 or maybe the 290 wicking variety. He did make a special counter bore to spot face for the cap screws; he is planning to fill the holes with some epoxy prior to painting.

A word of caution, watch the prints closely; although many years old they are full of errors that maybe have been corrected in later versions. One other thing that really drove him nuts is rather than fully dimensioning the prints there is a whole bunch of "fit at assembly" notes. He would go to work on a part and then find out that he could not finish it until another part was made to match it to.

I cut the cam for him on my CNC and found some errors on that part also; I had to wing it on a couple of dimensions but it came out ok and the engine runs.

To get it to hit once and latch out (which is how we like a hit & miss to run) he needed to add some weight to the governor. The flyweight and yoke assembly has to move much too far to latch out on one power cycle. I tried to get him to change the ramp angle on the weight but he wasn't comfortable doing that. A little extra weight did the trick.

It is running real nice now but it does hit pretty hard even with the timing retarded a little. He ordered a cart kit from the Shelley's and is waiting for it to arrive before he finishes up the project.

I could put you in touch with him if you would like to chat.
 
Thanks Idahoan,
The prints are just plain terrible. If they were drawn up last week I could understand it but they've been around for years. As many of these things that have been built you'd have thought they would have taken care of it.
gbritnell
 
Maybe now that Liney are producing and selling the kits they will update the drawings, anyone know if they will be doing the carts as I can't see them on their site.

If mine was not the little 1/6th version I would have had a go at making a model of this saw rig

Jason
 
George, my 1/6 prints answer several of the issues you raised over on Smokestak, let me know if you want scans.

J
 
Back
Top