Tin Falcon
Well-Known Member
- Joined
- Jul 9, 2007
- Messages
- 7,207
- Reaction score
- 787
guys:
There are a number of members on the board with kids or grand kids .
Here is a fun little engine to build on a rainy Saturday morning with the young apprentice.
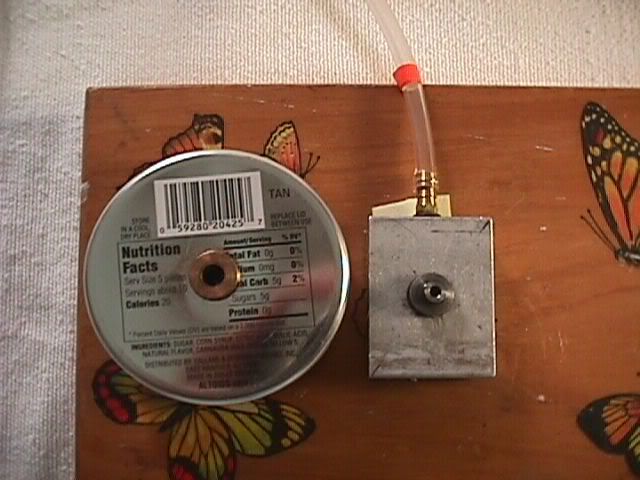
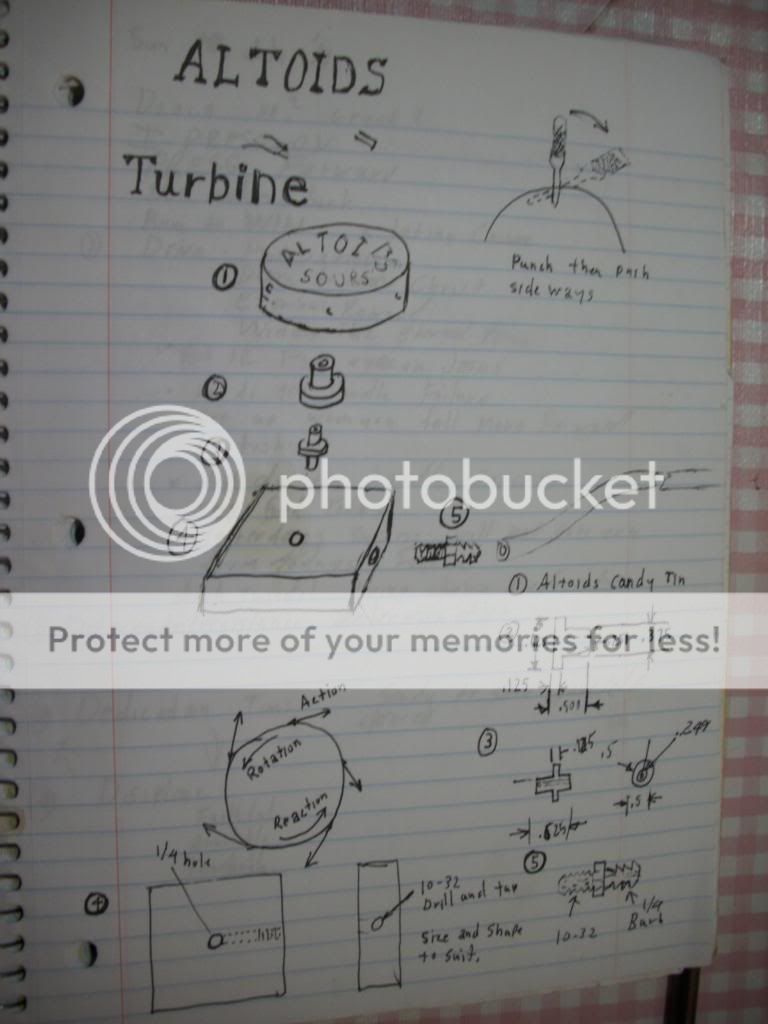
I used my lathe to build this but a drill is all that is needed. a block for the base. a piece of 1/4 inch tubing, a flanged sleeve bearing(AKA Top Hat Bushing) Mc Master Carr #7815K11 $3.00 US or equivalent a little electrical tape and and Altiods Candy tin tin.
Drill two 1/4 connecting holes in the base. One in the top and one in the side . The top one is where the bushing rides the side one feeds air in.
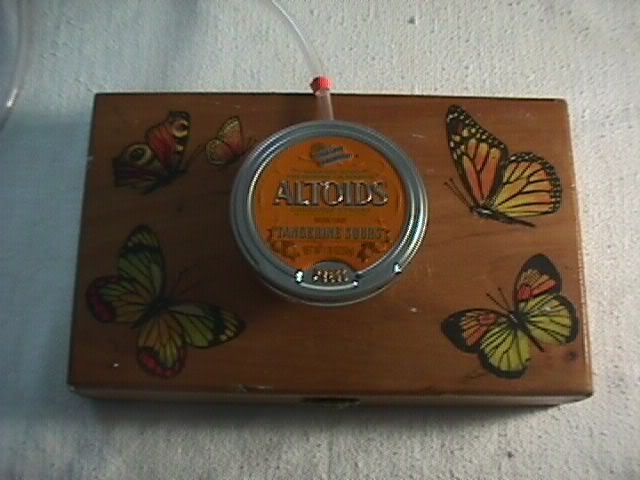
Drill a 3/8 hole in the bottom center of the tin. Insert bushing. Punch a set of holes 1/16th diameter around the perimeter of the can. once in push punch sideways to vector the thrust . make sure all holes go in the same direction. Seal the can with a strip of electrical tape. A drop of super glue or lock tite will help hold the bushing and tube sections in. A drop of oil on the bushing will keep it going. Mine will turn on breath power. Use your imagination and materials at hand, have fun. I made my own bushing ,nipple to fit bushing and drilled and tapped the block 10 -32 on the side. and made a threaded air fitting. The photo shows the block double stick taped to a wooden box. the engine was moving around the display table I got tired of chasing it.
Tin
There are a number of members on the board with kids or grand kids .
Here is a fun little engine to build on a rainy Saturday morning with the young apprentice.
I used my lathe to build this but a drill is all that is needed. a block for the base. a piece of 1/4 inch tubing, a flanged sleeve bearing(AKA Top Hat Bushing) Mc Master Carr #7815K11 $3.00 US or equivalent a little electrical tape and and Altiods Candy tin tin.
Drill two 1/4 connecting holes in the base. One in the top and one in the side . The top one is where the bushing rides the side one feeds air in.
Drill a 3/8 hole in the bottom center of the tin. Insert bushing. Punch a set of holes 1/16th diameter around the perimeter of the can. once in push punch sideways to vector the thrust . make sure all holes go in the same direction. Seal the can with a strip of electrical tape. A drop of super glue or lock tite will help hold the bushing and tube sections in. A drop of oil on the bushing will keep it going. Mine will turn on breath power. Use your imagination and materials at hand, have fun. I made my own bushing ,nipple to fit bushing and drilled and tapped the block 10 -32 on the side. and made a threaded air fitting. The photo shows the block double stick taped to a wooden box. the engine was moving around the display table I got tired of chasing it.
Tin