


- Joined
- Dec 28, 2008
- Messages
- 1,731
- Reaction score
- 9
#1 In one of my last posts on my Upshur Farm Engines thread I mentioned that I would need a fitting to re-direct the exhaust pipe to clear the fuel tanks close mounting position. After two days of experimenting I came up with a fixture to drill and tap 1/4" model pipe elbows with a repeatable accuracy. In the past I tried many different methods that yielded inconsistent and unsatisfactory results. This fixture is not my original idea, a very similar fixture was posted by one of our members last year. Unfortunately I couldn't find it, and gave up trying to locate the thread on which it was presented.
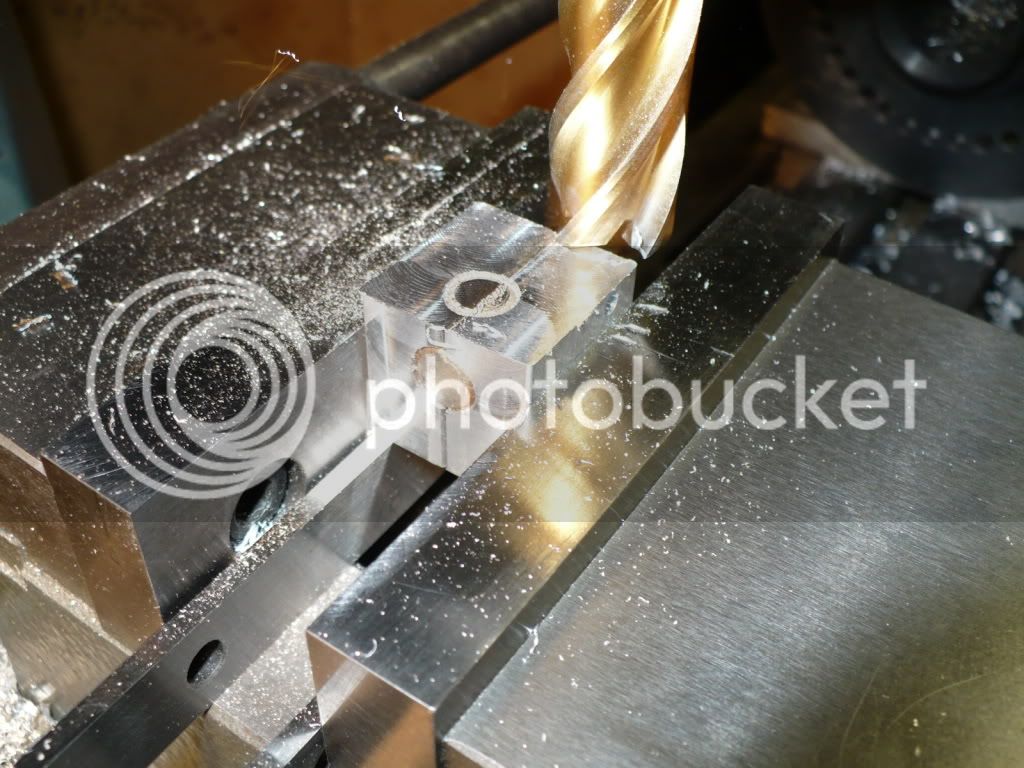
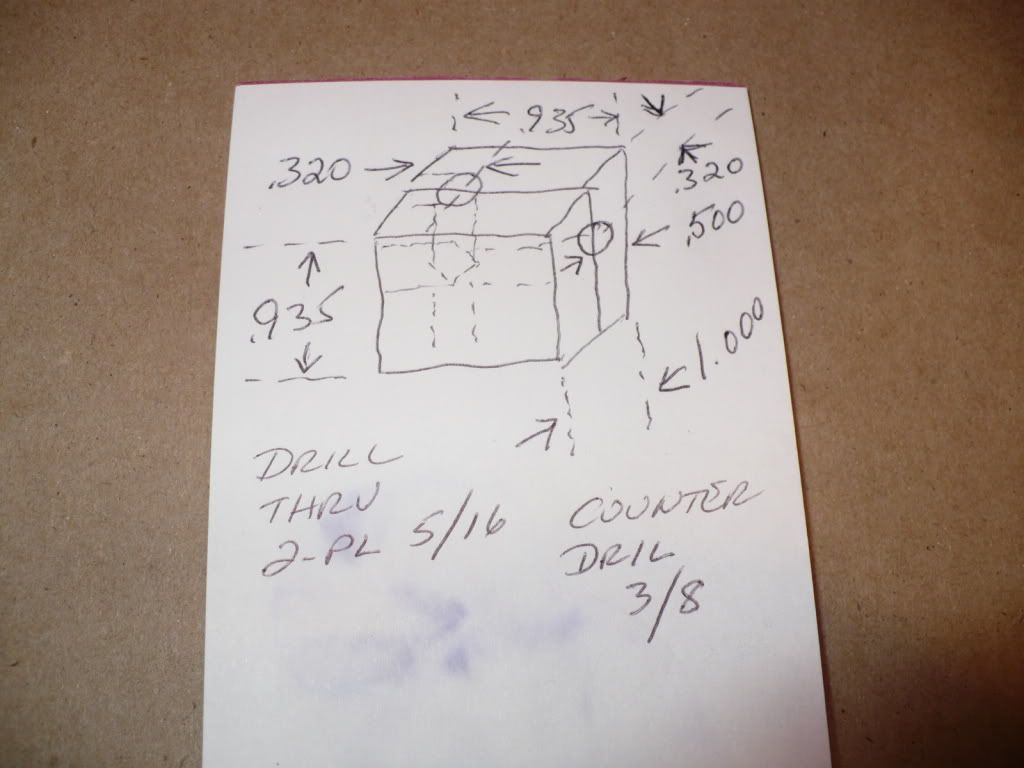
Below is a picture of the fixture I made. It consists of two identical halves lined up with dowel pins. I pinned the two 1/2" halves together before milling them to final dimensions. I drilled and reamed both dowel pin holes in one set up. First I reamed .1245" all the way through both halves of the fixture, followed with a .1260" reamer though the top halve at both locations. This allowed the dowel pins to be pressed into one half of the two piece fixture, and a slip fit into the other half.
Two through holes were drilled 5/16" followed by countersinking them with a 3/8" drill for the flanges on the pipe fittings. The countersinking was an eye balled job requiring patience. I would drill in part way and measure with calipers, then drill closer to the target location. I would stop to check the fit, and continue to drill and check. It took quite a bit of time to get the counter sunk steps just right to support the flanges on the pipe fittings. I don't know of any other way to do this since I was dealing with casting variances that could only be eye balled. It worked, and extremely well.

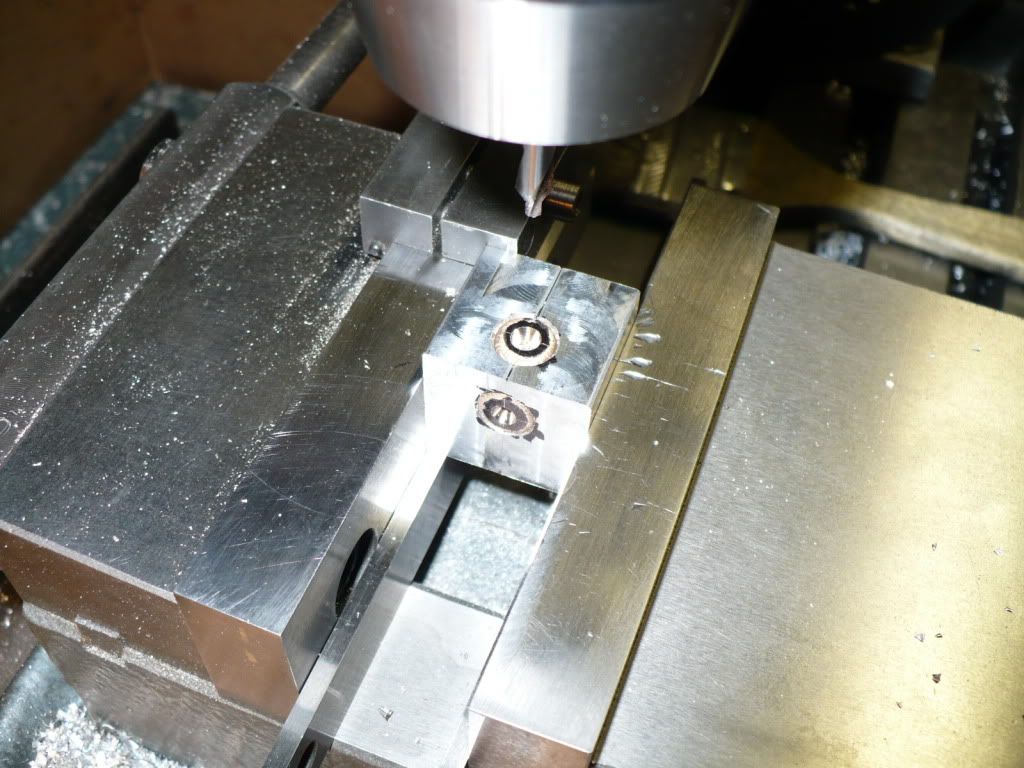
#2 The fixture makes finishing the elbows very quick and simple. In the picture below I lowered the end mill till it touched the top of the fixture and locked the quill. I then zeroed out my quill mounted dial indicator and raised the end mill .002". With one pass I trimmed one end of the elbow, and flipped the fixture over in the vise to trim the other end. It doesn't get any quicker or easier than this.
#3 With one elbow trimmed I went on and did another. You can get a rough idea from the picture of the accuracy a fixture like this provides.
#4 Using the same coordinates of X=.320" and Y=.500" to drill the fixture, the elbows can now be drilled and tapped with accurate results. I set the fixture against a vise work stop since I was planing on finishing more than one elbow. The first step was to center drill, or spot if you prefer, both ends of the elbow.
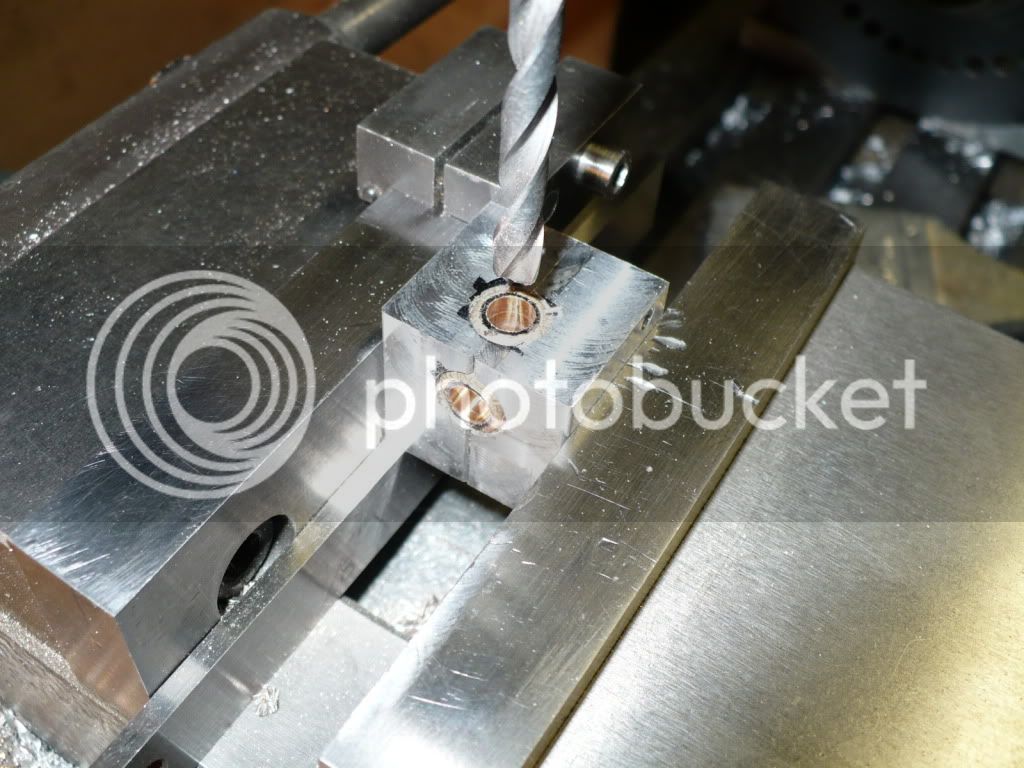
#5 The next step was to drill with a 7/32" drill at both locations. I drilled .400 deep measuring from the drills tip. I placed a .020" feeler gauge over the center drilled end and lowered the drill till it touched. After locking the quill I zeroed out my dial indicator, unlocked the quill, removed the feeler gauge and drilled till the indicator showed .420", meaning the hole was .400" deep at the tip.
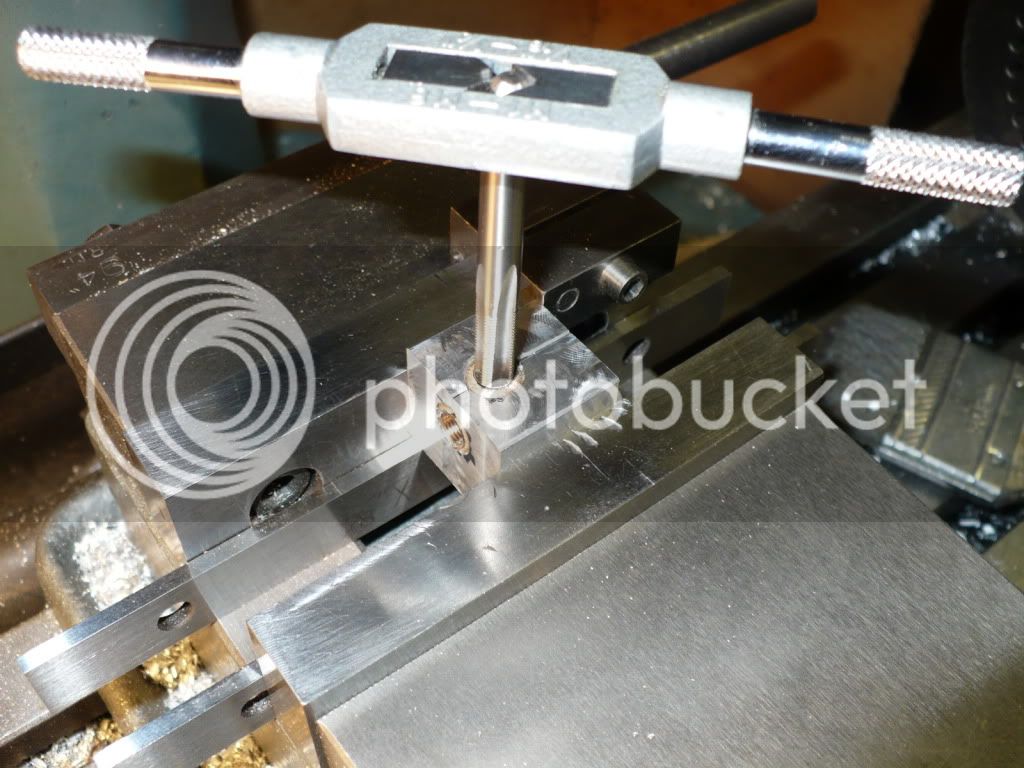
#6 I tapped the holes 1/4"-40 UNS. After locking the tap in the mills chuck I applied downward pressure with one hand on the spider handle and drove the tap in part way by rotating the chuck by hand, to get the tap started strait, and finished up with a small tap wrench.
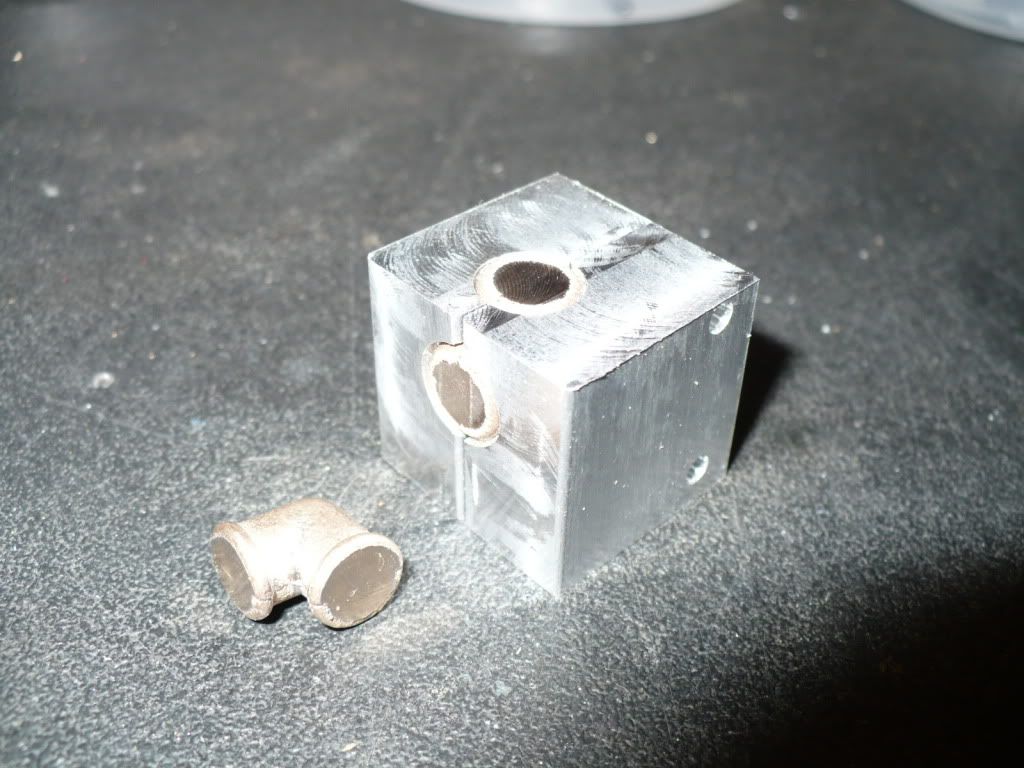
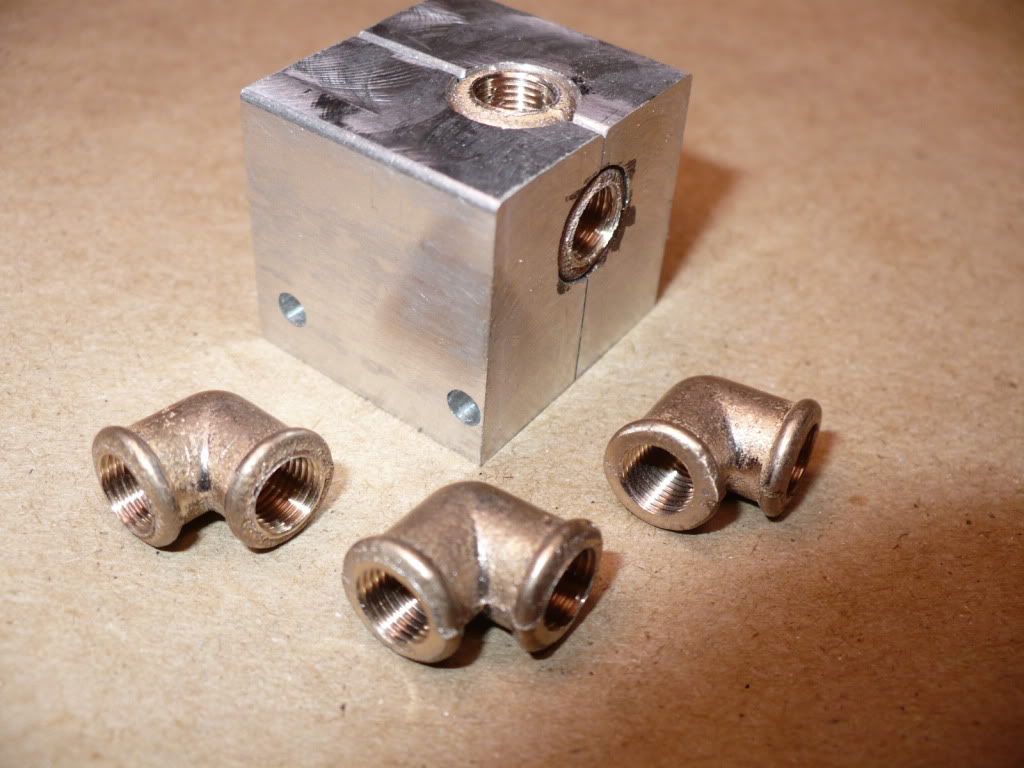
#7 I finished up 4 elbows. I only needed one elbow for my project, but I got carried away a little, and made four. You know me, once I start having fun theirs no stopping me.
#8 Here's a rough sketch of the fixture I made. Feel free to post a proper drawing that anyone could use to make their own fixture. I used the fixture and made four perfectly good elbows, so it's a proven design.
-MB
Below is a picture of the fixture I made. It consists of two identical halves lined up with dowel pins. I pinned the two 1/2" halves together before milling them to final dimensions. I drilled and reamed both dowel pin holes in one set up. First I reamed .1245" all the way through both halves of the fixture, followed with a .1260" reamer though the top halve at both locations. This allowed the dowel pins to be pressed into one half of the two piece fixture, and a slip fit into the other half.
Two through holes were drilled 5/16" followed by countersinking them with a 3/8" drill for the flanges on the pipe fittings. The countersinking was an eye balled job requiring patience. I would drill in part way and measure with calipers, then drill closer to the target location. I would stop to check the fit, and continue to drill and check. It took quite a bit of time to get the counter sunk steps just right to support the flanges on the pipe fittings. I don't know of any other way to do this since I was dealing with casting variances that could only be eye balled. It worked, and extremely well.
#2 The fixture makes finishing the elbows very quick and simple. In the picture below I lowered the end mill till it touched the top of the fixture and locked the quill. I then zeroed out my quill mounted dial indicator and raised the end mill .002". With one pass I trimmed one end of the elbow, and flipped the fixture over in the vise to trim the other end. It doesn't get any quicker or easier than this.
#3 With one elbow trimmed I went on and did another. You can get a rough idea from the picture of the accuracy a fixture like this provides.
#4 Using the same coordinates of X=.320" and Y=.500" to drill the fixture, the elbows can now be drilled and tapped with accurate results. I set the fixture against a vise work stop since I was planing on finishing more than one elbow. The first step was to center drill, or spot if you prefer, both ends of the elbow.
#5 The next step was to drill with a 7/32" drill at both locations. I drilled .400 deep measuring from the drills tip. I placed a .020" feeler gauge over the center drilled end and lowered the drill till it touched. After locking the quill I zeroed out my dial indicator, unlocked the quill, removed the feeler gauge and drilled till the indicator showed .420", meaning the hole was .400" deep at the tip.
#6 I tapped the holes 1/4"-40 UNS. After locking the tap in the mills chuck I applied downward pressure with one hand on the spider handle and drove the tap in part way by rotating the chuck by hand, to get the tap started strait, and finished up with a small tap wrench.
#7 I finished up 4 elbows. I only needed one elbow for my project, but I got carried away a little, and made four. You know me, once I start having fun theirs no stopping me.
#8 Here's a rough sketch of the fixture I made. Feel free to post a proper drawing that anyone could use to make their own fixture. I used the fixture and made four perfectly good elbows, so it's a proven design.
-MB
")

