Slide hammer prick punch

Home Model Engine Machinist Forum

Help Support Home Model Engine Machinist Forum:

This site may earn a commission from merchant affiliate links, including eBay, Amazon, and others.

mklotz

Well-Known Member
Joined
Aug 29, 2007
Messages
3,047
Reaction score
27
Location
LA, CA, USA
It seems that, whenever I get the prick punch located just so, I accidentally nudge it out of position while reaching for the hammer I've inevitably forgotten to lay close to hand.

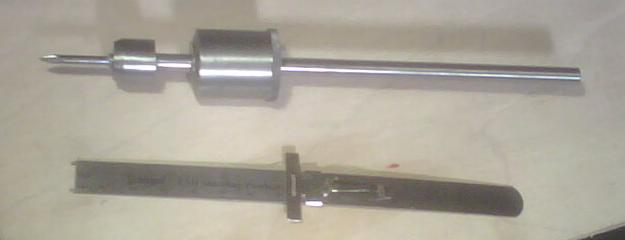
So, I made a prick punch that has a built-in hammer.

PRICK.jpg


The steel slug rides freely on the rod and is dropped, slidehammer-fashion, onto the steel plate pinned to the shaft to drive the prick punch into the work. The punch itself is made from an index hole punch rescued from an old mechanical teletype. The brass screw at the end hides a pocket to store extra punches and also serves to keep the hammer on the rod.
 
Now that, Marv, is a superb idea!, I have a couple of the automatic variety, WOT for small stuff as they tend to jump!, definitely on my "next to do" list...Giles
 
gilessim said:
Now that, Marv, is a superb idea!, I have a couple of the automatic variety, WOT for small stuff as they tend to jump!, definitely on my "next to do" list...Giles

I have to agree. If you're building 1:1 battleships, I suppose the automatic center punch is useful but for small models their best use is to change out the punch tip and use them to set miniature rivets.

When you finish yours, show us a picture. It's always nice to get some feedback on these tool suggestion posts to prove that people are actually making use of the ideas presented - and I mean that in regard to not just my ideas but to all the folks who share their ideas and cleverness here.
 
Have to agree, Marv, that is a good idea. My automatic punches all slip once in a while.

Kenny
 

Marv,
Having just cussed my spring loaded punch for yet another missed mark today, you've once again made a very timely post. I've got a small micro chuck that will be easily modified, needing only the addition of a sleeve for the drop hammer and it will still drill tiny holes too. Twenty minutes of work might result in less need for anger management therapy ...LOL

Thanks again Marv...
Steve
 
Marv, thanks for sharing a very simple solution to a common problem. I think there will be one in my shop this weekend!
 
I made a 'Marv-hammer' this afternoon. Turned out I needed more weight than I'd initially expected, but it worked very well to punch some little pieces I'd been working on. I chose to thread and superglue the anvil into place versus pinning and am using a broken Dremel bit reground as the punch.

I put a rim of coining (half-knurl) around the top of the weight more or less by accident, but it turns out I really like it.

MarvHammer1.jpg

 
Shred,

If you're not getting a deep enough impression, you might consider a variant I use on another slide hammer tool I made.

Make two hammer slugs - one about twice as heavy as the other. Slide the smaller onto the tool first, then the larger. Dropping just the smaller will produce a light impression. For a deeper impression, drop them both.
 
mklotz said:
Shred,

If you're not getting a deep enough impression, you might consider a variant I use on another slide hammer tool I made.

Make two hammer slugs - one about twice as heavy as the other. Slide the smaller onto the tool first, then the larger. Dropping just the smaller will produce a light impression. For a deeper impression, drop them both.
Thanks. With the weight shown (~1" dia), it works well and I can vary the drop-height to vary the depth of the impression. I suspect the tip angle is probably steeper than necessary at the moment-- more 'poke' and less 'splat', as it were.

Btw, since the picture was taken, I cross-drilled the back end and added a small loop of 3/32" music wire which acts as a hang-loop, weight-stop and lets me use it as a mini slide-hammer should I need to do some model dent-pulling :).
 
The more look at this, The more I need one ;D This wil be a handy addition to my box.

Thanks again for sharing, Wes
 
with all this talk about the slide hammer center punch i thought i just had to have one!
so here is my version:
IMG_0097.jpg


now that i have built one i look at it and say "how did i work without it"!!!!

i'm going to my dads this afternoon and i know he is going to want one as well, i guess i should have made 2 of them!!

i used a broken 1/8" carbide endmill for the punch and the rest is just bit's of steel from the scrap box.
thanks mklots for the great idea.

chuck
 
And thank you Chuck and Shred for taking the time to show me and the other forum members that the ideas folks pick up on this forum are actually being used to improve people's workshops.

The fact that you've proved that you're actually using ideas found here may encourage some of our more bashful lurkers to submit their ideas, tips and self-designed tools.
 
Marv
Thanks for an enjoyable afternoon project idea. I raided my scrap box for likely materials and wound up using nothing but bits and bobs that had accumulated there. The prick point is an old scribe that once lived with a tri-square, while the hammer weight is a cylinder drum from an early screw up made during the Elbow engine project. The little retainer end was something that has been in the scrap box for years and never seemed to be needed for anything. I'll be happy not to have to move it out of the way anymore when scrounging. The point is an interference fit, set in place with a bit of heat. The brass anvil was silver soldered in position.

This one is a nice addition to my growing collection of custom made tooling and an absolutely excellent novice project.

Steve

pinprick-hammer.jpg

 
A great tool I have thats simular is a vice grip slide hammer. Its like a dumb bell with a hole through it thats on a long rod that threads into a vice grip. Its handy on machine repairs where you need to pull taper pins and roll pins.

If you dont have one then you should make one, its sweet to have around.
 
Hi, well , here's my slightly blinged version of Marv's great idea, it's about 6" long, I used a masonry nail for the point and a chunk of stainless for the hammer....
slidepunchrg9.jpg

Giles
 
Wow, Giles, that's almost too pretty to use. I love it though. Looks like you inherited it in some proper Victorian gentleman's tool chest.

Tell me, do you wear an ascot and a cut-away while machining? :)
 
Giles you've turned a simple tool into yet another work of art!

Absolutely Beautiful!

Rick
 
Thanks for the compliments guys!, I guess we're all artists at heart and some days it comes out ,and some days a little less!

Marv, I've never been one for ties (they made me wear one at school!) but funnily enough I do wear an apron that is like a long, cutaway waistcoat that my wife made me (her idea, she's a dressmaker!) it works really well!, I'll put up a pic sometime.

I wanted to say that a couple of weeks ago, I was at my dentist (ugh!) to change some 20 year old bridge work and he used a similar slide hammer affair, with a hook on the end, to pull out the old bridge, I have to go again next week so I think I'll take mine along to show him!.....Giles
 
Replace the masonry nail with plastic in case he wants to try it out on you.

Completely off topic, but your dentist anecdote reminded me...

I was asked once to remove some drive screws holding a thread chart to a lathe. I took a pair of miniature ViseGrips and replaced the adjustment screw with a length of CRS rod I had threaded to fit the pliers adjustment nut. Added a slide weight and a washer screwed on the end of the rod to make a slide hammer ViseGrip. Grab those nasty little drive screws in a death grip, slam the weight a few times and they come out far enough to get a screwdriver under them and pry them out. Worked slicker than deer guts on a glass door knob.
 
Hey Marv:

Here is one to file for future reference. I needed to come up with some sort of dynometer to do tear test on bonded metal coupons. After much chin rubbing and butt scratching, I ended up replacing the Vice Grip adjusting screw with an eye bolt and just used a "Fish Scale" for the measurement. Since, I have used the same trick for everything from hanging cowling sections in the paint booth to stretching composite material for vacuum bagging.
 

Latest posts

Back
Top