Sharpening small drills

Home Model Engine Machinist Forum

Help Support Home Model Engine Machinist Forum:

This site may earn a commission from merchant affiliate links, including eBay, Amazon, and others.

Oldmechthings

Well-Known Member
Joined
Jan 10, 2008
Messages
153
Reaction score
12
A couple days ago there was discussion on the forum about sharpening small drills. I learned how to sharpen drills in High School, and have had a lot of practice since then, and I can do a pretty good job until they get down to about 3/23" and smaller, then I have a difficult time keeping the cutting lips the same length. So for the small drills I use sharpening guides, and sharpen the drills on a hand stone.

P1200004.jpg


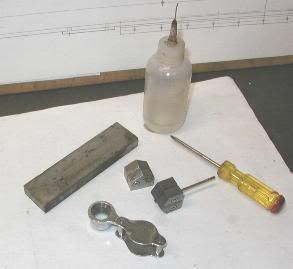
Shown here is the equipment that I use. The drills are clamped in the guides, protruding slightly, and oriented so they will get the right clearance, (that is where the magnifier comes into play) and then sharpened on the stone. Pretty simple. I regularly sharpen drills down to about .020" diameter. I could go smaller, but I have not yet used drills smaller than that.
In the book "Two Shop Masters" published by Village Press, Frank McLean has a section on building and using sharpening guides. He stated that "All the old machinists had them", who ever they were.

 
I keep forgetting things. Most everyone knows that the web or that blunt wedge shape in the center of a drill does no cutting, or at least not very good, so it has to be literally forced through the material. If that web is thinned down it makes drilling so much easier. I thin webs as a standard practice, but on tiny drills it is next to impossible using a shop grinder. So on the tiny ones, I clamp them in the vise at a convenient angle and carefully thin the web with a diamond coated needle file. Who says those Harbor Freight tools are no good?
 
Back when I came out of the services, I worked as a trailer mechanic on large semi trailers. There were lots of dirty jobs to the trade , but re-flooring a flatbed trailer was among the most hated. First you had to remove the old floor, which was a nasty physically demanding effort. Then you had to grind down the old screws, usually about 2500 of them, so the new floor would lie flat.

When you began putting the new ship lapped oak boards in place you had to wedge them in nice and tight before screwing them down. These were secured by hand drilling #7 holes through the wood and the steel cross members and screwing in 2500 1/4 x 2 1/2 20TPI phillips counter sunk screws. . Usually the job was done outside in the blazing sun of a South Carolina summer. I soon learned the easy way to sharpen drill bits by hand, from an old guy who could make them cut better than when new. I also learned that not everyone had the knack so I took full advantage of it. I would volunteer to keep the sharp bits coming and managed to spend most of the day in front of the large shop fan while I worked.

All I had to do is let the crew sharpen a few of their own and no one complained about me not being out on the hot deck drilling holes...LOL. I don't think anyone ever figured out that the old guy had cut drill point profiles notched into the large support column next to the bench grinder. He had several point profiles for aggressive cutting drills and one especially for screwing with the guy who had him pissed off that week. That poor guys drill bits would barely cut butter and worked him twice as hard.

At one time I could do a decent job down to 1/8 and sometimes down to 1/16 if I wasn't hung over...(grin) The hand movement I was shown not only put the edge on the bit, but also gave it the needed relief in one smooth motion. I need to see if I can still do that trick.... nearly 30 years later.

Steve
 
Oldmechthings said:
So for the small drills I use sharpening guides, and sharpen the drills on a hand stone.
Now THAT got my attention! Can you post some close-up pictures of one of those and show it in use? What metal are they made out of?

Thanks,
Milton
 
Milton
The guide block clamps are made out of plain mild steel. They have a groove down the center to hold the drill straight. See that set with a drill already clamped in it and the drill slightly protruding. That is ready to be tipped up so the bevel surface is parallel with the stone. Make a few strokes, rotate it 180 degrees, and a few more strokes to sharpen the other lip and you're done. The only thing you have to watch is the drill is turned or oriented so that it grinds material off behind the cutting lips to provide clearance. The guides hardly need to even touch the stone so they do not wear out.
Try it, I think you'll like it.
Birk
 
Thanks Birk,

So, the amount the bit protrudes from the jig sets the clearance? Clever! That one's on my to-do list.:)
 
I like that block idea.
I had to sharpen a 1-1/4" 82deg single flute countersink for a guy at work last week.(He broaches the chamfer in his parts more than he actually cuts.) I worked on it about 5 mins and it worked great. You have to make sure you grind evenly all the way around or it will chatter real bad. Then clean up the cutting edge by grinding the inside of the flute.
An old toolmaker that likes giving me a friendly hard time asked " So you tried to sharpen that thing huh?" with a grin. So with my grin I said " No I did" After telling him how I did it he explained how he thought I would have messed it up.

You guys drill alot of brass, Do any of you dull the cutting edge of the drill. I usually had to do this when drilling brass and bronze especially it there was an exsisting hole. I didn't think it would work b/c I thought red metals were soft and you wanted a good sharp edge but it actually works quite well.
 
You don't "dull" the edge it's just ground to zero rake. ie. the face of the cutting
lip is a small flat that is parallel to the axis of the bit.
Dull is when there is no longer a sharp break from the clearance to the rake
surface. :)
...lew...
 
Not sure if I understand so here is a link I found.
http://www.hawkfish.org/snailman/acrdrill.htm
We would (on a 5/16 drill) break the cutting edge by about .010".
When looking through the drill boxes if you came across these drills you would think they were dull. But you could tell there purpose b/c they would have a brass color to them from all the drilling we did. I think the point is to keep the drill from grabbing and trying to pull itself into the material.
 

Latest posts

Back
Top